以LNMP架构部署动态网站-源码方式
目录
Linux:准备一台linux服务器即可,本文采用Centos7版本服务器
部署MySQL:选择使用yum安装的mysql
部署Nginx
配置PHP
验证是否搭建成功:
LNMP架构:Linux+Nginx+MySQL+PHP
Linux:准备一台linux服务器即可,本文采用Centos7版本服务器
- 环境条件
1:连网
[root@localhost ~]# ping baidu.com2:配置一个好用的yum软件
备份本地数据
[root@localhost ~]# cd /etc/yum.repos.d/
[root@localhost yum.repos.d]# ls
CentOS-Base.repo  CentOS-Debuginfo.repo  CentOS-Media.repo    CentOS-Vault.repo
CentOS-CR.repo    CentOS-fasttrack.repo  CentOS-Sources.repo
[root@localhost yum.repos.d]# mkdir CentOS
[root@localhost yum.repos.d]# mv CentOS-* CentOS
[root@localhost yum.repos.d]# ls
CentOS
配置一个163的yum软件仓库,注意,本文的源也是Centos7的
[root@localhost yum.repos.d]# vim 163.repo
[root@localhost yum.repos.d]# ls
163.repo  CentOS
[root@localhost yum.repos.d]# cat 163.repo
[163repo]
name=linux redhat 163.repo
baseurl=http://mirrors.163.com/centos/7/os/x86_64/
gpgcheck=0
enabled=1
刷新yum软件仓库
[root@localhost yum.repos.d]# yum clean all
已加载插件:fastestmirror, langpacks
正在清理软件源: 163repo
Cleaning up everything
[root@localhost yum.repos.d]# yum list
3:安装需要用到的各种编译软件环境
本文因为采用的是源码安装,所以,一定要安装所有相关的编译软件的环境,请将下面的内容全部复制
[root@localhost yum.repos.d]# yum install -y apr* autoconf automake bison bzip2 bzip2* compat* cpp curl curl-devel fontconfig fontconfig-devel freetype freetype* freetype-devel gcc gcc-c++ gd gettext gettext-devel glibc kernel kernel-headers keyutils keyutils-libs-devel krb5-devel libcom_err-devel libpng libpng-devel libjpeg* libsepol-devel libselinux-devel libstdc++-devel libtool* libgomp libxml2 libxml2-devel libXpm* libtifflibtiff* make mpfr ncurses* ntp openssl openssl-devel patch pcre-devel perl php-common php-gd policycoreutils telnet t1lib t1lib* nasm nasm* wget zlib-devel
安装的内容较多,所以这里省略,但是毕竟安装了这么久,附一张安装完成的图:

4:上传LNMP架构需要使用到的软件(下载地址)
链接: https://pan.baidu.com/s/1ubh1rmxfYlTSxCrGTiwMIg 提取码: mqjh[root@localhost src]# cd /usr/local/src/
[root@localhost src]# ls
cmake-2.8.11.2.tar.gz libpng-1.6.12.tar.gz php-5.5.14.tar.gz
Discuz_X3.2_SC_GBK.zip libvpx-v1.3.0.tar.bz2 t1lib-5.1.2.tar.gz
freetype-2.5.3.tar.gz mysql-5.6.19.tar.gz tiff-4.0.3.tar.gz
jpegsrc.v9a.tar.gz nginx-1.6.0.tar.gz yasm-1.2.0.tar.gz
libgd-2.1.0.tar.gz openssl-1.0.1h.tar.gz zlib-1.2.8.tar.gz
libmcrypt-2.5.8.tar.gz pcre-8.35.tar.gz
[root@localhost src]# ls | wc -l
17
部署cmake软件,注意:编译安装过程省略
[root@localhost src]# tar -zxvf cmake-2.8.11.2.tar.gz
[root@localhost src]# cd cmake-2.8.11.2/
[root@localhost cmake-2.8.11.2]# ./configure
[root@localhost cmake-2.8.11.2]# make && make install
Linux部署完成!
部署MySQL:选择使用yum安装的mysql
注意:选择源码安装,将会“浪费”很多时间
本文选择源码安装(注意:安装过于复杂,没怎么解释,请大家选择yum安装mysql)
[root@localhost cmake-2.8.11.2]# cd ..
创建mysql用户,用于管理MySQL数据库(因为不是yum安装的)
[root@localhost src]# useradd mysql -s /sbin/nologin创建数据库服务程序和数据的存放位置,并修改为mysql用户所有
[root@localhost src]# mkdir -p /usr/local/mysql/var
[root@localhost src]# chown -Rf mysql:mysql /usr/local/mysql
编译安装mysql
[root@localhost src]# tar -zxvf mysql-5.6.19.tar.gz
[root@localhost src]# cd mysql-5.6.19/
[root@localhost mysql-5.6.19]# cmake . -DCMAKE_INSTALL_PREFIX=/usr/local/mysql -DMYSQL_DATADIR=/usr/local/mysql/var -DSYSCONFDIR=/etc
[root@localhost mysql-5.6.19]# make && make install
开始了长时间的编译.......
好了,安装完成后,进入mysql文件夹
[root@localhost mysql-5.6.19]# cd /usr/local/mysql/删除默认的mysql配置文件
[root@localhost mysql]# rm /etc/my.cnf
rm:是否删除普通文件 "/etc/my.cnf"?y
生成新的配置文件
[root@localhost mysql]# ./scripts/mysql_install_db --user=mysql --basedir=/usr/local/mysql --datadir=/usr/local/mysql/var
修改mysql的环境
[root@localhost mysql]# ln -s my.cnf /etc/my.cnf
[root@localhost mysql]# cp ./support-files/mysql.server /etc/rc.d/init.d/mysqld
[root@localhost mysql]# chmod 755 /etc/rc.d/init.d/mysqld
编译mysql脚本文件
[root@localhost mysql]# vim /etc/rc.d/init.d/mysqld
...
 42
 43 # If you change base dir, you must also change datadir. These may get
 44 # overwritten by settings in the MySQL configuration files.
 45
 46 basedir=/usr/local/mysql
 47 datadir=/usr/local/mysql/var
...
启动数据库
[root@localhost mysql]# service mysqld start
Starting MySQL.. SUCCESS!
[root@localhost mysql]# chkconfig mysqld on
配置mysql环境变量:将下面内容添加到文件最后面
[root@localhost mysql]# vim /etc/profile
...
#mysql
export PATH=$PATH:/usr/local/mysql/bin
source
[root@localhost mysql]# source /etc/profile
mysql链接
[root@localhost mysql]# mkdir /var/lib/mysql
[root@localhost mysql]# ln -s /usr/local/mysql/lib/mysql /usr/lib/mysql
[root@localhost mysql]# ln -s /tmp/mysql.sock /var/lib/mysql/mysql.sock
[root@localhost mysql]# ln -s /usr/local/mysql/include/mysql /usr/include/mysql
准备初始化mysql
[root@localhost mysql]# mysql_secure_installation


NOTE: RUNNING ALL PARTS OF THIS SCRIPT IS RECOMMENDED FOR ALL MySQL
      SERVERS IN PRODUCTION USE!  PLEASE READ EACH STEP CAREFULLY!

In order to log into MySQL to secure it, we'll need the current
password for the root user.  If you've just installed MySQL, and
you haven't set the root password yet, the password will be blank,
so you should just press enter here.

Enter current password for root (enter for none):     #回车
OK, successfully used password, moving on...

Setting the root password ensures that nobody can log into the MySQL
root user without the proper authorisation.

Set root password? [Y/n] y    #设置root密码
New password:
Re-enter new password:
Password updated successfully!
Reloading privilege tables..
 ... Success!


By default, a MySQL installation has an anonymous user, allowing anyone
to log into MySQL without having to have a user account created for
them.  This is intended only for testing, and to make the installation
go a bit smoother.  You should remove them before moving into a
production environment.

Remove anonymous users? [Y/n] y    #删除匿名用户
 ... Success!

Normally, root should only be allowed to connect from 'localhost'.  This
ensures that someone cannot guess at the root password from the network.

Disallow root login remotely? [Y/n] y    #禁止远程登录
 ... Success!

By default, MySQL comes with a database named 'test' that anyone can
access.  This is also intended only for testing, and should be removed
before moving into a production environment.

Remove test database and access to it? [Y/n] y    #删除test数据库和数据库的访问权限
 - Dropping test database...
 ... Success!
 - Removing privileges on test database...
 ... Success!

Reloading the privilege tables will ensure that all changes made so far
will take effect immediately.

Reload privilege tables now? [Y/n] y    #刷新权限
 ... Success!


All done!  If you've completed all of the above steps, your MySQL
installation should now be secure.

Thanks for using MySQL!


Cleaning up...
好了,数据库源码安装完成,最后在提示一下,选择yum安装呀......
部署Nginx
- 编译安装pcre、OpenSSL、zlib
prce:
[root@localhost mysql]# cd /usr/local/src/
[root@localhost src]# tar -zxvf pcre-8.35.tar.gz
[root@localhost src]# cd pcre-8.35/
[root@localhost pcre-8.35]# ./configure --prefix=/usr/local/pcre
[root@localhost pcre-8.35]# make && make install
OpenSSL:
[root@localhost pcre-8.35]# cd ..
[root@localhost src]# tar -zxvf openssl-1.0.1h.tar.gz
[root@localhost src]# cd openssl-1.0.1h/
[root@localhost openssl-1.0.1h]# ./config --prefix=/usr/local/openssl
[root@localhost openssl-1.0.1h]# make && make install
zlib:
[root@localhost openssl-1.0.1h]# cd ..
[root@localhost src]# tar -zxvf zlib-1.2.8.tar.gz
[root@localhost src]# cd zlib-1.2.8/
[root@localhost zlib-1.2.8]# ./configure --prefix=/usr/local/zlib
[root@localhost zlib-1.2.8]# make && make install
设置OpenSSL全局变量,文件最后面加上下面内容
[root@localhost zlib-1.2.8]# cd ..
[root@localhost src]# vim /etc/profile
...
#openssl
export PATH=$PATH:/usr/local/openssl/bin
source
[root@localhost src]# source /etc/profile- 编译安装nginx
创建执行nginx的用户
[root@localhost src]# useradd www -s /sbin/nologin编译安装
[root@localhost src]# tar -zxvf nginx-1.6.0.tar.gz
[root@localhost src]# cd nginx-1.6.0/
[root@localhost nginx-1.6.0]# ./configure --prefix=/usr/local/nginx --without-http_memcached_module --user=www --group=www --with-http_stub_status_module --with-http_ssl_module --with-http_gzip_static_module --with-openssl=/usr/local/src/openssl-1.0.1h --with-zlib=/usr/local/src/zlib-1.2.8 --with-pcre=/usr/local/src/pcre-8.35
[root@localhost nginx-1.6.0]# make && make install
编译nginx启动脚本
[root@localhost src]# vim /etc/rc.d/init.d/nginx

#!/bin/bash
# nginx - this script starts and stops the nginx daemon
# chkconfig: - 85 15
# description: Nginx is an HTTP(S) server, HTTP(S) reverse \
# proxy and IMAP/POP3 proxy server
# processname: nginx
# config: /etc/nginx/nginx.conf
# config: /usr/local/nginx/conf/nginx.conf
# pidfile: /usr/local/nginx/logs/nginx.pid
# Source function library.
. /etc/rc.d/init.d/functions
# Source networking configuration.
. /etc/sysconfig/network
# Check that networking is up.
[ "$NETWORKING" = "no" ] && exit 0
nginx="/usr/local/nginx/sbin/nginx"
prog=$(basename $nginx)
NGINX_CONF_FILE="/usr/local/nginx/conf/nginx.conf"
[ -f /etc/sysconfig/nginx ] && . /etc/sysconfig/nginx
lockfile=/var/lock/subsys/nginx
make_dirs() {
# make required directories
user=`$nginx -V 2>&1 | grep "configure arguments:" | sed 's/[^*]*--user=\([^ ]*\).
*/\1/g' -`
        if [ -z "`grep $user /etc/passwd`" ]; then
                useradd -M -s /bin/nologin $user
        fi
options=`$nginx -V 2>&1 | grep 'configure arguments:'`
for opt in $options; do
        if [ `echo $opt | grep '.*-temp-path'` ]; then
                value=`echo $opt | cut -d "=" -f 2`
                if [ ! -d "$value" ]; then
                        # echo "creating" $value
                        mkdir -p $value && chown -R $user $value
                fi
        fi
done
}
start() {
[ -x $nginx ] || exit 5
[ -f $NGINX_CONF_FILE ] || exit 6
make_dirs
echo -n $"Starting $prog: "
daemon $nginx -c $NGINX_CONF_FILE
retval=$?
echo
[ $retval -eq 0 ] && touch $lockfile
return $retval
}
stop() {
echo -n $"Stopping $prog: "
killproc $prog -QUIT
retval=$?
echo
[ $retval -eq 0 ] && rm -f $lockfile
return $retval
}
restart() {
#configtest || return $?
stop
sleep 1
start
}
reload() {
#configtest || return $?
echo -n $"Reloading $prog: "
killproc $nginx -HUP
RETVAL=$?
echo
}
force_reload() {
restart
}
configtest() {
$nginx -t -c $NGINX_CONF_FILE
}
rh_status() {
status $prog
}
rh_status_q() {
rh_status >/dev/null 2>&1
}
case "$1" in
start)
        rh_status_q && exit 0
        $1
        ;;
stop)
        rh_status_q || exit 0
        $1
        ;;
restart|configtest)
        $1
        ;;
reload)
        rh_status_q || exit 7
        $1
        ;;
force-reload)
        force_reload
        ;;
status)
        rh_status
        ;;
condrestart|try-restart)
        rh_status_q || exit 0
        ;;
*)
echo $"Usage: $0 {start|stop|status|restart|condrestart|try-restart|reload|force-
reload|configtest}"
exit 2
esac
启动
[root@localhost src]# chmod 755 /etc/rc.d/init.d/nginx
[root@localhost src]# /etc/rc.d/init.d/nginx restart
Reloading systemd:                                         [  确定  ]
Restarting nginx (via systemctl):                          [  确定  ]
[root@localhost src]# chkconfig nginx on
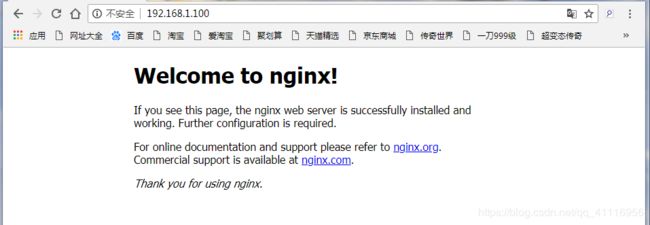
在web界面查询(关闭防火墙)
配置PHP
下面就是重复的编译过程了,因为php相关的软件有点多,在这个时候,小博主就决定,在写一篇文章来快速部署LNMP环境,毕竟,源码安装时真的,费时间:
以下软件不需要大家全部都正确安装,如果有错误,请无视(make && make install 分开执行可有效避免错误)
1:
[root@localhost src]# tar -zxvf yasm-1.2.0.tar.gz
[root@localhost src]# cd yasm-1.2.0/
[root@localhost yasm-1.2.0]# ./configure
[root@localhost yasm-1.2.0]# make && make install
2:
[root@localhost yasm-1.2.0]# cd ..
[root@localhost src]# tar -zxvf libmcrypt-2.5.8.tar.gz
[root@localhost src]# cd libmcrypt-2.5.8/
[root@localhost libmcrypt-2.5.8]# ./configure
[root@localhost libmcrypt-2.5.8]# make && make install
3:
[root@localhost libmcrypt-2.5.8]# cd ..
[root@localhost src]# tar -jxvf libvpx-v1.3.0.tar.bz2
[root@localhost src]# cd libvpx-v1.3.0/
[root@localhost libvpx-v1.3.0]# ./configure --prefix=/usr/local/libvpx --enable-shared --enable-vp9
[root@localhost libvpx-v1.3.0]# make
[root@localhost libvpx-v1.3.0]# make install
4:
[root@localhost libvpx-v1.3.0]# cd ..
[root@localhost src]# tar -zxvf tiff-4.0.3.tar.gz
[root@localhost src]# cd tiff-4.0.3/
[root@localhost tiff-4.0.3]# ./configure --prefix=/usr/local/tiff --enable-shared
[root@localhost tiff-4.0.3]# make && make install
5:
[root@localhost tiff-4.0.3]# cd ..
[root@localhost src]# tar -zxvf libpng-1.6.12.tar.gz
[root@localhost src]# cd libpng-1.6.12/
[root@localhost libpng-1.6.12]# ./configure --prefix=/usr/local/libpng --enable-shared
[root@localhost libpng-1.6.12]# make && make install
6:
[root@localhost libpng-1.6.12]# cd ..
[root@localhost src]# tar -zxvf freetype-2.5.3.tar.gz
[root@localhost src]# cd freetype-2.5.3/
[root@localhost freetype-2.5.3]# ./configure --prefix=/usr/local/freetype -enable-shared
[root@localhost freetype-2.5.3]# make
[root@localhost freetype-2.5.3]# make install
7:
[root@localhost freetype-2.5.3]# cd ..
[root@localhost src]# tar -zxvf jpegsrc.v9a.tar.gz
[root@localhost src]# cd jpeg-9a/
[root@localhost jpeg-9a]# ./configure --prefix=/usr/local/jpeg --enable-shared
[root@localhost jpeg-9a]# make && make install
8:
[root@localhost jpeg-9a]# cd ..
[root@localhost src]# tar -zxvf libgd-2.1.0.tar.gz
[root@localhost src]# cd libgd-2.1.0/
[root@localhost libgd-2.1.0]# ./configure --prefix=/usr/local/libgd --enable-shared --with-jpeg=/usr/local/jpeg --with-png=/usr/local/libpng --with-freetype=/usr/local/freetype --with-fontconfig=/usr/local/freetype --with-xpm=/usr/ --with-tiff=/usr/local/tiff --with-vpx=/usr/local/libvpx
[root@localhost libgd-2.1.0]# make && make install
9:
[root@localhost libgd-2.1.0]# cd ..
[root@localhost src]# tar -zxvf t1lib-5.1.2.tar.gz
[root@localhost src]# cd t1lib-5.1.2/
[root@localhost t1lib-5.1.2]# ./configure --prefix=/usr/local/t1lib --enable-shared
[root@localhost t1lib-5.1.2]# make
[root@localhost t1lib-5.1.2]# make install
[root@localhost t1lib-5.1.2]# ln -s /usr/lib64/libltdl.so /usr/lib/libltdl.so
[root@localhost t1lib-5.1.2]# cp -frp /usr/lib64/libXpm.so* /usr/lib/
以上软件根据linux服务器的差异,可能存在部分错误,但是,不用一直纠结,因为安装的很多内容可能并不会用到
- 安装PHP
[root@localhost t1lib-5.1.2]# cd ..
[root@localhost src]# tar -zxvf php-5.5.14.tar.gz
[root@localhost src]# cd php-5.5.14/
[root@localhost php-5.5.14]# export LD_LIBRARY_PATH=/usr/local/libgd/lib
[root@localhost php-5.5.14]# ./configure --prefix=/usr/local/php --with-config-file-path=/usr/local/php/etc --with-mysql=/usr/local/mysql --with-mysqli=/usr/local/mysql/bin/mysql_config --with-mysql-sock=/tmp/mysql.sock --with-pdo-mysql=/usr/local/mysql --with-gd --with-png-dir=/usr/local/libpng --with-jpeg-dir=/usr/local/jpeg --with-freetype-dir=/usr/local/freetype --with-xpm-dir=/usr/ --with-vpx-dir=/usr/local/libvpx/ --with-zlib-dir=/usr/local/zlib --with-t1lib=/usr/local/t1lib--with-iconv --enable-libxml --enable-xml --enable-bcmath --enable-shmop --enable-sysvsem --enable-inline-optimization --enable-opcache --enable-mbregex --enable-fpm --enable-mbstring --enable-ftp --enable-gd-native-ttf --with-openssl --enable-pcntl --enable-sockets --with-xmlrpc --enable-zip --enable-soap --without-pear --with-gettext --enable-session --with-mcrypt --with-curl --enable-ctype
[root@localhost php-5.5.14]# make
[root@localhost php-5.5.14]# make install
配置php文件
[root@localhost php-5.5.14]# rm /etc/php.ini
rm:是否删除普通文件 "/etc/php.ini"?y
[root@localhost php-5.5.14]# cp php.ini-production /usr/local/php/etc/php.ini
[root@localhost php-5.5.14]# ln -s /usr/local/php/etc/php.ini /etc/php.ini
[root@localhost php-5.5.14]# cp /usr/local/php/etc/php-fpm.conf.default /usr/local/php/etc/php-fpm.conf
[root@localhost php-5.5.14]# ln -s /usr/local/php/etc/php-fpm.conf /etc/php-fpm.conf
修改php-fpm.conf文件:25行和148行、149行
[root@localhost php-5.5.14]# vim /usr/local/php/etc/php-fpm.conf
 10 ; files from a glob(3) pattern. This directive can be used everywhere in the
 11 ; file.
 12 ; Relative path can also be used. They will be prefixed by:
 13 ;  - the global prefix if it's been set (-p argument)
 14 ;  - /usr/local/php otherwise
 15 ;include=etc/fpm.d/*.conf
 16
 17 ;;;;;;;;;;;;;;;;;;
 18 ; Global Options ;
 19 ;;;;;;;;;;;;;;;;;;
 20
 21 [global]
 22 ; Pid file
 23 ; Note: the default prefix is /usr/local/php/var
 24 ; Default Value: none
 25 pid = run/php-fpm.pid
 26
 27 ; Error log file
148 user = www
149 group = www
完善php配置
[root@localhost php-5.5.14]# cp sapi/fpm/init.d.php-fpm /etc/rc.d/init.d/php-fpm
[root@localhost php-5.5.14]# chmod 755 /etc/rc.d/init.d/php-fpm
[root@localhost php-5.5.14]# chkconfig php-fpm on
设置php安全
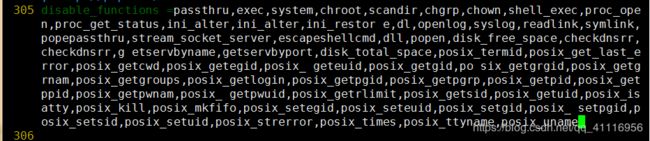
[root@localhost php-5.5.14]# vim /usr/local/php/etc/php.ini

disable_functions =passthru,exec,system,chroot,scandir,chgrp,chown,shell_exec,proc_open,proc_get_status,ini_alter,ini_alter,ini_restor e,dl,openlog,syslog,readlink,symlink,popepassthru,stream_socket_server,escapeshellcmd,dll,popen,disk_free_space,checkdnsrr,checkdnsrr,g etservbyname,getservbyport,disk_total_space,posix_termid,posix_get_last_error,posix_getcwd,posix_getegid,posix_ geteuid,posix_getgid,po six_getgrgid,posix_getgrnam,posix_getgroups,posix_getlogin,posix_getpgid,posix_getpgrp,posix_getpid,posix_getppid,posix_getpwnam,posix_ getpwuid,posix_getrlimit,posix_getsid,posix_getuid,posix_isatty,posix_kill,posix_mkfifo,posix_setegid,posix_seteuid,posix_setgid,posix_ setpgid,posix_setsid,posix_setuid,posix_strerror,posix_times,posix_ttyname,posix_uname
搭建完成,最后需要修改一下Nginx配置文件
1:第二行的用户和用户组为Nginx的用户和组
2:45-添加index.php
3:去掉65-71的#并修改69的文件
[root@localhost php-5.5.14]# vim /usr/local/nginx/conf/nginx.conf

  1
  2 user  www www;
  3 worker_processes  1;
...
 45             index  index.html index.htm index.php;
...
 62
 63         # pass the PHP scripts to FastCGI server listening on 127.0.0.1:9000
 64         #
 65         location ~ \.php$ {
 66             root           html;
 67             fastcgi_pass   127.0.0.1:9000;
 68             fastcgi_index  index.php;
 69             fastcgi_param  SCRIPT_FILENAME  $document_root$fastcgi_script_name;
 70             include        fastcgi_params;
 71         }
重新启动nginx和php服务
[root@localhost html]# systemctl restart nginx.service
[root@localhost html]# systemctl restart php-fpm
验证是否搭建成功:
[root@localhost php-5.5.14]# cd /usr/local/nginx/html/
[root@localhost html]# ls
50x.html  index.html
[root@localhost html]# rm *
rm:是否删除普通文件 "50x.html"?y
rm:是否删除普通文件 "index.html"?y
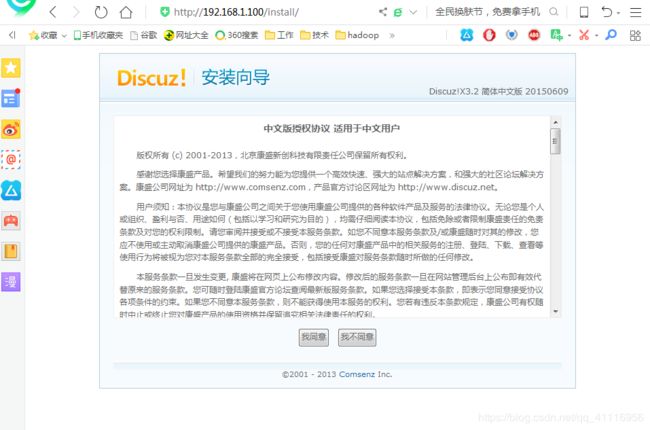
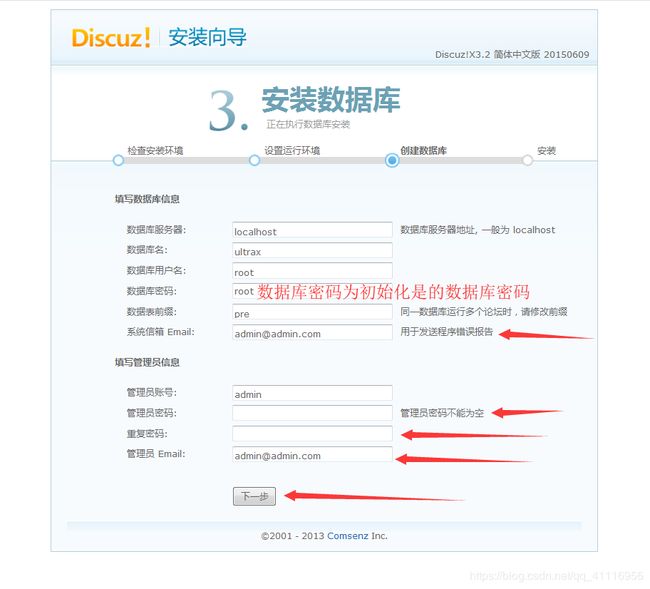
安装网站
[root@localhost html]# cd /usr/local/src/
[root@localhost src]# unzip Discuz_X3.2_SC_GBK.zip
[root@localhost src]# mv upload/* /usr/local/nginx/html/
[root@localhost src]# chown -Rf www:www /usr/local/nginx/html
[root@localhost src]# chmod -Rf 755 /usr/local/nginx/html
打开web页面:192.168.1.100


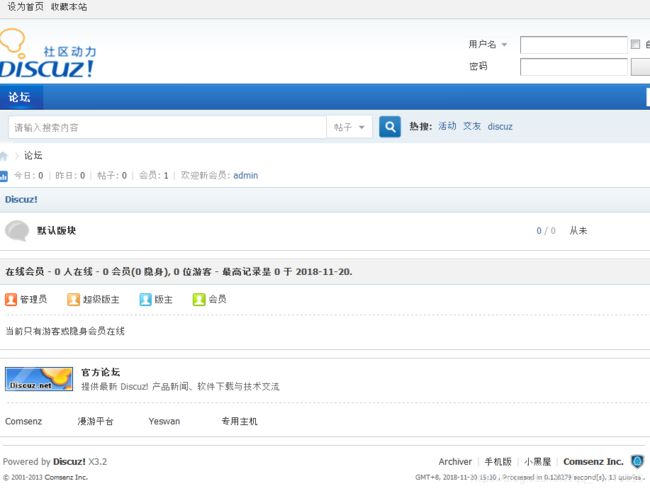
好了,LNMP架构完!