Android Jetpack-Navigation
Android Jetpack-Navigation(一)
1. 简介
Navigation是一个可简化Android导航的库和插件。
Navigation是用来管理Fragment的切换,并且可以通过可视化的方式,看见App的交互流程。
2. 优点
- 处理Fragment的切换
- 默认情况下正确处理Fragment的前进和后退
- 为过渡和动画提供标准化的资源
- 实现和处理深层连接
- 可以绑定 Toolbar,BottomNavigationView和ActionBar
- ViewModel支持
3. 准备
AndroidStudio 3.2或更高
4. Navigation三要素
| 名词 | 解释 |
|---|---|
| NavigationGraph | 这是一个新的资源文件,用户在可视化界面可以看出它能够到达的Destination(用户能够到达的屏幕界面),以及流程关系 |
| NavHostFragment | 当前fragment的容器 |
| NavController | 导航的控制者 |
5. 使用
1. 添加依赖
implementation group: 'androidx.navigation', name: 'navigation-fragment', version: '2.2.0'
implementation group: 'androidx.navigation', name: 'navigation-ui', version: '2.2.0'
2. 创建NavigationGraph
在res目录下创建新的文件夹navigation,右键点击创建New Navigation resource file。
Destinations:
HOST:即上表中的NavHostFragment,也就是fragment的容器
GRAPH:就是f当前容器中的fragment
app:startDestination默认的起始位置
android:name:fragment的完整包名
tools:layout:fragment的布局文件
action
android:id:在fragment的跳转中会引用到此id
android:destination:目的地,代表这个动作是从此fragment跳转到destination所代表的fragment
android:popUpTo:这个代表着,出栈直到popUpTo所指定的fragment
3. 建立NavHostFragment
即第二步中的HOST,也就是当前fragment的容器
<androidx.constraintlayout.widget.ConstraintLayout xmlns:android="http://schemas.android.com/apk/res/android"
xmlns:app="http://schemas.android.com/apk/res-auto"
xmlns:tools="http://schemas.android.com/tools"
android:layout_width="match_parent"
android:layout_height="match_parent"
tools:context=".LoginActivity">
| 属性 | 解释 |
|---|---|
| android:name | 值必须是androidx.navigation.fragment.NavHostFragment |
| android:navGraph | 存放的是第二步建好的导航资源文件,也就是确定了NavigationGraph |
| app:defaultNavHost=“true” | 与系统的返回按钮相关联 |
6. 处理跳转
跳转通过NavController对象,它有三种获取方法:
NavHostFragment.findNavController(Fragment);Navigation.findController(Activity,@IdRes int viewId);Navigation.findController(View);
调用NavController的navigate方法执行跳转,navigate的参数可以是一个destination(这里就是fragment在导航图nav_graph中的id),也可以是action的id
7. 演示
welcome_navigation.xml
<navigation xmlns:android="http://schemas.android.com/apk/res/android"
    xmlns:app="http://schemas.android.com/apk/res-auto"
    xmlns:tools="http://schemas.android.com/tools"
    android:id="@+id/welcome_navigation"
    app:startDestination="@id/firstFragment">

    <fragment
        android:id="@+id/firstFragment"
        android:name="com.example.navigationproject.FirstFragment"
        android:label="fragment_first"
        tools:layout="@layout/fragment_first"
        >
        <action
            android:id="@+id/action_firstFragment_to_secondFragment"
            app:destination="@id/secondFragment"
            app:enterAnim="@anim/fragment_close_enter"
            app:exitAnim="@anim/fragment_close_exit"
            app:popEnterAnim="@anim/nav_default_pop_enter_anim"
            app:popExitAnim="@anim/nav_default_pop_exit_anim" />
        <action
            android:id="@+id/action_firstFragment_to_thirdFragment"
            app:destination="@id/thirdFragment"
            />
    fragment>
    <fragment
        android:id="@+id/secondFragment"
        android:name="com.example.navigationproject.SecondFragment"
        android:label="fragment_second"
        tools:layout="@layout/fragment_second" >
        <action
            android:id="@+id/action_secondFragment_to_blankFragment2"
            app:destination="@id/blankFragment2"
            app:enterAnim="@anim/fragment_close_enter"
            app:exitAnim="@anim/fragment_close_exit"
            app:popEnterAnim="@anim/nav_default_pop_enter_anim"
            app:popExitAnim="@anim/nav_default_pop_exit_anim" />
    fragment>
    <fragment
        android:id="@+id/thirdFragment"
        android:name="com.example.navigationproject.ThirdFragment"
        android:label="fragment_third"
        tools:layout="@layout/fragment_third" />
    <fragment
        android:id="@+id/blankFragment2"
        android:name="com.example.navigationproject.BlankFragment"
        android:label="fragment_blank"
        tools:layout="@layout/fragment_blank" >
        <action
            android:id="@+id/backToFirst"
            app:popUpTo="@id/firstFragment"/>
        <action
            android:id="@+id/aBackToFirst"
            app:destination="@id/firstFragment"
            app:enterAnim="@anim/fragment_close_enter"
            app:exitAnim="@anim/fragment_close_exit"
            app:popEnterAnim="@anim/nav_default_pop_enter_anim"
            app:popExitAnim="@anim/nav_default_pop_exit_anim" />
    fragment>
navigation>
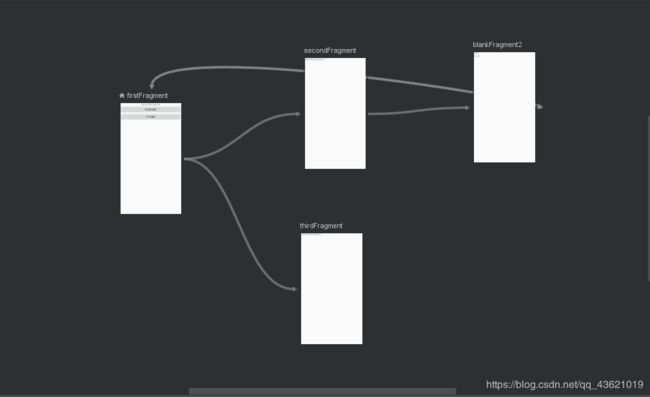
主要通过上面的一条线来演示fragment的切换
firstfragment:点击第一个button进入到secondfragment
secondfragment:点击textview进入到blankfragment2
blankfragment2:点击第一个textview通过android:popupto的方式跳转到firstfragment
点击第二个text view通过android:destination的方式跳转到firstfragment
在每个fragment中我们都重写了onDestroy方法,并在控制台打印log
当我们点击了blankfragment2的第一个textview的时候,可以看到blankfragment2和secondfragment都执行了onDestroy方法并且看界面回到了firstfragment
当我们点击blankfragment2的第二个textview的时候,可以看到控制台并没有打印什么,也就是说此时fragment容器中共有四个fragment:firstfragment-secondfragment-blankfragment2-firstfragment
app:defaultNavHost="true"的作用
表示 NavHostFragment 可以拦截处理返回键。
如果设置为false的话,当点击返回键时,效果是切换activity而不是fragment


