android studio实验二 Activity及常用布局和控件的使用
实验内容
1.创建一个Android应用,创建一个Android应用,创建MainActivity和LoginActivity。
2.在MainActivity中的onCreate,onStart,onResume,onPause,onStop,onDestroy,onRestart生命周期方法中打印log,运行App观察不同操作下Activity的生命周期调用时机和顺序并在实验报告中描述出来。
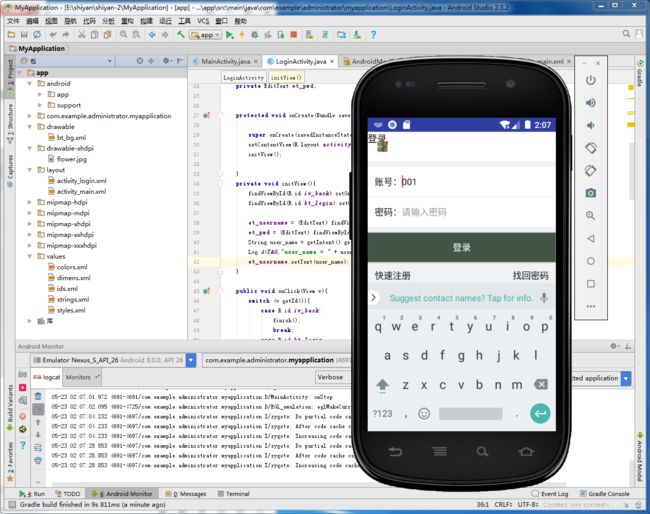
3.在MainActivity中打开LoginActivity,并传递参数user_name,值为“001”,将其显示在LoginActivity页面中的用户名输入框中。
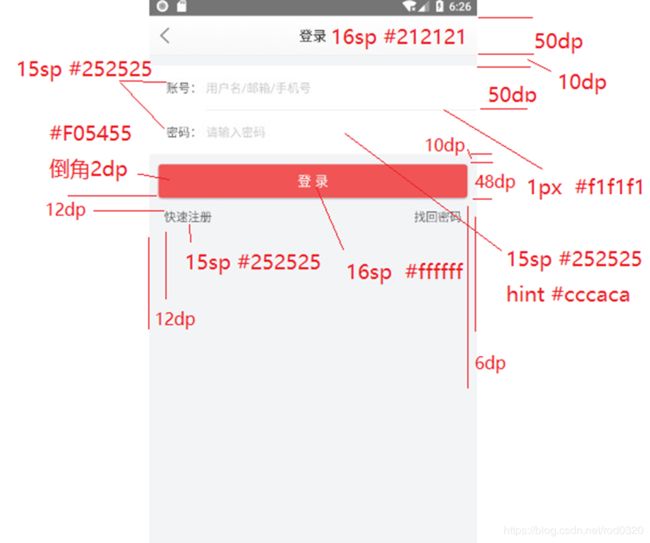
4.根据所给UI实现以下LoginActivity页面,点击登录按钮检测账号密码输入是否为空,如果为空弹出Toast提示“账号不能为空”“密码不能为空”,如果不为空,弹出对话框显示账号密码. 四、实验步骤
1、创建工程:
修改activity_main,根布局使用LinearLayout,添加一个Button:
<?xml version="1.0" encoding="utf-8"?>
<LinearLayout xmlns:android="http://schemas.android.com/apk/res/android"

    android:layout_width="match_parent"
    android:layout_height="match_parent"
    android:orientation="vertical"
    >

  <Button
      android:id="@+id/bt_login"
      android:layout_width="match_parent"
      android:layout_height="wrap_content"
      android:text="打开Login页面"/>
package com.example.administrator.myapplication;

import android.content.Intent;
import android.support.v7.app.AppCompatActivity;
import android.os.Bundle;
import android.util.Log;
import android.view.View;
import android.widget.Button;
import android.widget.Toast;

import static com.example.administrator.myapplication.R.id.bt_login;

public class MainActivity extends AppCompatActivity implements View.OnClickListener{
    //点击都会加implements View.OnClickListener
    //因为OnClickListener这个东西MainActivity是看不懂的
    // 所以要加implements(英语是工具的意思)让他看懂

    private static final String TAG = "MainActivity";

    @Override
    protected void onCreate(Bundle savedInstanceState) {

            //不是现在这个onCreate 而是AppCompatActivity里的onCreate 有个super(超)
        super.onCreate(savedInstanceState);

        //打开布局
        setContentView(R.layout.activity_main);


        Button bt_login = (Button) findViewById(R.id.bt_login);
        //找到上面打开的布局里面一个id 叫bt_login的控件(view),强制转换为button类
        //findViewById返回默认为view类 不是button类所以要转换(Button),括号里的就算要转的类型


        bt_login.setOnClickListener(this);
        //set设置,为bt_login(控件)设置一个点击的事件
        // (this)代表它等会 会在 现在这个class类里给你做出解释,也就是下面的onclick()

        Log.d(TAG,"onCreate");
        //打印信息日志(logcat)(也就是运行后报错会给出提示 不是编译的错误是真正运行后)
        // .d  就是 ligcat里verbose debug的缩写 用哪个点那个
    }

            protected void onRestart(){
               super.onRestart();
                Log.d(TAG,"onRestart");
            }
             protected void onStart(){
               super.onStart();
             Log.d(TAG,"onStart");
    }

            protected void onResume(){
             super.onResume();
              Log.d(TAG,"onResume");
    }

             protected void onPause(){
           super.onPause();
           Log.d(TAG,"onPause");
    }

            protected void onStop(){
              super.onStop();
              Log.d(TAG,"onStop");
    }
            protected void onDestroy(){
               super.onDestroy();
             Log.d(TAG,"onDestroy");
    }
            public void onClick(View v){
              switch (v.getId()){
                  //get获取; 获取view里(视图)的id  也就是上面你点的那个布局(界面)里的id
                  //好知道你点的是那个控件(按钮) 可能会有很多个按钮

                  case  R.id.bt_login:
                      //如果获取的id 就是现在条件的这个 就执行

                  Intent intent   =   new Intent(MainActivity.this,LoginActivity.class);
                 //Intent:即意图,一般是用来启动新的Activity
                 // (现在这个,要转到的那个)也就相当于我要从qq的主页点到别人空间里换个页面的意思
                      //   https://www.cnblogs.com/xiobai/p/10775386.html


                      intent.putExtra("user_name", "001");
                      //put(英语是放入的意思);Extra(英语是 额外另外的意思)放入其他东西
                      //放到了intent (勉强当作容器)里面
                      //("user_name", "001")
                      // ("钥匙名字(等会你要告诉他密码他才能给你东西)" ,"你要给它的东西")

                      startActivity(intent);
                      //开启  ;也就是现在你可以跳到你想转到的页面了

                break;
                  //如果你点的控件不是叫R.id.bt_login 这个  那不好意思  我不管了
        }
    }
}
创建LoginActivity:
public class LoginActivity extends AppCompatActivity implements View.OnClickListener{


    private static final String TAG = "LoginActivity";

    //定义一些控件名字  因为毕竟我这不是布局页面 你在布局文件里写的东西还是要 告诉我一下的
    private EditText et_username;
    private EditText et_pwd;


    protected void onCreate(Bundle savedInstanceState){

        super.onCreate(savedInstanceState);
        setContentView(R.layout.activity_login);

        //初始化的方法  等会你就会跳的一个长得跟initView()这个一模一样的代码里搞事情
        initView();

    }
    private void initView(){

        //缩写 没有那么麻烦  意思就相当于  找到一个 id 叫iv_back的 而且我还要点它
        //当然因为我只打开了activity_login布局 所以你就老老实实在这里面找
        //为什么不用换类型
        //(ImageView)findViewById(R.id.iv_back).setOnClickListener(this);
        //像这样  我们缩写就直接给它去了
        findViewById(R.id.iv_back).setOnClickListener(this);
        findViewById(R.id.bt_login).setOnClickListener(this);

        //正常的换类型
        et_username = (EditText) findViewById(R.id.et_username);
        et_pwd = (EditText) findViewById(R.id.et_pwd);

        //定义一个接受的方法(装置) 叫做 intent
        // 这里的intent就是这里的 那里的intent是那里的 也可以改个不一样的名字
        //getIntent() 获取了前面的容器intent 里面是什么不知道等会打开看看
        Intent intent = getIntent();

        //接受MainActivity传过来的信息 赋给一个类型是字符串的叫做user_name的对象(一个东西)上
        //getStringExtra就是我要打开容器了  看到你要给我的东西了
        //("user_name") 这就是前面你给我设置的密码
        String user_name = intent.getStringExtra("user_name");

        Log.d(TAG,"user_name = " + user_name);

       et_username.setText(user_name);
        //user_name(String的那个)接收的信息设置在et_username上
    }

    public void onClick(View v){
        switch (v.getId()){
            //同mainactivity
            case R.id.iv_back:

                //要是你点的是这个按钮就不是我要你点的那个按钮 就结束
                finish();
                break;
            case R.id.bt_login:
                String user_name = et_username.getText().toString();
                //识别输入的东西
                //String是不能识别数字的 (今天12号)只能识别今天 号
                //tostring()识别数字 再给她设置一下 默认十进制 (2)就是二进制
                //接受到输入的信息,后面好知道为不为空
                String pwd = et_pwd.getText().toString();

                if (TextUtils.isEmpty(user_name)){
                    //就是判断为不为空 如果你传给我的user_name没内容 就执行

                    Toast.makeText(LoginActivity.this,"用户名不能为空",Toast.LENGTH_SHORT).show();
                    //Toast的几种用法
                    //第一,Toast.makeText()
// 第一个参数:当前的上下文环境。可用getApplicationContext()或this
// 第二个参数:要显示的字符串。也可是R.string中字符串ID
// 第三个参数:显示的时间长短。Toast默认的有两个LENGTH_LONG(长)和LENGTH_SHORT(短),也可以使用毫秒如2000ms

                    return;
                }

                if (TextUtils.isEmpty(pwd)){
                    Toast.makeText(LoginActivity.this,"密码不能为空",Toast.LENGTH_SHORT).show();
                    return;

                }


                 new AlertDialog.Builder(this)
                         //在oncreate中用this就可以,Dialog是对话框 对话框教程.P.131
                         //AlertDialog:警告对话框
                         //ProgressDialog:进度条对话框
                         //DatePickerDialog:日期对话框
                         //TimePickerDialog:时间对话框
                            .setTitle("提示")
                         //标题 设置文本内容
                            .setMessage("用户名:" + user_name + "密码" + pwd)
                         //内容
                            .show();
                //当调用了show方法后会展示到屏幕上,可以用cancel()来消除。
                break;
        }
    }
拷贝必要的图标:
首先创建一个drawable-xhdpi文件夹
将图标拷贝到drawable-xhdpi文件夹

在drawable文件夹下创建xml图片资源bt_bg
在values里添加需要的值:
styles.xml
<resources>

    <!-- Base application theme. -->
    <style name="AppTheme" parent="Theme.AppCompat.Light.DarkActionBar">
        <!-- Customize your theme here. -->

        <item name="windowNoTitle">true</item>

        <item name="colorPrimary">@color/colorPrimary</item>
        <item name="colorPrimaryDark">@color/colorPrimaryDark</item>
        <item name="colorAccent">@color/colorAccent</item>
    </style>

</resources>
colors.xml
<?xml version="1.0" encoding="utf-8"?>
<resources>
    <color name="colorPrimary">#3F51B5
    <color name="colorPrimaryDark">#303F9F
    <color name="colorAccent">#FF4081
    <color name="title_text">#211212
</resources>
strinigs.xml
<resources>
    <string name="app_name">My Application</string>
    <string name="login">登录</string>
</resources>
dimens.xml
<?xml version="1.0" encoding="utf-8"?>
<resources>

    <dimen name="title_height">50dp</dimen>

</resources>
修改activity_login布局文件:
<?xml version="1.0" encoding="utf-8"?>
<LinearLayout xmlns:android="http://schemas.android.com/apk/res/android"
    android:orientation="vertical"
    android:layout_width="match_parent"
    android:layout_height="match_parent">
    <RelativeLayout
        android:layout_width="match_parent"
        android:layout_height="@dimen/title_height"
        android:background="@android:color/white">


    <TextView
        android:layout_width="wrap_content"
        android:layout_height="wrap_content"
        android:text="@string/login"
        android:textColor="@color/title_text"
        android:textSize="16sp">
    </TextView>


    <ImageView
        android:id="@+id/iv_back"
        android:layout_width="50dp"
        android:layout_height="50dp"
        android:padding="16dp"
        android:src="@drawable/flower" />

</RelativeLayout>


    <ScrollView
        android:layout_width="match_parent"
        android:layout_height="match_parent"
        android:background="#f1f1f1">

        <LinearLayout
            android:layout_width="match_parent"
            android:layout_height="match_parent"
            android:orientation="vertical">


        <LinearLayout
            android:layout_width="match_parent"
            android:layout_height="50dp"
            android:layout_marginTop="10dp"
            android:background="@android:color/white"
            android:gravity="center_vertical"
            android:orientation="horizontal"
            android:paddingLeft="12dp"
            android:paddingRight="12dp">

            <TextView
                android:layout_width="wrap_content"
                android:layout_height="wrap_content"
                android:text="账号:"
                android:textColor="#252525"
                android:textSize="15sp"/>

            <EditText
                android:id="@+id/et_username"
                android:layout_width="match_parent"
                android:layout_height="wrap_content"
                android:background="@android:color/white"
                android:hint="用户名/邮箱/手机号"
                android:textColor="#ff0000"
                android:textSize="15sp"/>
        </LinearLayout>

        <LinearLayout
            android:layout_width="match_parent"
            android:layout_height="50dp"
            android:layout_marginTop="1dp"
            android:background="@android:color/white"
            android:gravity="center_vertical"
            android:orientation="horizontal"
            android:paddingLeft="12dp"
            android:paddingRight="12dp"
            >

            <TextView
                android:layout_width="wrap_content"
                android:layout_height="wrap_content"
                android:text="密码:"
                android:textColor="#252525"
                android:textSize="15sp"/>

            <EditText
                android:id="@+id/et_pwd"
                android:layout_width="match_parent"
                android:layout_height="wrap_content"
                android:background="@android:color/white"
                android:hint="请输入密码"
                android:inputType="textPassword"
                android:textColor="#252525"
                android:textSize="15sp"/>
        </LinearLayout>

        <Button
            android:id="@+id/bt_login"
            android:layout_width="match_parent"
            android:layout_height="50dp"
            android:layout_marginTop="10dp"
            android:background="@drawable/bt_bg"
            android:padding="12dp"
            android:text="登录"
            android:textColor="#ffffff"
            android:textSize="15sp" />


        <RelativeLayout
            android:layout_width="match_parent"
            android:layout_height="wrap_content"
            android:padding="12dp">


            <TextView
                android:layout_width="wrap_content"
                android:layout_height="wrap_content"
                android:text="快速注册"
                android:textColor="#252525"
                android:textSize="15sp"/>


            <TextView
                android:layout_width="wrap_content"
                android:layout_height="wrap_content"
                android:layout_alignParentRight="true"
                android:text="找回密码"
                android:textColor="#252525"
                android:textSize="15sp"/>

        </RelativeLayout>
        </LinearLayout>
    </ScrollView>
</LinearLayout>
LoginActivity:
public class LoginActivity extends AppCompatActivity implements View.OnClickListener{

    private static final String TAG = "LoginActivity";

    //定义一些控件名字  因为毕竟我这不是布局页面 你在布局文件里写的东西还是要 告诉我一下的
    private EditText et_username;
    private EditText et_pwd;


    protected void onCreate(Bundle savedInstanceState){

        super.onCreate(savedInstanceState);
        setContentView(R.layout.activity_login);

        //初始化的方法  等会你就会跳的一个长得跟initView()这个一模一样的代码里搞事情
        initView();

    }
    private void initView(){

        //缩写 没有那么麻烦  意思就相当于  找到一个 id 叫iv_back的 而且我还要点它
        //当然因为我只打开了activity_login布局 所以你就老老实实在这里面找
        //为什么不用换类型
        //(ImageView)findViewById(R.id.iv_back).setOnClickListener(this);
        //像这样  我们缩写就直接给它去了
        findViewById(R.id.iv_back).setOnClickListener(this);
        findViewById(R.id.bt_login).setOnClickListener(this);

        //正常的换类型
        et_username = (EditText) findViewById(R.id.et_username);
        et_pwd = (EditText) findViewById(R.id.et_pwd);

        //定义一个接受的方法(装置) 叫做 intent
        // 这里的intent就是这里的 那里的intent是那里的 也可以改个不一样的名字
        //getIntent() 获取了前面的容器intent 里面是什么不知道等会打开看看
        Intent intent = getIntent();

        //接受MainActivity传过来的信息 赋给一个类型是字符串的叫做user_name的对象(一个东西)上
        //getStringExtra就是我要打开容器了  看到你要给我的东西了
        //("user_name") 这就是前面你给我设置的密码
        String user_name = intent.getStringExtra("user_name");

        Log.d(TAG,"user_name = " + user_name);

       et_username.setText(user_name);
        //user_name(String的那个)接收的信息设置在et_username上
    }

    public void onClick(View v){
        switch (v.getId()){
            //同mainactivity
            case R.id.iv_back:

                //要是你点的是这个按钮就不是我要你点的那个按钮 就结束
                finish();
                break;
            case R.id.bt_login:
                String user_name = et_username.getText().toString();
                //识别输入的东西
                //String是不能识别数字的 (今天12号)只能识别今天 号
                //tostring()识别数字 再给她设置一下 默认十进制 (2)就是二进制
                //接受到输入的信息,后面好知道为不为空
                String pwd = et_pwd.getText().toString();

                if (TextUtils.isEmpty(user_name)){
                    //就是判断为不为空 如果你传给我的user_name没内容 就执行

                    Toast.makeText(LoginActivity.this,"用户名不能为空",Toast.LENGTH_SHORT).show();
                    //Toast的几种用法
                    //第一,Toast.makeText()
// 第一个参数:当前的上下文环境。可用getApplicationContext()或this
// 第二个参数:要显示的字符串。也可是R.string中字符串ID
// 第三个参数:显示的时间长短。Toast默认的有两个LENGTH_LONG(长)和LENGTH_SHORT(短),也可以使用毫秒如2000ms

                    return;
                }
                if (TextUtils.isEmpty(pwd)){
                    Toast.makeText(LoginActivity.this,"密码不能为空",Toast.LENGTH_SHORT).show();
                    return;
                }
                 new AlertDialog.Builder(this)
           //在oncreate中用this就可以,Dialog是对话框 对话框教程.P.131
                         //AlertDialog:警告对话框
                         //ProgressDialog:进度条对话框
                         //DatePickerDialog:日期对话框
                         //TimePickerDialog:时间对话框
              .setTitle("提示")
                      //标题 设置文本内容
             .setMessage("用户名:" + user_name + "密码" + pwd)
                         //内容
              .show();
           //当调用了show方法后会展示到屏幕上,可以用cancel()来消除。
                break;
        }
    }
篮奏云apk地址:
https://rod.lanzous.com/b0dk28ida
密码:6k50
