扒一扒微信小程序 客服消息以及转发客服消息遇到的坑。
此博客主要针对于小程序api中的
客服消息以及转发消息,此处转发消息指的是转发给小程序的人工网页客服。
因为小程序api中讲解比较少,把我的爬坑之路写出来供大家参考一下。

首先要开启消息配送,配置的时候出现了校验失败的问题:

这个原因是你后台必须要设置 token,保证存入的url的get请求能校验成功,就是先设置后台,在设置token
@GetMapping("/wx")
public @ResponseBody String weixinProcessGetMethod(HttpServletRequest request,
                       HttpServletResponse response) throws IOException {
    // 微信加密签名
    String signature = request.getParameter("signature");
    // 时间戳
    String timestamp = request.getParameter("timestamp");
    // 随机数
    String nonce = request.getParameter("nonce");
    // 随机字符串
    String echostr = request.getParameter("echostr");
    // 通过检验signature对请求进行校验,若校验成功则原样返回echostr,表示接入成功,否则接入失败
    if (SignUtil.checkSignature(signature, timestamp, nonce)) {
        log.info("get"+ echostr);
        return echostr;
    }
    log.info("get   NULL");
    return null;
}
然后SignUtil:
public class SignUtil {
    // 与接口配置信息中的Token要一致
    private static String token = "xxxx";

    /**
     * 验证签名
     * @ sc
     * @param signature
     * @param timestamp
     * @param nonce
     * @return
     */
    public static boolean checkSignature(String signature, String timestamp,
            String nonce) {
        String[] arr = new String[] { token, timestamp, nonce };
        // 将token、timestamp、nonce三个参数进行字典序排序
        Arrays.sort(arr);
        StringBuilder content = new StringBuilder();
        for (int i = 0; i < arr.length; i++) {
            content.append(arr[i]);
        }
        MessageDigest md = null;
        String tmpStr = null;

        try {
            md = MessageDigest.getInstance("SHA-1");
            // 将三个参数字符串拼接成一个字符串进行sha1加密
            byte[] digest = md.digest(content.toString().getBytes());
            tmpStr = byteToStr(digest);
        } catch (NoSuchAlgorithmException e) {
            e.printStackTrace();
        }

        content = null;
        // 将sha1加密后的字符串可与signature对比,标识该请求来源于微信
        return tmpStr != null ? tmpStr.equals(signature.toUpperCase()) : false;
    }

    /**
     * 将字节数组转换为十六进制字符串
     *
     * @param byteArray
     * @return
     */
    private static String byteToStr(byte[] byteArray) {
        String strDigest = "";
        for (int i = 0; i < byteArray.length; i++) {
            strDigest += byteToHexStr(byteArray[i]);
        }
        return strDigest;
    }

    /**
     * 将字节转换为十六进制字符串
     *
     * @param mByte
     * @return
     */
    private static String byteToHexStr(byte mByte) {
        char[] Digit = { '0', '1', '2', '3', '4', '5', '6', '7', '8', '9', 'A',
                'B', 'C', 'D', 'E', 'F' };
        char[] tempArr = new char[2];
        tempArr[0] = Digit[(mByte >>> 4) & 0X0F];
        tempArr[1] = Digit[mByte & 0X0F];

        String s = new String(tempArr);
        return s;
    }
}
到此这个问题就解决了。
然后是post请求处理消息的方法
@PostMapping("/wx")
@ResponseBody
public String weixinProcessPostMethod(HttpServletRequest request,
                                          HttpServletResponse response) throws IOException {
    // 将请求、响应的编码均设置为UTF-8(防止中文乱码)
    response.setCharacterEncoding("UTF-8");
    HashMap resultMap = new HashMap<>();
    try {
        ServletInputStream stream = request.getInputStream();
        BufferedReader reader = new BufferedReader(new InputStreamReader(stream));
        StringBuffer buffer = new StringBuffer();
        String line = new String("");
        while((line = reader.readLine()) != null){
            buffer.append(line);
        }
        JSONObject jsonObject = JSONObject.parseObject(buffer.toString());
        System.out.println(jsonObject);
        //resultMap.put("ToUserName",jsonObject.getString("ToUserName"));
        //resultMap.put("FromUserName","S______A");
        //resultMap.put("CreateTime", (new  Date()).getTime());
        // resultMap.put("MsgType","transfer_customer_service");
        //String json = JSON.toJSONString(resultMap);
        //JSONObject result = JSONObject.parseObject(json);
        if (jsonObject.getString("MsgType").equals("text")) { //收到的是文本消息

            //也回复一个文本消息
            log.info("POST"  +  jsonObject);
            WXMsgResponseUtil.sendCustomerMessage(jsonObject.getString("FromUserName"));

            return "success";
        } else if(jsonObject.getString("MsgType").equals("event")){
            WXMsgResponseUtil.sendFirstMessage(jsonObject.getString("FromUserName"));
            return "success";
        } else { //那就是图片的消息了
            //也回复一个图片消息
            WXMsgResponseUtil.sendCustomerImageMessage(jsonObject.getString("FromUserName"), jsonObject.getString("MediaId"));
            return "success";
        }


    } catch (Exception e) {
        e.printStackTrace();
    }
    return null;

}
此处注意收到请求给微信回复“success”,不然微信即使能正常回复,也会报小程序异常的错误。
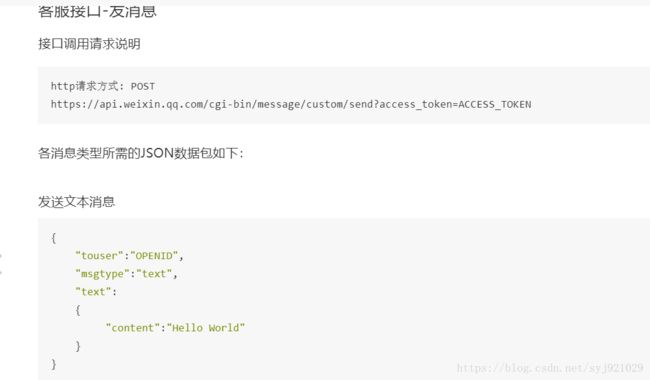
之后是回复sendCustomerMessage方法。
public static JSONObject sendCustomerMessage(String touser){
    JSONObject obj = new JSONObject();

    obj.put("touser", touser);
    obj.put("msgtype", "text");

    JSONObject text = new JSONObject();
    text.put("content", RES_RESULT);

    obj.put("text", text);

    log.info("回复的文本:\n"+obj.toString());
    JSONObject jsonObject = HttpUtil.httpsRequest(obj);

    log.info("回复jsonObject:\n"+jsonObject);
    return jsonObject;
}
HttpUtil就是把发请求后微信后台处理下发消息给用户。
此处post请求的几个参数都比较明显,access_token一开始我以为是之前设置的Token,
讲过无数次的token验证失败之后,我才意识到这个token是要自己去获取的。
也就是说,要下发,首先是要取得 access_token,这个token是根据appId和appSercet来获取的。
请求如下,此处返回的就是我们要的 access_token:
public static  String getAccess_token(String url) {
    String accessToken = null;
    try {
        URL urlGet = new URL(url);
        HttpURLConnection http = (HttpURLConnection) urlGet
                .openConnection();
        http.setRequestMethod("GET"); // 必须是get方式请求
        http.setRequestProperty("Content-Type",
                "application/x-www-form-urlencoded");
        http.setDoOutput(true);
        http.setDoInput(true);
        System.setProperty("sun.net.client.defaultConnectTimeout", "30000");// 连接超时30秒
        System.setProperty("sun.net.client.defaultReadTimeout", "30000"); // 读取超时30秒
        http.connect();
        InputStream is = http.getInputStream();
        int size = is.available();
        byte[] jsonBytes = new byte[size];
        is.read(jsonBytes);
        accessToken = new String(jsonBytes, "UTF-8");
        System.out.println(accessToken);
        is.close();
    } catch (Exception e) {

        e.printStackTrace();

    }
    JSONObject result = JSONObject.parseObject(accessToken);
    Map map = JSONObject.toJavaObject(result, Map.class);
    System.out.println(map.get("access_token"));
    return map.get("access_token");

}
有了这个就可以完成下发消息的代码:
public static JSONObject httpsRequest(JSONObject jsonParam){
    String aToken = HttpUtil.getAccess_token("https://api.weixin.qq.com/cgi-bin/token?grant_type=client_credential&appid="+APPID+"&secret="+APPSECRET);
    StringBuffer sb=new StringBuffer();
    try {
        ;
        // 创建url资源
        URL url = new URL(RES_URL + aToken);
        // 建立http连接
        HttpURLConnection conn = (HttpURLConnection) url.openConnection();
        // 设置允许输出
        conn.setDoOutput(true);
        // 设置允许输入
        conn.setDoInput(true);
        // 设置不用缓存
        conn.setUseCaches(false);
        // 设置传递方式
        conn.setRequestMethod("POST");
        // 设置维持长连接
        conn.setRequestProperty("Connection", "Keep-Alive");
        // 设置文件字符集:
        conn.setRequestProperty("Charset", "UTF-8");
        // 转换为字节数组
        byte[] data = (jsonParam.toString()).getBytes();
        // 设置文件长度
        conn.setRequestProperty("Content-Length", String.valueOf(data.length));
        // 设置文件类型:
        conn.setRequestProperty("contentType", "application/json");
        // 开始连接请求
        conn.connect();
        OutputStream out = new DataOutputStream(conn.getOutputStream()) ;
        // 写入请求的字符串
        out.write((jsonParam.toString()).getBytes());
        out.flush();
        out.close();

        System.out.println(conn.getResponseCode());

        // 请求返回的状态
        if (HttpURLConnection.HTTP_OK == conn.getResponseCode()){
            System.out.println("连接成功");
            // 请求返回的数据
            InputStream in1 = conn.getInputStream();
            try {
                String readLine=new String();
                BufferedReader responseReader=new BufferedReader(new InputStreamReader(in1,"UTF-8"));
                while((readLine=responseReader.readLine())!=null){
                    sb.append(readLine).append("\n");
                }
                responseReader.close();
                System.out.println(sb.toString());

            } catch (Exception e1) {
                e1.printStackTrace();
                log.info("error1++" + e1);
            }
        } else {
            System.out.println("error++");
            log.info("error++");
        }

    } catch (Exception e) {
        log.info("error3++" + e);
    }
    log.info(sb+"sb");
    return JSONObject.parseObject(sb.toString());
}
到这里就可以成功回复客服消息了。
下一步就是根据回复人工客服转发消息至网页客服的实现:
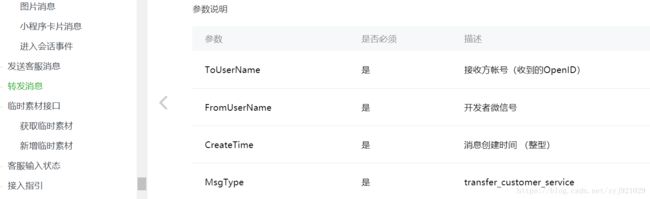
这个参数里面的FromUserName,开发者微信号???这是个啥???
经过多次尝试之后才发现这里要用小程序的原始Id,注意是原始Id,原始Id,原始Id。重要的事情说三遍!!!

还有第三个参数创建时间注意是用微信传过来的时间!!!不然会报错。。。
代码:
if (jsonObject.getString("MsgType").equals("text")) { //收到的是文本消息
    //回复转人工服务
    if("人工服务".equals(jsonObject.getString("Content"))){
        HashMap resultMap = new HashMap<>();
        resultMap.put("ToUserName",jsonObject.getString("FromUserName"));
        resultMap.put("FromUserName",jsonObject.getString("ToUserName"));
        resultMap.put("CreateTime", Long.parseLong(jsonObject.getString("CreateTime")));
        resultMap.put("MsgType","transfer_customer_service");
        String json = JSON.toJSONString(resultMap);
        JSONObject result = JSONObject.parseObject(json);
        log.info("POST   result"  +  result);
        return result.toString();
    }

    //也回复一个文本消息
    log.info("POST"  +  jsonObject);
    WXMsgResponseUtil.sendCustomerMessage(jsonObject.getString("FromUserName"));
    return "success";
好了,这些就是我遇到的坑,到此,回复客服消息以及转发消息的功能就实现了。之后我会把代码上传码云分享一下,或者大家直接加我好友跟我要就好了。。。