【ONNX】使用yolov3.onnx模型进行目标识别的实验
文章目录
- yolov3原理分析
- yolov3.onnx模型来源和介绍
- 来源
- 介绍
- 模型输入
- 模型输出
- 节点类型种类
- 依赖库
- 思路
- 代码
- 准备工作
- 处理图像
- 获取概率最大的概率值和索引
- 获取bbox+第一次筛选(目标置信度阈值)
- 第二次筛选(NMS非极大值抑制)
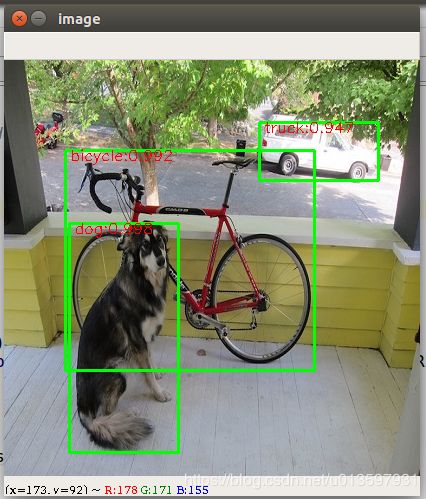
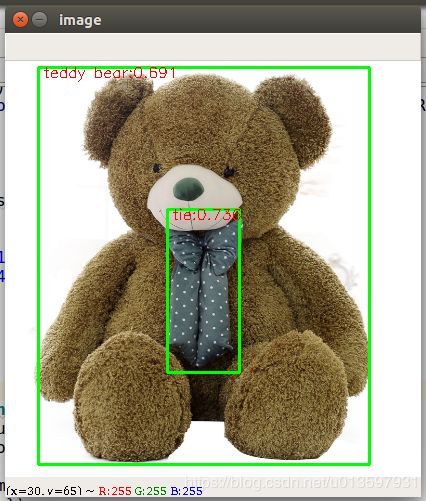
- 绘制预测框
- 总流程
- 测试图像结果
yolov3原理分析
关于模型原理分析,网上已有很多博客,不再赘述。下面是两个我认为写的比较好的。
yolo系列之yolo v3【深度解析】
yolov3实验总结
yolov3.onnx模型来源和介绍
来源
darknet—>caffe—>onnx
1.darknet转caffe参考
2.caffe转onnx用的是我前面写的caffe2onnx工具。
介绍
模型输入
本模型输入为416x416的图像,输入名为input。
模型输入为:
name: "input"
type {
  tensor_type {
    elem_type: 1
    shape {
      dim {
        dim_value: 1
      }
      dim {
        dim_value: 3
      }
      dim {
        dim_value: 416
      }
      dim {
        dim_value: 416
      }
    }
  }
}
模型输出
本模型输出为三个feature map,维度分别是255x13x13,255x26x26,255x52x52,其中255=3 x (80 + 5),80个类的概率加 t x , t y , t w , t h , t o t_x,t_y,t_w,t_h,t_o tx,ty,tw,th,to(置信度)。
模型输出为:
name: "layer82-conv_Y"
type {
  tensor_type {
    elem_type: 1
    shape {
      dim {
        dim_value: 1
      }
      dim {
        dim_value: 255
      }
      dim {
        dim_value: 13
      }
      dim {
        dim_value: 13
      }
    }
  }
}

name: "layer94-conv_Y"
type {
  tensor_type {
    elem_type: 1
    shape {
      dim {
        dim_value: 1
      }
      dim {
        dim_value: 255
      }
      dim {
        dim_value: 26
      }
      dim {
        dim_value: 26
      }
    }
  }
}

name: "layer106-conv_Y"
type {
  tensor_type {
    elem_type: 1
    shape {
      dim {
        dim_value: 1
      }
      dim {
        dim_value: 255
      }
      dim {
        dim_value: 52
      }
      dim {
        dim_value: 52
      }
    }
  }
}

一共有3个输出
节点类型种类
各类型节点数为:
LeakyRelu:72个
BatchNormalization:72个
Conv:75个
Upsample:2个
Concat:4个
Add:23个
依赖库
- onnxruntime
- numpy
- cv2
思路
代码
准备工作
导入库并设置好标签和anchors,由于只使用了numpy,因此自己实现一个sigmoid函数。
import onnxruntime
import numpy as np
import cv2
label = ["background", "person",
        "bicycle", "car", "motorbike", "aeroplane",
        "bus", "train", "truck", "boat", "traffic light",
        "fire hydrant", "stop sign", "parking meter", "bench",
        "bird", "cat", "dog", "horse", "sheep", "cow", "elephant",
        "bear", "zebra", "giraffe", "backpack", "umbrella", "handbag",
        "tie", "suitcase", "frisbee", "skis", "snowboard", "sports ball",
        "kite", "baseball bat", "baseball glove", "skateboard", "surfboard",
        "tennis racket", "bottle", "wine glass", "cup", "fork", "knife", "spoon",
        "bowl", "banana", "apple", "sandwich", "orange", "broccoli", "carrot", "hot dog",
        "pizza", "donut", "cake", "chair", "sofa", "potted plant", "bed", "dining table",
        "toilet", "TV monitor", "laptop", "mouse", "remote", "keyboard", "cell phone",
        "microwave", "oven", "toaster", "sink", "refrigerator", "book", "clock", "vase",
        "scissors", "teddy bear", "hair drier", "toothbrush"]
anchors = [[(116,90),(156,198),(373,326)],[(30,61),(62,45),(59,119)],[(10,13),(16,30),(33,23)]]

def sigmoid(x):
    s = 1 / (1 + np.exp(-1*x))
    return s
处理图像
def process_image(img_path):
    img = cv2.imread(img_path)
    img = cv2.resize(img, (416, 416))
    image =  img[:,:,::-1].transpose((2,0,1))
    image = image[np.newaxis,:,:,:]/255
    image = np.array(image,dtype=np.float32)
    #返回原图像和处理后的数组
    return img,image
获取概率最大的概率值和索引
def getMaxClassScore(class_scores):
    class_score = 0
    class_index = 0
    for i in range(len(class_scores)):
        if class_scores[i] > class_score:
            class_index = i+1
            class_score = class_scores[i]
    return class_score,class_index
获取bbox+第一次筛选(目标置信度阈值)
对feature map的每一个grid cell获取三个对应anchors的bbox( b x , b y , b w , b h , b c l a s s _ s c o r e s , b c l a s s _ i n d e x b_x,b_y,b_w,b_h,b_{class\_scores},b_{class\_index} bx,by,bw,bh,bclass_scores,bclass_index),并根据目标置信度阈值进行筛选。
def getBBox(feat,anchors,image_shape,confidence_threshold):
    box = []
    for i in range(len(anchors)):
        for cx in range(feat.shape[0]):
            for cy in range(feat.shape[1]):
                tx = feat[cx][cy][0 + 85 * i]
                ty = feat[cx][cy][1 + 85 * i]
                tw = feat[cx][cy][2 + 85 * i]
                th = feat[cx][cy][3 + 85 * i]
                cf = feat[cx][cy][4 + 85 * i]
                cp = feat[cx][cy][5 + 85 * i:85 + 85 * i]

                bx = (sigmoid(tx) + cx)/feat.shape[0]
                by = (sigmoid(ty) + cy)/feat.shape[1]
                bw = anchors[i][0]*np.exp(tw)/image_shape[0]
                bh = anchors[i][1]*np.exp(th)/image_shape[1]

                b_confidence = sigmoid(cf)
                b_class_prob = sigmoid(cp)
                b_scores = b_confidence*b_class_prob
                b_class_score,b_class_index = getMaxClassScore(b_scores)

                if b_class_score > confidence_threshold:
                    box.append([bx,by,bw,bh,b_class_score,b_class_index])
    return box
第二次筛选(NMS非极大值抑制)
NMS原理和实现参考
def donms(boxes,nms_threshold):
    b_x = boxes[:, 0]
    b_y = boxes[:, 1]
    b_w = boxes[:, 2]
    b_h = boxes[:, 3]
    scores = boxes[:,4]
    areas = (b_w+1)*(b_h+1)
    order = scores.argsort()[::-1]
    keep = []  # 保留的结果框集合
    while order.size > 0:
        i = order[0]
        keep.append(i)  # 保留该类剩余box中得分最高的一个
        # 得到相交区域,左上及右下
        xx1 = np.maximum(b_x[i], b_x[order[1:]])
        yy1 = np.maximum(b_y[i], b_y[order[1:]])
        xx2 = np.minimum(b_x[i] + b_w[i], b_x[order[1:]] + b_w[order[1:]])
        yy2 = np.minimum(b_y[i] + b_h[i], b_y[order[1:]] + b_h[order[1:]])
        #相交面积,不重叠时面积为0
        w = np.maximum(0.0, xx2 - xx1 + 1)
        h = np.maximum(0.0, yy2 - yy1 + 1)
        inter = w * h
        #相并面积,面积1+面积2-相交面积
        union = areas[i] + areas[order[1:]] - inter
        # 计算IoU:交 /(面积1+面积2-交)
        IoU = inter / union
        # 保留IoU小于阈值的box
        inds = np.where(IoU <= nms_threshold)[0]
        order = order[inds + 1]  # 因为IoU数组的长度比order数组少一个,所以这里要将所有下标后移一位

    final_boxes = [boxes[i] for i in keep]
    return final_boxes
绘制预测框
def drawBox(boxes,img):
    for box in boxes:
        x1 = int((box[0]-box[2]/2)*416)
        y1 = int((box[1]-box[3]/2)*416)
        x2 = int((box[0]+box[2]/2)*416)
        y2 = int((box[1]+box[3]/2)*416)
        cv2.rectangle(img,(x1,y1),(x2,y2),(0,255,0),2)
        cv2.putText(img, label[int(box[5])]+":"+str(round(box[4],3)), (x1+5,y1+10), cv2.FONT_HERSHEY_SIMPLEX, 0.5, (0, 0, 255), 1)
    cv2.imshow('image',img)
    cv2.waitKey(0)
    cv2.destroyAllWindows()
总流程
def getBoxes(prediction,confidence_threshold,nms_threshold):
    boxes = []
    for i in range(len(prediction)):
        feature_map = prediction[i][0].transpose((2, 1, 0))
        box = getBBox(feature_map, anchors[i], [416, 416], confidence_threshold)
        boxes.extend(box)
    Boxes = donms(np.array(boxes),nms_threshold)
    return Boxes

def main():
    img,TestData = process_image("dog416.jpg")
    session = onnxruntime.InferenceSession("yolov3.onnx")
    inname = [input.name for input in session.get_inputs()][0]
    outname = [output.name for output in session.get_outputs()]

    print("inputs name:",inname,"outputs name:",outname)
    prediction = session.run(outname, {inname:TestData})
    boxes = getBoxes(prediction,0.25,0.6)
    drawBox(boxes,img)


