一、操作BLOB类型字段
1. MySQL BLOB类型
-
MySQL中,BLOB是一个二进制大型对象,是一个可以存储大量数据的容器,它能容纳不同大小的数据。
-
插入BLOB类型的数据必须使用PreparedStatement,因为BLOB类型的数据无法使用字符串拼接写的。
-
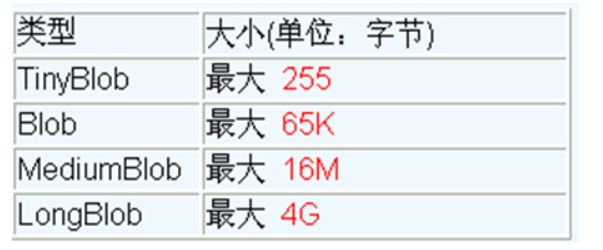
MySQL的四种BLOB类型(除了在存储的最大信息量上不同外,他们是等同的)

-
实际使用中根据需要存入的数据大小定义不同的BLOB类型。
-
需要注意的是:如果存储的文件过大,数据库的性能会下降。
-
如果在指定了相关的Blob类型以后,还报错:xxx too large,那么在mysql的安装目录下,找my.ini文件加上如下的配置参数: max_allowed_packet=16M。同时注意:修改了my.ini文件之后,需要重新启动mysql服务
2. 向数据表中插入大数据类型
其中的配置信息和上次使用的一样
@Test
	public void testInsert() throws Exception {
		Connection conn = JDBCUtils.getConnection();

		String sql = "insert into customers(name,email,birth,photo)values(?,?,?,?)";

		PreparedStatement ps = conn.prepareStatement(sql);

		ps.setObject(1, "冯宝宝");
		ps.setObject(2, "[email protected]");
		ps.setObject(3, "1000-10-10");
		// 图片
		FileInputStream is = new FileInputStream(new File("timg.jpg"));
		ps.setBlob(4, is);
		// 执行
		ps.execute();

		JDBCUtils.closeResource(conn, ps);
	}
3. 修改数据表中的Blob类型字段
Connection conn = JDBCUtils.getConnection();
String sql = "update customers set photo = ? where id = ?";
PreparedStatement ps = conn.prepareStatement(sql);

// 填充占位符
// 操作Blob类型的变量
FileInputStream fis = new FileInputStream("coffee.png");
ps.setBlob(1, fis);
ps.setInt(2, 25);

ps.execute();

fis.close();
JDBCUtils.closeResource(conn, ps);
4. 从数据表中读取大数据类型
@Test
	public void testQuery() {
		Connection conn = null;
		PreparedStatement ps = null;
		InputStream is = null;
		FileOutputStream fos = null;
		ResultSet rs = null;
		try {
			conn = JDBCUtils.getConnection();

			String sql = "select id , name , email , birth , photo from customers where id = ?";

			ps = conn.prepareStatement(sql);

			ps.setObject(1, 19);
			// 有结果集
			rs = ps.executeQuery();
			if(rs.next()) {
				int id = rs.getInt("id");
				String name = rs.getString("name");
				String  email = rs.getString("email");
				Date birth = rs.getDate("birth");

				Customer cust = new Customer(id , name , email , birth);
				System.out.println(cust);

				// 将Blob字段下载下来,保存到本地,除了调用了getBinaryStream()方法,剩下的和二进制流差不多
				Blob photo = rs.getBlob("photo");
				 is = photo.getBinaryStream();
				 fos = new FileOutputStream("lin.jpg");
				byte[] buffer = new byte[1024];
				int len;
				while((len = is.read(buffer)) != -1) {
					fos.write(buffer , 0, len);
				}
			}
		} catch (Exception e) {
			// TODO Auto-generated catch block
			e.printStackTrace();
		}finally {
			try {
				if(is != null)
					is.close();
			} catch (IOException e) {
				// TODO Auto-generated catch block
				e.printStackTrace();
			}

			try {
				if(fos != null)
					fos.close();
			} catch (IOException e) {
				// TODO Auto-generated catch block
				e.printStackTrace();
			}

			JDBCUtils.closeResource(conn, ps, rs);
		}
	}
二、批量插入
1. 批量执行SQL语句
当需要成批插入或者更新记录时,可以采用Java的批量更新机制,这一机制允许多条语句一次性提交给数据库批量处理。通常情况下比单独提交处理更有效率
JDBC的批量处理语句包括下面三个方法:
- addBatch(String):添加需要批量处理的SQL语句或是参数;
- executeBatch():执行批量处理语句;
- clearBatch():清空缓存的数据
通常我们会遇到两种批量执行SQL语句的情况:
- 多条SQL语句的批量处理;
- 一个SQL语句的批量传参;
2. 例如:插入20000条数据
CREATE TABLE goods(
id INT PRIMARY KEY AUTO_INCREMENT,
NAME VARCHAR(20)
);
这个就不演示了,太low
Connection conn = JDBCUtils.getConnection();
Statement st = conn.createStatement();
for(int i = 1;i <= 20000;i++){
	String sql = "insert into goods(name) values('name_' + "+ i +")";
	st.executeUpdate(sql);
}
3. 方式一:使用PreparedStatement
JDBCUtils在上一篇写过,获取连接以及释放连接
@Test
	public void testInsert() {

		Connection conn = null;
		PreparedStatement ps = null;
		try {
			// 开始时间
			long start = System.currentTimeMillis();

			conn = JDBCUtils.getConnection();

			String sql = "insert into goods(name) values(?)";

			ps = conn.prepareStatement(sql);

			for(int i=1; i <= 20000; i++) {
				ps.setObject(1, "name_"+i);

				ps.execute();
			}

			// 结束时间
			long end = System.currentTimeMillis();

			System.out.println("花费的时间:"+(end-start)); //903016
		} catch (Exception e) {
			e.printStackTrace();
		}finally {
			JDBCUtils.closeResource(conn, ps);
		}
	}
可以看到,花费的时间是很长的
4. 方式二:xxxBatch()
需要准备:
- mysql服务器默认是关闭批处理的,我们需要通过一个参数,让mysql开启批处理的支持,
- ?rewriteBatchedStatements=true 写在配置文件的url后面
- 使用更新的mysql 驱动:mysql-connector-java-5.1.37-bin.jar
- 使用 addBatch() / executeBatch() / clearBatch()
![]()
需要注意,因为之前用的mysql驱动是mysql-connector-java-5.1.7-bin.jar,所以先把这个
![]()
然后再重新导入mysql-connector-java-5.1.37-bin.jar这个
![]()
下面就可以写代码了,还是在方式一的基础上:
@Test
	public void testInsert1() {

		Connection conn = null;
		PreparedStatement ps = null;
		try {
			// 开始时间
			long start = System.currentTimeMillis();

			conn = JDBCUtils.getConnection();

			String sql = "insert into goods(name) values(?)";

			ps = conn.prepareStatement(sql);

			for(int i=1; i <= 20000; i++) {
				ps.setObject(1, "name_"+i);

				// 1. 攒sql
				ps.addBatch();

				if(i % 500 == 0) {
					// 2. 执行batch
					ps.executeBatch();

					// 3. 清空batch
					ps.clearBatch();
				}

			}

			// 结束时间
			long end = System.currentTimeMillis();

			System.out.println("花费的时间:"+(end-start)); //5399
		} catch (Exception e) {
			e.printStackTrace();
		}finally {
			JDBCUtils.closeResource(conn, ps);
		}
	}
花费的时间明显少了很多
5. 方式三:终极版
- 方式三:在方式二的基础上操作
- 使用Connection 的 setAutoCommit(false) / commit()
@Test
		public void testInsert2() {

			Connection conn = null;
			PreparedStatement ps = null;
			try {
				// 开始时间
				long start = System.currentTimeMillis();

				conn = JDBCUtils.getConnection();

				// 设置不允许自动提交数据
				conn.setAutoCommit(false);

				String sql = "insert into goods(name) values(?)";

				ps = conn.prepareStatement(sql);

				for(int i=1; i <= 20000; i++) {
					ps.setObject(1, "name_"+i);

					// 1. 攒sql
					ps.addBatch();

					if(i % 500 == 0) {
						// 2. 执行batch
						ps.executeBatch();

						// 3. 清空batch
						ps.clearBatch();
					}
				}
				// 提交数据
				conn.commit();

				// 结束时间
				long end = System.currentTimeMillis();

				System.out.println("花费的时间:"+(end-start)); //2223
			} catch (Exception e) {
				e.printStackTrace();
			}finally {
				JDBCUtils.closeResource(conn, ps);
			}
		}
速度几乎又提升了一倍