网页管理数据库
安装http
下载phpdomain for linux
安装php
安装php-mysql
加cookie
邮件服务器
两个虚拟机,一个主机名改为maillcdqqq.lcdqqq.com,在其上配置DNS,设两个.zone文件,写好配置文件,把另一个虚拟机主机名改为mailcddamowang.cddamowang.com,nameserver设为lcdqqq.com的ip
通过在两个虚拟机上分别dig -t mx lcdqqq.com检测
配置两个虚拟机的/etc/postXXX/main.cfg文件,改75,83,99,113,164行
开始发送邮件
mail [email protected] 给lcdqqq.com的root发邮件
mailq 待发送队列
mail 查看收件箱
postsuper -d 4B9DE17E849 删除发送失败的邮件
postqueue -f 刷新发送状态
postconf -n 查看当前设置 -n(non-defaults)
postconf -e "inet_interfaces=localhost" 设置 -e(edit)
postconf -d | grep innet 查看默认设置 -d(defaults)
改别名(群发)
DNS服务器:
vim /etc/aliases
lcdqqq: student
|| ||
别名 真名
more: :include:/etc/moreusers 群发邮件
vim /etc/moreusers
student
root
postalias /etc/aliases 让别名生效
systemctl restart postfix.service
出站地址伪装
DNS服务器
vim /etc/postfix/generic
在最后一行加上
[email protected] [email protected]
postmap generic给generic加密,生成generic.db
postconf -d | grep generic 查看加密使用的参数
postconf -e "smtp_generic_maps=hash:/etc/postfix/generic"
把加密的文件写入/etc/postfix/main.cf主配置文件
systemctl restart postfix
远程登陆哦邮件服务器
telnet
yum install telnet -y
telnet 172.25.254.101 25
ehlo hello(打个招呼。。有反应代表链接成功)
mail from:[email protected]
rcpt to:[email protected]
data
lalalala
.
quit
通过telnet远程控制端口来发送邮件
限制远程用户使用邮件服务
1.限制客户端:通过限制IP
服务器:
vim/etc/postfix/access
172.25.254.1 REJECT
postmap access (给access加密)
postconf -d | grep client (查看使用参数)
postconf -e "smtpd_client_restrictions=check_client_access hash:/etc/postfix/access" 写入配置文件
2.限制客户端指定用户发邮件:通过限制用户全部主机名
服务器
vim/etc/postfix/recip
[email protected] REJECT
postmap recip加密成db文件
postconf -e"smtpd_sender_restrictions =check_sender_access hash:/etc/postfix/recip"
systemctl restart postfix.service
3.限制客户端指定用户收邮件
服务器
vim/etc/postfix/recip
[email protected] REJECT
postmap recip
postconf -e"smtpd_recipient_restrictions = check_recipient_accesshash:/etc/postfix/recip"
systemctl restart postfix.service
邮件本地用户
服务器
常见端口号
pop3 110
pop3S 995
imap 143
imaps 993
cat /etc/services |grep imap 可以查看imap的端口号
yum install dovecot.x86 -y
vim /etc/dovecot/dovecot.conf
24 protocols = imap pop3 lmtp dovecot使用的协议
49 disable_plaintext_auth = no 使用明文认证
50 login_trusted_networks = 0.0.0.0/0 使外网也可以使用dovecot服务
vim /etc/dovecot/conf.d/10-mail
30 mail_location =mbox:~/mail:INBOX=/var/mail/%u
netstat -antlupe |grep dovecot
passwd student
客户端
yum install mutt -y
mkdir –p /home/mooc/mail/.imap
touch /home/mooc/mail/.imap/INBOX
mutt -f imap://[email protected]
按o,输入密码
雷鸟
tar -jxf 安装包 , 把安装包解压
然后进入thunderbird目录,执行./thunderbird
可能会提示错误,缺少东西
执行yum whatprovides 缺少的东西
可以查出哪个包提供组件
然后yum install 查出来的包 -y
注意,执行雷鸟的时候,要打开postfix对于外网的25端口
vim /etc/postfix/main.cf
113 打开
116 关闭
每个新用户都要手动创建/home/mooc/mail/.imap/INBOX,太过麻烦
我们可以直接在骨架文件/etc/skel中创建mail/.imap/INBOX,这样在系统创建新用户时,会自动创建/home/newuser/mail/.imap/INBOX
邮件虚拟用户
建立一个虚拟用户来管理邮箱数据库,直接用root风险过大
服务器:
groupadd -g 666 vmail
useradd -g 666 -u 666 -s /sbin/nologin vmail
在数据库中添加信息
在数据库中查看
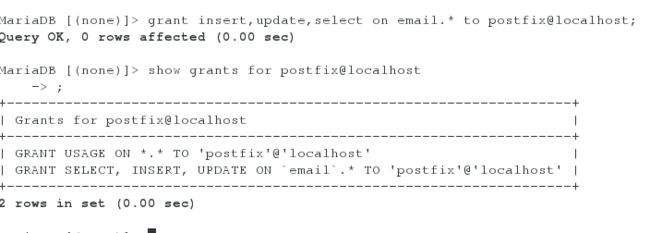
给postfix授权,SELECT
grant select on email.* to postfix@localhost
show grants for postfix@localhost
检测数据库是否成功
vim/etc/postfix/mysql-users.cf
hosts = localhost
user = postfix
password = postfix
dbname = email
table = muser
select_field = username
where_field = username
cp-p mysql-users.cf mysql-domain.cf
hosts = localhost
user = postfix
password = postfix
dbname = email
table = muser
select_field = domain
where_field = domain
cp-p mysql-users.cf mysql-maildir.cf
hosts = localhost
user = postfix
password = postfix
dbname = email
table = muser
select_field = maildir
where_field = username
进行检测:
postmap -q "[email protected]"mysql:/etc/postfix/mysql-users.cf
postmap -q "westos.org"mysql:/etc/postfix/mysql-domain.cf
postmap -q "[email protected]"mysql:/etc/postfix/mysql-maildir.cf
此处有张图
检测成功后,将数据写入配置文件
postconf -d | grep map
postconf -e "virtual_uid_maps =static:666"
postconf -e "virtual_gid_maps =static:666"
postconf -e "virtual_mailbox_base=/home/vmail" 指定邮箱位置
postconf -e"virtual_alias_maps=mysql:/etc/postfix/mysql-users.cf" 本地文件连接数据库
postconf -e"virtual_mailbox_domains=mysql:/etc/postfix/mysql-domain.cf"
postconf -e"virtual_mailbox_maps=mysql:/etc/postfix/mysql-maildir.cf"
检测:
mail [email protected]
数据库和邮箱进行连接
其实本地并没有org这个域名,org在数据库中,实现org用户之间的相互通信
yum install dovecot-mysql -y
vim /etc/dovecot/conf.d/auth-sql.conf.ext 查看模板位置
cp -p /usr/share/doc/dovecot-2.2.10/example-config/dovecot-sql.conf.ext /etc/dovecot
vim /etc/dovecot/dovecot-sql.conf.ext
32driver = mysql 驱动
70connect = host=localhost dbname=email user=postfix password=postfix
使用本地用户(postfix)连接数据库email,他通常只拥有select权限(在企业中)
77default_pass_scheme = PLAIN 登陆密码明文(数据库)
106 password_query = \
107 SELECT username, domain, password \
108 FROM muser WHERE username = '%u' AND domain = '%d'
%u=entire user@domain
%d=domainpart of user@domian
%n=userpart in user@domian,same as %u if there is no domain
124 user_query = SELECT maildir, 666 AS uid,666 AS gid FROM muser WHERE username = '%u'
vim10-mail.conf
30 mail_location =maildir:/home/vmail/%d/%n 邮箱的位置
168 first_valid_uid = 666 使虚拟用户和mail有联系
175 first_valid_gid = 666
vim 10-auth.conf
122 !include auth-system.conf.ext系统用户
123 !include auth-sql.conf.ext 数据库用户
检测
首先检测[email protected]是否能通过172.25.254.101的110端口登陆,能登陆成功则说明配置成功,才可以使用雷鸟
主要目的:
在雷鸟上实现[email protected]和[email protected]互发邮件
在服务器,客户端都可以使用雷鸟


