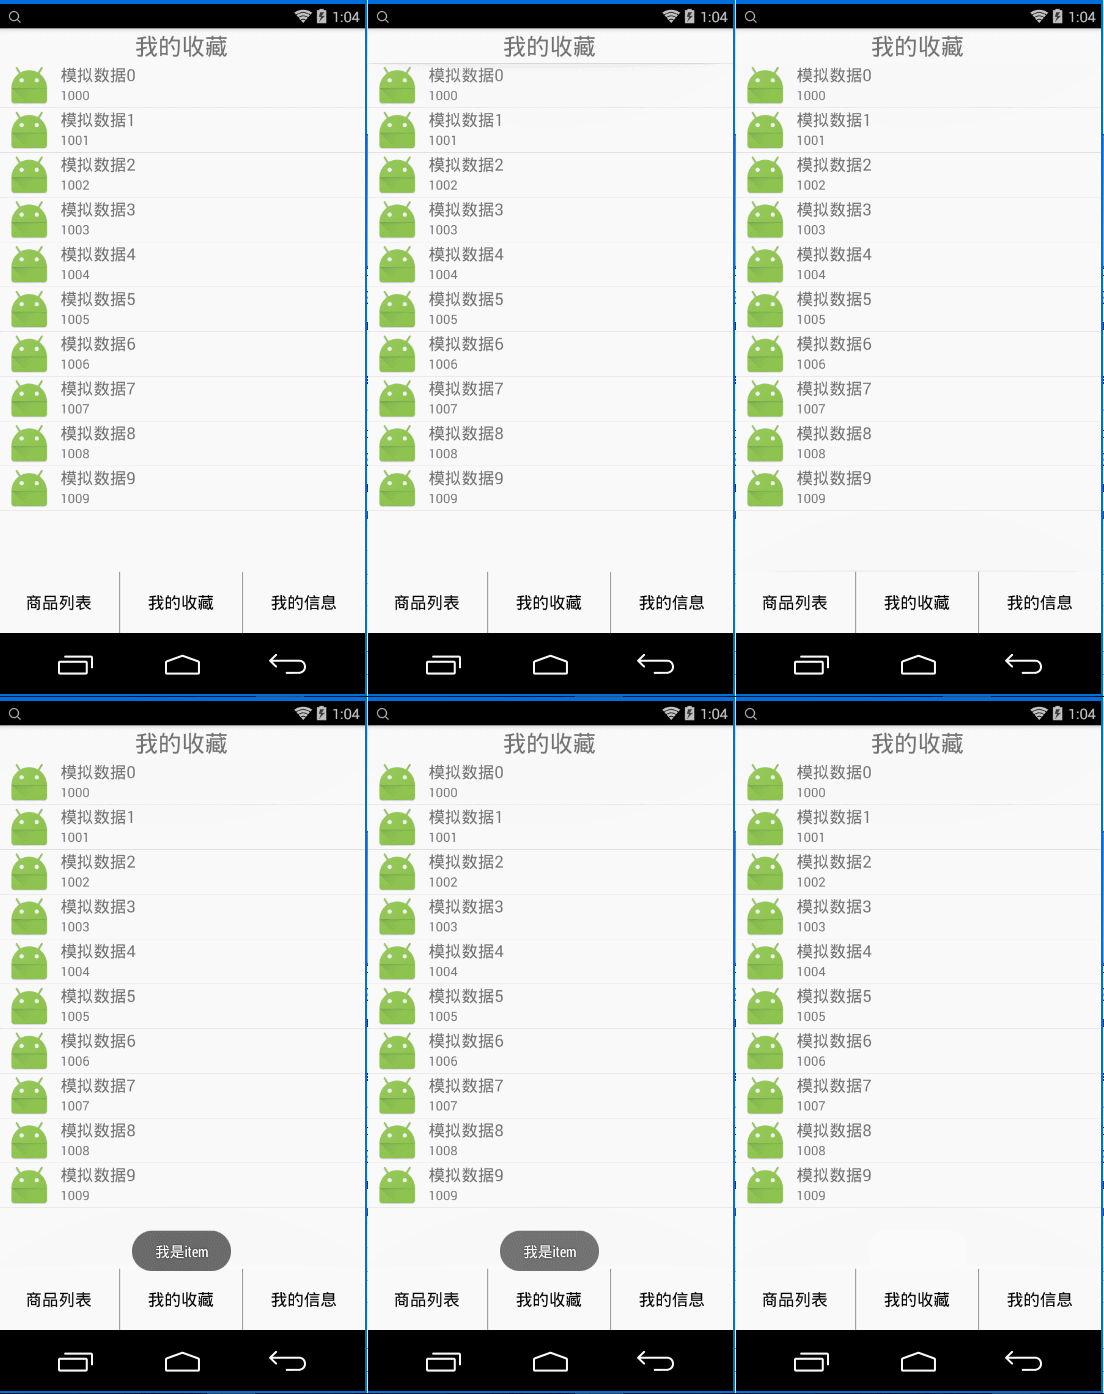
Fragment中RecyclerView的使用解析,以及监听事件处理
RecyclerView是可以代替listview使用的新组件,个人感觉其主要特色:其适配器adapter中,重写的东西少了,页面展示的效果跟加多了,比如可以在RecyclerView设置listview的显示效果,也可以设置gridview的显示效果,也可以设置瀑布流的显示效果!下面代码主要是针对Fragment中RecyclerView组件中listview效果进行学习,在此做简单总结记录!
第一步:在fragment对应的布局xml文件中使用recyclerview
简单解释:此处布局根据具体业务进行属性设置,我需要recyclerview充满整个fragment
需要注意的是recyclerview是v7包中的组件,需要提前导入v7包,有的可能在使用的时候不会出现提醒,但是我使用的导入v7包的Android studio是有提示的!
第二步:在fragment中定义使用
public class CollectFragment extends Fragment {
    private View view;//定义view用来设置fragment的layout
    public RecyclerView mCollectRecyclerView;//定义RecyclerView
    //定义以goodsentity实体类为对象的数据集合
    private ArrayList goodsEntityList = new ArrayList();
    //自定义recyclerveiw的适配器
    private CollectRecycleAdapter mCollectRecyclerAdapter;

    @Nullable
    @Override
    public View onCreateView(LayoutInflater inflater, @Nullable ViewGroup container, @Nullable Bundle savedInstanceState) {
        //获取fragment的layout
        view = inflater.inflate(R.layout.collect_page, container, false);
        //对recycleview进行配置
        initRecyclerView();
        //模拟数据
        initData();
        return view;
    }

    /**
     * TODO 模拟数据
     */
    private void initData() {
        for (int i=0;i<10;i++){
            GoodsEntity goodsEntity=new GoodsEntity();
            goodsEntity.setGoodsName("模拟数据"+i);
            goodsEntity.setGoodsPrice("100"+i);
            goodsEntityList.add(goodsEntity);
        }
    }

    /**
     * TODO 对recycleview进行配置
     */

    private void initRecyclerView() {
        //获取RecyclerView
        mCollectRecyclerView=(RecyclerView)view.findViewById(R.id.collect_recyclerView);
        //创建adapter
        mCollectRecyclerAdapter = new CollectRecycleAdapter(getActivity(), goodsEntityList);
        //给RecyclerView设置adapter
        mCollectRecyclerView.setAdapter(mCollectRecyclerAdapter);
        //设置layoutManager,可以设置显示效果,是线性布局、grid布局,还是瀑布流布局
        //参数是:上下文、列表方向(横向还是纵向)、是否倒叙
        mCollectRecyclerView.setLayoutManager(new LinearLayoutManager(getActivity(), LinearLayoutManager.VERTICAL, false));
        //设置item的分割线
        mCollectRecyclerView.addItemDecoration(new DividerItemDecoration(getActivity(),DividerItemDecoration.VERTICAL));
        //RecyclerView中没有item的监听事件,需要自己在适配器中写一个监听事件的接口。参数根据自定义
        mCollectRecyclerAdapter.setOnItemClickListener(new CollectRecycleAdapter.OnItemClickListener() {
            @Override
            public void OnItemClick(View view, GoodsEntity data) {
                //此处进行监听事件的业务处理
                Toast.makeText(getActivity(),"我是item",Toast.LENGTH_SHORT).show();
            }
        });
    }

}
第三步设置RecyclerView的适配器
public class CollectRecycleAdapter extends RecyclerView.Adapter {
    private Context context;
    private ArrayList goodsEntityList;

    //创建构造函数
    public CollectRecycleAdapter(Context context, ArrayList goodsEntityList) {
        //将传递过来的数据,赋值给本地变量
        this.context = context;//上下文
        this.goodsEntityList = goodsEntityList;//实体类数据ArrayList
    }

    /**
     * 创建viewhodler,相当于listview中getview中的创建view和viewhodler
     *
     * @param parent
     * @param viewType
     * @return
     */
    @Override
    public myViewHodler onCreateViewHolder(ViewGroup parent, int viewType) {
        //创建自定义布局
        View itemView = View.inflate(context, R.layout.item_layout, null);
        return new myViewHodler(itemView);
    }

    /**
     * 绑定数据,数据与view绑定
     *
     * @param holder
     * @param position
     */
    @Override
    public void onBindViewHolder(myViewHodler holder, int position) {
        //根据点击位置绑定数据
        GoodsEntity data = goodsEntityList.get(position);
//        holder.mItemGoodsImg;
        holder.mItemGoodsName.setText(data.goodsName);//获取实体类中的name字段并设置
        holder.mItemGoodsPrice.setText(data.goodsPrice);//获取实体类中的price字段并设置

    }

    /**
     * 得到总条数
     *
     * @return
     */
    @Override
    public int getItemCount() {
        return goodsEntityList.size();
    }

    //自定义viewhodler
    class myViewHodler extends RecyclerView.ViewHolder {
        private ImageView mItemGoodsImg;
        private TextView mItemGoodsName;
        private TextView mItemGoodsPrice;

        public myViewHodler(View itemView) {
            super(itemView);
            mItemGoodsImg = (ImageView) itemView.findViewById(R.id.item_goods_img);
            mItemGoodsName = (TextView) itemView.findViewById(R.id.item_goods_name);
            mItemGoodsPrice = (TextView) itemView.findViewById(R.id.item_goods_price);
            //点击事件放在adapter中使用,也可以写个接口在activity中调用
            //方法一:在adapter中设置点击事件
            itemView.setOnClickListener(new View.OnClickListener() {
                @Override
                public void onClick(View v) {
                    //可以选择直接在本位置直接写业务处理
                    //Toast.makeText(context,"点击了xxx",Toast.LENGTH_SHORT).show();
                    //此处回传点击监听事件
                    if(onItemClickListener!=null){
                        onItemClickListener.OnItemClick(v, goodsEntityList.get(getLayoutPosition()));
                    }
                }
            });

        }
    }

    /**
     * 设置item的监听事件的接口
     */
    public interface OnItemClickListener {
        /**
         * 接口中的点击每一项的实现方法,参数自己定义
         *
         * @param view 点击的item的视图
         * @param data 点击的item的数据
         */
        public void OnItemClick(View view, GoodsEntity data);
    }

    //需要外部访问,所以需要设置set方法,方便调用
    private OnItemClickListener onItemClickListener;

    public void setOnItemClickListener(OnItemClickListener onItemClickListener) {
        this.onItemClickListener = onItemClickListener;
    }
}
自定义实体类简单展示:
public class GoodsEntity implements Serializable {
    public String imgPath;//图片地址
    public String goodsName;//货物名称
    public String goodsPrice;//货物价格

    public GoodsEntity() {
    }

    public GoodsEntity(String imgPath, String goodsName, String goodsPrice) {
        this.imgPath = imgPath;
        this.goodsName = goodsName;
        this.goodsPrice = goodsPrice;
    }

    public String getImgPath() {
        return imgPath;
    }

    public void setImgPath(String imgPath) {
        this.imgPath = imgPath;
    }

    public String getGoodsName() {
        return goodsName;
    }

    public void setGoodsName(String goodsName) {
        this.goodsName = goodsName;
    }

    public String getGoodsPrice() {
        return goodsPrice;
    }

    public void setGoodsPrice(String goodsPrice) {
        this.goodsPrice = goodsPrice;
    }

    @Override
    public String toString() {
        return "GoodsEntity{" +
                "imgPath='" + imgPath + '\'' +
                ", goodsName='" + goodsName + '\'' +
                ", goodsPrice='" + goodsPrice + '\'' +
                '}';
    }
}
显示效果展示:
相关fragment xml adapter entity文件下载
演示效果gif截屏工具
