LiteCAD参考文档的学习五(视区、条码、路线图、箭头、螺旋线、相机视图、线宽)
LiteCAD API reference
一、Viewport
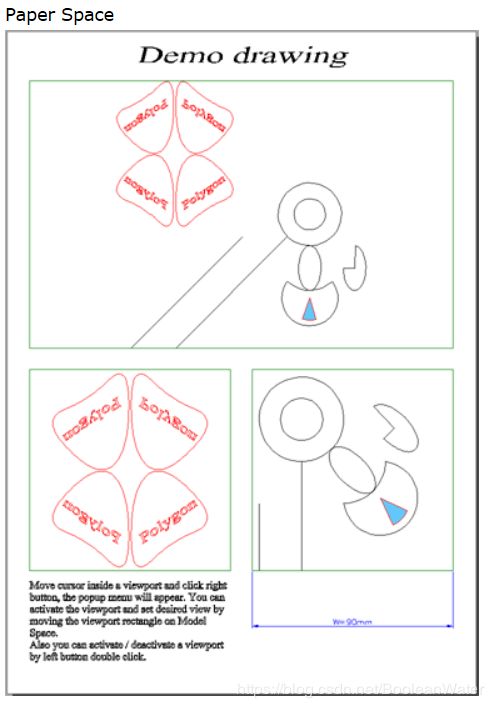
Adds a new viewport object into a block. Viewport can be added only into “Paper space” blocks. HANDLE lcBlockAddViewport (HANDLE hBlock,double Lef,double Bot,double Width,double Height,double DrwPntX,double DrwPntY,double DrwScale,double DrwAngle);
Parameters:
hBlock(Handle to a block.The block must have “Paper space” flag (LC_PROP_BLOCK_PAPER).);Lef Bot(Coordinates of the viewport left-bottom corner. );Width(Width of the viewport.);Height(Height of the viewport.);DrwPntX DrwPntY(Coordinates of the Model Space point which will be at the center of the viewport. );DrwScale(Defines the Model Space scale in the viewport.If zero is specified then the viewport will display the Model Space extents. DrwPntX, DrwPntY, DrwAngle parameters will be ignored.);DrwAngle(Defines a rotation angle of the Model Space in the viewport.).
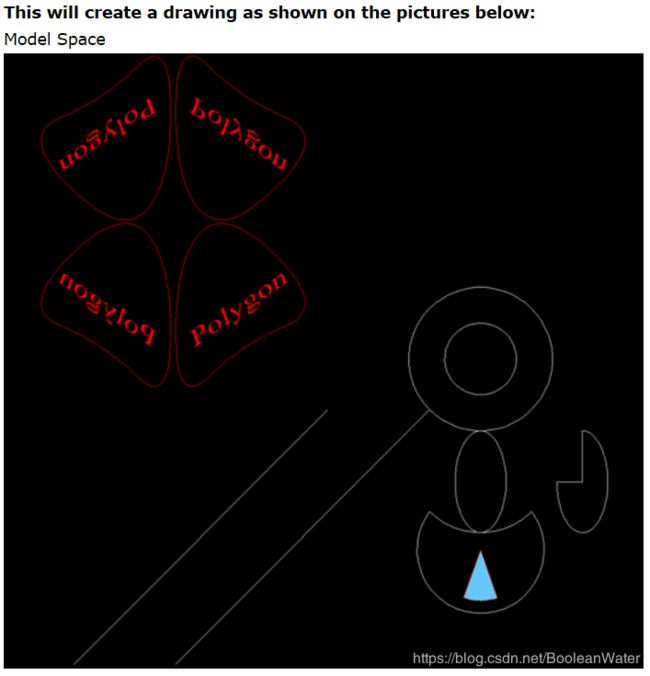
Create a drawing and save it into a file (see project \LC_Samples\CreateDrawing)
int _tmain (int argc, _TCHAR* argv[])
{
  WCHAR  szOutFile[256];
  HANDLE hDrw;
  HANDLE hBlock, hLayer, hPline, hEnt, hText, hTStyle;
  double Lef, Bot, Rig, Top;
  BOOL   bSaved;
  WCHAR* szText = NULL;
  BOOL   bRet;

  // Generate the drawing's filename
  ::GetModuleFileName( ::GetModuleHandle(NULL), szOutFile, 255 );
  WCHAR* p = wcsrchr( szOutFile, L'\\' );
  if (p){
    p[0] = 0;
    wcscat( szOutFile, L"\\CreateDrawing.lcd" );
  }else{
    return 1;
  }

  lcInitialize( 0, 0, 0 );
  hDrw = lcCreateDrawing();
  hBlock = lcDrwGetFirstObject( hDrw, LC_OBJ_BLOCK );
  // add lines
  lcBlockAddLine( hBlock, 0,0, 50,50 );
  lcBlockAddLine( hBlock, 20,0, 70,50 );
  // add circles
  lcBlockAddCircle( hBlock, 80,60, 14.142, false );
  lcBlockAddCircle( hBlock, 80,60, 7.071, false );
  //add arcs
  lcBlockAddArc( hBlock, 80, 40, 14.142, -45*LC_DEG_TO_RAD, -90*LC_DEG_TO_RAD );
  lcBlockAddArc3P( hBlock, 70,30, 80, 10, 90, 30 );
  hEnt = lcBlockAddArc( hBlock, 80, 22.5, 10, 250*LC_DEG_TO_RAD, 40*LC_DEG_TO_RAD );
  lcPropPutBool( hEnt, LC_PROP_ARC_SECTOR, true );
  lcPropPutBool( hEnt, LC_PROP_ENT_SOLIDFILL, true );
  lcPropPutStr( hEnt, LC_PROP_ENT_COLOR, L"red" );
  lcPropPutStr( hEnt, LC_PROP_ENT_FCOLOR, L"100,200,250" );
  // add ellipse
  lcBlockAddEllipse( hBlock, 80, 35.858, 5, 10, 0, 0, 0 );
  hEnt = lcBlockAddEllipse( hBlock, 100, 35.858, 5, 10, 0, 180*LC_DEG_TO_RAD, 270*LC_DEG_TO_RAD );
  lcPropPutBool( hEnt, LC_PROP_ELL_SECTOR, true );
  // add new layer and make it active
  hLayer = lcDrwAddLayer( hDrw, L"New Layer", L"red", 0, LC_LWEIGHT_DEFAULT );
  lcPropPutHandle( hDrw, LC_PROP_DRW_LAYER, hLayer );
  // add polyline
  hPline = lcBlockAddPolyline( hBlock, LC_PLFIT_QUAD, true, false );
  lcPlineAddVer( hPline, 0, 20, 80 );
  lcPlineAddVer( hPline, 0, 30, 90 );
  lcPlineAddVer( hPline, 0, 50, 70 );
  lcPlineAddVer( hPline, 0, 33, 63 );
  lcPlineAddVer( hPline, 0, 20, 50 );
  lcPlineEnd( hPline );
  // add new text style and make it active
  hTStyle = lcDrwAddTextStyle( hDrw, L"New Style", L"Times New Roman", true );
  lcPropPutHandle( hDrw, LC_PROP_DRW_TEXTSTYLE, hTStyle );
  // add text
  hText = lcBlockAddText2( hBlock, L"Polygon", 32,70, LC_TA_CENTER, 3, 0, 35*LC_DEG_TO_RAD, 0 );
  // copy and mirror the text and the polyline
  lcBlockSelectEnt( hBlock, hPline, true );
  lcBlockSelectEnt( hBlock, hText, true );
  lcBlockSelMirror( hBlock, 19.5, 0, 19.5, 100, true, false );
  hEnt = lcBlockGetLastEnt( hBlock );
  lcBlockSelectEnt( hBlock, hEnt, true );
  hEnt = lcBlockGetPrevEnt( hBlock, hEnt );
  lcBlockSelectEnt( hBlock, hEnt, true );
  lcBlockSelMirror( hBlock, 0, 87, 100, 87, true, false );
  lcBlockUnselect( hBlock );
  // calculate extents
  lcBlockUpdate( hBlock, true, 0 );

  // get extents of model block
  Lef = lcPropGetFloat( hBlock, LC_PROP_BLOCK_XMIN );
  Bot = lcPropGetFloat( hBlock, LC_PROP_BLOCK_YMIN );
  Rig = lcPropGetFloat( hBlock, LC_PROP_BLOCK_XMAX );
  Top = lcPropGetFloat( hBlock, LC_PROP_BLOCK_YMAX );
  // set visible rect (fit to the extents)
  lcBlockSetViewRect2( hBlock, Lef, Bot, Rig, Top );

  // add paper view
  hBlock = lcDrwAddBlockPaper( hDrw, L"", LC_PAPER_A4, LC_PAPER_BOOK, 0, 0 );
  // set active layer
  hLayer = lcDrwGetObjectByName( hDrw, LC_OBJ_LAYER, L"0" );
  lcPropPutHandle( hDrw, LC_PROP_DRW_LAYER, hLayer );
  // set default parameters for a text
  lcPropPutInt( hTStyle, LC_PROP_TSTYLE_ALIGN, LC_TA_CENTOP );
  lcPropPutFloat( hTStyle, LC_PROP_TSTYLE_HEIGHT, 7.0 );
  lcPropPutFloat( hTStyle, LC_PROP_TSTYLE_OBLIQUE, 15.0*LC_DEG_TO_RAD );
  lcPropPutFloat( hTStyle, LC_PROP_TSTYLE_WSCALE, 1.5 );
  // add text
  lcBlockAddText( hBlock, L"Demo drawing", 105,290 );
  // add some more text
  szText = L"Move cursor inside a viewport and click right button, the popup menu "
           L"will appear. You can activate the viewport and set desired view by moving "
           L"the viewport rectangle on Model Space.\\P"
           L"Also you can activate / deactivate a viewport by left button "
           L"double click.";
  lcBlockAddMText( hBlock, szText, 10, 50, 90, LC_TA_LEFTOP, 0, 3.2, 1 );
  // add new layer for viewports and make it active
  hLayer = lcDrwAddLayer( hDrw, L"Viewports", L"96", 0, LC_LWEIGHT_DEFAULT );
  lcPropPutHandle( hDrw, LC_PROP_DRW_LAYER, hLayer );
  // add viewports on the paper view
  lcBlockAddViewport( hBlock, 10, 155, 190, 120, 0,0, 0, 0 );
  lcBlockAddViewport( hBlock, 10, 55, 90, 90, 19.5, 87, 0.745, 0 );
  lcBlockAddViewport( hBlock, 110, 55, 90, 90, 80, 35.858, 0.745, 45*LC_DEG_TO_RAD );
  // set active color
  lcPropPutStr( hDrw, LC_PROP_DRW_COLOR, L"blue" );
  // add dimension
  lcBlockAddDimHor( hBlock, 110, 55, 200, 55, 30, L"W=<>mm" );
  // calculate extents
  lcBlockUpdate( hBlock, true, 0 );

  // set active view (that will be dispayed in a window when the drawing will be opened in editor)
  lcPropPutHandle( hDrw, LC_PROP_DRW_VISBLOCK, hBlock );
  // save the drawing into the file
  bSaved = lcDrwSave( hDrw, szOutFile, false, 0 );
  // delete drawing object (clear memory)
  lcDeleteDrawing( hDrw );

  lcUninitialize( false ); // if true - save config

  if (bSaved){
    wprintf( L"The drawing was saved to\n%s\nPress any key\n", szOutFile );
  }else{
    wprintf( L"Error of saving file\n%s\nPress any key\n", szOutFile );
  }
  _getch();

  return 0;
}
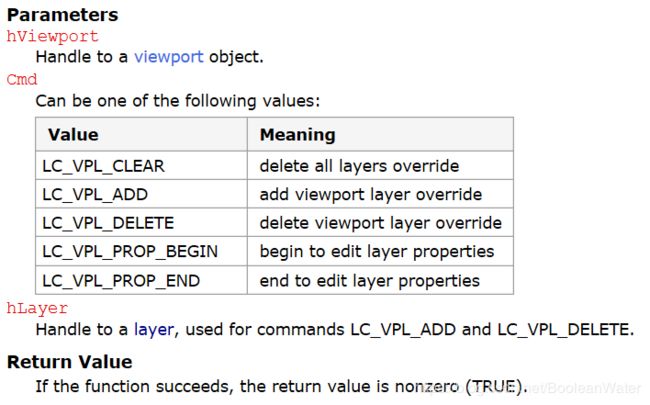
BOOL lcVportLayerCmd (HANDLE hViewport,int Cmd,HANDLE hLayer);
Overrides some Layers properties for specified viewport.
The following layer properties can be overriden:LC_PROP_LAYER_VISIBLE, LC_PROP_LAYER_COLORx, LC_PROP_LAYER_FCOLORx, LC_PROP_LAYER_LINETYPE, LC_PROP_LAYER_LWIDTH
Code sample:
void DemoVportLayers (HANDLE hLcWnd)
{
  HANDLE hVport, hLayer1, hLayer2, hLcDrw;
  hVport = lcWndGetEntByKey( hLcWnd, 123 );
  if (hVport){
    lcVportLayerCmd( hVport, LC_VPL_CLEAR, 0 );
    hLcDrw = lcPropGetHandle( hLcWnd, LC_PROP_WND_DRW );
    hLayer1 = lcDrwGetObjectByName( hLcDrw, LC_OBJ_LAYER, L"Layer1" );
    hLayer2 = lcDrwGetObjectByName( hLcDrw, LC_OBJ_LAYER, L"Layer2" );
    if (hLayer1 && hLayer2){
      lcVportLayerCmd( hVport, LC_VPL_ADD, hLayer1 );
      lcVportLayerCmd( hVport, LC_VPL_ADD, hLayer2 );
      lcVportLayerCmd( hVport, LC_VPL_PROP_BEGIN, 0 );
        lcPropPutInt( hLayer1, LC_PROP_LAYER_COLORT, RGB(0,0,255) );
        lcPropPutBool( hLayer2, LC_PROP_LAYER_VISIBLE, false );
      lcVportLayerCmd( hVport, LC_VPL_PROP_END, 0 );
    }
    lcWndRedraw( hLcWnd );
  }
}
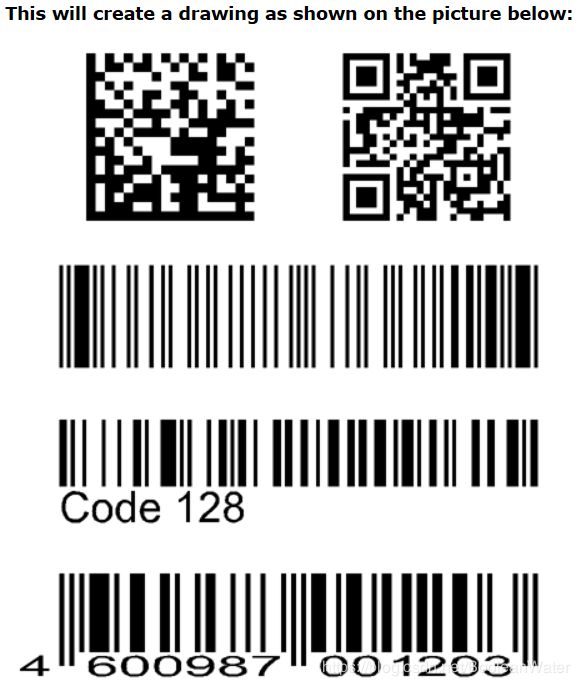
二、Barcode
A barcode is an optical machine-readable representation of data relating to the object to which it is attached.
Create barcodes
void DemoBarcodes (HANDLE hLcWnd)
{
  HANDLE hDrw, hBlock, hTStyle, hEnt;
  double X, Y, W, H, dx;
  WCHAR* szTextStyle = L"Bar text";
  WCHAR* szFontName = L"Arial";

  // get drawing and block, linked with CAD window
  hDrw = lcPropGetHandle( hLcWnd, LC_PROP_WND_DRW );
  hBlock = lcPropGetHandle( hLcWnd, LC_PROP_WND_BLOCK );
  // get text style with specified name
  hTStyle = lcDrwGetObjectByName( hDrw, LC_OBJ_TEXTSTYLE, szTextStyle );
  if (hTStyle == NULL){
    // the style don't exist, create new text style
    hTStyle = lcDrwAddTextStyle( hDrw, szTextStyle, szFontName, true );
  }
  // set current text style
  lcPropPutHandle( hDrw, LC_PROP_DRW_TEXTSTYLE, hTStyle );
  // add barcodes
  W = 50.0;
  H = 10.0;
  X = W / 2.0;
  Y = H / 2.0;
  hEnt = lcBlockAddBarcode( hBlock, LC_BARTYPE_EAN13, X, Y, W, H, L"4600987001203" );
  Y = Y + (H * 1.5 );
  hEnt = lcBlockAddBarcode( hBlock, LC_BARTYPE_CODE128, X, Y, W, H, L"Code 128" );
  lcPropPutFloat( hEnt, LC_PROP_BARC_TEXTH, 0.3 );
  lcPropPutInt( hEnt, LC_PROP_BARC_TEXTALIGN, 0 );
  Y = Y + (H * 1.5 );
  hEnt = lcBlockAddBarcode( hBlock, LC_BARTYPE_CODE93, X, Y, W, H, L"1234567890" );
  lcPropPutBool( hEnt, LC_PROP_BARC_HIDETEXT, true );
  Y = Y + (H / 2.0 );
  dx = W / 4.0;
  W = W * 0.35;
  X = dx;
  Y = Y + dx;
  hEnt = lcBlockAddBarcode( hBlock, LC_BARTYPE_DM, X, Y, W, 0, L"Data Matrix 12345" );
  X = X + dx + dx;
  hEnt = lcBlockAddBarcode( hBlock, LC_BARTYPE_QR, X, Y, W, 0, L"This is QR code" );
  // update extents
  lcBlockUpdate( hBlock, true, 0 );
  // zoom extents
  lcWndZoomRect( hLcWnd, 0, 0, 0, 0 );
}
三、Road plan
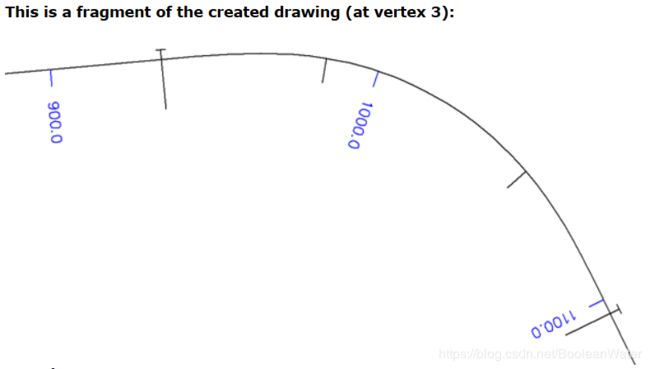
A road plan is a polyline with curves fitted in vertices. The curve consist from arc segment and start/end clothoids.
Create “road plan” object
void DemoRPlan (HANDLE hLcWnd)
{
  int    Side;
  double Len, Dist, X, Y, X2, Y2, DirAng, Ang, Step;
  WCHAR  szText[32];
  HANDLE hVer[6], hRPlan, hBlock, hDrw;

  // get drawing and block, linked with CAD window
  hDrw = lcPropGetHandle( hLcWnd, LC_PROP_WND_DRW );
  hBlock = lcPropGetHandle( hLcWnd, LC_PROP_WND_BLOCK );
  // create empty object
  hRPlan = lcBlockAddRPlan( hBlock );
  // add vertices
  hVer[0] = lcRPlanAddVer( hRPlan, 0,120 );
  hVer[1] = lcRPlanAddVer( hRPlan, 200,0 );
  hVer[2] = lcRPlanAddVer( hRPlan, 500,420 );
  hVer[3] = lcRPlanAddVer( hRPlan, 830,450 );
  hVer[4] = lcRPlanAddVer( hRPlan, 1000,100 );
  hVer[5] = lcRPlanAddVer( hRPlan, 1300,0 );
  // define curves
  lcRPlanSetCurve( hVer[1], 100,50,50 );
  lcRPlanSetCurve( hVer[2], 250,70,70 );
  lcRPlanSetCurve( hVer[3], 100,50,50 );
  lcRPlanSetCurve( hVer[4], 500,0,0 );

  // Now we will add distance markers along the road
  // set current color
  lcPropPutStr( hDrw, LC_PROP_DRW_COLOR, L"blue" );
  // get road length
  Len = lcPropGetFloat( hRPlan, LC_PROP_RPLAN_LEN );
  Step = 100.0;
  Dist = 0.0;
  while( Dist < Len ){
      // get on-road point (X,Y) by distance from beginning
    lcRPlanGetPoint( hRPlan, Dist, &X, &Y, &DirAng, &Side );
      // add line and text at this position
    Ang = DirAng - LC_DEG90;
    lcGetPolarPoint( X, Y, Ang, 5.0, &X2, &Y2 );
    lcBlockAddLine( hBlock, X, Y, X2, Y2 );
    lcGetPolarPoint( X, Y, Ang, 10.0, &X2, &Y2 );
    swprintf( szText, L"%.1f", Dist );
    lcBlockAddText2( hBlock, szText, X2, Y2, LC_TA_LEFCEN, 3.0, 1.0, Ang, 0.0 );
    Dist += Step;
  }
  // make the picture visible in a window
  lcBlockUpdate( hBlock, true, 0 );
  lcWndExeCommand( hWnd, LC_CMD_ZOOM_EXT, 0 );
}
Retrieves a point on a road plan curve, nearest to given off-curve point:BOOL lcRPlanGetDist (HANDLE hRPlan,double X,double Y,double pX2,double pY2,double* pDist,double* pOffset);**
Parameters:
hRPlan(Handle to a road plan object.);X Y(Off-curve point.);pX2 pY2(Pointers to variables that will receive coordinates of the found on-curve point (which is nearest to X,Y));pDist(Pointer to variable that will receive the distance from beginning of road plan curve to found point.);pOffset(Pointer to variable that will receive the distanve from given point (X,Y) to found point (X2,Y2).).
Retrieve position on a curve of “road plan” object by mouse click.
The below function is called on the Left button down event.When user clicks on RPlan object, the function find coordinates on the curve and insert a pointon this place.
void DemoRPlanLBDown (HANDLE hEvent)
{
  HANDLE hLcWnd, hDrw, hBlock, hPtStyle, hRPlan, hPnt;
  int    EntType;
  double X, Y, X2, Y2, Dist, Offset;
  WCHAR* szName = L"MyPtStyle";

  //------- This part is used to set style and color for new points
  // get drawing handle
  hDrw = lcPropGetHandle( hEvent, LC_PROP_EVENT_DRW );
  // set active point style
  hPtStyle = lcDrwGetObjectByName( hDrw, LC_OBJ_PNTSTYLE, szName );
  if (hPtStyle == 0){
    // the point style don't exist, create it
    hPtStyle = lcDrwAddPntStyle( hDrw, szName, 0, 1.0, 0, 1.0, 1.0 );
    lcPropPutInt( hPtStyle, LC_PROP_PSTYLE_PTMODE, LC_POINT_PLUS|LC_POINT_CIRCLE );
    lcPropPutFloat( hPtStyle, LC_PROP_PSTYLE_PTSIZE, -1.0 );
  }
  // set active point style
  lcPropPutHandle( hDrw, LC_PROP_DRW_PNTSTYLE, hPtStyle );
  // set active color
  lcPropPutInt( hDrw, LC_PROP_DRW_COLOR, RGB(255,100,0) );
  //-------------------------

  // get window handle
  hLcWnd = lcPropGetHandle( hEvent, LC_PROP_EVENT_WND );
  // get block handle
  hBlock = lcPropGetHandle( hEvent, LC_PROP_EVENT_BLOCK );
  // get entity by cursor position
  hRPlan = lcWndGetEntByPoint( hLcWnd, -1, -1 );
  if (hRPlan != 0){
    // check the entity type
    EntType = lcPropGetInt( hRPlan, LC_PROP_ENT_TYPE );
    if (EntType == LC_ENT_RPLAN){
      // get cursor coordinates
      X = lcPropGetFloat( hEvent, LC_PROP_EVENT_FLOAT1 );
      Y = lcPropGetFloat( hEvent, LC_PROP_EVENT_FLOAT2 );
      // by the click point, get position on RPlan curve
      if (lcRPlanGetDist( hRPlan, X, Y, &X2, &Y2, &Dist, &Offset )){
        // at found position, add point entity
        hPnt = lcBlockAddPoint( hBlock, X2, Y2 );
        lcBlockUpdate( hBlock, false, hPnt );
        lcWndRedraw( hLcWnd );
        // disable default Litecad reaction on the event
        lcEventReturnCode( 1 );
      }
    }
  }
}
四、Arrow
To add an arrow into a drawing use following function:lcBlockAddArrow(By two points)
五、Spiral
To add a spiral into a drawing use following function:lcBlockAddSpiral(By two points)
六、Camera view
Note: In order to work with camera functions, your application must preliminary attach IC Imaging Control DLL
using lcTIS_InitLibrary function.
BOOL lcTIS_InitLibrary (LPCWSTR szLicenseKey,BOOL bErrMsg);
Parameters:
szLicenseKey(IC Imaging Control license key or NULL if only a trial version is available. );bErrMsg(If TRUE then function will display error message if can not initialize the library.).
Return Value:
If the function succeeds, the return value is nonzero (TRUE).
Remarks:
For supporting industrial camera devices, LiteCAD uses IC Imaging Control DLL version 3.4.0.51 (November 23, 2017)from The Imaging Source Europe GmbH.
You have to download the following files and copy them into LiteCAD.dll directory:
Download 32-bit DLL’s: tisgrabber.dll, TIS_UDSHL11.dll
Download 64-bit DLL’s: tisgrabber.dll_x64, TIS_UDSHL11_x64.dll
Detaches IC Imaging Control DLL from your application:
BOOL lcTIS_CloseLibrary ();
Adds a new camera view object into a block:
HANDLE lcBlockAddCamview (HANDLE hBlock,double Left,double Bottom,double Width,double Height);
Connects camera device into LiteCAD:
BOOL lcCameraConnect (LPCWSTR szName);
Parameters:
szName(Name of camera device.If used string “” then function will show the device selection dialog. )
Disconnects camera device from LiteCAD:
BOOL lcCameraDisconnect ();
Saves an image from a camera into a memory buffer.This buffer can be read via LC_PROP_G_CAMERA_BITS
property:
BOOL lcCameraShot ();
Code sample
Connect / disconnect camera device
// Mode:
// 0 - disconnect
// 1 - connect by dialog
// 2 - connect last device
//-----------------------------------------------
void DemoCameraConnect (int Mode)
{
int i, n;
BOOL bConnected, bRet;
WCHAR szName[256];
bConnected = lcPropGetBool( 0, LC_PROP_G_CAMERA_ON );
if (Mode == 0){
if (bConnected){
// disconnect camera
bRet = lcCameraDisconnect();
}
}else{
if (bConnected == false){
if (Mode == 1){
// select camera by dialog
bRet = lcCameraConnect( L"Add Camera view entity into a drawing
//-----------------------------------------------
void DemoCameraView (HANDLE hLcWnd)
{
double Wcam, Hcam, Ratio;
double Lef, Bot, Rig, Top, Wview, Hview, Gap;
BOOL bConnected;
HANDLE hBlock;
bConnected = lcPropGetBool( 0, LC_PROP_G_CAMERA_ON );
if (bConnected){
// get camera image size
Wcam = lcPropGetInt( 0, LC_PROP_G_CAMERA_WIDTH );
Hcam = lcPropGetInt( 0, LC_PROP_G_CAMERA_HEIGHT );
Ratio = Wcam / Hcam;
// get a block, linked with CAD window
hBlock = lcPropGetHandle( hLcWnd, LC_PROP_WND_BLOCK );
// add "camera view" object
Lef = 0.0;
Bot = 0.0;
Wview = 100.0;
Hview = Wview / Ratio;
lcBlockAddCamview( hBlock, Lef, Bot, Wview, Hview );
Rig = Lef + Wview;
Top = Bot + Hview;
Gap = Wview / 4.0;
lcWndZoomRect( hLcWnd, Lef-Gap, Bot-Gap, Rig+Gap, Top+Gap );
}else{
::MessageBox( 0, L"Camera is disconnected", L"Camera View", MB_OK );
lcWndSetFocus( hLcWnd );
}
}
Get snapshot image from a camera
//-----------------------------------------------
void DemoCameraShot (HANDLE hLcWnd)
{
  int Time;

  // get camera update time
  Time = lcPropGetInt( 0, LC_PROP_G_CAMERA_TIME );
  if (Time > 0){
    // do not update camera by timer
    lcPropPutInt( 0, LC_PROP_G_CAMERA_TIME, 0 );
  }
  // update camera view
  lcCameraShot();
  lcWndRedraw( hLcWnd );
}
Access data of camera image and save the image into a file
//-----------------------------------------------
void DemoCameraMem (HANDLE hLcWnd)
{
  BYTE* pBuf;
  int   nBytesPerRow, W, H;
  BITMAPFILEHEADER bfh;
  BITMAPINFOHEADER bih;
  FILE* df;
  WCHAR szFileName[256];
  HWND  hWnd;

  // generate filename
  swprintf( szFileName, L"d:/Image_%d.bmp", ::GetTickCount() );

  pBuf = (BYTE*)lcPropGetHandle( 0, LC_PROP_G_CAMERA_BITS );
  nBytesPerRow = lcPropGetInt( 0, LC_PROP_G_CAMERA_BPROW );
  W = lcPropGetInt( 0, LC_PROP_G_CAMERA_WIDTH );
  H = lcPropGetInt( 0, LC_PROP_G_CAMERA_HEIGHT );

  // Set BITMAPINFOHEADER
  memset( &bih, 0, sizeof(BITMAPINFOHEADER) );
  bih.biSize          = 40;       // header size, 40
  bih.biWidth         = W;        // image width, pixel
  bih.biHeight        = -H;       // image height, pixel
  bih.biPlanes        = 1;
  bih.biCompression   = BI_RGB;
  bih.biXPelsPerMeter = 5905;     // preferable resolution, pixel/meter
  bih.biYPelsPerMeter = 5905;     // ---- on Y
  bih.biBitCount      = 24;       // bits per pixel
  bih.biSizeImage     = nBytesPerRow * H;   // size of image data (pBuf), bytes
  // sat data for file header
  memset( &bfh, 0, sizeof(bfh) );
  bfh.bfType = 0x4D42;   // BM
  // file size
  bfh.bfSize = 14 + bih.biSize + bih.biSizeImage;
  // offset to bitmap bits
  bfh.bfOffBits = 14 + bih.biSize;  // sizeof(BITMAPFILEHEADER) + sizeof(BITMAPINFOHEADER)
  // write the image file (BMP)
  df = _wfopen( szFileName, L"wb" );
  if (df){
    // write file header
    fwrite( &bfh, 14, 1, df );
    // write bitmap info header
    fwrite( &bih, 40, 1, df );
    // write bitmap bits
    fwrite( pBuf, 1, bih.biSizeImage, df );
    // finish
    fclose( df );
    hWnd = (HWND)lcPropGetHandle( hLcWnd, LC_PROP_WND_HWND );
    ::MessageBox( hWnd, szFileName, L"SAVED", MB_OK );
    lcWndSetFocus( hLcWnd );
  }
}
七、Linewidth
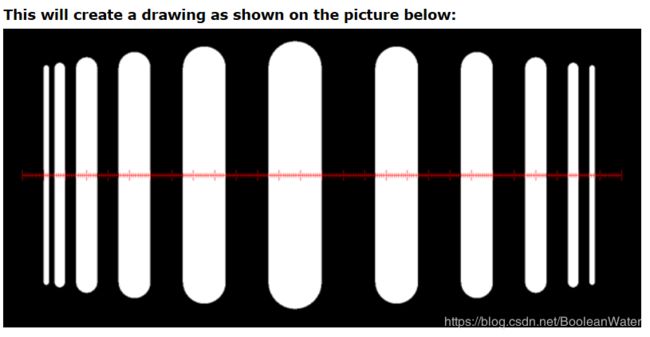
Linewidth represents the exact width of an object’s lines, multiplied by 1000.For example, if you want a line to be plotted with width 0.25 mm,you have to specify value 250, for 1.5 mm - 1500 and so on.
A linewidth value of 0 is displayed as one pixel and print at the thinnest width available on the specified printer.If an object is filled and its linewidth is 0, then the line is not drawn at all.
Use drawing’s parameter LC_PROP_DRW_LWMODE to display or not display real linewidth in a window (LC_LW_THIN, LC_LW_REAL, LC_LW_PIXEL). A drawing’s redraw time increases with linewights that are represented by more than one pixel.
On model space layout, you can set a mode to display linewidths in the same way as AutoCAD lineweights, i.e. in constant pixel values that does not represent an object’s real-world width. For this, set non-zero value for drawing’s parameter LC_PROP_DRW_LWSCALE, which means “pixel size for lineweight”. For example, if LC_PROP_DRW_LWSCALE is 0.15, than a linewidth of 0.5 mm will be drawn with 3 pixel width ((int)(0.5/0.15)) and is always displayed using 3 pixels regardless of how far you zoom into your drawing. If LC_PROP_DRW_LWSCALE is set to zero,then LiteCAD displays real width, which depends of current zoom.In a paper space layout, linewidths always display in the exact plotting width.

Linewidth demo
void DemoLinewidth (HANDLE hLcWnd)
{
  HANDLE hDrw, hBlock, hEnt;
  double x0, x, y, y1, y2, Lw;
  double Lwidth[11] = {0.25, 0.5, 1.0, 1.5, 2.0, 2.5, 2.0, 1.5, 1.0, 0.5, 0.25};
  int    i, j;

  // get drawing and block, linked with CAD window
  hDrw = lcPropGetHandle( hLcWnd, LC_PROP_WND_DRW );
  hBlock = lcPropGetHandle( hLcWnd, LC_PROP_WND_VIEWBLOCK );

  // draw lines with various width
  x0 = 0.0;
  y1 = 5.0;
  y2 = -5.0;
  Lw = 0.0;
  for (i=0; i<11; ++i){
    x0 = x0 + Lw + Lw;
    Lw = Lwidth[i];
    x = x0 + (Lw / 2.0);
    hEnt = lcBlockAddLine( hBlock, x, y1, x, y2 );
    lcPropPutFloat( hEnt, LC_PROP_ENT_LWIDTH, Lw );
  }

  // draw ruler
  lcPropPutInt( hDrw, LC_PROP_DRW_COLORT, RGB(255,0,0) );
  lcPropPutInt( hDrw, LC_PROP_DRW_LWIDTH, 0 );
  lcBlockAddLine( hBlock, -1.0, 0.0, 27.0, 0.0 );
  x = -1.0;
  y1 = 0.1;
  y2 = 0.25;
  j = 0;
  for (i=0; i<=280; ++i){
    if (j == 0){
      y = y2;
      j = 10;
    }else{
      y = y1;
    }
    --j;
    lcBlockAddLine( hBlock, x, -y, x, y );
    x += 0.1;
  }

  // Set real linewidth mode
  lcPropPutInt( hDrw, LC_PROP_DRW_LWMODE, LC_LW_REAL );
  // update view
  lcBlockUpdate( hBlock, LC_TRUE, 0 );
  // zoom extents
  lcWndZoomRect( hLcWnd, 0, 0, 0, 0 );
}
