VS2017 FFmpeg配置
首先需要去FFmpeg官网下载相应的内容:
下载地址为:https://ffmpeg.zeranoe.com/builds/,这里有三种类型的:static、shared、dev。
包含三个版本:Static、Shared以及Dev
Static --- 包含3个应用程序:ffmpeg.exe , ffplay.exe , ffprobe.exe,体积都很大,相关的DLL已经被编译到exe里面去了。
Shared --- 除了ffmpeg.exe , ffplay.exe , ffprobe.exe之外还有一些DLL,exe体积很小,在运行时到相应的DLL中调用功能。
Dev --- 开发者(developer)版本,里面包含了库文件xxx.lib以及头文件xxx.h,这个版本不含exe文件
从上面的类型说明中,可以知道,我们需要下载的是shared和dev两个文件
然后将这些文件拷贝到项目中,具体如下:
- 将shared的DLL文件拷贝到项目中。
- 将dev的include和lib文件夹一起拷贝到目录中。
添加附加包含目录指向拷贝的include文件,如下: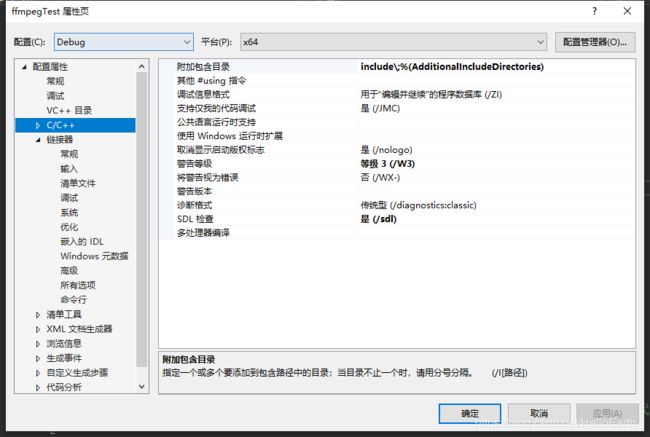
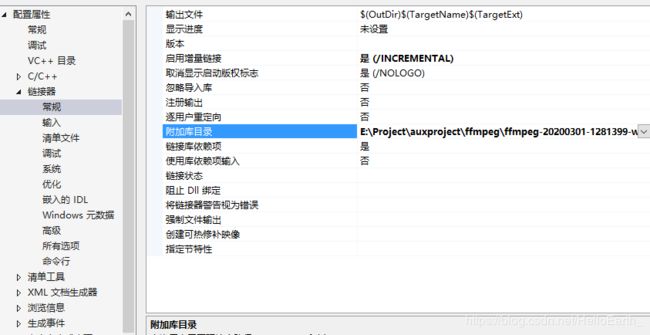
添加附加库目录,如下:
添加附加依赖项,内容为
avcodec.lib; avformat.lib; avutil.lib; avdevice.lib; avfilter.lib;postproc.lib;swresample.lib; swscale.lib至此,FFmpeg的开发环境配置完毕了。
验证
extern "C" {
#include "libavcodec/avcodec.h"
#include "libavformat/avformat.h"
}

int main()
{
    std::cout << "Hello World!\n";
	printf("%s\n", avcodec_configuration());
}
如果编译运行不报错,且输出如下的界面,则说明FFmpeg设置成功了:

补充
如果在运行代码的时候,IDE提示,***声明已被否决,这时可以通过以下几种方式来解决:
1. 修改项目的配置
Project Properties > Configuration Properties > C/C++ > General > SDL checks关掉
2. 代码中添加编译参数信息
#pragma warning(disable: 4996)
但是这并不是一个好方法。出现这个的原因在于deprecated问题
'av_register_all': 被声明为已否决
其实就是av_register_all()这个方法在FFMPEG 4.0以后将不再推荐使用,而且是非必需的,因此直接注释掉即可。
avcodec_decode_video2()
原本的解码函数被拆解为两个函数avcodec_send_packet()和avcodec_receive_frame() 具体用法如下:
   old:
   avcodec_decode_video2(pCodecCtx, pFrame, &got_picture, pPacket);
   new:
   avcodec_send_packet(pCodecCtx, pPacket);
   avcodec_receive_frame(pCodecCtx, pFrame);
avcodec_encode_video2()
对应的编码函数也被拆分为两个函数avcodec_send_frame()和avcodec_receive_packet() 具体用法如下:
   old:
   avcodec_encode_video2(pCodecCtx, pPacket, pFrame, &got_picture);
   new:
   avcodec_send_frame(pCodecCtx, pFrame);
   avcodec_receive_packet(pCodecCtx, pPacket);
avpicture_get_size()
现在改为使用av_image_get_size() 具体用法如下:
   old:
   avpicture_get_size(AV_PIX_FMT_YUV420P, pCodecCtx->width, pCodecCtx->height);
   new:
   //最后一个参数align这里是置1的,具体看情况是否需要置1
   av_image_get_buffer_size(AV_PIX_FMT_YUV420P, pCodecCtx->width, pCodecCtx->height, 1);
avpicture_fill()
现在改为使用av_image_fill_arrays 具体用法如下:
   old:
   avpicture_fill((AVPicture *)pFrame, buffer, AV_PIX_FMT_YUV420P, pCodecCtx->width, pCodecCtx->height);
   new:
   //最后一个参数align这里是置1的,具体看情况是否需要置1
   av_image_fill_arrays(pFrame->data, pFrame->linesize, buffer, AV_PIX_FMT_YUV420P,  pCodecCtx->width, pCodecCtx->height,1);
'AVStream::codec': 被声明为已否决:
pCodecCtx = pFormatCtx->streams[videoindex]->codec;
=>
pCodecCtx = avcodec_alloc_context3(NULL);
avcodec_parameters_to_context(pCodecCtx, pFormatCtx->streams[videoindex]->codecpar);'av_free_packet': 被声明为已否决
av_free_packet()可被av_free_packet()替换