Android graphics 学习-生产者、消费者、BufferQueue介绍
备注:博文根据Android5.1代码分析,为个人学习笔记。如有问题,欢迎指正。
文章目录
- 一、BufferQueue介绍
- 1.消费者Consumer介绍
- 2.生产者Producer介绍
- 3.阶段小结
- 4.BufferQueue实例学习
- 二、详细分析
- 1.过程1 - 创建SurfaceComposerClient 代理对象
- 2.过程2 - createSurface()创建surface.
- 3.过程3 - 设置层数
- 4.过程4 - dequeueBuffer 获取buffer
- 5.过程5 - queueBuffer buffer入buffer queue
感兴趣可以加QQ群85486140,大家一起交流相互学习下!
博文是后续理解Camera preview,recording buffer流转的基础。要不然后续Camera buffer部分不好分析。这是这几天看的笔记,也算是对BufferQueue有了新的认识,仍有许多地方需要探索。首先从整体上初步认识一下graphics组件(图片来源于Android官方文档)。
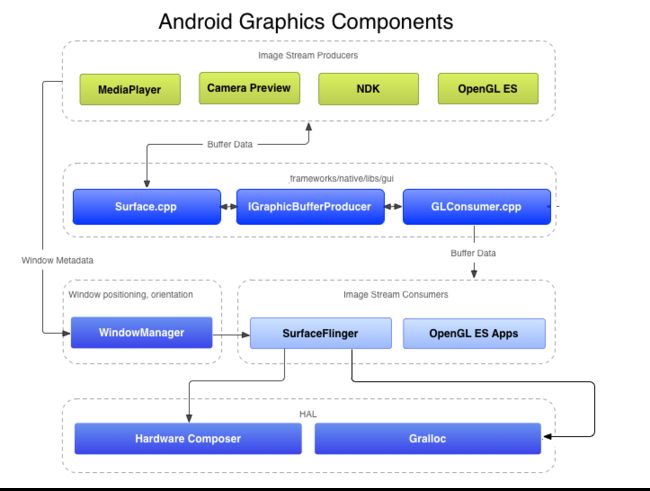
上图中大家见的最多的就是mediaPlayer和CameraPreview.buffer数据流,首先经过surface->GLConsumer->SurfaceFlinger->hardwareComposer,这样一条线路,buffer数据就渲染到屏幕上了。这里为什么只提到Camera Preview 那么Camera Recording,Caputre模式下buffer又如何流转的呢。这里先提出疑问?后续博文在一一解开。这里大体上有个整体认识举行。
一、BufferQueue介绍
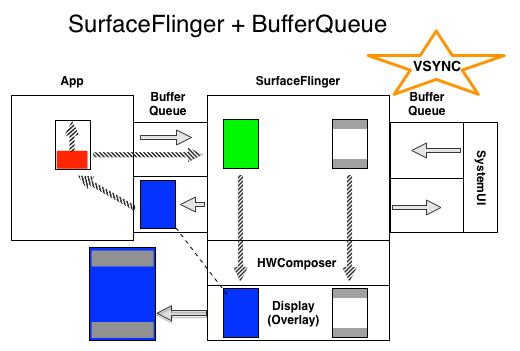
BufferQueue是buffer流转重要中转站,理解它的工作机制是非常重要的,它的状态改变经历过下面几个过程。只需要先了解一下buffer状态和owner转变过程。后面会结合例子来分析。
- 1.首先生产者dequeue过来一块Buffer,此时该buffer的状态为DEQUEUED,所有者为PRODUCER,生产者可以填充数据了。在没有dequeue操作时,buffer的状态为free,所有者为BUFFERQUEUE.
- 2.生产者填充完数据后,进行queue操作,此时buffer的状态由DEQUEUED->QUEUED的转变,buffer所有者也变成了BufferQueue了。
- 注意:这个时候producer代理对象进行queue操作后,producer本地对象会回调BufferQueue的onFrameAvailable函数,通知消费者有可用的buffer已经就绪了,你可以拿去用了。
- 3 上面已经通知消费者去拿buffer了,这个时候消费者就进行acquire操作将buffer拿过来,此时buffer的状态由QUEUED->ACQUIRED转变,buffer的拥有者由BufferQueue变成Consumer.
- 4.当消费者已经消费了这块buffer(已经合成,已经编码等),就进行release操作释放buffer,将buffer归还给BufferQueue,buffer状态由ACQUIRED变成FREE.buffer拥有者由Consumer变成BufferQueue.
下图也是从Android官网上引用过来Android7.0的BufferQueue工作状态图(与Android5.1意思一样,只是这个下过更好一点)。
源码路径:frameworks/native/include/gui/BufferSlot.h
enum BufferState {
// FREE indicates that the buffer is available to be dequeued
// by the producer.  The buffer may be in use by the consumer for
// a finite time, so the buffer must not be modified until the
// associated fence is signaled.
//
// The slot is "owned" by BufferQueue.  It transitions to DEQUEUED
// when dequeueBuffer is called.
FREE = 0,

// DEQUEUED indicates that the buffer has been dequeued by the
// producer, but has not yet been queued or canceled.  The
// producer may modify the buffer's contents as soon as the
// associated ready fence is signaled.
//
// The slot is "owned" by the producer.  It can transition to
// QUEUED (via queueBuffer) or back to FREE (via cancelBuffer).
DEQUEUED = 1,

// QUEUED indicates that the buffer has been filled by the
// producer and queued for use by the consumer.  The buffer
// contents may continue to be modified for a finite time, so
// the contents must not be accessed until the associated fence
// is signaled.
//
// The slot is "owned" by BufferQueue.  It can transition to
// ACQUIRED (via acquireBuffer) or to FREE (if another buffer is
// queued in asynchronous mode).
QUEUED = 2,

// ACQUIRED indicates that the buffer has been acquired by the
// consumer.  As with QUEUED, the contents must not be accessed
// by the consumer until the fence is signaled.
//
// The slot is "owned" by the consumer.  It transitions to FREE
// when releaseBuffer is called.
ACQUIRED = 3
};
虽然Android源码中的BufferQueue类中包含一个buffer监听类定义和静态创建BufferQueue对象的静态方法。但是bufferQueue主要工作由类BufferQueueCore来完成,该类中由几个变量非常值得我们了解一下(贴出来都是源码中的注释)。如果想探索其它成员的话,还是撸撸源码吧。
- 1.mAllocator:这个是gralloc buffer分配对象,由SurfaceFlinger提供的,这个在创建消费者Client对象时,会根据例子介绍,先了解一下。
// mAllocator is the connection to SurfaceFlinger that is used to allocate
// new GraphicBuffer objects.
    sp<IGraphicBufferAlloc> mAllocator;
- 2.mConsumerListener:这个是消费者监听对象,用于当有帧可用时,bufferQueue会回调该对象中的onFrameAvailable函数,来通知消费者有帧可用了,赶紧来取buffer.
// mConsumerListener is used to notify the connected consumer of
// asynchronous events that it may wish to react to. It is initially
// set to NULL and is written by consumerConnect and consumerDisconnect.
    sp<IConsumerListener> mConsumerListener;
- 3.mSlots:为存放buffer的地方,它的数量为64,这里先剧透一下一个surface对象对应一个mSlot对象,一个mSlot对象最多保存64块Buffer,即BufferQueue最多能运转64块buffer。这样的话,每一个surface最多能申请64个buffer.但为了确保buffer能异步进行,一般有2个reserver的。
// mSlots is an array of buffer slots that must be mirrored on the producer
// side. This allows buffer ownership to be transferred between the producer
// and consumer without sending a GraphicBuffer over Binder. The entire
// array is initialized to NULL at construction time, and buffers are
// allocated for a slot when requestBuffer is called with that slot's index.
BufferQueueDefs::SlotsType mSlots;
//----------------------------------
// BufferQueue will keep track of at most this value of buffers.
// Attempts at runtime to increase the number of buffers past this
// will fail.
enum { NUM_BUFFER_SLOTS = 64 };//官方定义的是64个
typedef BufferSlot SlotsType[NUM_BUFFER_SLOTS];
- 4.mFrameCounter:表示已经入队列和刚刚分配的buffer的数量。
    // mFrameCounter is the free running counter, incremented on every
    // successful queueBuffer call and buffer allocation.
    uint64_t mFrameCounter;
- 5.createBufferQueue():创建bufferQueue接口。该静态方法,内部根据surfaceFlinger传过来的buffer分配对象allocator,然后依次创建BufferQueue,生产者,消费者,创建生产者和消费者过程中,将它们都捆绑到了同一个BufferQueue上。
void BufferQueue::createBufferQueue(sp<IGraphicBufferProducer>* outProducer,
        sp<IGraphicBufferConsumer>* outConsumer,
        const sp<IGraphicBufferAlloc>& allocator) {
    LOG_ALWAYS_FATAL_IF(outProducer == NULL,
            "BufferQueue: outProducer must not be NULL");
    LOG_ALWAYS_FATAL_IF(outConsumer == NULL,
            "BufferQueue: outConsumer must not be NULL");

    sp<BufferQueueCore> core(new BufferQueueCore(allocator));
    LOG_ALWAYS_FATAL_IF(core == NULL,
            "BufferQueue: failed to create BufferQueueCore");

    sp<IGraphicBufferProducer> producer(new BufferQueueProducer(core));
    LOG_ALWAYS_FATAL_IF(producer == NULL,
            "BufferQueue: failed to create BufferQueueProducer");
//请先留意一下消费者对象类是BufferQueueConsumer,该类能够实现进程间通信
    sp<IGraphicBufferConsumer> consumer(new BufferQueueConsumer(core));
    LOG_ALWAYS_FATAL_IF(consumer == NULL,
            "BufferQueue: failed to create BufferQueueConsumer");

    *outProducer = producer;//返回到client中
    *outConsumer = consumer;
}
1.消费者Consumer介绍
消费者接口类主要实现了IGraphicBufferConsumer接口。它们的继承引用关系如下所示:
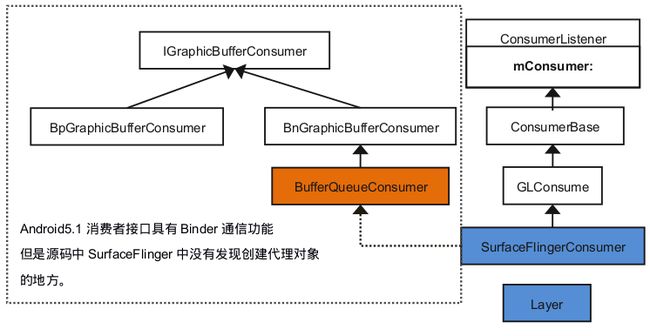
虽然这里定义IGraphicBufferConsumer消费者标准接口。但是在下面的事例中,没跟踪到创建代理对象的地方。这里先不做深入理解吧。下面列出来一些比较熟悉的接口加上官方注释。
virtual status_t acquireBuffer(BufferItem* buffer, nsecs_t presentWhen) = 0;
virtual status_t releaseBuffer(int buf, uint64_t frameNumber,
            EGLDisplay display, EGLSyncKHR fence,
            const sp<Fence>& releaseFence) = 0;
// consumerConnect connects a consumer to the BufferQueue.  Only one
// consumer may be connected, and when that consumer disconnects the
// BufferQueue is placed into the "abandoned" state, causing most
// interactions with the BufferQueue by the producer to fail.
// controlledByApp indicates whether the consumer is controlled by
// the application.
//
// consumer may not be NULL.
//
// Return of a value other than NO_ERROR means an error has occurred:
// * NO_INIT - the buffer queue has been abandoned
// * BAD_VALUE - a NULL consumer was provided
virtual status_t consumerConnect(const sp<IConsumerListener>& consumer, bool controlledByApp) = 0;
上面列出来的几个接口,让我头痛的是consumerConnect()这个接口。当时在分析注册帧监听对象时,始终不确定Consumer到底调用的是哪一个consumerConnect()方法。一开始以为调用的是代理对象的consumerConnect()方法。但是在创建BufferQueue对象时,创建的是BufferQueueConsumer对象,该类继承了BnGraphicBufferConsumer().到后来我才发现,其实BufferQueueConsumer类中已经实现了consumerConnect()方法。
void Layer::onFirstRef() {
    // Creates a custom BufferQueue for SurfaceFlingerConsumer to use
    sp<IGraphicBufferProducer> producer;
    sp<IGraphicBufferConsumer> consumer;
    BufferQueue::createBufferQueue(&producer, &consumer);
    mProducer = new MonitoredProducer(producer, mFlinger);
    mSurfaceFlingerConsumer = new SurfaceFlingerConsumer(consumer, mTextureName);
    mSurfaceFlingerConsumer->setConsumerUsageBits(getEffectiveUsage(0));
    mSurfaceFlingerConsumer->setContentsChangedListener(this);
    mSurfaceFlingerConsumer->setName(mName);
    //此处省略几行代码,目前不是我们关心的。
    const sp<const DisplayDevice> hw(mFlinger->getDefaultDisplayDevice());
    updateTransformHint(hw);
}
客户端在请求创建surface时,会在SurfaceFlinger服务中,创建一个Layer对象,而在第一次引用该layer对象时,就会调用onFirstRef函数。上面代码可以发现创建Layer对象同时创建了生产者,消费者,BufferQueue对象,其中将创建出来的IGraphicBufferConsumer consumer消费者对象传给了SurfaceFlingerConsumer()构造函数。创建SurfaceFlingerConsumer对象有点曲折,分成下面几步走。
- 1.由于SurfaceFlingerConsumer类继承了ConsumerBase类,所以会回调基类的构造函数。该构造函数中的bufferQueue输入参数,就是我们在创建BufferQueue对象时,创建的BufferQueueConsumer对象,该类已经实现了consumerConnect方法,所以下面ConsumerBase构造函数中直接调用了该方法,注册监听对象到BufferQueue,这里的注册只是注册一个躯壳,真正的监听对象注册是由上面的setContentsChangedListener方法实现。
ConsumerBase::ConsumerBase(const sp<IGraphicBufferConsumer>& bufferQueue, bool controlledByApp) :
        mAbandoned(false),
        mConsumer(bufferQueue) {
    // Choose a name using the PID and a process-unique ID.
    mName = String8::format("unnamed-%d-%d", getpid(), createProcessUniqueId());

    // Note that we can't create an sp<...>(this) in a ctor that will not keep a
    // reference once the ctor ends, as that would cause the refcount of 'this'
    // dropping to 0 at the end of the ctor.  Since all we need is a wp<...>
    // that's what we create.
//以当前类对象为输入参数,重新创建一个监听对象。
    wp<ConsumerListener> listener = static_cast<ConsumerListener*>(this);
    sp<IConsumerListener> proxy = new BufferQueue::ProxyConsumerListener(listener);

    status_t err = mConsumer->consumerConnect(proxy, controlledByApp);
    if (err != NO_ERROR) {
        CB_LOGE("ConsumerBase: error connecting to BufferQueue: %s (%d)",
                strerror(-err), err);
    } else {
        mConsumer->setConsumerName(mName);
    }
}
- 2.注册帧可用通知对象
上面在ConsumerBase构造函数中,创建ProxyConsumerListener监听对象时,将ConsumerBase对象传入给ProxyConsumerListener,其实这里面真正的监听对象是通过ConsumerBase可以修改的。
    virtual status_t consumerConnect(const sp<IConsumerListener>& consumer,
            bool controlledByApp) {
        return connect(consumer, controlledByApp);//直接调用了connect,如下所示
    }
//在源文件中实现
status_t BufferQueueConsumer::connect(
        const sp<IConsumerListener>& consumerListener, bool controlledByApp) {
    ATRACE_CALL();
//此处省略一些错误检查代码。
    Mutex::Autolock lock(mCore->mMutex);

    if (mCore->mIsAbandoned) {
        BQ_LOGE("connect(C): BufferQueue has been abandoned");
        return NO_INIT;
    }
    //将消费者监听对象注册到BufferQueue中,这里可以看到,监听对象赋给了BufferQueue的mConsumerListener成员。
    mCore->mConsumerListener = consumerListener;
    mCore->mConsumerControlledByApp = controlledByApp;

    return NO_ERROR;
}
- 3.帧可用通知函数onFrameAvailable干了什么
由于在Layer时onFirstRef()函数中调用了setContentsChangedListener(this),其时Layer实现了FrameAvailableListener接口。下面就是在Layer实现的onFrameAvailable方法。
void Layer::onFrameAvailable(const BufferItem& item) {
    // Add this buffer from our internal queue tracker
    { // Autolock scope
        Mutex::Autolock lock(mQueueItemLock);
        mQueueItems.push_back(item);
    }

    android_atomic_inc(&mQueuedFrames);
    mFlinger->signalLayerUpdate();//通知更新Layer.
}
- 4.何时触发帧可用通知onFrameAvailable()回调
当生产者进行queueBuffer操作时,会在生产者本地对象中回调注册到BufferQueue中的帧可用回调。
status_t BufferQueueProducer::queueBuffer(int slot,
        const QueueBufferInput &input, QueueBufferOutput *output) {
//.......
    sp<IConsumerListener> frameAvailableListener;
    sp<IConsumerListener> frameReplacedListener;
//......
//由于生产者和消费者属于同一个BufferQueue对象,那么这里取出来的监听对象就是
//上面我们注册进去的。
    frameAvailableListener = mCore->mConsumerListener;//取到注册到BufferQueue中的帧可用通知。
//......
    if (frameAvailableListener != NULL) {
        frameAvailableListener->onFrameAvailable(item);
    } else if (frameReplacedListener != NULL) {
        frameReplacedListener->onFrameReplaced(item);
    }
//......
}
2.生产者Producer介绍
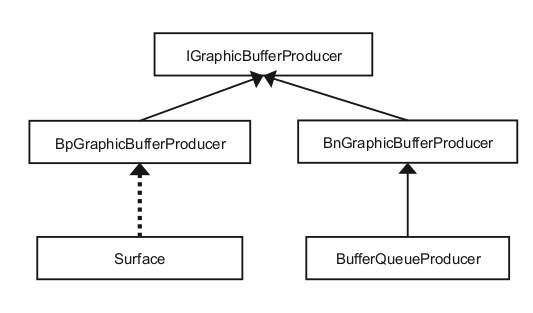
生产者实现IGraphicBufferProducer的接口,在实际运行过程中,应用端存在代理对象,SurfaceFlinger端存在本地对象。生产者代理对象通过Binder通信,不断的dequeueBuffer和queueBuffer操作,本地对象同样响应这些操作请求,这样buffer就转了起来了。
下面列举出了和生产者有密切关系的几个类。不同的是Surface类中包含了一个BpGraphicBufferProducer代理对象接口,它的DequeueBuffer和queueBuffer操作实际上是通过生产者代理对象实现的。
这里介绍几个非常重要的大咖,注释是官方的,应该是最好的解释了。
- 1.requestBuffer:字面意思就是请求buffer,留意一下它的参数,可以知道是请求序号为slot的buffer。如果返回值是无效的,必须在进行一次dequeueBuffer操作。
// requestBuffer returns the GraphicBuffer for slot N.
//
// In normal operation, this is called the first time slot N is returned
// by dequeueBuffer.  It must be called again if dequeueBuffer returns
// flags indicating that previously-returned buffers are no longer valid.
virtual status_t requestBuffer(int slot, sp<GraphicBuffer>* buf);
- 2.dequeueBuffer:重磅大咖,它的作用就是获取下一块可用buffer的slot索引index.
如果该index的buffer为NULL,则会自动申请buffer.其中输出参数fence对象,用来同步该块Buffer.Buffer的内容在fence信号发送之前是不能被重写的。如果fence对象是Fence::NO_FENCE,则该块buffer可以直接被重写。
// dequeueBuffer gets the next buffer slot index for the producer to use.
// If a buffer slot is available then that slot index is written to the
// location pointed to by the buf argument and a status of OK is returned.
// If no slot is available then a status of -EBUSY is returned and buf is
// unmodified.
//
// The outFence parameter will be updated to hold the fence associated with
// the buffer. The contents of the buffer must not be overwritten until the
// fence signals. If the fence is Fence::NO_FENCE, the buffer may be
// written immediately.
//
// The width and height parameters must be no greater than the minimum of
// GL_MAX_VIEWPORT_DIMS and GL_MAX_TEXTURE_SIZE (see: glGetIntegerv).
// An error due to invalid dimensions might not be reported until
// updateTexImage() is called.  If width and height are both zero, the
// default values specified by setDefaultBufferSize() are used instead.
//
// The pixel formats are enumerated in graphics.h, e.g.
// HAL_PIXEL_FORMAT_RGBA_8888.  If the format is 0, the default format
// will be used.
//
// The usage argument specifies gralloc buffer usage flags.  The values
// are enumerated in gralloc.h, e.g. GRALLOC_USAGE_HW_RENDER.  These
// will be merged with the usage flags specified by setConsumerUsageBits.
//
// The return value may be a negative error value or a non-negative
// collection of flags.  If the flags are set, the return values are
// valid, but additional actions must be performed.
//
// If IGraphicBufferProducer::BUFFER_NEEDS_REALLOCATION is set, the
// producer must discard cached GraphicBuffer references for the slot
// returned in buf.
// If IGraphicBufferProducer::RELEASE_ALL_BUFFERS is set, the producer
// must discard cached GraphicBuffer references for all slots.
//
// In both cases, the producer will need to call requestBuffer to get a
// GraphicBuffer handle for the returned slot.
virtual status_t dequeueBuffer(int *outSlot, sp<Fence>* outFence, bool async,
uint32_t width, uint32_t height, uint32_t format, uint32_t usage);
- 3.queueBuffer:当buffer填充完毕之后,生产者通过该接口将buffer归还给BufferQueue,有些额外的信息需要提供给bufferQueue,具体如下面介绍。尤其是时间戳必须提供BufferQueue.时间戳以纳秒为单位,具有单调递增属性。这也就是在Camera preview过程中hal上传的每一帧都包含时间戳信息。
// queueBuffer returns a filled buffer to the BufferQueue.
//
// Additional data is provided in the QueueBufferInput struct. Notably,
// a timestamp must be provided for the buffer. The timestamp is in
// nanoseconds, and must be monotonically increasing. Its other semantics
// (zero point, etc) are producer-specific and should be documented by the
// producer.
//
// The caller may provide a fence that signals when all rendering
// operations have completed. Alternatively, NO_FENCE may be used,
// indicating that the buffer is ready immediately.
//
// Some values are returned in the output struct: the current settings
// for default width and height, the current transform hint, and the
// number of queued buffers.
virtual status_t queueBuffer(int slot,
const QueueBufferInput& input, QueueBufferOutput* output);
//需要提供的数据如下
// timestamp - a monotonically increasing value in nanoseconds
// isAutoTimestamp - if the timestamp was synthesized at queue time
// crop - a crop rectangle that's used as a hint to the consumer
// scalingMode - a set of flags from NATIVE_WINDOW_SCALING_* in 3.阶段小结
这里简单画了一张流程图,来显示生产者和消费者,bufferQueue如何工作的。图中标号代表先后顺序,其中特别的是queueBuffer和onFrameAvailable回调是前后进行的,这里就记作同一序号。
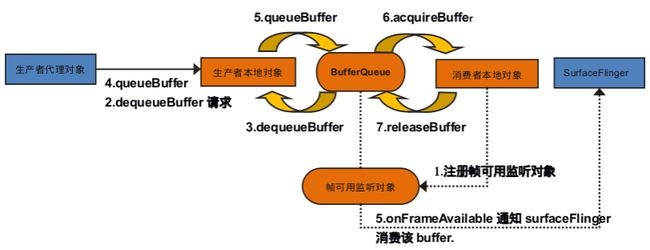
4.BufferQueue实例学习
下面是一个Android自带的一个实例程序,不过本地变异要解决一些编译错误问题,修改我也在代码后面贴出来了。在接下来的分析中,我们就随着这个程序,简单探索一下Bufferqueue是如何工作起来的。首先贴出完整的测试程序。
#include 如果有代码的话,可以本地实验一把。将编译出来的可执行程序,push进自己开发板实验看看。
- Makefile中存在的问题
diff --git a/Android.mk b/Android.mk index 8a86970..e615e16 100644 --- a/Android.mk +++ b/Android.mk @@ -8,7 +8,8 @@ LOCAL_SHARED_LIBRARIES := \ libcutils \ libutils \ libui \ - libgui + libgui \ + libbinder LOCAL_MODULE:= test-resize - 源码中存在的问题
其中主要是没有添加native_window.h头文件和surface->lock参数问题。其它都是本人添加log笔记。diff --git a/resize.cpp b/resize.cpp index 8b051e8..b4e22bc 100644 --- a/resize.cpp +++ b/resize.cpp @@ -24,10 +24,12 @@ #include#include +#include <android/native_window.h> +#include <sys/time.h> using namespace android; -namespace android { +//namespace android { int main(int argc, char** argv) { @@ -49,16 +51,21 @@ int main(int argc, char** argv) ANativeWindow_Buffer outBuffer; surface->lock(&outBuffer, NULL); + ALOGE("armwind,buffer_height:0x%x,buffer_width:0x%x,f:%d",outBuffer.height,outBuffer.width,outBuffer.format); ssize_t bpr = outBuffer.stride * bytesPerPixel(outBuffer.format); android_memset16((uint16_t*)outBuffer.bits, 0xF800, bpr*outBuffer.height); surface->unlockAndPost(); + ALOGE("armwind,first sleep 4s,addr:0x%x,stride:%d",outBuffer.bits,outBuffer.stride); + sleep(4); - surface->lock(&outBuffer); + surface->lock(&outBuffer, NULL); android_memset16((uint16_t*)outBuffer.bits, 0x07E0, bpr*outBuffer.height); surface->unlockAndPost(); + ALOGE("armwind,second sleep 4s,addr:0x%x,stride:%d",outBuffer.bits,outBuffer.stride); + sleep(4); SurfaceComposerClient::openGlobalTransaction(); - surfaceControl->setSize(320, 240); + surfaceControl->setSize(2000, 1000); SurfaceComposerClient::closeGlobalTransaction(); @@ -66,3 +73,4 @@ int main(int argc, char** argv) return 0; } +//}
mma命令编译完成后,会在out/target/product/nanopi2/system/bin生成test-resize可执行程序(这里我是nanopi2开发板)
E/ ( 1973): armwind,buffer_height:0xf0,buffer_width:0xa0,f:4
E/ ( 1973): armwind,first sleep 4s,addr:0xb6c80000,stride:160
E/ ( 1973): armwind,second sleep 4s,addr:0xb6c6d000,stride:160
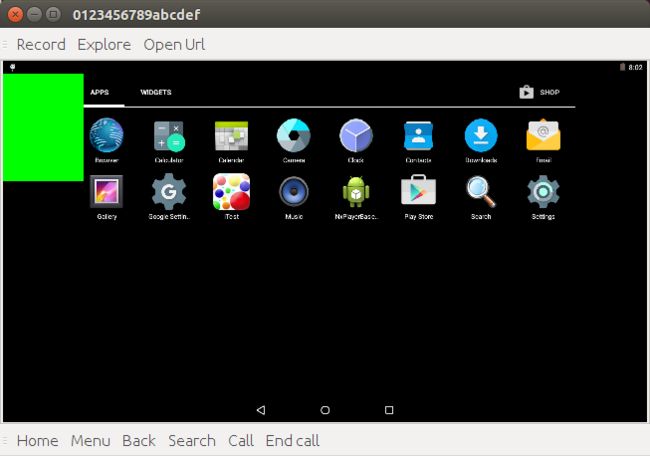
效果图如下,其实是有2个过程的,首先会显示成红色块,4S后显示成下面这种颜色,先用心去感受一下。
二、详细分析
1.过程1 - 创建SurfaceComposerClient 代理对象
Composer是在ComposerService上又封装了一下,Composer字面意思就是作曲家。这里就是surface混合类。在过程1中,直接创建了surfaceComposerClient对象。构造函数中获取Composer单例对象,可见一个进程只有一个composer对象。接下来在onFirstRef()做了很多。在进行一步步分析之前,先看一下类之间的关系,surfaceFlinger实现了ISurfaceComposer接口,而surfaceFlinger代理对象又保存到ComposerService类中的mComposerService成员中。下面简单画了一个继承和引用关系图。

SurfaceComposerClient::SurfaceComposerClient()
    : mStatus(NO_INIT), mComposer(Composer::getInstance())
{
}

void SurfaceComposerClient::onFirstRef() {
    sp<ISurfaceComposer> sm(ComposerService::getComposerService());
    if (sm != 0) {
        sp<ISurfaceComposerClient> conn = sm->createConnection();
        if (conn != 0) {
            mClient = conn;
            mStatus = NO_ERROR;
        }
    }
}
onFirstRef()函数是在我们使用sp智能指针时,第一次引用该对象时会调用的函数。可以看到上面函数中主要是获取surfaceflinger代理对象,然后通过该代理对象获取一个BpSurfaceComposerClient代理对象,这里随着代码一步步跟进。
/*static*/ sp<ISurfaceComposer> ComposerService::getComposerService() {
    ComposerService& instance = ComposerService::getInstance();//这里是一个单例,
    Mutex::Autolock _l(instance.mLock);
    if (instance.mComposerService == NULL) {
        ComposerService::getInstance().connectLocked();//第一次创建会走这里
        assert(instance.mComposerService != NULL);
        ALOGD("ComposerService reconnected");
    }
    return instance.mComposerService;
}
//下面是composerService类的声明,可以看到ComposerService继承了单例类Singleton.
//那么上面调用的connectLocked()方法,也是ComposerService.
class ComposerService : public Singleton<ComposerService>//注意这里模板参数就是ComposerService自己。
//-------------------------------------------------------
void ComposerService::connectLocked() {
    const String16 name("SurfaceFlinger");//注意这里的名字是"SurfaceFlinger"
    //根据名字,从serviceManage查找我们SurfaceFlinger服务。并将获取到的代理对象保存到mComposerService成员中
    while (getService(name, &mComposerService) != NO_ERROR) {
        usleep(250000);
    }
    assert(mComposerService != NULL);

   //这里还有一些死亡监听对象类声明和对象创建,这里我们就不贴代码了。
}
经过上面的折腾,SurfaceFlinger的代理对象终于保存到ComposerService::mComposerService成员中,详细的注释都添加到了代码中。这里主要做的就是-通过单例接口getInstance(),获取surfaceFlinger代理对象。
接下来SurfaceFlinger代理对象通过匿名binder通信方式,获取ISurfaceComposerClient代理对象。其实这里和ComposerService类类似,将ISurfaceComposerClient对象保存到成员mClient中。下面简图中的Client就是在createConnet过程中在SurfaceFlinger服务端new出来的。
    virtual sp<ISurfaceComposerClient> createConnection()
    {
        uint32_t n;
        Parcel data, reply;
        data.writeInterfaceToken(ISurfaceComposer::getInterfaceDescriptor());
        remote()->transact(BnSurfaceComposer::CREATE_CONNECTION, data, &reply);
        return interface_cast<ISurfaceComposerClient>(reply.readStrongBinder());
    }
上面是surfaceFlinger代理端实现的接口,将获取到的binder对象转换成ISurfaceComposerClient对象。下面是本地对象响应CREATE_CONNECTION消息的地方。
status_t BnSurfaceComposer::onTransact(
    uint32_t code, const Parcel& data, Parcel* reply, uint32_t flags)
{
    switch(code) {
        case CREATE_CONNECTION: {
        //检查SurfaceFlinger服务的名字是否正确。
            CHECK_INTERFACE(ISurfaceComposer, data, reply);
            //直接调用SurfaceFlinger实现的接口。
            sp<IBinder> b = createConnection()->asBinder();
            //该操作会在kernel生成一个Binder_node和Binder_ref对象,其中binder_ref就会传送给应用进程端。
            reply->writeStrongBinder(b);
            return NO_ERROR;
    //......
}
//surfaceFlinger中createConnection实现
sp<ISurfaceComposerClient> SurfaceFlinger::createConnection()
{
    sp<ISurfaceComposerClient> bclient;
    //new了SurfaceFlinger端的Client,同时将surfaceFlinger对象传进去了,这里Client对象内部会回调SurfaceFlinger的接口。
    sp<Client> client(new Client(this));
    status_t err = client->initCheck();
    if (err == NO_ERROR) {
        bclient = client;
    }
    //clinet进程实现了ISurfaceComposerClient接口,这里返回到SurfaceFlinger本地对象中,写给引用Clinet端。
    return bclient;
}
上面与SurfaceFlinger建立连接后,会创建一个对应当前应用进程的Client进程。需要特别注意这里,下面会介绍Client和Layer的关系。到目前为止,我们需要知道已经创建哪几个对象。下图中左侧是应用进程端的对象,右侧是在SurfaceFlinger服务中存在的对象。其中SurfaceComposerclient对象包含Composer(可以理解成surfaceFlinger代理对象)和ISurfaceComposerClient代理对象。

2.过程2 - createSurface()创建surface.
- (1) SurfaceComposerClient->createSurface()
sp<SurfaceControl> SurfaceComposerClient::createSurface(
        const String8& name,
        uint32_t w,
        uint32_t h,
        PixelFormat format,
        uint32_t flags)
{
    sp<SurfaceControl> sur;
    if (mStatus == NO_ERROR) {
        sp<IBinder> handle;
        sp<IGraphicBufferProducer> gbp;
        status_t err = mClient->createSurface(name, w, h, format, flags,
                &handle, &gbp);
        ALOGE_IF(err, "SurfaceComposerClient::createSurface error %s", strerror(-err));
        if (err == NO_ERROR) {
            sur = new SurfaceControl(this, handle, gbp);
        }
    }
    return sur;
}
上面createSurface接口调用ISurfaceComposerClient代理对象createSurface的接口。注意这里创建3个局部变量sur,handle和gbp,其中sur是管理surface的类,handle可以理解成该buffer的id,gbp是buffer生产者代理对象。
- (2) createSurface代理端接口实现
源码:frameworks/native/libs/gui/ISurfaceComposerClient.cpp
    virtual status_t createSurface(const String8& name, uint32_t w,
            uint32_t h, PixelFormat format, uint32_t flags,
            sp<IBinder>* handle,
            sp<IGraphicBufferProducer>* gbp) {
        Parcel data, reply;
        data.writeInterfaceToken(ISurfaceComposerClient::getInterfaceDescriptor());
        data.writeString8(name);
        data.writeInt32(w);
        data.writeInt32(h);
        data.writeInt32(format);
        data.writeInt32(flags);
        remote()->transact(CREATE_SURFACE, data, &reply);
        *handle = reply.readStrongBinder();
        *gbp = interface_cast<IGraphicBufferProducer>(reply.readStrongBinder());
        return reply.readInt32();
    }
上面代理端只是做了数据转发。往下看
- (3) createSurface本地端接口实现
creteSurface的本地端接口还是调用了Client实现的CreteSurface接口.
源码路径:frameworks/native/services/surfaceflinger/Client.cpp
status_t Client::createSurface(
        const String8& name,
        uint32_t w, uint32_t h, PixelFormat format, uint32_t flags,
        sp<IBinder>* handle,
        sp<IGraphicBufferProducer>* gbp)
{
    /*
     * createSurface must be called from the GL thread so that it can
     * have access to the GL context.
     */

    class MessageCreateLayer : public MessageBase {
        SurfaceFlinger* flinger;
        Client* client;
        sp<IBinder>* handle;
        sp<IGraphicBufferProducer>* gbp;
        status_t result;
        const String8& name;
        uint32_t w, h;
        PixelFormat format;
        uint32_t flags;
    public:
        MessageCreateLayer(SurfaceFlinger* flinger,
                const String8& name, Client* client,
                uint32_t w, uint32_t h, PixelFormat format, uint32_t flags,
                sp<IBinder>* handle,
                sp<IGraphicBufferProducer>* gbp)
            : flinger(flinger), client(client),
              handle(handle), gbp(gbp),
              name(name), w(w), h(h), format(format), flags(flags) {
        }
        status_t getResult() const { return result; }
        virtual bool handler() {
        //最关键就是在这里,创建CreateLayer.还记得我们前面Reszie进程中申请的surface大小吗?
        //w=160, h=240, format=PIXEL_FORMAT_RGB_565, flags=0
            result = flinger->createLayer(name, client, w, h, format, flags,
                    handle, gbp);
            return true;
        }
    };
    //这里定义了一个内部创建Layer的消息类,将该消息类对象发送给SurfaceFlinger对象处理createLayer请求。
    //注意这里client对象this,就是上面createConnection中new出来的client,先留意一下。
    sp<MessageBase> msg = new MessageCreateLayer(mFlinger.get(),
            name, this, w, h, format, flags, handle, gbp);
    mFlinger->postMessageSync(msg);//发送给SurfaceFlinger对象处理。
    return static_cast<MessageCreateLayer*>( msg.get() )->getResult();
}
本地端的createSurface内部定义了内部类MessageCreateLayer,而需要我们关心的是handler()实现。在handler中直接调用了SurfaceFlinger对象的CreateLayer接口来创建一个layer对象,由此可想而知,应用端的surface对象对应的就是layer对象。一个surface对象对应一个Layer对象,而一个Layer又对应多个buffer,Android5.1每一个Layer最多有64个mSlot。

status_t SurfaceFlinger::createLayer(
        const String8& name,
        const sp<Client>& client,
        uint32_t w, uint32_t h, PixelFormat format, uint32_t flags,
        sp<IBinder>* handle, sp<IGraphicBufferProducer>* gbp)
{
   //记得这个时候w=160,h=240,format=PIXEL_FORMAT_RGB_565,flag=0
   //省掉一些检查宽高检查代码----------------
    status_t result = NO_ERROR;
    sp<Layer> layer;

    switch (flags & ISurfaceComposerClient::eFXSurfaceMask) { //flag = 0
        case ISurfaceComposerClient::eFXSurfaceNormal:
        //上面flag=0,直接走到这里了。w=160,h=240,format=PIXEL_FORMAT_RGB_565,flag=0
            result = createNormalLayer(client,
                    name, w, h, flags, format,
                    handle, gbp, &layer);
            break;
        case ISurfaceComposerClient::eFXSurfaceDim:
        //这个就是创建不需要显示出来的Layer。
            result = createDimLayer(client,
                    name, w, h, flags,
                    handle, gbp, &layer);
            break;
        default:
            result = BAD_VALUE;
            break;
    }

    if (result == NO_ERROR) {
        addClientLayer(client, *handle, *gbp, layer);
        setTransactionFlags(eTransactionNeeded);
    }
    return result;
}
该函数算主要做了下面几件事情:
- 1.首先会检查宽高是否合法,然后根据我们传进来的flag,来创建需要显示的surface还是不需要显示的surface。
- 2.createNormalLayer()函数中创建Layer对象和handle对象。其中handle对象表示该Layer对象的句柄。
- 3.addClientLayer()最后将新创建的Layer对象和handle对象捆绑,此外将该layer对象和BufferProducer对象保存到SurfaceFlinger相应的数组中,便于后面查找。
void SurfaceFlinger::addClientLayer(const sp<Client>& client,
        const sp<IBinder>& handle,
        const sp<IGraphicBufferProducer>& gbc,
        const sp<Layer>& lbc)
{
    // attach this layer to the client
    client->attachLayer(handle, lbc);

    // add this layer to the current state list
    Mutex::Autolock _l(mStateLock);
    mCurrentState.layersSortedByZ.add(lbc);//保存到SurfaceFlinger对象中
    mGraphicBufferProducerList.add(gbc->asBinder());//记录BufferProducer对象
}
到这里应用Client端请求createSurface请求已经处理完了,请求处理过程中,又诞生了下面几个对象。
- Layer:一个Layer对应一个surface对象。
- buffer_producer本地对象:该对象是在创建Layer对象同时创建的。创建该对象便于应用端获取buffer,应用Client端有了buffer_producer代理对象后,就可以detachBuffer,queueBuffer了。
- buffer_consumer本地对象:该对象目前我的发现是由于buffer_consumer本地对象实现了FrameAvailableListener接口中的onFrameAvailable(),这样的话,应用端拿到buffer_consumer代理对象后,当帧可用后就可以通知surfaceFliner去合成layer了。
status_t BnSurfaceComposerClient::onTransact(
    uint32_t code, const Parcel& data, Parcel* reply, uint32_t flags)
{
     switch(code) {
        case CREATE_SURFACE: {
            CHECK_INTERFACE(ISurfaceComposerClient, data, reply);
            String8 name = data.readString8();
            uint32_t w = data.readInt32();
            uint32_t h = data.readInt32();
            PixelFormat format = data.readInt32();
            uint32_t flags = data.readInt32();
            sp<IBinder> handle;
            sp<IGraphicBufferProducer> gbp;
            status_t result = createSurface(name, w, h, format, flags,
                    &handle, &gbp);
            //匿名binder写入,会在kernel中生成对应的binder_node.
            reply->writeStrongBinder(handle);
            //匿名binder写入,会在kernel中生成对应的binder_node.
            reply->writeStrongBinder(gbp->asBinder());
            reply->writeInt32(result);//写入返回值
            return NO_ERROR;
        } break;
    //.......
    }
与此同时,应用端这样获取的。
        remote()->transact(CREATE_SURFACE, data, &reply);
        *handle = reply.readStrongBinder();
        //这里直接就转换成IGraphicBufferProducer代理对象了。
        *gbp = interface_cast<IGraphicBufferProducer>(reply.readStrongBinder());
        return reply.readInt32();//返回结果
到这里我们返回到SurfaceComposerClient对象的createSurface对象中
sp<SurfaceControl> SurfaceComposerClient::createSurface(.....)
{
    sp<SurfaceControl> sur;
    if (mStatus == NO_ERROR) {
        sp<IBinder> handle;
        sp<IGraphicBufferProducer> gbp;
        status_t err = mClient->createSurface(name, w, h, format, flags, &handle, &gbp);
        ALOGE_IF(err, "SurfaceComposerClient::createSurface error %s", strerror(-err));
        if (err == NO_ERROR) {
            sur = new SurfaceControl(this, handle, gbp);//这里根据生产者代理对象创建了SurfaceControl对象,最好这里追追源码看看。
        }
    }
    return sur;
}
可以发现上面获取到handle对象和BufferProducer代理对象后,直接出入SurfaceControl构造函数中,获取到了一个surface对象。
SurfaceControl::SurfaceControl(
        const sp<SurfaceComposerClient>& client,
        const sp<IBinder>& handle,
        const sp<IGraphicBufferProducer>& gbp)
    : mClient(client), mHandle(handle), mGraphicBufferProducer(gbp)
{
}
sp<Surface> SurfaceControl::getSurface() const
{
    Mutex::Autolock _l(mLock);
    if (mSurfaceData == 0) {
        // This surface is always consumed by SurfaceFlinger, so the
        // producerControlledByApp value doesn't matter; using false.
        //看到了吧,这里直接new的,666666
        mSurfaceData = new Surface(mGraphicBufferProducer, false);
    }
    return mSurfaceData;
}
上面可以看到getSurface接口,根据bufferProducer代理对象创建了surface对象。这样有了mGraphicBufferProducer代理对象后,后续申请buffer就方便了。生产者代理对象,本地对象,Layer对象的关系如下图所示。

3.过程3 - 设置层数
该过程是通过SurfaceControl对象设置当前surface所在层数,而SurfaceControl对象又通过SurfaceComposerClient代理对象来完成的。
status_t SurfaceControl::setLayer(int32_t layer) {
    status_t err = validate();//这里会进行校验,如果mHandle和SurfaceComposerClient代理对象等于0的话,就返回错误码
    if (err < 0) return err;
    return mClient->setLayer(mHandle, layer);
}
上面SurfaceComposerClient代理对象也是通过获取Composer对象设置层数,这里就不贴出中间的代码了,直接贴出最卖力的代码。
status_t Composer::setLayer(const sp<SurfaceComposerClient>& client,
        const sp<IBinder>& id, int32_t z) {
    Mutex::Autolock _l(mLock);
//这里的id其实是上面提到的handle本地对象地址(驻留在SurfaceFlinger中),这里google程序员当做id来使用。当然在同一个进程空间,这个地址是唯一的,可以这样来用。
    layer_state_t* s = getLayerStateLocked(client, id);
    if (!s)
        return BAD_INDEX;
    s->what |= layer_state_t::eLayerChanged;//层改变标志
    s->z = z;//设置层级,可以想象成三维坐标上的Z轴。
    return NO_ERROR;
}
//获取id=id的
layer_state_t* Composer::getLayerStateLocked(
        const sp<SurfaceComposerClient>& client, const sp<IBinder>& id) {
    //将当前的SurfaceComposerClient代理对象和属于它的surface的id,封装成一个ComposerState对象,然后到ComposerState数组中找到该surfac的layer状态信息,如果找不到的话,创建一个新的,添加到mComposerStates数组中。
    ComposerState s;
    s.client = client->mClient;
    s.state.surface = id;

    ssize_t index = mComposerStates.indexOf(s);
    if (index < 0) {
        // we don't have it, add an initialized layer_state to our list
        index = mComposerStates.add(s);
    }

    ComposerState* const out = mComposerStates.editArray();
    return &(out[index].state);
}
目前代码中发现setLayer等设置属性的操作,没有直接通过Binder通信发送到服务本地端处理,而是在应用端代理对象本地维护一个mComposerStates数组对象,在打开事务通信后,所有的状态信息都包含在mComposerStates数组中,等关闭事务通信时closeGlobalTransaction,通过一次binder通信把之前的surface修改的数据更新到SurfaceFlinger中了。这也就有了下面这样的代码。
    SurfaceComposerClient::openGlobalTransaction();
    surfaceControl->setLayer(100000);
    SurfaceComposerClient::closeGlobalTransaction();
4.过程4 - dequeueBuffer 获取buffer
status_t Surface::lock(
        ANativeWindow_Buffer* outBuffer, ARect* inOutDirtyBounds)
{
//省略一些错误检查代码------
//下面这几行很有讲究,作用就是告诉BufferQueue该buffer会被谁填充,如下面的NATIVE_WINDOW_API_CPU:表示被CPU填充,这里我们用代码直接填充上去的,当然是CPU.mConnectedToCpu初始化是FALSE,和生产者本地对象连接成功后会置为TRUE.此外还有几种填充方式。
//NATIVE_WINDOW_API_EGL = 1, 该buffer由OpenGL ES来填充,通过eglSwapBuffers enqueue入队列。
//NATIVE_WINDOW_API_CPU = 2,该buffer被CPU来填充和queued入队列。
//NATIVE_WINDOW_API_MEDIA = 3,该buffer被video decoder来填充(不管是硬编码还是软编码),由Stagefright 来queued入队列。
//NATIVE_WINDOW_API_CAMERA = 4,该buffer被Camera Hal来填充和queued
    if (!mConnectedToCpu) {
        int err = Surface::connect(NATIVE_WINDOW_API_CPU);
        if (err) {
            return err;
        }
        // we're intending to do software rendering from this point
        setUsage(GRALLOC_USAGE_SW_READ_OFTEN | GRALLOC_USAGE_SW_WRITE_OFTEN);
    }

    ANativeWindowBuffer* out;
    int fenceFd = -1;
    status_t err = dequeueBuffer(&out, &fenceFd);
    ALOGE_IF(err, "dequeueBuffer failed (%s)", strerror(-err));
    if (err == NO_ERROR) {
        sp<GraphicBuffer> backBuffer(GraphicBuffer::getSelf(out));
        const Rect bounds(backBuffer->width, backBuffer->height);
//这中间代码目前还不清楚是干什么的,有一个backBuffer和frontBuffer有效区域对比等方面的操作,目前还理解不了,就先去掉吧。等后面有机会深入学习SurfaceFlinger在来看吧。
        void* vaddr;
//下面的lockAsync将该buffer映射到当前进程的虚拟地址空间中,其中vaddr就是buffer起始地址。
        status_t res = backBuffer->lockAsync(
                GRALLOC_USAGE_SW_READ_OFTEN | GRALLOC_USAGE_SW_WRITE_OFTEN,
                newDirtyRegion.bounds(), &vaddr, fenceFd);

        ALOGW_IF(res, "failed locking buffer (handle = %p)",
                backBuffer->handle);

        if (res != 0) {
            err = INVALID_OPERATION;
        } else {
        //输出参数的赋值,就是我们申请buffer的一些信息,这里就不多说了。
            mLockedBuffer = backBuffer;
            outBuffer->width  = backBuffer->width;
            outBuffer->height = backBuffer->height;
            outBuffer->stride = backBuffer->stride;
            outBuffer->format = backBuffer->format;
            outBuffer->bits   = vaddr;
        }
    }
    return err;
}
函数主要干了下面几件事情。
- 1.通知BufferQueue,该surface是由谁来填充。这里我们是设置为软件来填充,即NATIVE_WINDOW_API_CPU。
- 2.dequeueBuffer操作,从BufferQueue中获取空闲Buffer.
- 3.将该buffer映射到当前进程地址空间。
5.过程5 - queueBuffer buffer入buffer queue
buffer的queueBuffer都是封装在Surface对象的unlockAndPost方法中。下面来分析一下都干了什么。
status_t Surface::unlockAndPost()
{
//省略一些错误检查代码......
    int fd = -1;
    status_t err = mLockedBuffer->unlockAsync(&fd);
    ALOGE_IF(err, "failed unlocking buffer (%p)", mLockedBuffer->handle);
//这里将Buffer入队列操作。
    err = queueBuffer(mLockedBuffer.get(), fd);
    ALOGE_IF(err, "queueBuffer (handle=%p) failed (%s)",
            mLockedBuffer->handle, strerror(-err));
//将当前queueBuffer记录下来,为下次做DequeuBuffer操作时做对比的。
    mPostedBuffer = mLockedBuffer;
    mLockedBuffer = 0;
    return err;
}
上面主要做的就是queueBuffer操作(详细请看下面代码),其中FenceFd当前还没仔细研究它的同步机理,这里就先放到这里吧。
int Surface::queueBuffer(android_native_buffer_t* buffer, int fenceFd) {
    ATRACE_CALL();
    ALOGV("Surface::queueBuffer");
    Mutex::Autolock lock(mMutex);
    int64_t timestamp;
    bool isAutoTimestamp = false;
    //如果是自动记录时间戳的话,会调用systemTime()接口获取系统时间。
    //这里mTimestamp变量在构造函数中已经初始化为NATIVE_WINDOW_TIMESTAMP_AUTO
    if (mTimestamp == NATIVE_WINDOW_TIMESTAMP_AUTO) {
        timestamp = systemTime(SYSTEM_TIME_MONOTONIC);
        isAutoTimestamp = true;
        ALOGV("Surface::queueBuffer making up timestamp: %.2f ms",
            timestamp / 1000000.f);
    } else {
//如果不是自动获取时间的话,会调用surface的setBuffersTimestamp()接口重新设置时间戳,Camera的时间戳由hal来填充,这里是diaoy
        timestamp = mTimestamp;
    }
//根据buffer的handle获取当前buffer在mSlog中的索引,这个要传到BufferQueue中,因为生产者镜像了BufferQueue的mSlog对象。
    int i = getSlotFromBufferLocked(buffer);
    if (i < 0) {
        return i;
    }
//.................
//下面是打包一些当前buffer的信息,其中最重要的就是时间戳信息,这里其它的暂时不关心。
    sp<Fence> fence(fenceFd >= 0 ? new Fence(fenceFd) : Fence::NO_FENCE);
    IGraphicBufferProducer::QueueBufferOutput output;
    IGraphicBufferProducer::QueueBufferInput input(timestamp, isAutoTimestamp,
            crop, mScalingMode, mTransform ^ mStickyTransform, mSwapIntervalZero,
            fence, mStickyTransform);
//终于调用生产者的queueBuffer接口,调到了生产者本地对象中的queueBuffer.
    status_t err = mGraphicBufferProducer->queueBuffer(i, input, &output);
    if (err != OK)  {
        ALOGE("queueBuffer: error queuing buffer to SurfaceTexture, %d", err);
    }
//这里输出参数中包含了BufferQueue当前的状态,其中numPendingBuffers当前阻塞的buffer数量,即还没有被acquier的Buffer,消费的buffer.。
    uint32_t numPendingBuffers = 0;
    uint32_t hint = 0;
    output.deflate(&mDefaultWidth, &mDefaultHeight, &hint,
            &numPendingBuffers);

    // Disable transform hint if sticky transform is set.
    if (mStickyTransform == 0) {
        mTransformHint = hint;
    }
//标志变量,当消费者落后生产者2帧以上,该标志位置1.
    mConsumerRunningBehind = (numPendingBuffers >= 2);
    return err;
}
到此为止,例子程序中的几个过程,我们算是走完了。该函数做了下面几件事情
- 1.获取时间戳信息,如果不是系统自动获取的话,则由setBuffersTimestamp()接口设置时间戳。这里要留一下,后面继续分析Camera时,会再提到这里。
- 2.创建Fence对象,由前面获取到的fenceFd来判断是来创建真正的Fenced对象,还是直接Fence::NO_FENCE)。
- 3.打包enqueuBuffer过程中需要的QueueBufferInput数据包。这里再次贴出数据包中国包含的信息。
- timestamp - a monotonically increasing value in nanoseconds
- isAutoTimestamp - if the timestamp was synthesized at queue time
- crop - a crop rectangle that’s used as a hint to the consumer
- scalingMode - a set of flags from NATIVE_WINDOW_SCALING_* in window.h
- transform - a set of flags from NATIVE_WINDOW_TRANSFORM_* in window.h
- async - if the buffer is queued in asynchronous mode
- fence - a fence that the consumer must wait on before reading the buffer,
set this to Fence::NO_FENCE if the buffer is ready immediately - sticky - the sticky transform set in Surface (only used by the LEGACY
camera mode).
- 4.调用生产者ququeBuffer代理对象接口将buffer还给BufferQueue.
- 5.根据queueBuffer接口返回的数据,当消费者是否落后于生产者大于等于2帧数据时,则置位mConsumerRunningBehind标志位。
六、总结
到这里笔记整理完了,自己也算是对BufferQueue有了新的认识。其实这里主要的障碍就是binder了,如果Binder搞懂了,理解Android其它模块代码就更容易了。我本人去年花了2个月的时间,来专心撸Binder framework和kernel驱动代码,算是搞懂它了(还有几篇Binder笔记还没整理,后面整理发出来)。所以很有必要好好研究一下Binder,搞懂了这里看surfaceFlinger代码就没那么难受了。就到这吧,且行且努力吧。下面以官方的SurfaceFlinger工作图来结束这次笔记。
