企业LNMP环境应用实践
常见web框架结构
比如:LNMP和LAMP
L=linux 、N=nginx A=apache、P=php、T=tomcat
nginx和Apache都是web应用服务器
nginx处理静态数据块,Apache处理动态快
nginx对系统资源占用小,Apache资源占用高
nginx用的是epoll模型,Apache用的select模型
LNMP的部署方式分为两种全都部署在一台上或全都不在一台上,N+P+M
只分离mysql, NP+M
LNMP组合的环境过程解析
在LNMP组合工作时,首先是用户通过浏览器输入域名请求Nginx Web服务,如果请求是静态资源,则由Nginx解析返回给用户;如果是动态请求(.php结尾),那么Nginx就会把它通过FastCGI接口(生产常用方法)发送给PHP引擎服务(FastCGI进程php-fpm)进行解析,如果这个动态请求要读取数据库数据,那么PHP就会继续向后请求MySQL数据库,以读取需要的数据,并最终通过Nginx服务把获取的数据返回给用户,这就是LNMP环境的基本请求顺序流程。这个请求流程是企业使用LNMP环境的常用流程。
nginx的前面会有个http数据包
http数据包特点格式很松散,因此解析的速度慢,但是数据包比fastcgi格式数据包小
nginx到PHP5中间有一个fastcgi接口(接口规则=快速接口)
fastcgi数据包这种规则的数据包格式非常严谨,因此,PHP解析的速度非常快,但是越严谨的数据包数据就越大,所以fastcgi数据包大小要绝对大于http数据包
用户的请求一定是遵循HTTP协议的因此是通过浏览器过来的
fastcgi软件的设计架构分为C/S和B/S作为客户端client的fastcgi_pass和作为server端的php-fpm,因此经常用所以,fastcgi_pass和nginx合并而PHP-fpm和PHP功能合并了
nginx和Apache其实一样,如果没有PHP支持,那么都处理不了所谓的动态请求。他们自身其实都只能处理静态,只是Apache转发动态数据包的速度快,但是只是单个包速度,Apache并发低。
过滤的时候
location ~*. (php|php5)${
fastcgi_pass 127.0.0.1:9000 (如果这里的ip地址改变的话那就会成分离式)
}
动态网页的格式 index.php 动态网页也是有实体文件。
开始部署LNMP
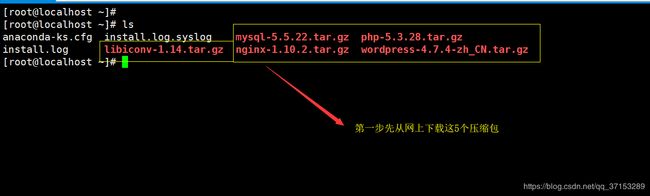
部署nginx服务
[root@localhost ~]# yum install -y pcre-devel openssl-devel 安装nginx的关联包
[root@localhost ~]# tar xf nginx-1.10.2.tar.gz -C /usr/src/ #把包解压缩之后放到了/usr/src下
[root@localhost nginx-1.10.2]# useradd -M -s /sbin/nologin www
[root@localhost nginx-1.10.2]# ./configure --user=www --group=www --prefix=/usr/local/nginx --with-http_stub_status_module --with-http_ssl_module	#源码编译
[root@localhost nginx-1.10.2]# make && make install
[root@localhost nginx-1.10.2]# ln -s /usr/local/nginx/sbin/* /usr/local/sbin/	#做个软链接
[root@localhost conf]# egrep -v "#|^$" nginx.conf.default > nginx.conf		#去掉没用的,修饰一下
安装mysql服务(PHP安装需要先有mysql环境,不然php编译报错)
问题1: 如果mysql在其他服务器改这么办呢?
[root@localhost mysql-5.5.32-linux2.6-x86_64]# /bin/cp support-files/my-small.cnf /etc/my.cnf		#把东西复制过来
[root@localhost mysql-5.5.32-linux2.6-x86_64]# echo "192.168.233.133 LNMP" >> /etc/hosts	#最好做一下本地映射,不然有可能会报错
[root@localhost mysql-5.5.32-linux2.6-x86_64]# ln -s /usr/local/mysql-5.5.32-linux2.6-x86_64/ /usr/local/mysql	#名字有点长,做个软链接
[root@localhost mysql-5.5.32-linux2.6-x86_64]# chown mysql.mysql /usr/local/mysql		#给mysql目录属组
[root@localhost mysql-5.5.32-linux2.6-x86_64]# yum install -y libaio	光盘源安装包
[root@localhost mysql]# /usr/local/mysql/scripts/mysql_install_db --basedir=/usr/local/mysql --datadir=/usr/local/mysql/data --user=mysql	初始化mysql数据库
[root@localhost mysql]# cp support-files/mysql.server /etc/init.d/mysqld	#给mysql做个启动脚本
[root@localhost mysql]# chmod +x /etc/init.d/mysqld	#赋予可执行权限
[root@localhost mysql]# /etc/init.d/mysqld start  启动mysql服务器
[root@localhost mysql]# ln -s /usr/local/mysql/bin/* /usr/local/bin/		#做个软链接
[root@localhost mysql]# mysqladmin -uroot password '123456'		#给mysql设置登录账号和密码
检查PHP函数库的支持包
[root@localhost mysql]# yum -y install zlib-devel libxml2-devel libjpeg-devel libjpeg-turbo-devel libiconv-devel
[root@localhost mysql]# yum -y install freetype-devel libpng-devel gd libcurl-devel libxslt-devel
只有libiconv-devel这个包没有安装,因为默认的yum源没有此包。
[root@localhost mysql]# wget http://ftp.gnu.org/pub/gnu/libiconv/libiconv-1.14.tar.gz	#从网上下载libiconv-devel包
[root@localhost ~]# tar xf libiconv-1.14.tar.gz -C /usr/src/		#然后解压
[root@localhost ~]# cd /usr/src/libiconv-1.14/
[root@localhost libiconv-1.14]# ./configure --prefix=/usr/local/libiconv && make && make install	#源码编译
----------------------------------------------------------
###安装着4个rpm包,必须按着个顺序来
[root@localhost data]# rpm  -ivh libmcrypt-2.5.8-9.el6.x86_64.rpm
[root@localhost data]# rpm  -ivh mhash-0.9.9.9-3.el6.x86_64.rpm
[root@localhost data]# rpm  -ivh libmcrypt-devel-2.5.8-9.el6.x86_64.rpm
[root@localhost data]# rpm -ivh mcrypt-2.6.8-10.el6.x86_64.rpm
安装PHP
[root@localhost ~]# tar xf php-5.3.28.tar.gz -C /usr/src/		#解压缩
[root@localhost ~]# cd /usr/src/php-5.3.28/
[root@localhost php-5.3.28]# ./configure \	预配置
> --prefix=/usr/local/php5.3.28 \
> --with-mysql=/usr/local/mysql \
> --with-iconv-dir=/usr/local/libiconv \
> --with-freetype-dir \
> --with-jpeg-dir \
> --with-png-dir \
> --with-zlib \
> --with-libxml-dir=/usr \
> --enable-xml \
> --disable-rpath \
> --enable-safe-mode \
> --enable-bcmath \
> --enable-shmop \
> --enable-sysvsem \
> --enable-inline-optimization \
> --with-curl \
> --with-curlwrappers \
> --enable-mbregex \
> --enable-fpm \
> --enable-mbstring \
> --with-mcrypt \
> --with-gd \
> --enable-gd-native-ttf \
> --with-openssl \
> --with-mhash \
> --enable-pcntl \
> --enable-sockets \
> --with-xmlrpc \
> --enable-zip \
> --enable-soap \
> --enable-short-tags \
> --enable-zend-multibyte \
> --enable-static \
> --with-xsl \
> --with-fpm-user=www \
> --with-fpm-group=www \
> --enable-ftp
上面的这些步骤,必须有mysql环境下才能这么做
----------------------------------------------------------------------------
如果没有MySQL软件包,也可以不单独安装,这样的情况可使用--with-mysql=mysqlnd替代--with-mysql=/usr/local/mysql,因为PHP软件里已经自带了连接MySQL的客户端工具。
---------------------------------------------------------
#这个是做分离式部署环境    快捷方式
[root@localhost php-5.3.28]# yum -y install openssl-devel openssl		 	安装着俩个包要不然会报错

[root@localhost php-5.3.28]# ./configure  --prefix=/usr/local/php5.3.28  --with-mysql=mysqlnd  --with-iconv-dir=/usr/local/libiconv  --with-freetype-dir  --with-jpeg-dir --with-png-dir --with-zlib --with-libxml-dir=/usr --enable-xml  --disable-rpath  --enable-safe-mode --enable-bcmath --enable-shmop --enable-sysvsem  --enable-inline-optimization  --with-curl  --with-curlwrappers --enable-mbregex  --enable-fpm --enable-mbstring --with-mcrypt  --with-gd  --enable-gd-native-ttf   --with-openssl  --with-mhash  --enable-pcntl  --enable-sockets --with-xmlrpc --enable-zip  --enable-soap  --enable-short-tags --enable-zend-multibyte  --enable-static --with-xsl  --with-fpm-user=www  --with-fpm-group=www  --enable-ftp
编译PHP
[root@localhost php-5.3.28]# ln -s /usr/local/mysql/lib/libmysqlclient.so.18 /usr/lib64/ #做个软链接
[root@localhost php-5.3.28]# touch ext/phar/phar.phar 创建这个文件要不然会报错
[root@localhost php-5.3.28]# make #生成
[root@localhost php-5.3.28]# make install
[root@localhost ~]# ln -s /usr/local/php5.3.28/ /usr/local/php
[root@localhost php-5.3.28]# ls php.ini* 查看模板文件
php.ini-development php.ini-production
#拷贝PHP配置文件到PHP默认目录,并更改文件名称为php.ini
[root@localhost php-5.3.28]# cp php.ini-production /usr/local/php/lib/php.ini
[root@localhost php-5.3.28]# cd /usr/local/php/etc/
[root@localhost etc]# cp php-fpm.conf.default php-fpm.conf
[root@localhost etc]# /usr/local/php/sbin/php-fpm #启动PHP服务php-fpm
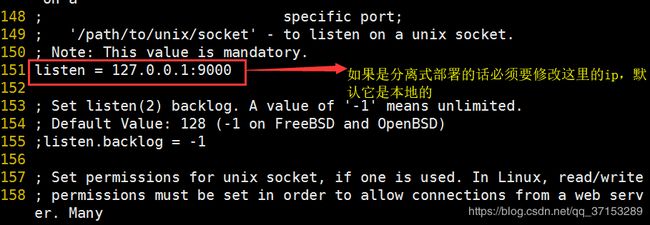
[root@localhost etc]# netstat -antup | grep 9000 过滤端口
tcp 0 0 127.0.0.1:9000 0.0.0.0:* LISTEN 10063/php-fpm
[root@localhost etc]# vim php-fpm.conf
修改nginx配置文件(配置Nginx支持PHP)
error_log logs/error.log;
events {
    worker_connections  1024;
}
http {
    include       mime.types;
    default_type  application/octet-stream;
    sendfile        on;
    keepalive_timeout  65;
    server {
        listen       80;
        server_name  blog.yunjisuan.com;
        location / {
            root   html/blog;
            index  index.html index.htm;
                }
        location ~.*\.(php|php5)?$ {
        root html/blog;
        fastcgi_pass 127.0.0.1:9000;
        fastcgi_index index.php;
        include fastcgi.conf;
                }
        }
}
[root@localhost blog]# /usr/local/nginx/sbin/nginx	#启动nginx的服务
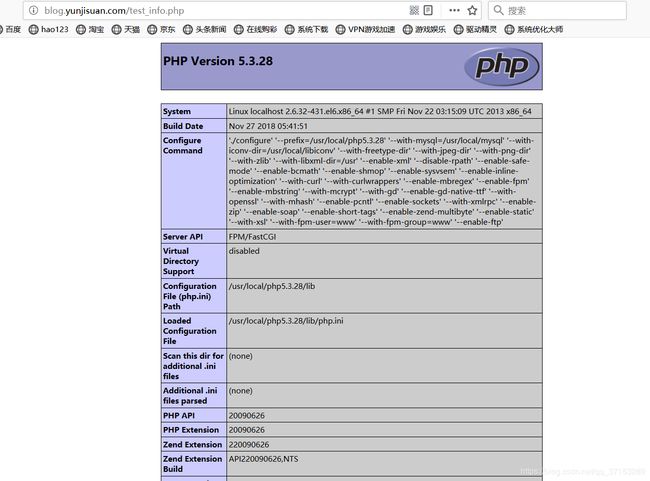
测试php
[root@localhost blog]# cat test_info.php
PHP连接MySQL的检查脚本
[root@localhost blog]# cat test_mysql.php


-----------------------------------------------------------------------
[root@localhost blog]# ln -s /usr/local/php/bin/* /usr/local/sbin/		#给命令创建个软链接
[root@localhost blog]# which php
/usr/local/sbin/php

[root@localhost blog]# php test_mysql.php
mysql successful by Mr.zhuxinwang !
WordPress 博客搭建准备
[root@localhost blog]# mysql -uroot -p123456			#登录数据库
Welcome to the MySQL monitor.  Commands end with ; or \g.
Your MySQL connection id is 6
Server version: 5.5.32 MySQL Community Server (GPL)

Copyright (c) 2000, 2013, Oracle and/or its affiliates. All rights reserved.

Oracle is a registered trademark of Oracle Corporation and/or its
affiliates. Other names may be trademarks of their respective
owners.

Type 'help;' or '\h' for help. Type '\c' to clear the current input statement.

mysql>

mysql> create database wordpress;
mysql> grant all on wordpress.* to wordpress@'localhost' identified by '123123';	#localhost是客户端的ip地址
mysql> flush privileges;  	#刷新权限
(2)对nginx配置文件
[root@localhost blog]# cat /usr/local/nginx/conf/nginx.conf
worker_processes  1;
error_log logs/error.log;
events {
    worker_connections  1024;
}
http {
    include       mime.types;
    default_type  application/octet-stream;
    sendfile        on;
    keepalive_timeout  65;
    server {
        listen       80;
        server_name  blog.yunjisuan.com;
        location / {
            root   html/blog;
            index  index.html index.htm index.php;		#添加一个首页文件index.php
        	}
	location ~.*\.(php|php5)?$ {
	root html/blog;
	fastcgi_pass 127.0.0.1:9000;
	fastcgi_index index.php;
	include fastcgi.conf;
		}
        }
}
[root@localhost blog]# /usr/local/nginx/sbin/nginx -s reload	#重启nginx服务,切记只要修改配置文件必须要重启
配置WordPress博客
[root@localhost ~]# tar -xf wordpress-4.7.4-zh_CN.tar.gz -C /usr/local/nginx/html/blog/		#解压到 /usr/local/nginx/html/blog/这个目录下
[root@localhost ~]# cd /usr/local/nginx/html/blog/	#进入到这个目录下
[root@localhost blog]# rm -f *	#删除所有文件
[root@localhost blog]# cd wordpress/	  #进入到这个目录
[root@localhost wordpress]# mv * .. 	#把目录里面的所有东西移动到上级目录
[root@localhost blog]# rm -rf wordpress/	#然后把这个目录删除了
[root@localhost blog]# chown -R www.www /usr/local/nginx/html/blog/		#递归授权给blog下的所有文件或目录

[root@localhost blog]# ll
total 188
-rw-r--r--  1 www www   418 Sep 25  2013 index.php
-rw-r--r--  1 www www 19935 Jan  3  2017 license.txt
-rw-r--r--  1 www www  6956 Apr 23  2017 readme.html
-rw-r--r--  1 www www  5447 Sep 28  2016 wp-activate.php
drwxr-xr-x  9 www www  4096 Apr 23  2017 wp-admin
-rw-r--r--  1 www www   364 Dec 19  2015 wp-blog-header.php
-rw-r--r--  1 www www  1627 Aug 29  2016 wp-comments-post.php
-rw-r--r--  1 www www  2930 Apr 23  2017 wp-config-sample.php
drwxr-xr-x  5 www www  4096 Apr 23  2017 wp-content
-rw-r--r--  1 www www  3286 May 25  2015 wp-cron.php
drwxr-xr-x 18 www www 12288 Apr 23  2017 wp-includes
-rw-r--r--  1 www www  2422 Nov 21  2016 wp-links-opml.php
-rw-r--r--  1 www www  3301 Oct 25  2016 wp-load.php
-rw-r--r--  1 www www 33939 Nov 21  2016 wp-login.php
-rw-r--r--  1 www www  8048 Jan 11  2017 wp-mail.php
-rw-r--r--  1 www www 16255 Apr  7  2017 wp-settings.php
-rw-r--r--  1 www www 29896 Oct 19  2016 wp-signup.php
-rw-r--r--  1 www www  4513 Oct 15  2016 wp-trackback.php
-rw-r--r--  1 www www  3065 Sep  1  2016 xmlrpc.php
第一步
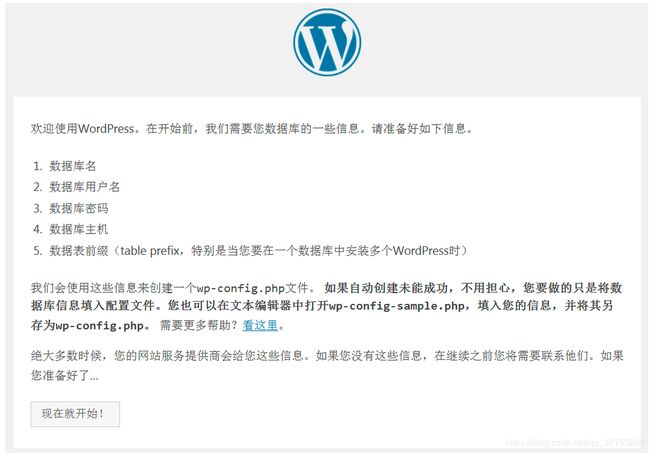
第二步

第三步

第四步
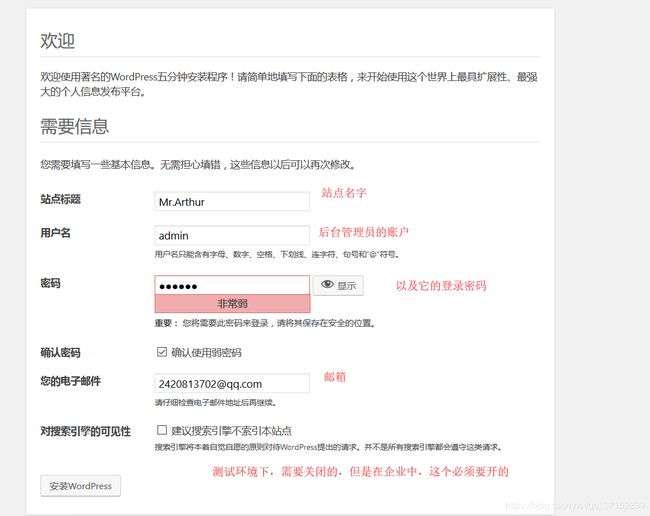 第五步
第五步
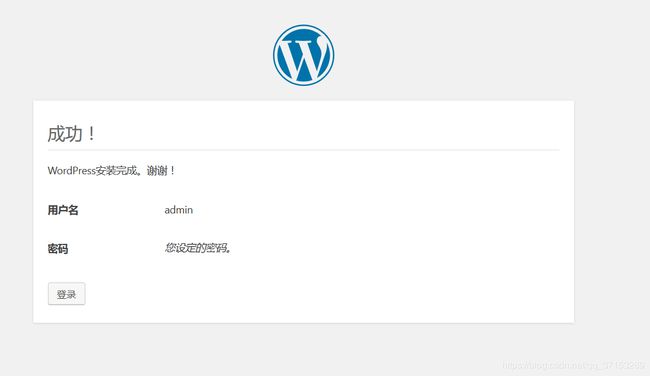
第六步:登录成功,之后的界面

实现WordPress博客程序URL伪静态化
/archives/%post_id%.html
##说明:%post_id%是数据库对应博文内容的唯一ID,例如423
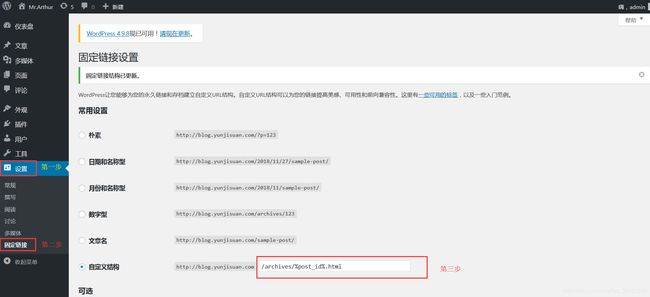
在Nginx配置文件的server体里面中添加代码
[root@lnmp conf]# vim /usr/local/nginx/conf/nginx.conf
worker_processes  1;
error_log logs/error.log;
events {
    worker_connections  1024;
}
error_log logs/error.log;
events {
    worker_connections  1024;
}
http {
    include       mime.types;
    default_type  application/octet-stream;
    sendfile        on;
    keepalive_timeout  65;
    server {
        listen       80;
        server_name  blog.yunjisuan.com;
        location / {
            root   html/blog;
            index  index.html index.htm index.php;
         if (-f $request_filename/index.html){
            rewrite (.*) $1/index.html break;
                }
        if (-f $request_filename/index.php){
            rewrite (.*) $1/index.php;
                }
        if (!-f $request_filename){
            rewrite (.*) /index.php;
                }
        }
        location ~.*\.(php|php5)?$ {
        root html/blog;
        fastcgi_pass 127.0.0.1:9000;
        fastcgi_index index.php;
        include fastcgi.conf;
                }
        }
}

用户浏览器的图片解析
用户通过PC上网,当输入blog.yunjisuan.com时,PC机向Web服务器发起请求;访问浏览器首页index.html,web浏览器读取index.html文件的内容,发给用户浏览器;用户浏览器开始解析,解析到文字时,文字就会出现在浏览器上;解析到图片时,用户浏览器将图片的地址读取出来,再次向Web服务器发起请求,Web服务器收到请求后,将图片读取出来再次发给用户浏览器,用户浏览器再把返还的内容显示到浏览器的页面上,此时图片就解析出来了。
上传图片时,图片存在存储里(挂载存储NFS),再把图片放在存储里的位置写到数据库里;
设计上传时,网页目录html由两个子目录:static(读的)和upload(上传的),NFS存储既要挂载在static目录上,还要挂载在upload目录上;静态网页读取时经过static目录,php动态网页读取时也要经过static目录,但是,PHP还要经过upload目录;PHP经过upload目录后,图片上传进upload后,还要将图片的具体位置写入MySQL数据库;这样,在下次访问index.php,SQL语句直接到MySQL中查找。
PHP有两个作用:
(1)读动态网页(读取时可以不挂载存储NFS,直接从MySQL里把URL读出来反馈给用户,用户浏览器解析的图片会再发次请求,找static读取图片)
(2)上传数据,向服务器写入数据
图片加文字的部署
第一步:
[root@lnmp conf]# vim nginx.conf

worker_processes  1;
error_log logs/error.log;
events {
    worker_connections  1024;
}
http {
    include       mime.types;
    default_type  application/octet-stream;
    sendfile        on;
    keepalive_timeout  65;
server{
listen 80;
server_name xxx.yunjisuan.com;
location / {
root html/xxx;
index index.html index.htm;
                }
        }
}
第二步:
[root@lnmp xxx]# vim index.html

welcome to yunjisuan
