高通平台msm8916修改开机logo 高通平台修改LK(bootloader)开机logo
转载自:http://www.cnblogs.com/zzb-Dream-90Time/p/6510908.html
高通平台msm8916修改开机logo
经过两天的奋战终于把开机logo给搞定了啊。
首先修改开机logo要从哪里入手呢?先分析一下源码看看. --->
 1 void display_image_on_screen()
 2 {
 3     struct fbimage default_fbimg, *fbimg;
 4     bool flag = true;
 5
 6     fbcon_clear();
 7     fbimg = fetch_image_from_partition();      //从splash镜像分区抓取图片
 8     if(fbimg){
 9         dprintf(CRITICAL, "zbzhuang### ->fetch_image_from_partition\n");
10     }
11
12     if(!fbimg) {                              //如果splash.img分区的内容不存在或者被擦除则从splash.h头文件从获取要显示图像的数组
13         dprintf(CRITICAL, "zbzhuang### ->not fetch_image_from_partition\n");
14         flag = false;
15         fbimg = &default_fbimg;
16         fbimg->header.width = SPLASH_IMAGE_HEIGHT;
17         fbimg->header.height = SPLASH_IMAGE_WIDTH;
18 #if DISPLAY_TYPE_MIPI
19         fbimg->image = (unsigned char *)imageBuffer_rgb888;
20 #else
21         fbimg->image = (unsigned char *)imageBuffer;
22 #endif
23     }
24
25     fbcon_putImage(fbimg, flag);
26 }
粗略的看了一下源码,大概可以知道要修改开机logo有两种方式一种是通过。经过本人的验证,对于大图片强烈建议使用方法一,当然小图片也可以使用方法一。方法二只适合分辨率不超过320*200的图片,之前本人测试了无数次,验证了很久才总结出来的啊,分辨率超过320*200的一定不要使用方法二。
方法一:利用工具根据图像生成splash.img镜像之后,使用fastboot重新刷splash.img分区。
方法二:利用工具将图片重新生成splash.h头文件的数据,替换相应的头文件就OK。
方法一:利用工具根据图像生成splash.img镜像之后,使用fastboot重新刷splash.img分区。
首先准备一张800*1280的图片(png格式),和生成splash.img镜像的脚本工具--->logo_gen.py。
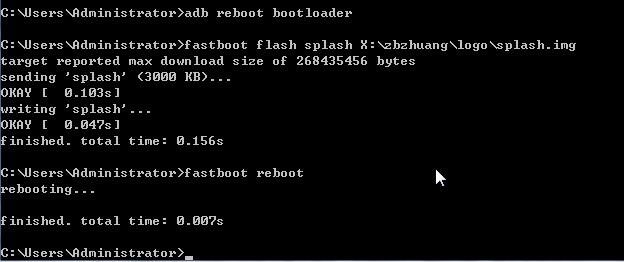
将图片和工具都扔到服务器上面去,并且执行下面的代码,就会生成splash.img的镜像文件,之后使用fastboot 命令就可以刷开机logo的图片了啊,看到强悍的路飞我们的任务完成了啊。
1 python ./logo_gen.py lufi.png
1 adb reboot bootloader         //进入bootloader模式
2 fastboot flash splash         //将镜像刷入
3 fastboot reboot               //重启平板电脑
方法二:利用工具将图片重新生成splash.h头文件的数据,替换相应的头文件就OK。
在ubuntu下敲如下三行命令,要事先安装好conver xxd等工具 。fire_296137.png 图片
1 convert fire_296137.png -recolor "0 0 1,0 1 0,1 0 0" fire_296137_re.png    //将图片重新着色BRG转C成rgb
2 convert -depth 8 fire_296137_re.png rgb:fire_296137_raw.raw                //将png格式转成raw图片格式
3 xxd -i fire_296137_raw.raw > splash.h                                      //生成对于的splash.h头文件的数组
至于生成的数组要替换Splash.h (z:\bootable\bootloader\lk\platform\msm_shared\include) 那个数组呢?我的平板电脑是采用MIPI接口股修改第二个数组:imageBuffer_rgb888[]数组的内容。同时修改分辨率
1 #define SPLASH_IMAGE_WIDTH     320
2 #define SPLASH_IMAGE_HEIGHT    200
从我刚开始贴的代码的第7行和第12号可知,如果splash分区的有图片的镜像,那么在显示logo的时候就优先从splash分区当中加载,否则从splash[]数组中加载图片。
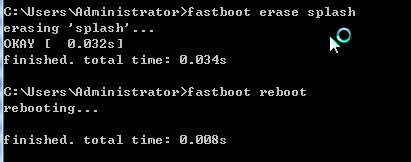
因此我们要从splas[]数组当中加载图片一定要擦除splash分区:之后才可以成功的从splash.h头文件的数组中显示图片,或者注释第7行代码强制跳过从splash分区加载镜像,修改了源码之后只需要重新编译源码,之后重新烧录aboot镜像就可啦。
1 rm out/target/product/msm8916_64/emmc_appsboot.mbn    //编译之前一定要先删除,避免没有重新编译改动过的文件
2 make aboot -j8                                        //单独编译lk镜像
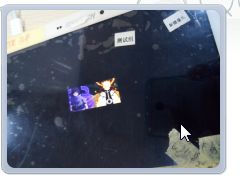
使用fastboot命令重新烧录aboot 镜像,重新开机,看到鸣人和佐助,我们可以安心的下班了啊。
转载自:http://blog.csdn.net/u011006622/article/details/62227231
高通平台修改LK(bootloader)开机logo
一,怎么更改bootloader里的logo图片:
1 首先得拿到图片,格式要求是png, 色深8bit, 且不带alpha(透明色)通道的
2 将 png文件转换成raw文件
convert Android.png -depth 8 rgb:Android.raw
3 对于某些屏(只支持RGB565才需要此步骤),将raw文件转换成565格式的raw文件, android 自带了一个这样的工具,在out/host/Linux-x86/bin
./rgb2565 android.raw android.raw565
4 将android.raw或android.raw565转换成原始数组
xxd -i android.raw565 > android_logo.h
xxd -i android.raw > android_logo.h
注意: splash.h 文件中,有 imageBuffer[] 和 imageBuffer_rgb888[] 两个数组。利用一个预编译进行判断
- #if (!DISPLAY_TYPE_MIPI)
修改宏的值:
- #define SPLASH_IMAGE_WIDTH 124
- #define SPLASH_IMAGE_HEIGHT 113
SPLASH_IMAGE_HEIGHT 对应logo.png的宽度
device\qcom\common\display\logo\logo_gen.py,生成splash.img的步骤:
(1) sudo apt-get install Python-imaging
(2) Python ./logo_gen.py snapdragon.png
这样就可在当前目录下生成splash.img,图片要求png格式,且且色深为8-bit的RGB或者RGBA格式。


