【Springboot学习笔记】SpringBoot+Mybatis+Thymeleaf+Layui数据表单从零开始实现按条件模糊分页查询的方法
【Springboot学习笔记】SpringBoot+Mybatis+Thymeleaf+Layui数据表单从零开始实现按条件模糊分页查询的方法
- 目录
- 1.搭建环境
- 1.1直接从网上下载SpringBoot样例网站程序
- 1.2使用IDEA新建SpringBoot样例网站
- 2.运行SpringBoot样例网站
- 3.配置Maven的本地仓库路径
- 4.导入Layui样式文件
- 5.新建数据库与数据表
- 6.使用Mybatis-generator生成数据表对应的实体类及基本数据库操作
- 7.添加Layui数据表单及编写服务层与控制层代码
- 7.1查询单个用户信息
- 7.2查询所有用户信息
- 7.3添加PageHelper插件
- 7.4添加Layui数据表单
目录
第一次使用 Markdown编辑器写文章,如有不足之处可以在评论中提出。MySQL数据库服务安装步骤和MySQLyog可视化管理工具,自行百度,百度有很多教程。
1.搭建环境
第一步:搭建环境
1.1直接从网上下载SpringBoot样例网站程序
如果使用可以先到Spring官网下载springboot的样例程序
https://spring.io/projects/spring-boot
拖动滚动条到网页底部点击 Spring Initializr.进入页面按需求选择进行下载即可。下载后可以通过STS、Eclipse和Idea等IDE软件对网站进行修改

1.2使用IDEA新建SpringBoot样例网站
打开IDEA软件,选择新建项目,然后选择Spring Initializr,点击Next,看见下图界面,设置参数后,继续点击Next

进入下一步后,看见下图的界面,选择所需要的Maven依赖,继续点击下一步选择存储路径,开始编写代码。

2.运行SpringBoot样例网站
在java文件目录下新建一个HelloWorldController控制层类,并使用注解@RequestMapper和@ResponseBody定义根目录的请求为返回字符串。
注意:
@RequestMapper用于指定数据解,"/"表示根目录的路径,
@ResponseBody表示返回JSON格式的字符串
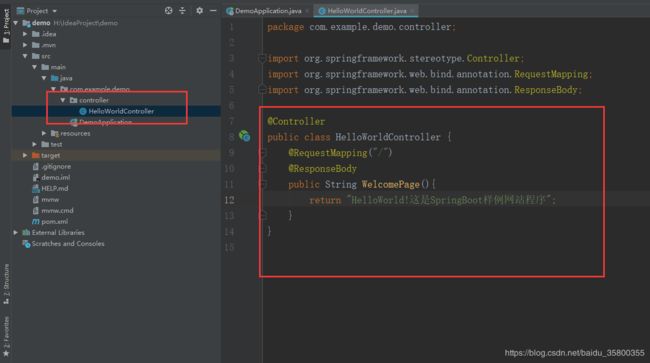
因为开始的时候默认添加了mybatis的Maven依赖所以需要在配置文件中配置数据库连接才能够运行测试测试程序。
直接运行网站会报如下错误。

在resources目录下新建application.yml配置文件,添加如下配置,配置内容根据实际自行修改。.yml文件是根据缩进识别层次,添加属性值的时候记住冒号和属性值内容之间有一个空格。同时在pon.xml,Maven的依赖管理文件中间mysql的runtime这一行注释掉。
配置文件的代码如下:
server:
  port: 8081 #服务器端口号
spring:
  datasource:
    driver-class-name: com.mysql.cj.jdbc.Driver
    url: jdbc:mysql://localhost:3306/oj?useUnicode=true&useJDBCCompliantTimezoneShift=true&useLegacyDatetimeCode=false&serverTimezone=UTC
    username: root
    password: mysql123456
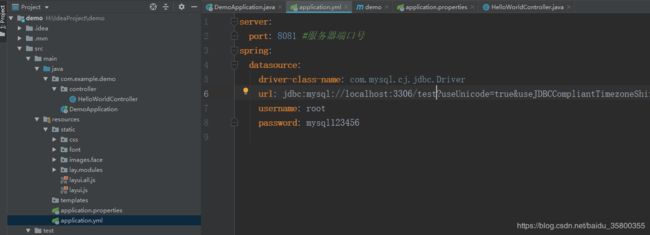

然后打开Application应用类,右键测试网站是否能成功运行。
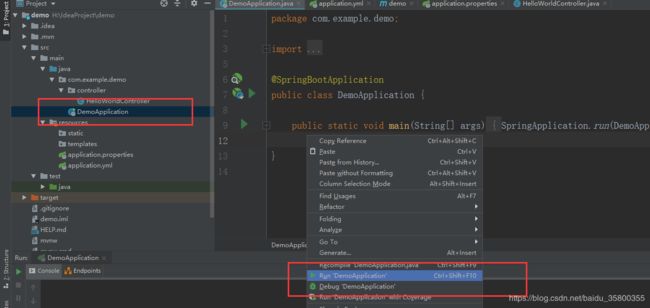
打开浏览器在地址栏中输入http://localhost:8081/即可成功访问测试网站。

3.配置Maven的本地仓库路径
访问Maven的http://maven.apache.org/download.cgi官网下载页面,下载Maven的官方程序。
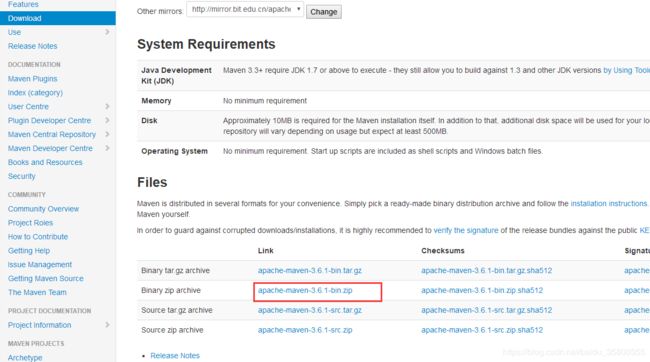
解压压缩包,访问压缩包下的apache-maven-3.6.1\conf\settings.xml配置文件,用记事本打开,找到本地配置路径的位置,修改本地路径。

然后打开idea的设置界面,直接使用自己下载的Maven包即可

4.导入Layui样式文件
通过上面的操作,我们已经成功运行了测试网站,接着引入Layui的JS和CSS样式文件,先访问Layui的官方网站https://www.layui.com/,下载需要的文件,然后将下载的layui文件夹目录下的文件复制demo工程的static文件夹目录下,如下图所示:


5.新建数据库与数据表
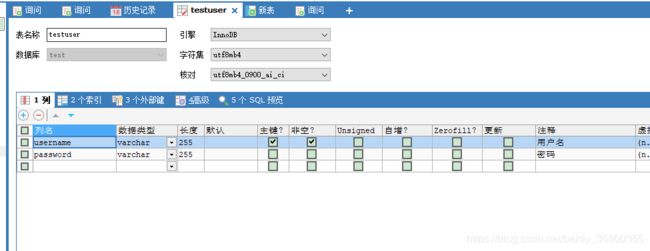
打开mysql可视化管理软件SQLyog,新建数据库test以及含有username和password两个字段的数据表testuser,如下图所示:
6.使用Mybatis-generator生成数据表对应的实体类及基本数据库操作
在pom.xml文件中加入Mybatis-generator的配置信息。
                org.mybatis.generator
                mybatis-generator-maven-plugin
                1.3.7

                    src/main/resources/mybatis-generator.xml
                    true
                    true
然后在resources目录下新建mybatis-generator.xml的配置文件。配置文件的代码如下,可按实际需求进行修改:
根据配置文件的目录新建文件夹:
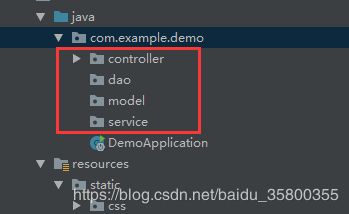
新建文件夹后,点击窗口右侧的Maven选项栏,然后双击下图中圈红色的选项。生成对应的实体类、数据访问对象接口以及数据库CRUD基本操作的xml文件。
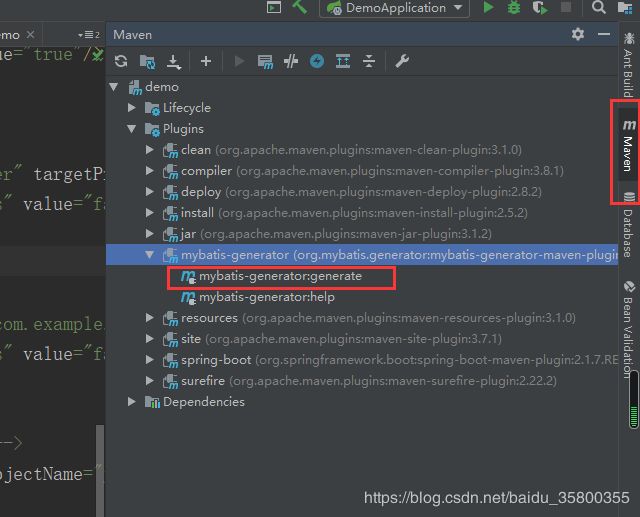
成功生成所需的文件。并为实体类testuser添加一个无参的构造函数以及重写toString()方法,输出对象的参数。

在dao文件夹下生成的Mapper文件中加上@Mapper注解

7.添加Layui数据表单及编写服务层与控制层代码
7.1查询单个用户信息
首先使用自动生成的crud方法,通过主键查询一个用户数据,以JSON数据格式放回到网页。下面看service层和controller层的代码。
service层代码如下:
package com.example.demo.service;

import com.example.demo.dao.testuserMapper;
import com.example.demo.model.testuser;
import org.springframework.beans.factory.annotation.Autowired;
import org.springframework.stereotype.Service;

@Service
public class UserService {
    @Autowired
    testuserMapper userMapper;

    public testuser getOne(String username){
        return userMapper.selectByPrimaryKey(username);
    }
}
controler层代码如下:
package com.example.demo.controller;

import com.example.demo.model.testuser;
import com.example.demo.service.UserService;
import org.springframework.beans.factory.annotation.Autowired;
import org.springframework.stereotype.Controller;
import org.springframework.web.bind.annotation.RequestMapping;
import org.springframework.web.bind.annotation.RequestParam;
import org.springframework.web.bind.annotation.ResponseBody;

import java.util.HashMap;
import java.util.Map;

@Controller
@RequestMapping("/user")
public class UserController {
    @Autowired
    UserService userService;

    @RequestMapping("/getOne")
    @ResponseBody
    public MapgetOne(@RequestParam String username){
        testuser user = userService.getOne(username);
        Map map = new HashMap();
        map.put("user",user);
        return map;
    }
}
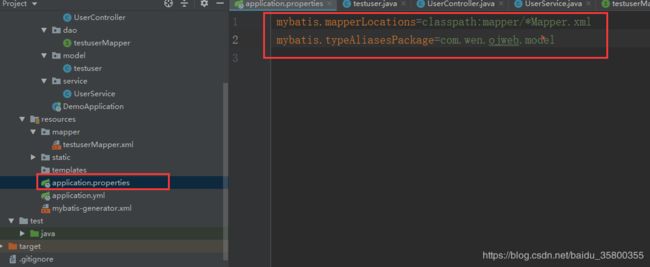
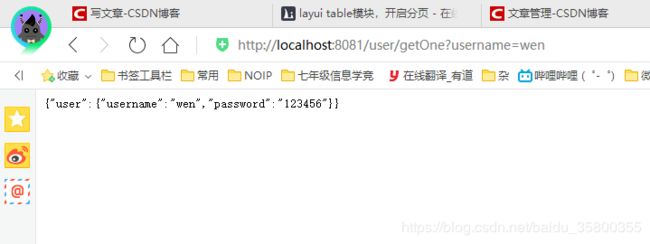
启动服务器前先在application.properties中指定mybatis配置信息,不然无法调用自动生成的CRUD数据库操作函数,接着启动服务器,测试是否能成功通过用户名查询到某个用户数据。在浏览器的地址栏输入http://localhost:8081/user/getOne?username=wen查询数据库中是否含有用户名为wen的数据,成功查询到数据并返回到页面。
7.2查询所有用户信息
测试成功后,编写查询所有用户信息的函数。首先到resources/mapper目录下的testuserMapper.xml文件中添加查询所有用户信息的代码:
接着在dao文件夹下的testuserMapper中添加接口函数,函数名要与testuserMapper.xml
文件中的名字一致。
List selectAll();
7.3添加PageHelper插件
接着编写service层和controller的代码,在编写代码之前,因为进行分页查询需要用到PageHelper这个类,因此要引入PageHelper的相关依赖。
因此在pom.xml中加入如下依赖:
            com.github.pagehelper
            pagehelper
            4.1.6


            com.github.jsqlparser
            jsqlparser
            0.9.6
同时,还需要修改mybatis的数据库配置文件,在resources目录下添加mybatis-config.xml配置文件,文件的代码如下:
并在修改application.properties配置文件的代码为:
#指定mapper文件所在路径
mybatis.mapperLocations=classpath:mapper/*Mapper.xml
#指定mybatis配置文件所在路径
mybatis.config-location=classpath:mybatis-config.xml
PageHelper的基本用法如下:
PageHelper.startPage(page,limit);
//在startPage后面紧跟的查询会变成一个分页查询
List list = new ArrayList<>();
//查询操作
list = userService.selectByUserName(content);
//查询之后使用PageInfo对象对数据进行包装
PageInfo pageInfo = new PageInfo(list);
接着,通过layui的用户文档,查看数据表单的默认接收的格式如下:有code、msg。count和data四个参数,其中,code表示返回的状态码(0表示成功返回),msg表示显示的状态信息,count表示数据的条目数,data表示范围的数据对象数组。如果想修改数据格式可以参考用户文档(https://www.layui.com/doc/modules/table.html)

了解完数据表单接收的数据格式之后,编写代码。
service层的代码如下:
    public List getAll(){
        return userMapper.selectAll();
    }
controller层的代码如下:
import org.apache.commons.logging.Log;
import org.apache.commons.logging.LogFactory;
    private static final Log log = LogFactory.getLog(OjuserController.class);
  /**
     * 糊查询用户信息
     * @param type 表示查询的类型,按什么关键字进行模糊查询,默认值0表示按用户名查询
     * @param content 表示查询的信息
     * @param page 表示页码,默认在第1页
     * @param limit 表示每页的条目数,默认每页10条数据,切换页数或条目数时,前台就会将page和limit两个参数传到后台执行数据表格默认的url操作
     * @return
     */
    @GetMapping("/Search")
    @ResponseBody
    public Map search(@RequestParam(required = false,defaultValue = "0") String type,@RequestParam(required = false,defaultValue = "") String content,@RequestParam(required = false,defaultValue = "1") int page, @RequestParam(required = false,defaultValue = "10") int limit){
        if(log.isTraceEnabled()){
            log.trace("search被调用了传入的参数有:"+ type + " "+ content);
        }
        System.out.println("search被调用了传入的参数有:"+ type + " "+ content);
        //在查询操作之前使用PageHelper进行分页,传入页码以及分页的大小
        PageHelper.startPage(page,limit);
        //在startPage后面紧跟的查询是一个分页查询
        List list = new ArrayList<>();
        list=userService.getAll();
//        if(type.equals("0"))
//            list = userService.selectByUserName(content);
        //查询之后使用PageInfo对象对数据进行包装
        PageInfo pageInfo = new PageInfo(list);
        Mapmap = new HashMap<>();
        map.put("code",0);
        map.put("msg","操作成功");
        map.put("count",pageInfo.getTotal());
        map.put("data",pageInfo.getList());
        System.out.println(map);
        return map;
    }
启动服务器,在浏览器地址栏输入http://localhost:8081/user/Search测试是否执行成功。
发现能够发挥所有的用户信息,表示已经执行成功。
7.4添加Layui数据表单
接着要在html页面加入数据表格的样式,通过查看layui的示例https://www.layui.com/demo/table/page.html,学习layui数据表单的使用方法。因为使用了thymeleaf,因此需要将html页面放在resources的templates文件夹下面
使用th:src和th:href可以直接取得绝对路径。
html页面的代码如下:
用户信息
UserInfo.js文件代码如下:
layui.use(['form', 'laypage', 'layer', 'table', 'element'], function(){
    var form = layui.form
        ,laypage = layui.laypage //分页
        ,layer = layui.layer //弹层
        ,table = layui.table //表格
        ,element = layui.element //元素操作
    table.render({
        elem: '#Usertable'
        ,height: 312
        ,url: '/user/Search' //数据接口
        ,page: true //开启分页
        ,cols: [[ //表头
            {type: 'checkbox', fixed: 'left'}
            ,{field: 'username', title: '用户名', width:200}
            ,{field: 'password', title: '密码', width: 120}
        ]]
    });
    //用于触发搜索搜索按钮的点击事件
    $("#BtnSearchUserInfo").on("click",function () {
        table.reload('Usertable',{
            where:{ //查询条件,传值到后台
                type:$("#type").val(),
                content:$("#content").val(),
            }
        })
    })
});
接着修改@RequestMapping("/")到数据表单的页面。将原来的
    @RequestMapping("/")
    @ResponseBody
    public String WelcomePage(){
        return "HelloWorld!这是SpringBoot样例网站程序";
    }
改为
    @RequestMapping("/")
    public String WelcomePage(){
        return "index";
    }
不使用@ResponseBody注解就会按照返回字符串的值,在templates目录下寻找.html扩展名的页面。
为了测试分页效果,使用
INSERT INTO test.testuser (username, password) VALUES (UUID(), ‘1232443’); 语句插入多条数据。
接着打开浏览器在地址栏输入http://localhost:8081/测试运行效果:

发现运行成功,但是因为之前调用的是查询传布数据的函数,最后,还要编写一个按用户名进行模糊查询的函数。
在resources/mapper文件夹下的testuserMapper.xml文件中编写按用户名进行模糊查询操作的语句,代码如下:
接着在dao\testuserMapper.java的dao接口文件中加入与刚才在xml中加入sellect语句id相同的函数:
ListselectByUserName(String username);
接着按照之前的步骤在service层与controller层中添加对应的操作代码:
service层的代码如下:
    public List getByUsername(String username){
        return userMapper.selectByUserName(username);
    }
controller层的代码修改如下:
   /**
     * 糊查询用户信息
     * @param type 表示查询的类型,按什么关键字进行模糊查询,默认值0表示按用户名查询
     * @param content 表示查询的信息
     * @param page 表示页码,默认在第1页
     * @param limit 表示每页的条目数,默认每页10条数据
     * @return
     */
    @GetMapping("/Search")
    @ResponseBody
    public Map search(@RequestParam(required = false,defaultValue = "0") String type,@RequestParam(required = false,defaultValue = "") String content,@RequestParam(required = false,defaultValue = "1") int page, @RequestParam(required = false,defaultValue = "10") int limit){
        if(log.isTraceEnabled()){
            log.trace("search被调用了传入的参数有:"+ type + " "+ content);
        }
        System.out.println("search被调用了传入的参数有:"+ type + " "+ content);
        //在查询操作之前使用PageHelper进行分页,传入页码以及分页的大小
        PageHelper.startPage(page,limit);
        //在startPage后面紧跟的查询是一个分页查询
        List list = new ArrayList<>();
        if(type.equals("0"))
            list = userService.getByUsername(content);
        //查询之后使用PageInfo对象对数据进行包装
        PageInfo pageInfo = new PageInfo(list);
        Mapmap = new HashMap<>();
        map.put("code",0);
        map.put("msg","操作成功");
        map.put("count",pageInfo.getTotal());
        map.put("data",pageInfo.getList());
        return map;
    }
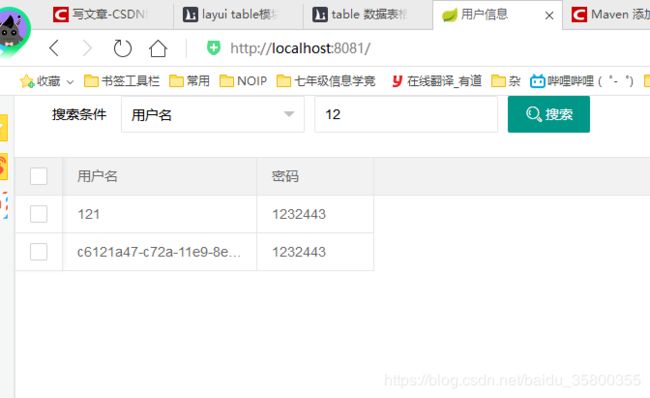
重新启动服务器,访问网页,测试模糊查询功能,能够查询到包含用户名中包含12的用户信息。
SpringBoot的配置文件:
properties和yml中的配置,相互补充;如果冲突,则properties优先级高。
注意:
(1)如果某项配置冲突(即多个配置文件中设置了同一参数的属性值),则优先级从上往下
(2)如果不冲突,则互补结合使用