学习笔记0509----LAMP架构(二)
LAMP架构
- 预习笔记
- 1.apache默认虚拟主机
- 1.1 windows系统中的hosts文件
- 1.2 编辑hosts文件
- 1.3 添加多个虚拟主机
- 2. apache用户认证
- 2.1 对访问的目录做认证限制
- 2.1.1 编辑vhosts配置文件
- 2.1.2 创建用户密码
- 2.1.3 查看状态
- 2.2 apache用户认证,针对访问某个文件
- 2.2.1 编辑vhosts配置文件
- 2.2.2 查看状态
- 3 域名跳转
- 3.1 修改配置文件
- 3.2 检查http.conf文件中rewrite模块是否开启
- 3.3 重新加载配置文件
- 3.4 查看状态
- 4. apache的访问日志
- 4.1 apache的日志目录/usr/local/httpd2.4/logs/
- 4.2 日志的格式
- 4.3 修改虚拟主机日志格式
- 4.4 修改访问日志不记录指定类型的文件
- 4.5 切割日志
- 4.5.1 修改配置文件
- 4.5.2 查看状态
- 4.6 静态元素过期时间
- 4.6.1 修改httpd.conf
- 4.6.2 修改虚拟主机配置文件
- 4.6.3 查看状态
- 课后总结
- 1.apache的另一种安装方法
- 2. httpd.conf 配置文件解析
预习笔记
11.16/11.17 Apache默认虚拟主机
11.18 Apache用户认证
11.19/11.20 域名跳转
11.21 Apache访问日志
11.22 访问日志不记录静态文件
11.23 访问日志切割
11.24 静态元素过期时间
1.apache默认虚拟主机
一台服务器可以访问多个网站,每个网站都是一个虚拟主机
概念:域名(主机名)、DNS、解析域名、hosts
任何一个域名解析到这台机器,都可以访问的虚拟主机就是默认虚拟主机
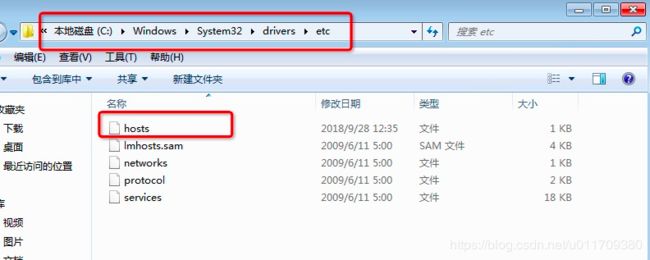
1.1 windows系统中的hosts文件
1.2 编辑hosts文件
添加一个IP和域名 :192.168.141.122 www.xihaji.com www.123.com 保存。
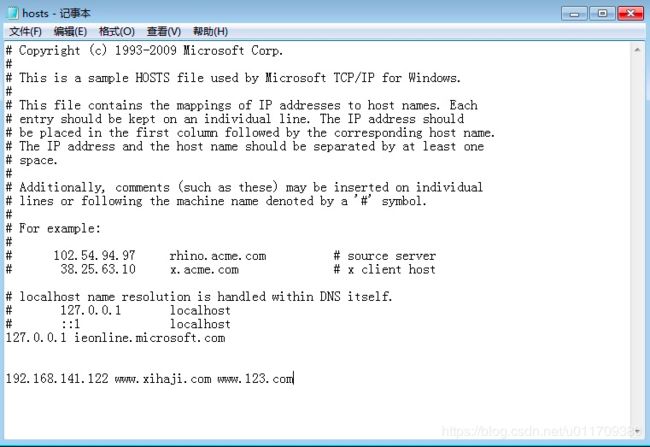
然后使用windows的命令行去ping域名,如下图: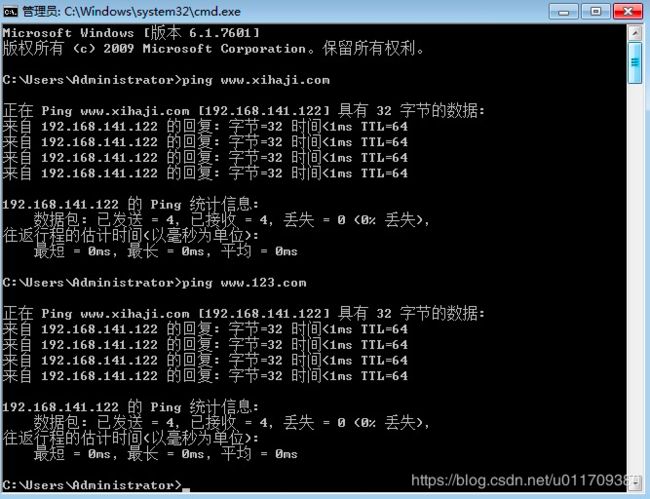
使用浏览器打开:www.123.com,可以发现可以打开域名。

1.3 添加多个虚拟主机
apache中默认使用的是/usr/local/httpd2.4/conf/httpd.conf配置文件,但是#Include conf/extra/httpd-vhosts.conf没有开启。如果要开启多个虚拟主机,需要把Include 前的#号去掉,但是主配置文件中的ServerName 和DocumentRoot "/usr/local/httpd2.4/htdocs"这两行配置会失效。
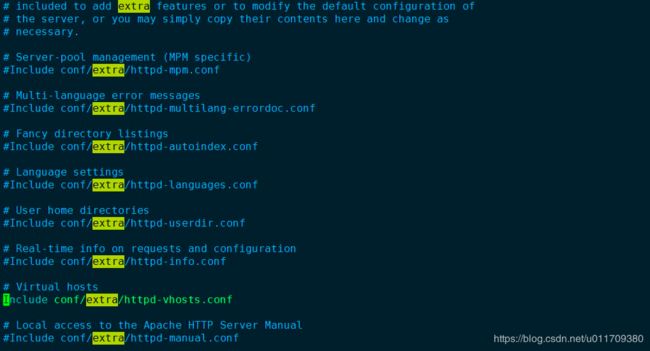
接下来查看下虚拟主机的配置文件:/usr/local/httpd2.4/conf/extra/httpd-vhosts.conf
[root@linux-001 extra]# vim /usr/local/httpd2.4/conf/extra/httpd-vhosts.conf
# Virtual Hosts
#
# Required modules: mod_log_config
# If you want to maintain multiple domains/hostnames on your
# machine you can setup VirtualHost containers for them. Most configurations
# use only name-based virtual hosts so the server doesn't need to worry about
# IP addresses. This is indicated by the asterisks in the directives below.
#
# Please see the documentation at
# block.
#
<VirtualHost *:80>
ServerAdmin [email protected] //定义管理员的邮箱,可以删除
DocumentRoot "/usr/local/httpd2.4/docs/dummy-host.example.com" // 定义虚拟主机的目录
ServerName dummy-host.example.com // 定义虚拟主机的名字,只能有一个
ServerAlias www.dummy-host.example.com // 定义虚拟主机的别名,可以有多个
ErrorLog "logs/dummy-host.example.com-error_log" // 定义虚拟主机的错误日志文件位置
CustomLog "logs/dummy-host.example.com-access_log" common // 定义访问虚拟主机的访问日志
</VirtualHost>
<VirtualHost *:80>
ServerAdmin [email protected]
DocumentRoot "/usr/local/httpd2.4/docs/dummy-host2.example.com"
ServerName dummy-host2.example.com
ErrorLog "logs/dummy-host2.example.com-error_log"
CustomLog "logs/dummy-host2.example.com-access_log" common
</VirtualHost>
[root@linux-001 extra]# mkdir /data/wwwroot/
[root@linux-001 extra]# mkdir /data/wwwroot/abc.com
[root@linux-001 extra]# mkdir /data/wwwroot/111.com
[root@linux-001 extra]# vim /data/wwwroot/abc.com/index.html
This is my first program !

[root@linux-001 extra]# vim /data/wwwroot/111.com/index.html
This is my second program !

[root@linux-001 extra]# /usr/local/httpd2.4/bin/apachectl  -t
Syntax OK
[root@linux-001 extra]# /usr/local/httpd2.4/bin/apachectl  graceful
[root@linux-001 extra]#
测试访问虚拟主机:
[root@linux-001 abc.com]# curl -x192.168.141.128:80 abc.com
This is my first program !
[root@linux-001 abc.com]# curl -x192.168.141.128:80 www.aminglinux.com  //没有定义域名默认访问的第一个虚拟主机
This is my first program !

[root@linux-001 abc.com]# curl -x192.168.141.128:80 111.com
This is my second program !
[root@linux-001 abc.com]# curl -x192.168.141.128:80 www.example.com
This is my first program !
[root@linux-001 abc.com]#
2. apache用户认证
2.1 对访问的目录做认证限制
2.1.1 编辑vhosts配置文件
[root@linux-001 abc.com]# vim /usr/local/httpd2.4/conf/extra/httpd-vhosts.conf

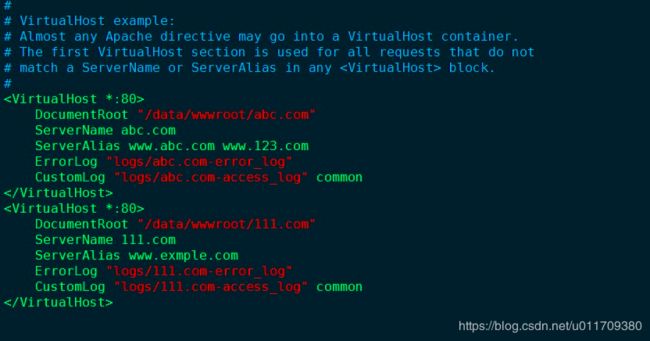
<VirtualHost *:80>
    DocumentRoot "/data/wwwroot/abc.com"
    ServerName abc.com
    ServerAlias www.abc.com www.123.com
    ErrorLog "logs/abc.com-error_log"
    CustomLog "logs/abc.com-access_log" common
</VirtualHost>

<VirtualHost *:80>
    DocumentRoot "/data/wwwroot/111.com"
    ServerName 111.com
    ServerAlias www.exmple.com
    ErrorLog "logs/111.com-error_log"
    CustomLog "logs/111.com-access_log" common
</VirtualHost>

<VirtualHost *:80>
    DocumentRoot "/data/wwwroot/xihaji.com"
    ServerName www.xihaji.com
    <Directory /data/wwwroot/xihaji.com> //指定认证的目录
        AllowOverride AuthConfig //这个相当于打开认证的开关
        AuthName "xihaji.com user auth" //自定义认证的名字,作用不大
        AuthType Basic //认证的类型,一般为Basic,其他类型阿铭没用过
        AuthUserFile /data/.htpasswd  //指定密码文件所在位置
        require valid-user //指定需要认证的用户为全部可用用户
    </Directory>
     ErrorLog "logs/xihaji.com-error_log"
    CustomLog "logs/xihaji.com-access_log" common
</VirtualHost>
2.1.2 创建用户密码
htpasswd -c参数创建 -m指定加密类型
[root@linux-001 xihaji.com]# /usr/local/httpd2.4/bin/htpasswd  -c -m /data/.htpasswd xihaji
New password:
Re-type new password:
Adding password for user xihajix

[root@linux-001 xihaji.com]#  cat /data/.htpasswd
xihaji:$apr1$oxc5sgAy$RN24iKv1C4WWmonou6A/.1
[root@linux-001 xihaji.com]#
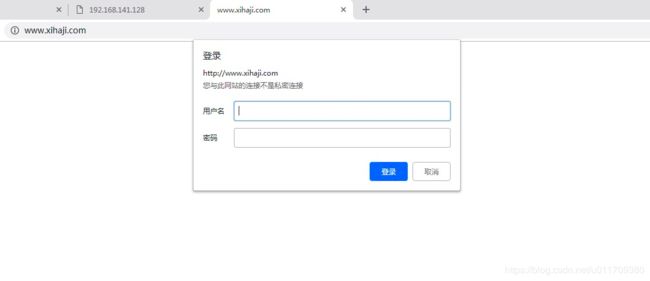
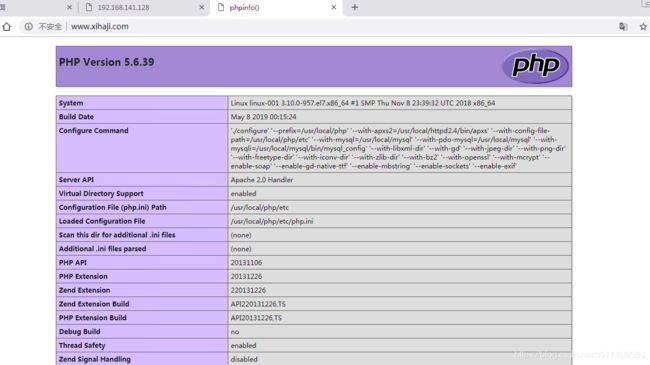
2.1.3 查看状态
[root@linux-001 xihaji.com]# /usr/local/httpd2.4/bin/apachectl  -t
Syntax OK
[root@linux-001 xihaji.com]# /usr/local/httpd2.4/bin/apachectl  graceful


[root@linux-001 xihaji.com]# curl  -x127.0.0.1:80 www.xihaji.com
<!DOCTYPE HTML PUBLIC "-//IETF//DTD HTML 2.0//EN">
<html><head>
<title>401 Unauthorized</title>
</head><body>
<h1>Unauthorized</h1>
<p>This server could not verify that you
are authorized to access the document
requested.  Either you supplied the wrong
credentials (e.g., bad password), or your
browser doesn't understand how to supply
the credentials required.</p>
</body></html>


[root@linux-001 xihaji.com]# curl  -x127.0.0.1:80 www.xihaji.com  -I
HTTP/1.1 401 Unauthorized
Date: Wed, 08 May 2019 22:12:55 GMT
Server: Apache/2.4.39 (Unix) PHP/5.6.39
WWW-Authenticate: Basic realm="xihaji.com user auth"
Content-Type: text/html; charset=iso-8859-1

[root@linux-001 xihaji.com]#
[root@linux-001 xihaji.com]# curl  -x127.0.0.1:80 -uxihaji:123qwe www.xihaji.com  -I
HTTP/1.1 200 OK
Date: Wed, 08 May 2019 22:17:49 GMT
Server: Apache/2.4.39 (Unix) PHP/5.6.39
X-Powered-By: PHP/5.6.39
Content-Type: text/html; charset=UTF-8
2.2 apache用户认证,针对访问某个文件
2.2.1 编辑vhosts配置文件
[root@linux-001 xihaji.com]# vim /usr/local/httpd2.4/conf/extra/httpd-vhosts.conf
<VirtualHost *:80>
    DocumentRoot "/data/wwwroot/xihaji.com"
    ServerName www.xihaji.com
   #
   #     AllowOverride AuthConfig
   #     AuthName "xihaji.com user auth"
   #     AuthType Basic
   #     AuthUserFile /data/.htpasswd
   #     require valid-user
   #
   <FilesMatch 1.php>
        AllowOverride AuthConfig
        AuthName "123.com user auth"
        AuthType Basic
        AuthUserFile /data/.htpasswd
        require valid-user
    </FilesMatch>
    ErrorLog "logs/xihaji.com-error_log"
    CustomLog "logs/xihaji.com-access_log" common
</VirtualHost>
2.2.2 查看状态
[root@linux-001 xihaji.com]# /usr/local/httpd2.4/bin/apachectl  -t
Syntax OK
[root@linux-001 xihaji.com]# /usr/local/httpd2.4/bin/apachectl  graceful

## 查看访问此文件的内容 ##
[root@linux-001 xihaji.com]# curl -x127.0.0.1:80  www.xihaji.com/1.php


401 Unauthorized

Unauthorized
This server could not verify that you
are authorized to access the document
requested.  Either you supplied the wrong
credentials (e.g., bad password), or your
browser doesn't understand how to supply
the credentials required.


## 查看访问此文件的状态 ##
[root@linux-001 xihaji.com]# curl -x127.0.0.1:80  www.xihaji.com/1.php  -I
HTTP/1.1 401 Unauthorized
Date: Wed, 08 May 2019 22:34:03 GMT
Server: Apache/2.4.39 (Unix) PHP/5.6.39
WWW-Authenticate: Basic realm="123.com user auth"
Content-Type: text/html; charset=iso-8859-1

## 查看访问此文件的内容 ##
[root@linux-001 xihaji.com]# curl -x127.0.0.1:80 -uxihaji:123qwe  www.xihaji.com/1.php
text wenjian !

## 查看访问此文件的状态 ##
[root@linux-001 xihaji.com]# curl -x127.0.0.1:80 -uxihaji:123qwe  www.xihaji.com/1.php  -I
HTTP/1.1 200 OK
Date: Wed, 08 May 2019 22:34:25 GMT
Server: Apache/2.4.39 (Unix) PHP/5.6.39
X-Powered-By: PHP/5.6.39
Content-Type: text/html; charset=UTF-8
3 域名跳转
域名跳转类似于将网页重新指向另一个网站,但区别是域名跳转会将域名本身重新指向网站,而不使用HTML或脚本来进行重新指向。当域名被设置为跳转至另一网站,域名的地址将不会保留在浏览器的URL栏中,该栏显示的会是新页面的URL。如果您希望保留该栏中的URL,则需要使用隐形跳转。
3.1 修改配置文件
- rewrite模块
//需要mod_rewrite模块支持
RewriteEngine on //打开rewrite功能
RewriteCond %{HTTP_HOST} !^www.123.com$ //定义rewrite的条件,主机名(域名)不是www.123.com满足条件
RewriteRule ^/(.*)$ http://www.123.com/$1 [R=301,L] //定义rewrite规则,当满足上面的条件时,这条规则才会执行
[root@linux-001 xihaji.com]# vim /usr/local/httpd2.4/conf/extra/httpd-vhosts.conf


    DocumentRoot "/data/wwwroot/xihaji.com"
    ServerName www.xihaji.com
    ServerAlias xihaji123.com aaa.com
   #
   #     AllowOverride AuthConfig
   #     AuthName "xihaji.com user auth"
   #     AuthType Basic
   #     AuthUserFile /data/.htpasswd
   #     require valid-user
   #
   #
   #     AllowOverride AuthConfig
   #     AuthName "123.com user auth"
   #     AuthType Basic
   #     AuthUserFile /data/.htpasswd
   #     require valid-user
   #

        RewriteEngine on
        RewriteCond %{HTTP_HOST} !^www.xihaji.com
        RewriteRule ^/(.*)$ http://www.xihaji.com/$1 [R=301,L]

    ErrorLog "logs/xihaji.com-error_log"
    CustomLog "logs/xihaji.com-access_log" common
3.2 检查http.conf文件中rewrite模块是否开启
[root@linux-001 xihaji.com]# cat /usr/local/httpd2.4/conf/httpd.conf | grep rewrite
#LoadModule rewrite_module modules/mod_rewrite.so
[root@linux-001 xihaji.com]# vim /usr/local/httpd2.4/conf/httpd.conf
LoadModule rewrite_module modules/mod_rewrite.so  //把前面的#号去掉
3.3 重新加载配置文件
[root@linux-001 xihaji.com]# /usr/local/httpd2.4/bin/apachectl  -t
Syntax OK
[root@linux-001 xihaji.com]# /usr/local/httpd2.4/bin/apachectl  graceful
3.4 查看状态
301代表永久跳转,302代表临时跳转,200代表文件存在,404代表文件不存在
[root@linux-001 xihaji.com]# curl -x192.168.141.128:80 www.xihaji.com  -I
HTTP/1.1 200 OK
Date: Thu, 09 May 2019 00:16:02 GMT
Server: Apache/2.4.39 (Unix) PHP/5.6.39
X-Powered-By: PHP/5.6.39
Content-Type: text/html; charset=UTF-8

[root@linux-001 xihaji.com]# curl -x192.168.141.128:80 www.xihaji.com/555.txt  -I
HTTP/1.1 404 Not Found
Date: Thu, 09 May 2019 00:16:11 GMT
Server: Apache/2.4.39 (Unix) PHP/5.6.39
Content-Type: text/html; charset=iso-8859-1

[root@linux-001 xihaji.com]# curl -x192.168.141.128:80 aaa.com  -I
HTTP/1.1 301 Moved Permanently
Date: Thu, 09 May 2019 00:16:23 GMT
Server: Apache/2.4.39 (Unix) PHP/5.6.39
Location: http://www.xihaji.com/
Content-Type: text/html; charset=iso-8859-1

[root@linux-001 xihaji.com]#
4. apache的访问日志
4.1 apache的日志目录/usr/local/httpd2.4/logs/
[root@linux-001 xihaji.com]# ll /usr/local/httpd2.4/logs/
总用量 120
-rw-r--r-- 1 root root   262 5月   9 05:48 111.com-access_log
-rw-r--r-- 1 root root   187 5月   9 04:26 111.com-error_log
-rw-r--r-- 1 root root 10210 5月   9 08:10 abc.com-access_log
-rw-r--r-- 1 root root 25181 5月   9 08:10 abc.com-error_log
-rw-r--r-- 1 root root  1746 5月   9 05:17 access_log
-rw-r--r-- 1 root root 19528 5月   9 08:12 error_log
-rw-r--r-- 1 root root     6 5月   9 08:12 httpd.pid
-rw-r--r-- 1 root root 12897 5月   9 08:16 xihaji.com-access_log
-rw-r--r-- 1 root root 24851 5月   9 06:22 xihaji.com-error_log
4.2 日志的格式
[root@linux-001 xihaji.com]# tail  /usr/local/httpd2.4/logs/xihaji.com-access_log
192.168.141.128 - - [09/May/2019:08:08:18 +0800] "HEAD HTTP://aaa.com/ HTTP/1.1" 301 -
192.168.141.128 - - [09/May/2019:08:13:00 +0800] "HEAD HTTP://aaaa.com/ HTTP/1.1" 301 -
192.168.141.128 - - [09/May/2019:08:13:09 +0800] "HEAD HTTP://aaa.com/ HTTP/1.1" 301 -
192.168.141.128 - - [09/May/2019:08:13:20 +0800] "HEAD HTTP://www.xihaji.com/ HTTP/1.1" 200 -
192.168.141.128 - - [09/May/2019:08:14:01 +0800] "HEAD HTTP://xihajiaaa.com/ HTTP/1.1" 301 -
192.168.141.128 - - [09/May/2019:08:16:02 +0800] "HEAD HTTP://www.xihaji.com/ HTTP/1.1" 200 -
192.168.141.128 - - [09/May/2019:08:16:11 +0800] "HEAD HTTP://www.xihaji.com/555.txt HTTP/1.1" 404 -
192.168.141.128 - - [09/May/2019:08:16:23 +0800] "HEAD HTTP://aaa.com/ HTTP/1.1" 301 -
192.168.141.1 - xihaji [09/May/2019:17:43:14 +0800] "GET / HTTP/1.1" 200 11
192.168.141.1 - xihaji [09/May/2019:17:43:18 +0800] "GET / HTTP/1.1" 200 11
[root@linux-001 xihaji.com]#
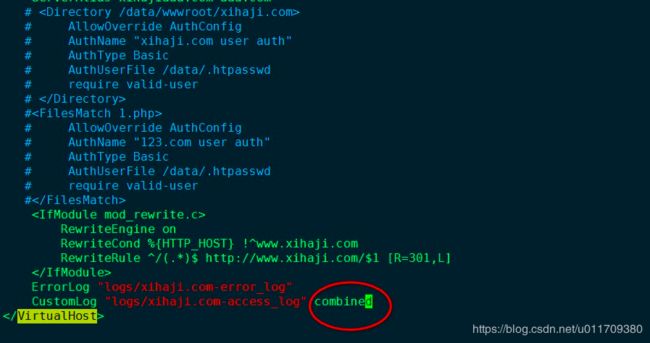
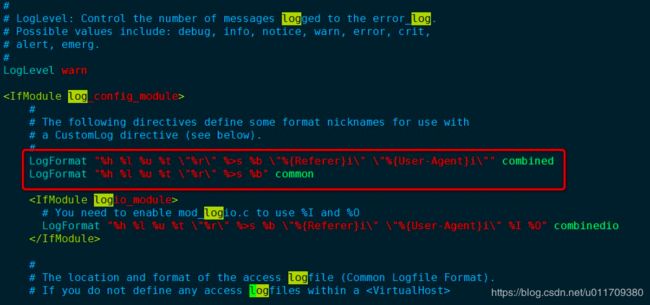
上面显示的信息包含:访问主机,用户,时间,访问的状态。这个日志的格式是有定义的,可以打开hhtpd.conf文件查看到,如下图
4.3 修改虚拟主机日志格式
查看新的日志格式,和上文的日志格式区别。
[root@linux-001 xihaji.com]# tail  /usr/local/httpd2.4/logs/xihaji.com-access_log
192.168.141.128 - - [09/May/2019:08:14:01 +0800] "HEAD HTTP://xihajiaaa.com/ HTTP/1.1" 301 -
192.168.141.128 - - [09/May/2019:08:16:02 +0800] "HEAD HTTP://www.xihaji.com/ HTTP/1.1" 200 -
192.168.141.128 - - [09/May/2019:08:16:11 +0800] "HEAD HTTP://www.xihaji.com/555.txt HTTP/1.1" 404 -
192.168.141.128 - - [09/May/2019:08:16:23 +0800] "HEAD HTTP://aaa.com/ HTTP/1.1" 301 -
192.168.141.1 - xihaji [09/May/2019:17:43:14 +0800] "GET / HTTP/1.1" 200 11
192.168.141.1 - xihaji [09/May/2019:17:43:18 +0800] "GET / HTTP/1.1" 200 11
127.0.0.1 - - [09/May/2019:18:42:35 +0800] "GET HTTP://www.xihaji.com/ HTTP/1.1" 200 11 "-" "curl/7.29.0"
127.0.0.1 - - [09/May/2019:18:42:43 +0800] "HEAD HTTP://www.xihaji.com/ HTTP/1.1" 200 - "-" "curl/7.29.0"
192.168.141.1 - xihaji [09/May/2019:18:42:47 +0800] "GET / HTTP/1.1" 200 11 "-" "Mozilla/5.0 (Windows NT 6.1; Win64; x64) AppleWebKit/537.36 (KHTML, like Gecko) Chrome/69.0.3497.100 Safari/537.36"
192.168.141.1 - xihaji [09/May/2019:18:42:54 +0800] "GET / HTTP/1.1" 200 11 "-" "Mozilla/5.0 (Windows NT 6.1; Win64; x64) AppleWebKit/537.36 (KHTML, like Gecko) Chrome/69.0.3497.100 Safari/537.36"
[root@linux-001 xihaji.com]#
4.4 修改访问日志不记录指定类型的文件
## 最后两行可以查看到访问的是图片jpg也会保存到日志当中 ##
[root@linux-001 xihaji.com]# tail -5f  /usr/local/httpd2.4/logs/xihaji.com-access_log
192.168.141.1 - xihaji [09/May/2019:18:42:54 +0800] "GET / HTTP/1.1" 200 11 "-" "Mozilla/5.0 (Windows NT 6.1; Win64; x64) AppleWebKit/537.36 (KHTML, like Gecko) Chrome/69.0.3497.100 Safari/537.36"
192.168.141.1 - - [09/May/2019:18:43:45 +0800] "-" 408 - "-" "-"
192.168.141.1 - xihaji [09/May/2019:14:17:47 +0800] "GET / HTTP/1.1" 200 11 "-" "Mozilla/5.0 (Windows NT 6.1; Win64; x64) AppleWebKit/537.36 (KHTML, like Gecko) Chrome/69.0.3497.100 Safari/537.36"
192.168.141.1 - - [09/May/2019:14:22:17 +0800] "GET /123.jpg HTTP/1.1" 304 - "-" "Mozilla/5.0 (Windows NT 6.1; Win64; x64) AppleWebKit/537.36 (KHTML, like Gecko) Chrome/69.0.3497.100 Safari/537.36"
192.168.141.1 - - [09/May/2019:14:22:28 +0800] "GET /123.jpg HTTP/1.1" 304 - "-" "Mozilla/5.0 (Windows NT 6.1; Win64; x64) AppleWebKit/537.36 (KHTML, like Gecko) Chrome/69.0.3497.100 Safari/537.36"
修改虚拟主机配置文件添加如下内容:
[root@linux-001 ~]# vim /usr/local/httpd2.4/conf/extra/httpd-vhosts.conf
<VirtualHost *:80>
# AllowOverride AuthConfig
# AuthName "xihaji.com user auth"
# AuthType Basic
# AuthUserFile /data/.htpasswd
# require valid-user
#
#这时候再去查看日志文件,发现访问jpg图片的信息已经被修改掉。
4.5 切割日志
-
CustomLog “|/usr/local/apache2/bin/rotatelogs -l logs/123test-access_log_%Y%m%d_log 86400” combined env=!img
-
/usr/local/apache2.4/bin/rotatelogs工具是apache自带的分割日志的工具
-
-l参数按当前系统时间为基准进行切割(我国为CST),否则默认UTC
-
%Y%m%d表示年月日,这样会每天记录一个带日期的日志文件,更方便
-
86400(s)表示每天都进行切割,一天24小时等于86400秒
4.5.1 修改配置文件
[root@linux-001 logs]# !vim
vim /usr/local/httpd2.4/conf/extra/httpd-vhosts.conf
# AuthUserFile /data/.htpasswd
# require valid-user
#
#4.5.2 查看状态
[root@linux-001 logs]# /usr/local/httpd2.4/bin/apachectl  -t
Syntax OK
[root@linux-001 logs]# /usr/local/httpd2.4/bin/apachectl  graceful
[root@linux-001 logs]# ls
111.com-access_log               abc.com-access_log  error_log                       xihaji.com-access_log
111.com-error_log                abc.com-error_log   httpd.pid                       xihaji.com-error_log
123test-access_log_20190509_log  access_log          xihaji-access_log_20190509_log
[root@linux-001 logs]# tail  xihaji-access_log_20190509_log
192.168.141.1 - xihaji [09/May/2019:14:45:51 +0800] "GET / HTTP/1.1" 200 11 "-" "Mozilla/5.0 (Windows NT 6.1; Win64; x64) AppleWebKit/537.36 (KHTML, like Gecko) Chrome/69.0.3497.100 Safari/537.36"
192.168.141.1 - xihaji [09/May/2019:14:45:51 +0800] "GET / HTTP/1.1" 200 11 "-" "Mozilla/5.0 (Windows NT 6.1; Win64; x64) AppleWebKit/537.36 (KHTML, like Gecko) Chrome/69.0.3497.100 Safari/537.36"
192.168.141.1 - xihaji [09/May/2019:14:45:51 +0800] "GET / HTTP/1.1" 200 11 "-" "Mozilla/5.0 (Windows NT 6.1; Win64; x64) AppleWebKit/537.36 (KHTML, like Gecko) Chrome/69.0.3497.100 Safari/537.36"
192.168.141.1 - xihaji [09/May/2019:14:45:51 +0800] "GET / HTTP/1.1" 200 11 "-" "Mozilla/5.0 (Windows NT 6.1; Win64; x64) AppleWebKit/537.36 (KHTML, like Gecko) Chrome/69.0.3497.100 Safari/537.36"
192.168.141.1 - - [09/May/2019:14:45:58 +0800] "GET /1/php HTTP/1.1" 404 203 "-" "Mozilla/5.0 (Windows NT 6.1; Win64; x64) AppleWebKit/537.36 (KHTML, like Gecko) Chrome/69.0.3497.100 Safari/537.36"
192.168.141.1 - xihaji [09/May/2019:14:46:03 +0800] "GET /1.php HTTP/1.1" 200 14 "-" "Mozilla/5.0 (Windows NT 6.1; Win64; x64) AppleWebKit/537.36 (KHTML, like Gecko) Chrome/69.0.3497.100 Safari/537.36"
[root@linux-001 logs]#
4.6 静态元素过期时间
浏览器访问网站的图片时会把静态的文件缓存在本地电脑里,这样下次再访问时就不用去远程下载了。 但是缓存多久呢?如果网站图片更新了呢,那么应该访问新图片才是。所以这就涉及到静态文件缓存时长的问题了,也就是“缓存过期时间”。
4.6.1 修改httpd.conf
由于expaire模块没有打开,所有需要去主配置文件中打开
[root@linux-001 httpd2.4]# ./bin/apachectl -M | grep expaire

[root@linux-001 httpd2.4]# vim conf/httpd.conf
……
LoadModule expires_module modules/mod_expires.so
……
4.6.2 修改虚拟主机配置文件
[root@linux-001 xihaji.com]# vim /usr/local/httpd2.4/conf/extra/httpd-vhosts.conf
……
<IfModule mod_expires.c>
ExpiresActive on //打开该功能的开关
ExpiresByType image/gif "access plus 1 days"
ExpiresByType image/jpeg "access plus 24 hours"
ExpiresByType image/png "access plus 24 hours"
ExpiresByType text/css "now plus 2 hour"
ExpiresByType application/x-javascript "now plus 2 hours"
ExpiresByType application/javascript "now plus 2 hours"
ExpiresByType application/x-shockwave-flash "now plus 2 hours"
ExpiresDefault "now plus 0 min" //除上述外的文件指定默认的过期时间
</IfModule>
4.6.3 查看状态
[root@linux-001 xihaji.com]# /usr/local/httpd2.4/bin/apachectl  -t
Syntax OK
[root@linux-001 xihaji.com]# /usr/local/httpd2.4/bin/apachectl  graceful
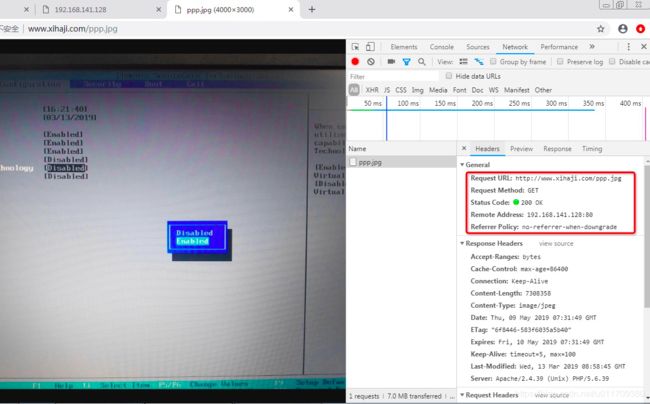
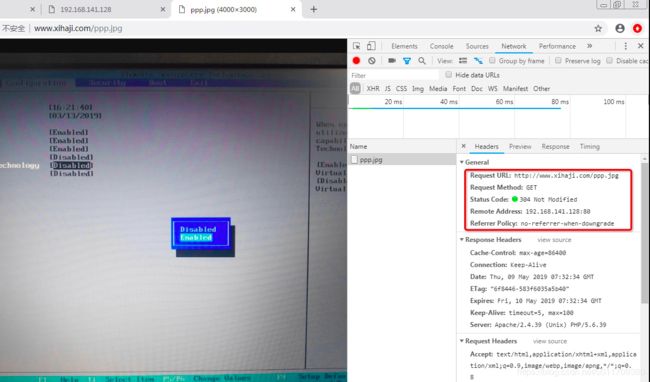
上图中的状态是200,浏览器使用F5刷新地址,可以查看到状态变为了304。
课后总结
1.apache的另一种安装方法
1.下载apr-1.6、apr-util-1.6以及httpd-2.4,分别解压三个源码包
2.把apr-1.6.3 放到httpd源码包的/srclib/下,改名apr
3.把apr-util-1.6.1 放到httpd源码包的/srclib/下,改名apr-util4)
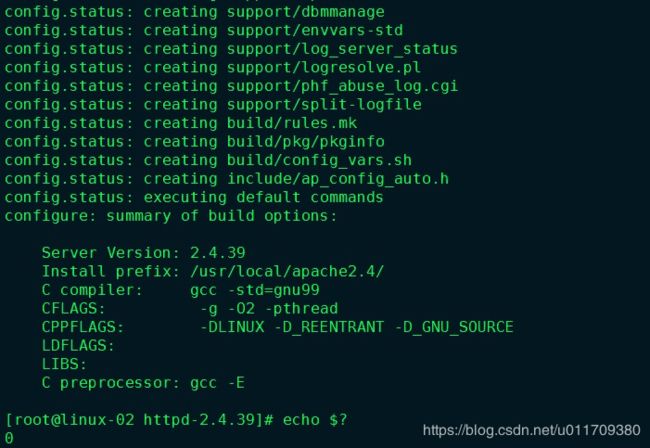
4.编译参数./configure --prefix=/dir/ --enable-so --enable-mpms-shared=all --with-mpm=event --enable-mods-shared=most --with-included-apr
说明:这里的/dir/为apache安装路径,根据需求定目录
apache的一些学习文档: https://github.com/aminglinux/apache
2. httpd.conf 配置文件解析
httpd.conf文件解析
1)Global Environment—全局环境配置,决定Apache服务器的全局参数
2)Main server configuration—主服务配置,相当于是Apache中的默认Web站点,如果我们的服务器中只有一个站点,那么就只需在这里配置就可以了。
3)Virtual Hosts—虚拟主机,虚拟主机不能与Main Server主服务器共存,当启用了虚拟主机之后,Main Server就不能使用了
