Android 实现自定义控件(组合控件)
Android 自定义控件的实现
本文种实现的自定义控件为 键盘,总体有三步:
- 实现键盘的样式(xml);
- 实现自定义属性(attrs);
- 实现自定义view类;
- .将自定义的键盘布局加载到自定义的dialog中;
- 自定义dialog,实现回调监听,让键盘被点击的数字都能回传
- 展示dialog
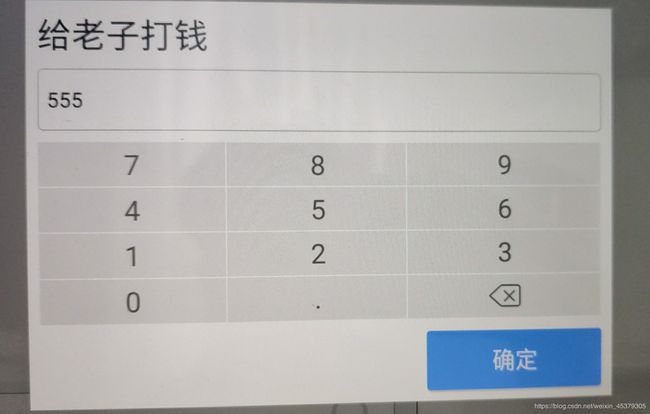
1.首先,先实现键盘的样式,我在这里实现的为输入金额的键盘;
<?xml version="1.0" encoding="utf-8"?>
<GridLayout xmlns:android="http://schemas.android.com/apk/res/android"
    android:layout_width="match_parent"
    android:layout_height="match_parent"
    android:columnCount="4"
    android:rowCount="4">

    <TextView
        android:id="@+id/t7"
        android:layout_columnWeight="1"
        android:layout_rowWeight="1"
        android:textSize="30sp"
        android:gravity="center"
        android:background="@color/text_bgcolor_gray"
        android:textColor="@color/text_color_black"
        android:text="7"
        android:layout_marginRight="1dp"
        android:layout_marginBottom="1dp"/>

    <TextView
        android:id="@+id/t8"
        android:layout_columnWeight="1"
        android:layout_rowWeight="1"
        android:textSize="30sp"
        android:gravity="center"
        android:background="@color/text_bgcolor_gray"
        android:textColor="@color/text_color_black"
        android:text="8"
        android:layout_marginRight="1dp"
        android:layout_marginBottom="1dp"/>

    <TextView
        android:id="@+id/t9"
        android:layout_columnWeight="1"
        android:layout_rowWeight="1"
        android:textSize="30sp"
        android:gravity="center"
        android:background="@color/text_bgcolor_gray"
        android:textColor="@color/text_color_black"
        android:text="9"
        android:layout_marginRight="1dp"
        android:layout_marginBottom="1dp"/>
    <TextView
        android:id="@+id/t100"
        android:visibility="gone"
        android:layout_columnWeight="1"
        android:layout_rowWeight="1"
        android:textSize="30sp"
        android:gravity="center"
        android:background="@color/text_bgcolor_darkgray"
        android:textColor="@color/text_color_black"
        android:text="¥100"
        android:layout_marginRight="1dp"
        android:layout_marginBottom="1dp"/>
    <TextView
        android:id="@+id/t4"
        android:layout_columnWeight="1"
        android:layout_rowWeight="1"
        android:textSize="30sp"
        android:gravity="center"
        android:background="@color/text_bgcolor_gray"
        android:textColor="@color/text_color_black"
        android:text="4"
        android:layout_marginRight="1dp"
        android:layout_marginBottom="1dp"/>
    <TextView
        android:id="@+id/t5"
        android:layout_columnWeight="1"
        android:layout_rowWeight="1"
        android:textSize="30sp"
        android:gravity="center"
        android:background="@color/text_bgcolor_gray"
        android:textColor="@color/text_color_black"
        android:text="5"
        android:layout_marginRight="1dp"
        android:layout_marginBottom="1dp"/>
    <TextView
        android:id="@+id/t6"
        android:layout_columnWeight="1"
        android:layout_rowWeight="1"
        android:textSize="30sp"
        android:gravity="center"
        android:background="@color/text_bgcolor_gray"
        android:textColor="@color/text_color_black"
        android:text="6"
        android:layout_marginRight="1dp"
        android:layout_marginBottom="1dp"/>
    <TextView
        android:id="@+id/t50"
        android:visibility="gone"
        android:layout_columnWeight="1"
        android:layout_rowWeight="1"
        android:textSize="30sp"
        android:gravity="center"
        android:background="@color/text_bgcolor_darkgray"
        android:textColor="@color/text_color_black"
        android:text="¥50"
        android:layout_marginRight="1dp"
        android:layout_marginBottom="1dp"/>
    <TextView
        android:id="@+id/t1"
        android:layout_columnWeight="1"
        android:layout_rowWeight="1"
        android:textSize="30sp"
        android:gravity="center"
        android:background="@color/text_bgcolor_gray"
        android:textColor="@color/text_color_black"
        android:text="1"
        android:layout_marginRight="1dp"
        android:layout_marginBottom="1dp"/>
    <TextView
        android:id="@+id/t2"
        android:layout_columnWeight="1"
        android:layout_rowWeight="1"
        android:textSize="30sp"
        android:gravity="center"
        android:background="@color/text_bgcolor_gray"
        android:textColor="@color/text_color_black"
        android:text="2"
        android:layout_marginRight="1dp"
        android:layout_marginBottom="1dp"/>
    <TextView
        android:id="@+id/t3"
        android:layout_columnWeight="1"
        android:layout_rowWeight="1"
        android:textSize="30sp"
        android:gravity="center"
        android:background="@color/text_bgcolor_gray"
        android:textColor="@color/text_color_black"
        android:text="3"
        android:layout_marginRight="1dp"
        android:layout_marginBottom="1dp"/>
    <TextView
        android:id="@+id/t20"
        android:visibility="gone"
        android:layout_columnWeight="1"
        android:layout_rowWeight="1"
        android:textSize="30sp"
        android:gravity="center"
        android:background="@color/text_bgcolor_darkgray"
        android:textColor="@color/text_color_black"
        android:text="¥20"
        android:layout_marginRight="1dp"
        android:layout_marginBottom="1dp"/>
    <TextView
        android:id="@+id/t0"
        android:layout_columnWeight="1"
        android:layout_rowWeight="1"
        android:textSize="30sp"
        android:gravity="center"
        android:background="@color/text_bgcolor_gray"
        android:textColor="@color/text_color_black"
        android:text="0"
        android:layout_marginRight="1dp"
        android:layout_marginBottom="1dp"/>
    <TextView
        android:id="@+id/t_point"
        android:layout_columnWeight="1"
        android:layout_rowWeight="1"
        android:textSize="30sp"
        android:gravity="center"
        android:background="@color/text_bgcolor_gray"
        android:textColor="@color/text_color_black"
        android:text="."
        android:layout_marginRight="1dp"
        android:layout_marginBottom="1dp"/>
    <LinearLayout
        android:id="@+id/delect"
        android:layout_columnWeight="1"
        android:layout_rowWeight="1"
        android:background="@color/text_bgcolor_gray"
        android:gravity="center"
        android:layout_marginRight="1dp"
        android:layout_marginBottom="1dp">
        <ImageView
            android:layout_width="40dp"
            android:layout_height="40dp"
            android:src="@drawable/delete" />
    </LinearLayout>
    <TextView
        android:id="@+id/t10"
        android:visibility="gone"
        android:layout_columnWeight="1"
        android:layout_rowWeight="1"
        android:textSize="30sp"
        android:gravity="center"
        android:background="@color/text_bgcolor_darkgray"
        android:textColor="@color/text_color_black"
        android:text="¥10"
        android:layout_marginRight="1dp"
        android:layout_marginBottom="1dp"/>
</GridLayout>
2.实现自定义属性(attrs);
在value文件夹下的attrs;
<?xml version="1.0" encoding="utf-8"?>
<resources>
    <declare-styleable name="KeyBoard">
        <attr name="canseemoney" format="boolean"/>
    </declare-styleable>
</resources>
3.实现自定义view类,在类中进行数字按键的判断;
package com.xx.xxx.view.component;

import android.content.Context;
import android.content.res.TypedArray;
import android.os.Build;
import android.support.annotation.Nullable;
import android.support.annotation.RequiresApi;
import android.util.AttributeSet;
import android.view.LayoutInflater;
import android.view.View;
import android.widget.GridLayout;
import android.widget.LinearLayout;
import android.widget.TextView;

import com.xx.xxx.R;

/**
 * Created by WPNA on 2020/3/12.
 */

public class KeyBoard extends GridLayout implements View.OnClickListener {
    TextView t1,t2,t3,t4,t5,t6,t7,t8,t9,t0,t10,t20,t50,t100,t_point;
    LinearLayout delete;
    private OnNumberclickListener onclickListener;
    private String add_number="";//金额的值

    public KeyBoard(Context context) {
        super(context);
    }

    public KeyBoard(Context context, AttributeSet attrs) {
        this(context,attrs,0);
    }

    public KeyBoard(Context context, AttributeSet attrs, int defStyleAttr) {
        super(context, attrs, defStyleAttr);
        LayoutInflater.from(context).inflate(R.layout.keyboard,this);
        Findview();
        //下面为获取attrs文件中的KeyBoard的属性;
        TypedArray array = context.obtainStyledAttributes(attrs, R.styleable.KeyBoard);
        //获取到canseemoney的值,如果没有则默认为flase;
        boolean arrayBoolean = array.getBoolean(R.styleable.KeyBoard_canseemoney, false);
        if (arrayBoolean){	//根据arrayBoolean决定是否展示某些控件
            t10.setVisibility(VISIBLE);
            t20.setVisibility(VISIBLE);
            t50.setVisibility(VISIBLE);
            t100.setVisibility(VISIBLE);
        }
    }

    private void Findview() {
        t1 = findViewById(R.id.t1);
        t2 = findViewById(R.id.t2);
        t3 = findViewById(R.id.t3);
        t4 = findViewById(R.id.t4);
        t5 = findViewById(R.id.t5);
        t6 = findViewById(R.id.t6);
        t7 = findViewById(R.id.t7);
        t8 = findViewById(R.id.t8);
        t9 = findViewById(R.id.t9);
        t0 = findViewById(R.id.t0);
        t10 = findViewById(R.id.t10);
        t20 = findViewById(R.id.t20);
        t50 = findViewById(R.id.t50);
        t100 = findViewById(R.id.t100);
        t_point = findViewById(R.id.t_point);
        delete = findViewById(R.id.delect);
        t1.setOnClickListener(this);
        t2.setOnClickListener(this);
        t3.setOnClickListener(this);
        t4.setOnClickListener(this);
        t5.setOnClickListener(this);
        t6.setOnClickListener(this);
        t7.setOnClickListener(this);
        t8.setOnClickListener(this);
        t9.setOnClickListener(this);
        t0.setOnClickListener(this);
        t_point.setOnClickListener(this);
        delete.setOnClickListener(this);
    }

    @Override
    public void onClick(View view) {
        switch (view.getId()){
            case R.id.t1:
                setNumber("1");
                break;
            case R.id.t2:
                setNumber("2");
                break;
            case R.id.t3:
                setNumber("3");
                break;
            case R.id.t4:
                setNumber("4");
                break;
            case R.id.t5:
                setNumber("5");
                break;
            case R.id.t6:
                setNumber("6");
                break;
            case R.id.t7:
                setNumber("7");
                break;
            case R.id.t8:
                setNumber("8");
                break;
            case R.id.t9:
                setNumber("9");
                break;
            case R.id.t0:
                setNumber("0");
                break;
            case R.id.t10:

                break;
            case R.id.t20:

                break;
            case R.id.t50:

                break;
            case R.id.t100:

                break;
            case R.id.t_point:
                if (!add_number.equals("")){	//实现只能输入一个小数点的逻辑;
                    if (add_number.indexOf(".") == -1){
                        setNumber(".");
                    }
                }
                break;
            case R.id.delect:
                if (add_number!=null && !add_number.equals("")){//实现删除按钮删除数字
                    add_number = add_number.substring(0,add_number.length()-1);
                    onclickListener.onClick(add_number);
                }
                break;
        }
    }

    private void setNumber(String s) {
        if (onclickListener!=null){
            //限制:第一位为0的时候,后面只能输入小数点
            if (!"0".equals(add_number)) {
                //限制只能输两位小数
                if (add_number.indexOf(".") == -1
                        || (add_number.indexOf(".") > -1
                        && (add_number.length() - add_number.indexOf(".")) < 3)) {
                    add_number += s;
                }
                onclickListener.onClick(add_number);
            } else if (".".equals(s)) {
                if (add_number.indexOf(".") == -1
                        || (add_number.indexOf(".") > -1
                        && (add_number.length() - add_number.indexOf(".")) < 3)) {
                    add_number += s;
                }
                //实现监听,数字键盘被点击后将把add_number传回给调用的地方
                onclickListener.onClick(add_number);
            }
        }

    }

    public interface OnNumberclickListener{
        void onClick(String number);
    }

    public void setOnNumberclickListener(OnNumberclickListener listener){
        onclickListener = listener;
    }

    public void cleanNumber() {
        add_number = "";
    }
}
这里有几个坑需要注意一下:
-
有些人是在KeyBoard(Context context, AttributeSet attrs)方法当中去实现布局的,这可能会导致布局加载失败,运行不报错,但是却无法显示布局;
在KeyBoard(Context context, AttributeSet attrs, int defStyleAttr) 中去加载布局,需将KeyBoard(Context context, AttributeSet attrs)中的super(context, attrs)更改为this(context,attrs,0); -
请务必重载三个方法:public KeyBoard(Context context) , public KeyBoard(Context context, AttributeSet attrs),public KeyBoard(Context context, AttributeSet attrs, int defStyleAttr);
-
LayoutInflater.from(context).inflate(R.layout.keyboard,this);不要写成LayoutInflater.from(context).inflate(R.layout.keyboard,this,false);会导致加载不出布局;
4.将自定义的键盘布局加载到自定义的dialog中,下面是dialog的布局代码;
<?xml version="1.0" encoding="utf-8"?>
<LinearLayout xmlns:android="http://schemas.android.com/apk/res/android"
    android:layout_width="match_parent"
    android:layout_height="match_parent"
    xmlns:app="http://schemas.android.com/apk/res-auto"
    android:orientation="vertical"
    android:background="#FFFFFF"
    android:focusable="true"
    android:focusableInTouchMode="true">

    <TextView
        android:layout_width="wrap_content"
        android:layout_height="wrap_content"
        android:layout_marginTop="12dp"
        android:layout_marginLeft="12dp"
        android:textSize="36sp"
        android:textColor="@color/text_color_smallblack"
        android:text="给老子打钱"/>

    <EditText
        android:id="@+id/reserve_et"
        android:layout_width="match_parent"
        android:layout_height="66dp"
        android:background="@drawable/textview_rounded_background"
        android:layout_marginLeft="12dp"
        android:layout_marginTop="12dp"
        android:layout_marginRight="12dp"
        android:hint=" 输入金额"
        android:textSize="22sp"
        android:textColorHint="@color/text_bgcolor_gray"
        android:paddingLeft="10dp"
       />
    <!--键盘 此处为调用键盘布局了,注意调用方式为:com.xx.xxx.view.component.KeyBoard-->
    <com.xx.xxx.view.component.KeyBoard
        android:id="@+id/keyboard"
        android:layout_width="match_parent"
        android:layout_height="match_parent"
        android:layout_marginTop="12dp"
        android:layout_marginLeft="12dp"
        android:layout_marginRight="12dp"
        android:layout_marginBottom="90dp"
        app:canseemoney="false"/>

    <Button
        android:id="@+id/confirm_reserve"
        android:layout_width="200dp"
        android:layout_height="66dp"
        android:background="@drawable/button_bg_blue2"
        android:text="确定"
        android:gravity="center"
        android:layout_gravity="right"
        android:layout_marginRight="12dp"
        android:layout_marginTop="-78dp"
        android:textSize="26sp"
        android:textColor="#FFFFFF"/>

    <Button
        android:id="@+id/cancel"
        android:visibility="gone"
        android:layout_width="200dp"
        android:layout_height="66dp"
        android:background="@drawable/button_bg_blue2"
        android:text="取消"
        android:gravity="center"
        android:layout_gravity="right"
        android:layout_marginRight="12dp"
        android:layout_marginTop="-78dp"
        android:layout_marginBottom="12dp"
        android:textSize="26sp"
        android:textColor="#FFFFFF"/>

</LinearLayout>
5.接下来为自定义dialog,实现回调监听,让键盘被点击的数字都能回传回来;
abstract class CustomDialog extends Dialog {
        private Button sure,cancel;
        private int layout;//需要加载的布局
        private boolean TouchOutside;
        private double width, height;
        private KeyBoard keyBoard; //键盘
        EditText reserve_et;//准备金的alertdialog的准备金额编辑框


        public CustomDialog(@NonNull Context context,int layout,boolean TouchOutside,double width ,double height) {
            super(context,layout);
            this.layout = layout;
            this.TouchOutside = TouchOutside;
            this.width = width;
            this.height = height;
        }

        @RequiresApi(api = Build.VERSION_CODES.LOLLIPOP)
        @Override
        protected void onCreate(Bundle savedInstanceState) {
            setContentView(layout);
			/**
			*此处省略了一些对dialog样式设置的代码,如果需要查看我之前自定义dialog的文章;
			*/


			//这里就是重点了
			//注意结合keyboard类查看
            keyBoard = findViewById(R.id.keyboard);
            keyBoard.setOnNumberclickListener(new KeyBoard.OnNumberclickListener() {
                @Override
                public void onClick(String number) {
                    reserve_et.setText(number);//将数字填入edittext
                    reserve_et.setSelection(number.length());
                }
            });


        public abstract void do_sure(String reserve);
        }

    }
6.在你需要展示dialog的地方show它就OK了;
 CustomDialog dialog = new CustomDialog(getActivity(), R.layout.reserve_dialog, false, 0.5, 0.65) {
                @Override
                public void do_sure(String reserve) {
                }
            };
            dialog.show();
7.接下来就是激动人心的展示图片时刻了!
有什么问题欢迎在评论中留言噢,大家一起探讨探讨~