View四种构造函数那些事儿
目录
- 构造函数
- 四种构造方法
- 属性优先级
- defStyleAttr
- defStyleRes
- 自定义属性
- attrs.xml
- 声明属性
- 取值
- 下集预告
本来想先说View的绘制流程,咱们也不一上来就onMeasure,onLayout,就拿自定义View来说,咱们最先做的其实是继承View,但是会让我选择实现4个构造方法,那么构造方法分别表示什么意思呢?下面咱们先来了解一波。
构造函数
四种构造方法
java代码创建
- public MyView(Context context) {
super(context);
}
xml创建View
-
public MyView(Context context, @Nullable AttributeSet attrs) {
super(context, attrs);
} -
public MyView(Context context, @Nullable AttributeSet attrs, int defStyleAttr) {
super(context, attrs, defStyleAttr);
} -
public MyView(Context context, @Nullable AttributeSet attrs, int defStyleAttr, int defStyleRes) {
super(context, attrs, defStyleAttr, defStyleRes);
}注:在此将根据形参的数量去命名方法名,如一个形参的构造方法则视为构1(MyView(Context context) )。
其实我们可分分为两类,根据创建View的方式,一种是通过Java代码去创建View的只会调用构1方法;那么通过xml去声明创建View的则回去调用构2、构3和构4.
在此构1方法没什么好讲的,主要来讲解通过XML创建View的构2、构3和构4方法,那么就会涉及到三个形参 AttributeSet attrs, int defStyleAttr, int defStyleRes。我们可以通过AttributeSet去获取在xml中设置的属性的值,defStyleAttr和defStyleRes表示要显示的样式资源。其实这三个参数都和View的属性显示有关,这三个参数所要显示的属性样式,其实是有的优先级。具体我们来通过实验来证明。
属性优先级
我们给View属性赋值,有哪几种方式呢?
- xml直接赋值设置
- xml中引入style
- 在theme中指定
- defStyleAttr设置
- deStyleRes设置
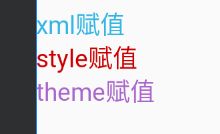
由于defStyleAttr deStyleRes需要涉及到自定义View,咱们待会再讲,先来讨论前三者 xml直接赋值设置、xml中引入style和在theme中指定。为了更加直观的显示三者的优先级,我通过TextColor来区分显示,xml中设置TextColor的颜色为蓝色,xml去引入style的方式去设置了红色,theme去设置了紫色。代码如下
 	Theme方法
    <style name="AppTheme" parent="Theme.AppCompat.Light.DarkActionBar">
        <!-- Customize your theme here. -->
        <item name="colorPrimary">@color/colorPrimary</item>
        <item name="colorPrimaryDark">@color/colorPrimaryDark</item>
        <item name="colorAccent">@color/colorAccent</item>
        <item name="android:textColor">@android:color/holo_purple</item>
    </style>

	xml的style方法
    <style name="style_red">
        <item name="android:textColor">@android:color/holo_red_dark</item>
    </style>
上诉代码显示的是theme设置的TextColor的值和xml的style设置的TextColor的值。那么下面是显示代码和效果图
<TextView
        android:layout_width="match_parent"
        android:layout_height="wrap_content"
        style="@style/style_red"
        android:text="xml赋值"
        android:textColor="@android:color/holo_blue_light"></TextView>
    <TextView
        android:layout_width="match_parent"
        android:layout_height="wrap_content"
        style="@style/style_red"
        android:text="style赋值"></TextView>

    <TextView
        android:layout_width="match_parent"
        android:layout_height="wrap_content"
        android:text="theme赋值"></TextView>

通过最终显示的样式,我们可以看到xml设置,xml引入style设置和theme设置三者的优先级,可以得出一下优先级
xml设置>xml引入style设置>theme设置
defStyleAttr
我们先来看一下TextView的构造方法

我们来看看TextView的源码,通过xml和java创建的view,最后都是会调用构4方法,并且defStyleAttr和defStyleRes的值一直都是不变的,defStyleAttr为R.attr.textViewStyle;defStyleRes为0;这表示什么意思呢?我们先来看看defStyleAttr的默认值textViewStyle,这个属性被定义了什么类型
![]()
我们可以看到textViewStyle是被定义成了reference类型,那么针对该类型在xml中一般使用@style/xxx的形式去赋值。那么问题来了textViewStyle什么时候被赋值?
其实在我们使用大部分主题样式里,都默认设置textViewStyle的值

这也就可以说得通,为什么我们创建TextView就会有默认的样式,这和主题是有很大的关系的。**有的人会问为什么没有看到textColor呢?**其实默认的颜色是在构4方法中实现的

那么还记得之前的theme方法中设置了紫色字体吗,那么我们可以在theme中设置textViewStyle去比较两者之间的优先级。
 <!-- Base application theme. -->
    <style name="AppTheme" parent="Theme.AppCompat.Light.DarkActionBar">
        <!-- Customize your theme here. -->
        <item name="colorPrimary">@color/colorPrimary</item>
        <item name="colorPrimaryDark">@color/colorPrimaryDark</item>
        <item name="colorAccent">@color/colorAccent</item>
        <item name="android:textViewStyle">@style/textViewStyle_orange</item>
        <item name="android:textColor">@android:color/holo_purple</item>
    </style>

    <style name="textViewStyle_orange">
        <item name="android:textColor">@android:color/holo_orange_light</item>
    </style>
最后的效果是TextView,那么我们可以得出一个结论
优先级:defStyleAttr>theme设置
defStyleRes
defStyleRes其实也是一个优先级比较低的样式,它是真正的style也就是说,它所指向的其实是一个定死的style类型的值。这么时候我们就需要去自定义一个TextView,来看看他的优先级。
@SuppressLint("AppCompatCustomView")
public class MyViewGreen extends TextView {

    public MyViewGreen(Context context) {
        super(context);
    }

    @RequiresApi(api = Build.VERSION_CODES.LOLLIPOP)
    public MyViewGreen(Context context, @Nullable AttributeSet attrs) {
        this(context, attrs,0);
    }

    @RequiresApi(api = Build.VERSION_CODES.LOLLIPOP)
    public MyViewGreen(Context context, @Nullable AttributeSet attrs, int defStyleAttr) {
        this(context, attrs, defStyleAttr, R.style.defStyleRes_green);
    }

    @RequiresApi(api = Build.VERSION_CODES.LOLLIPOP)
    public MyViewGreen(Context context, @Nullable AttributeSet attrs, int defStyleAttr, int defStyleRes) {
        super(context, attrs, defStyleAttr, defStyleRes);
    }
}

    <!-- Base application theme. -->
    <style name="AppTheme" parent="Theme.AppCompat.Light.DarkActionBar">
        <!-- Customize your theme here. -->
        <item name="colorPrimary">@color/colorPrimary</item>
        <item name="colorPrimaryDark">@color/colorPrimaryDark</item>
        <item name="colorAccent">@color/colorAccent</item>
        <item name="android:textColor">@android:color/holo_purple</item>
    </style>

    <style name="defStyleRes_green">
        <item name="android:textColor">@android:color/holo_green_dark</item>
    </style>
我们创建了一个MyViewGreen去继承TextView,对defStyleAttr赋值0,0表示不启用该属性。对defStyleRes指向了一个defStyleRes_green来设置绿色,此时默认的theme的颜色是紫色,那么最后显示TextView,也就是绿色。
那么如果我们在上诉代码中,同时给defStyleAttr和defStyleRes赋值于0,最后会显示textView为紫色,所以可以证明
优先级:defStyleRes>Theme设置
若要证明defStyleAttr defStyleRes theme的优先级,则在上诉代码中将defStyleAttr赋值于android.R.attr.textViewStyle,并且再在theme中添加textViewStyle去设置橙色
 <!-- Base application theme. -->
    <style name="AppTheme" parent="Theme.AppCompat.Light.DarkActionBar">
        <!-- Customize your theme here. -->
        <item name="colorPrimary">@color/colorPrimary</item>
        <item name="colorPrimaryDark">@color/colorPrimaryDark</item>
        <item name="colorAccent">@color/colorAccent</item>
        <item name="android:textViewStyle">@style/textViewStyle_orange</item>
        <item name="android:textColor">@android:color/holo_purple</item>
    </style>

    <style name="textViewStyle_orange">
        <item name="android:textColor">@android:color/holo_orange_light</item>
    </style>
运行起来最终显示的颜色是textView,那么我们可以得出一个优先级的结论
defStyleAttr>defStyleRes>Theme设置
由于这三者的属性都是依附于主题的所以优先级必然小于xml中style的引用,大家不妨来试一下。那么最终的优先级如下
xml设置>xml中style设置>defStyleAttr>defStyleRes>Theme设置
所以四种构造方法,主要是来根据优先级去设置View对应的属性的。那么接下来,我们开始真正讲解View的绘制流程。
自定义属性
由于自定义属性是通过构造函数的attr来获取的,所以在此咱们把自定义属性给说了吧。
attrs.xml
首先需要创建一个attrs.xml,用于声明什么View,拥有哪些额外的自定义属性。咱们先来看看如何声明。
<?xml version="1.0" encoding="utf-8"?>
<resources>
    <declare-styleable name="MyView">
        <attr name="my_color" format="color"></attr>
        <attr name="my_text" format="string"></attr>
        <attr name="my_size" format="float"></attr>
    </declare-styleable>
</resources>
declare-styleable是一个标签,表示一块属性集合name就是该属性集合的名字,为了避免与现有的冲突,最好与自定义View的名字一样。
attr则表示一个个属性,name为属性名,format表示属性值的类型。类型有很多咱们通过一个表格来认识。
| 属性类型 | 属性定义方法 | 属性值说明 |
|---|---|---|
| color | < attr name=“属性名” format=“color”/> | Color.BLACK |
| string | < attr name=“属性名” format=“string”/> | “字符串” |
| integer | < attr name=“属性名” format=“integer”/> | 1 |
| boolean | < attr name=“属性名” format=“boolean”/> | true |
| fraction | < attr name=“属性名” format=“fraction”/> | 0.9 |
| reference | < attr name=“属性名” format=“reference”/> | @drawable/xxx |
| dimension | < attr name=“属性名” format=“dimension”/> | 40dp |
| enum | < attr name=“属性名” format=“enum”>< enum name=“horizontal” value=“0”/>< enum name=“vertical” value=“1”/> | — |
| 组合使用 | < attr name=“color” format="color | reference"/> |
声明属性
既然定义好了属性,那么就可以在布局中使用自定义属性,
<LinearLayout xmlns:android="http://schemas.android.com/apk/res/android"
    xmlns:app="http://schemas.android.com/apk/res-auto"
    xmlns:tools="http://schemas.android.com/tools"
    android:layout_width="match_parent"
    android:layout_height="match_parent"
    android:gravity="center_horizontal"
    android:orientation="vertical"
    tools:context=".MainActivity">
    <com.sinosun.csdnnote.views.MyView
        android:layout_width="wrap_content"
        android:layout_height="wrap_content"
        app:my_color="@color/colorAccent"
        app:my_size="15"
        app:my_text="my_text"></com.sinosun.csdnnote.views.MyView>
</LinearLayout>
可以看到在使用自定义属性的时候,前缀既然不是android打头,而是app,而app出现在 xmlns:app="http://schemas.android.com/apk/res-auto"这一句话中,这是什么意思呢?
因为如果你想要使用自定义属性,你是不是得要先声明一下属性的出处?没有声明那么系统怎么找得到该数据,怎么会知道属性值的类型呢? xmlns:app="http://schemas.android.com/apk/res-auto"就表示声明属性的意思。声明属性不止这一种
- xmlns:abc=“http://schemas.android.com/apk/res/com.sinosun.csdnnote”
- xmlns:app=“http://schemas.android.com/apk/res-auto”
两者有什么区别呢?前者表示通过指定的包名去搜索资源;后者则表示自动搜索。推荐用后者,也是AS所推荐的,就不需要写多个命名空间,避免混乱。
取值
    public MyView(Context context, @Nullable AttributeSet attrs) {
        super(context, attrs);
        TypedArray typedArray = context.obtainStyledAttributes(attrs, R.styleable.MyView);
        float text_size = typedArray.getFloat(R.styleable.MyView_my_size, 0);
        String text = typedArray.getString(R.styleable.MyView_my_text);
        System.out.println("-----------------------" + text + "--------------------");
        int color = typedArray.getColor(R.styleable.MyView_my_color, Color.BLACK);
        typedArray.recycle();
    }
我们可以通过attr创建一个TypedArray,从而读取到资源的值,如上诉代码。注意typedArray需要回收。
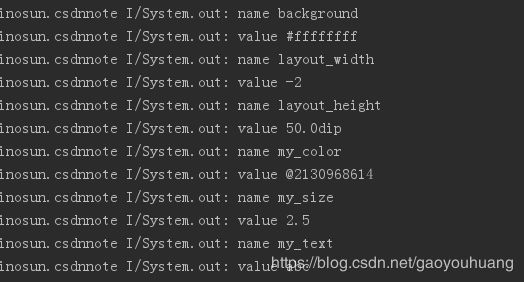
其实AttributeSet 也是可以来获取XML中属性的值,但是不建议用?为什么呢?我们来看看对应属性的值就知道了。
   for (int i = 0; i < attrs.getAttributeCount(); i++) {
            System.out.println("name " + attrs.getAttributeName(i));
            System.out.println("value " + attrs.getAttributeValue(i));
        }
获取全部属性的值,输出如下图

我们可以看到获取到的高是50.0dip而不是转化后的px,还有颜色是#ffffffff,不便于处理所以推荐同TypedArray
下集预告
View的绘制流程