攻防世界-Mobile-easyjava-最详细分析
攻防世界-Mobile-easyjava
本文首发于博主公众号LISTONE,欢迎关注哦!
这个题说是easyjava,但是我这个菜鸟一点也不觉得easy,花了我2个小时才做出来(我太菜了)。
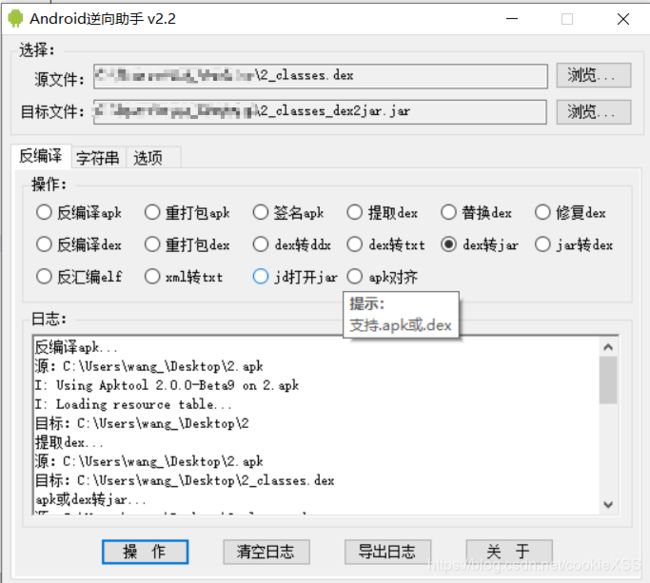
首先就是下载apk,反编译出源代码,说到这里就不得不吐槽一下Android逆向助手这个工具(就是下面这个),它反编译出来的源代码竟然还少函数,导致我看了半天,总觉得少点什么,最后我用jeb反编译之后才发现,Android逆向助手反编译的结果少了一个至关重要的有一个函数调用的函数。
言归正传,打开源代码首先看 onCreate 函数
protected void onCreate(Bundle arg3) {
    super.onCreate(arg3);
    this.setContentView(2130968603);
    this.findViewById(2131427446).setOnClickListener(new View$OnClickListener(((Context)this)) {
        public void onClick(View arg5) {
            if(MainActivity.a(this.a.findViewById(2131427445).getText().toString()).booleanValue()) {
   //首先调用了MainActivity类下的a方法,看到它传入的是一个string类型的参数,我们去找到它
                Toast.makeText(this.a, "You are right!", 1).show();
            }
            else {
                Toast.makeText(this.a, "You are wrong! Bye~", 1).show();
                new Timer().schedule(new TimerTask() {
                    public void run() {
                        System.exit(1);
                    }
                }, 2000);
            }
        }
    });
}
然后观察参数为 String 类型的 a 方法
static Boolean a(String arg1) {
    return MainActivity.b(arg1); //非常容易理解,就是调用了b方法
}
好,我们继续看 MainActivity.b 方法,这个方法就有点东西了,不过没事,我来一行一行的注释,保证你们都能看懂
private static Boolean b(String arg8) {
    Boolean v0_1; //定义了一个布尔类型的变量,这个是函数返回值
    int v0 = 0;
    if(!arg8.startsWith("flag{")) { //判断传入的参数arg8开头是否为flag{
        v0_1 = Boolean.valueOf(false);//如果不是,就返回false
    }
    else if(!arg8.endsWith("}")) {//判断结尾是否是}
        v0_1 = Boolean.valueOf(false);//如果不是返回flase
    }
    else {//如果传入的参数是以flag{开头,以}结束,就执行else
        //这个v2就是将传入的参数flag{xxxx},{}中的字符取出来
        String v2 = arg8.substring(5, arg8.length() - 1);
        b v4 = new b(Integer.valueOf(2));//实例化类b,里面的算法稍后详解
        a v5 = new a(Integer.valueOf(3));//实例化类a,同b
        StringBuilder v3 = new StringBuilder();
        int v1 = 0;
        while(v0 < v2.length()) {//遍历v3
            //调用MainActivity.a有三个参数的方法
            v3.append(MainActivity.a(v2.charAt(v0) + "", v4, v5));
            Integer v6 = Integer.valueOf(v4.b().intValue() / 25);
            if(v6.intValue() > v1 && v6.intValue() >= 1) {
                ++v1;
            }

            ++v0;
        }
		//判断输入的字符串经过变化是否与‘wigwrkaugala’相等,解题的关键
        v0_1 = Boolean.valueOf(v3.toString().equals("wigwrkaugala"));
    }

    return v0_1;
}
上面的代码中有两处实例化,现在来解释一下里面的算法,首先看 b 的构造方法,因为 b 先被调用:
public static ArrayList a;
static String b;
Integer[] c;
static Integer d;

static {
    b.a = new ArrayList();
    b.b = "abcdefghijklmnopqrstuvwxyz";
    b.d = Integer.valueOf(0);
}

public b(Integer arg9) {
    super();
    //c声明了一个整数数组
    //写简单就是{8, 25, 17, 23, 7, 22, 1, 16, 6, 9, 21, 0, 15, 5, 10, 18, 2, 24, 4, 11, 3, 14, 19, 12, 20, 13}
    this.c = new Integer[]{Integer.valueOf(8), Integer.valueOf(25), Integer.valueOf(17), Integer.valueOf(23), Integer.valueOf(7), Integer.valueOf(22), Integer.valueOf(1), Integer.valueOf(16), Integer.valueOf(6), Integer.valueOf(9), Integer.valueOf(21), Integer.valueOf(0), Integer.valueOf(15), Integer.valueOf(5), Integer.valueOf(10), Integer.valueOf(18), Integer.valueOf(2), Integer.valueOf(24), Integer.valueOf(4), Integer.valueOf(11), Integer.valueOf(3), Integer.valueOf(14), Integer.valueOf(19), Integer.valueOf(12), Integer.valueOf(20), Integer.valueOf(13)};
    int v0;
    //刚才在方法MainActivity.b实例化时传入的参数为2
    //这个循环就是将c第二位以后的数赋值给b.a
    for(v0 = arg9.intValue(); v0 < this.c.length; ++v0) {
        b.a.add(this.c[v0]);
    }
	//这个循环就是将c前两位跟在a的最后
    for(v0 = 0; v0 < arg9.intValue(); ++v0) {
        b.a.add(this.c[v0]);
    }
}
上面类 b 的实例化代码就是将c的前两位移到最后,运行之后,其中变量的值为
b.a = {17, 23, 7, 22, 1, 16, 6, 9, 21, 0, 15, 5, 10, 18, 2, 24, 4, 11, 3, 14, 19, 12, 20, 13, 8, 25}
b.b = "abcdefghijklmnopqrstuvwxyz";
c = {8, 25, 17, 23, 7, 22, 1, 16, 6, 9, 21, 0, 15, 5, 10, 18, 2, 24, 4, 11, 3, 14, 19, 12, 20, 13}
然后看类 a 的实例化做了什么:
public static ArrayList a;
    static String b;
    Integer[] c;
    static Integer d;

    static {
        a.a = new ArrayList();
        a.b = "abcdefghijklmnopqrstuvwxyz";
        a.d = Integer.valueOf(0);
    }

    public a(Integer arg8) {
        super();
        this.c = new Integer[]{Integer.valueOf(7), Integer.valueOf(14), Integer.valueOf(16), Integer.valueOf(21), Integer.valueOf(4), Integer.valueOf(24), Integer.valueOf(25), Integer.valueOf(20), Integer.valueOf(5), Integer.valueOf(15), Integer.valueOf(9), Integer.valueOf(17), Integer.valueOf(6), Integer.valueOf(13), Integer.valueOf(3), Integer.valueOf(18), Integer.valueOf(12), Integer.valueOf(10), Integer.valueOf(19), Integer.valueOf(0), Integer.valueOf(22), Integer.valueOf(2), Integer.valueOf(11), Integer.valueOf(23), Integer.valueOf(1), Integer.valueOf(8)};
        int v0;
        for(v0 = arg8.intValue(); v0 < this.c.length; ++v0) {
            a.a.add(this.c[v0]);
        }

        for(v0 = 0; v0 < arg8.intValue(); ++v0) {
            a.a.add(this.c[v0]);
        }
    }
上面的代码就不注释了,它和类 b 的功能类似,这里是将c的前3位移到最后,运行之后就是:
a.a = {21, 4, 24, 25, 20, 5, 15, 9, 17, 6, 13, 3, 18, 12, 10, 19, 0, 22, 2, 11, 23, 1, 8, 7, 14, 16}
a.b = "abcdefghijklmnopqrstuvwxyz";
c = {7, 14, 16, 21, 4, 24, 25, 20, 5, 15, 9, 17, 6, 13, 3, 18, 12, 10, 19, 0, 22, 2, 11, 23, 1, 8}
构造方法都看完了,我们接着上面的往下分析 MainActivity.b 方法,在实例化之后,我们可以看到如下这个循环,我们来看一下这个循环做了什么:
while(v0 < v2.length()) {//遍历v3
    //调用MainActivity.a有三个参数的方法
    v3.append(MainActivity.a(v2.charAt(v0) + "", v4, v5));
    Integer v6 = Integer.valueOf(v4.b().intValue() / 25);
    if(v6.intValue() > v1 && v6.intValue() >= 1) {
        ++v1;
    }
    ++v0;
}
它将v3中的每一个字符循环传给 MainActivity.a ,好,我们接下来就来看看这个 MainActivity.a 方法(三个参数)是何方神圣:
private static char a(String arg1, b arg2, a arg3) {
    return arg3.a(arg2.a(arg1));
}
我们可以很明显的看到这是一个嵌套的函数调用,代码有些混淆,我也懒得去弄了,直接分析吧,我头硬。
它先调用了 arg2.a(arg1) 我们可以看到,它将第一个参数作为参数传给第二个参数的 a 方法,好吧有点绕,仔细读一下,应该能读懂。
那我们就来看一下这个函数究竟干了什么,它是类 b 的 a 函数(有一个参数为String),下面就是代码,我给出详细的注释,方便大家理解。
public Integer a(String arg5) {
    int v0 = 0;
    Integer v1 = Integer.valueOf(0);
    //将传入的参数变为小写字母,判断是否在b.b中(b.b是一个小写字母表)
    if(b.b.contains(arg5.toLowerCase())) {
        //v2是参数arg5在b.b中的索引值
        Integer v2 = Integer.valueOf(b.b.indexOf(arg5));
        while(v0 < b.a.size() - 1) {//遍历b.a
            if(b.a.get(v0) == v2) {//判断b.a[v0]是否等于v2
                //如果相等,就将v0的值赋给v1,即v2在b.a中的索引值
                v1 = Integer.valueOf(v0);
            }
            ++v0;
        }
    }
    else {//如果参数arg5不在字母表中
        if(arg5.contains(" ")) {//如果arg5是空格
            v1 = Integer.valueOf(-10);//将v1赋值为-10
            goto label_24;//跳转到label_24执行
        }
        v1 = Integer.valueOf(-1);//如果也不是空格就将v1赋值为-1
    }

    label_24:
    b.a();//跳转执行b.a()方法
    return v1;
}
//这个a方法其实就是将b.a与b.b每次循环左移一位
public static void a() {
    int v0 = b.a.get(0).intValue();
    b.a.remove(0);
    b.a.add(Integer.valueOf(v0));
    b.b = b.b + "" + b.b.charAt(0);
    b.b = b.b.substring(1, 27);
    b.d = Integer.valueOf(b.d.intValue() + 1);
}
上面这个方法返回的是一个整数值,它的返回值传递给 arg3.a(arg2.a(arg1)) ,这个arg3 方法其实就是类 a 中的 a 方法,我在代码中给出详细注释:
public char a(Integer arg5) {
    char v0_1;//返回值
    int v0 = 0;
    Integer v1 = Integer.valueOf(0);
    if(arg5.intValue() == -10) {//如果参数为-10,就是上一个函数中的“ ”
        a.a();
        v0_1 = " ".charAt(0);
    }
    else {
        while(v0 < a.a.size() - 1) {//遍历a.a
            if(a.a.get(v0) == arg5) {//判断a.a[v0]是否等于参数arg5
                //如果相等,就将v0的值赋给v1,即参数arg5在a.a中的索引值
                v1 = Integer.valueOf(v0);
            }
            ++v0;
        }
        a.a(); //跳转a.a方法
        v0_1 = a.b.charAt(v1.intValue());//将a.b[v1]的字符赋值给v0_1
    }
    return v0_1;
}
//这个函数用处不大,因为我们用不到那么多次循环,a.d增不到25,所以移位没有执行
public static void a() {
    a.d = Integer.valueOf(a.d.intValue() + 1);
    if(a.d.intValue() == 25) {
        int v0 = a.a.get(0).intValue();
        a.a.remove(0);
        a.a.add(Integer.valueOf(v0));
        a.d = Integer.valueOf(0);
    }
}
从上面的分析我们对于整个程序的执行流程应该是很清楚了,那么我们就从程序中判断字符串 wigwrkaugala 反向推导,我用python写了一个反向推导的脚本:
# b构造方法
tb = [8, 25, 17, 23, 7, 22, 1, 16, 6, 9, 21, 0, 15, 5, 10, 18, 2, 24, 4, 11, 3, 14, 19, 12, 20, 13]
lb = []
v0 = 2
while v0 < len(tb):
    lb.append(tb[v0])
    v0 = v0+1
v0 = 0
while v0 < 2:
    lb.append(tb[v0])
    v0 = v0+1

print(lb)

# a构造方法
ta = [7, 14, 16, 21, 4, 24, 25, 20, 5, 15, 9, 17, 6, 13, 3, 18, 12, 10, 19, 0, 22, 2, 11, 23, 1, 8]
la = []
v0 = 3
while v0 < len(ta):
    la.append(ta[v0])
    v0 = v0+1
v0 = 0
while v0 < 3:
    la.append(ta[v0])
    v0 = v0+1
print(la)

al = list('abcdefghijklmnopqrstuvwxyz')
sec = 'wigwrkaugala'

def dec(s):
    global lb
    global la
    global al
    v1 = ord(s) - ord('a')
    v0 = v1
    arg5 = la[v0]
    bv1 = arg5
    bv0 = bv1
    bv2 = lb[bv0]
    barg5 = al[bv2]
    print(barg5,end='')
    al.append(al[0])
    al = al[1:27]
    lb.append(lb[0])
    lb = lb[1:27]
    # print(al)
    # print(lb)

for s in sec:
    dec(s)
最后可以得出来:
将得到的字符串两端加上flag{},然后就是正确答案了。
代码比较长,写的步骤很细,从 a.a 一直回推到 b.a ,变量名也尽量和原Java代码保持一致,如果想看明白,对着源代码仔细看,理解后,应该很容易看懂。
做题加写分析,足足花了三个多小时,如果各位老铁觉得写的不错,欢迎点下在看,谢谢各位啦。

