初始SpringCloud
微服务是一种架构方式,最终肯定需要技术架构去实施。
微服务的实现方式很多,但是最火的莫过于Spring Cloud了。为什么?
- 后台硬:作为Spring家族的一员,有整个Spring全家桶靠山,背景十分强大。
- 技术强:Spring作为Java领域的前辈,可以说是功力深厚。有强力的技术团队支撑,一般人还真比不了
- 群众基础好:可以说大多数程序员的成长都伴随着Spring框架,试问:现在有几家公司开发不用Spring?SpringCloud与Spring的各个框架无缝整合,对大家来说一切都是熟悉的配方,熟悉的味道。
- 使用方便:相信大家都体会到了SpringBoot给我们开发带来的便利,而SpringCloud完全支持SpringBoot的开发,用很少的配置就能完成微服务框架的搭建
简介
SpringCloud是Spring旗下的项目之一,官网地址:http://projects.spring.io/spring-cloud/
Spring最擅长的就是集成,把世界上最好的框架拿过来,集成到自己的项目中。
SpringCloud也是一样,它将现在非常流行的一些技术整合到一起,实现了诸如:配置管理,服务发现,智能路由,负载均衡,熔断器,控制总线,集群状态等等功能。其主要涉及的组件包括:
netflix
- Eureka:注册中心
- Zuul:服务网关
- Ribbon:负载均衡
- Feign:服务调用
- Hystrix:熔断器
以上只是其中一部分,架构图: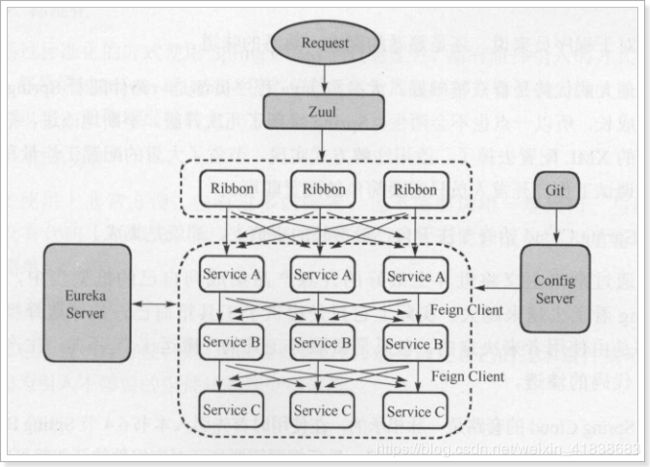
SpringCloud开发:
1.Maven创建父项目(pom)
pom文件导入依赖:
1.依赖 springboot 版本是 2.0.3
2.springcloud 用的版本是 Finchley


12 4.0.0 3cn.how2j.springcloud 4springcloud 50.0.1-SNAPSHOT 6springcloud 7springcloud 8pom 9 1011 16 17org.springframework.boot 12spring-boot-starter-parent 132.0.3.RELEASE 1415 18 23 24UTF-8 19UTF-8 201.8 21Finchley.RELEASE 2225 36 3726 30org.springframework.boot 27spring-boot-starter-test 28test 2931 35cn.hutool 32hutool-all 334.3.1 3438 48 4939 4740 46org.springframework.cloud 41spring-cloud-dependencies 42${spring-cloud.version} 43pom 44import 45
2.创建子模块项目(jar)--eureka-server注册中心
1.pom文件导入依赖:eureka-server
12 4.0.0 34 8cn.how2j.springcloud 5springcloud 60.0.1-SNAPSHOT 7eurekaServer 9 1011 16 1712 15org.springframework.cloud 13spring-cloud-starter-netflix-eureka-server 14
2.创建eureka-server启动类:
1 @SpringBootApplication
2 @EnableEurekaServer // 声明这个应用是一个EurekaServer
3 public class EurekaDemoApplication {
4
5     public static void main(String[] args) {
6         SpringApplication.run(EurekaDemoApplication.class, args);
7     }
8 }
3.编写yml配置文件:
eureka相关配置:
defaultZone: http://${eureka.instance.hostname}:${server.port}/eureka/ 自己作为服务器,公布出来的地址。 比如后续某个微服务要把自己注册到 eureka server, 那么就要使用这个地址
 1 server:
 2   port: 10086 # 端口
 3 spring:
 4   application:
 5     name: eureka-server # 应用名称,会在Eureka中显示
 6 eureka:
 7   instance:
 8     hostname: localhost #主机名称 ip
 9   client:
10     register-with-eureka: false # 是否注册自己的信息到EurekaServer,默认是true,因为它本身就是服务器,所以就无需把自己注册到服务器了
11     fetch-registry: false # 是否拉取其它服务的信息,默认是true,因为它本身就是服务器,所以就无需把自己注册到服务器了
12     service-url: # EurekaServer的地址,现在是自己的地址,如果是集群,需要加上其它Server的地址。
13      defaultZone: http://127.0.0.1:${server.port}/eureka
14      #defaultZone: http://${eureka.instance.hostname}:${server.port}/eureka
15 #######集群配置(逗号相隔)#########
16 eureka:
17   server:
18     eviction-interval-timer-in-ms: 60000   #设置清理的间隔时间,而后这个时间使用的是毫秒单位(默认是60秒)
19     enable-self-preservation: false #设置为false表示关闭保护模式
20   client:
21     fetch-registry: false
22     register-with-eureka: false
23     service-url:
24         defaultZone: http://localhost:7001/eureka,http://localhost:7002/eureka,http://localhost:7003/eureka
25        # defaultZone: http://insurance:insurance@localhost:7001/eureka
26        # defaultZone: http://admin:enjoy@eureka1:7001/eureka,http://admin:enjoy@eureka2:7002/eureka,http://admin:enjoy@eureka3:7003/eureka
27 #  instance: # eureak实例定义
28 #    hostname: eureka1 # 定义 Eureka 实例所在的主机名称
启动服务,浏览器访问:http://127.0.0.1:10086 即可查看eureka管理页面。
3.创建子项目(jar)---euraka-client注册微服务
有了注册中心Server,接下来我们需要开发微服务,然后交给Eureka负责管理、记录服务提供者的信息,当调用该微服务时,只需要调用该服务在注册中心的配置的应用名称即可(spring.application.name)
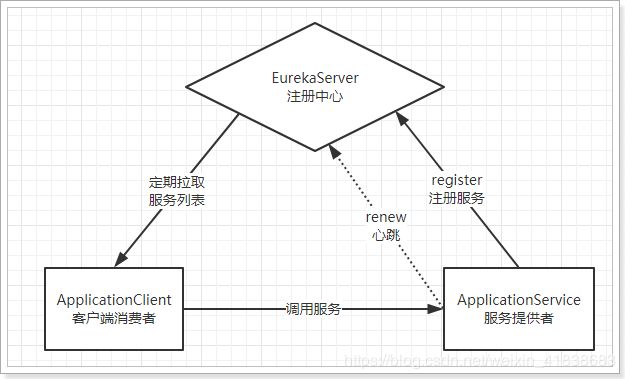
- Eureka:就是服务注册中心(可以是一个集群),对外暴露自己的地址
- 提供者:启动后向Eureka注册自己信息(地址,提供什么服务)
- 消费者:向Eureka订阅服务,Eureka会将对应服务的所有提供者地址列表发送给消费者,并且定期更新
- 心跳(续约):提供者定期通过http方式向Eureka刷新自己的状态
1.pom文件导入依赖:
spring-cloud-starter-netflix-eureka-client 表示这是个 eureka 客户端。
spring-boot-starter-web: 表示这是个web服务,会提供控制层
1"http://maven.apache.org/POM/4.0.0" xmlns:xsi="http://www.w3.org/2001/XMLSchema-instance" xsi:schemaLocation="http://maven.apache.org/POM/4.0.0 http://maven.apache.org/xsd/maven-4.0.0.xsd"> 2 4.0.0 34 8cn.how2j.springcloud 5springcloud 60.0.1-SNAPSHOT 7productDataservice 9 1011 20 2112 15org.springframework.cloud 13spring-cloud-starter-netflix-eureka-client 1416 19org.springframework.boot 17spring-boot-starter-web 18
2.控制层:
1 package cn.how2j.springcloud.controller; 2 3 import java.util.List; 4 5 import org.springframework.beans.factory.annotation.Autowired; 6 import org.springframework.web.bind.annotation.RequestMapping; 7 import org.springframework.web.bind.annotation.RestController; 8 9 import cn.how2j.springcloud.pojo.Product; 10 import cn.how2j.springcloud.service.ProductService; 11 12 @RestController 13 public class ProductController { 14 15 @Autowired ProductService productService; 16 17 @RequestMapping("/products") 18 public Object products() { 19 Listps = productService.listProducts(); 20 return ps; 21 } 22 }
3.服务层:
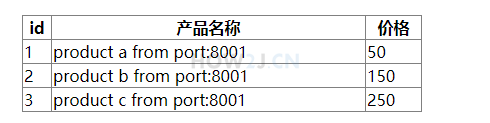
1 package cn.how2j.springcloud.service; 2 3 import java.util.ArrayList; 4 import java.util.List; 5 import org.springframework.beans.factory.annotation.Value; 6 import org.springframework.stereotype.Service; 7 8 import cn.how2j.springcloud.pojo.Product; 9 10 @Service 11 public class ProductService { 12 @Value("${server.port}") 13 String port; 14 15 public ListlistProducts(){ 16 List ps = new ArrayList<>(); 17 ps.add(new Product(1,"product a from port:"+port, 50)); 18 ps.add(new Product(2,"product b from port:"+port, 150)); 19 ps.add(new Product(3,"product c from port:"+port, 250)); 20 return ps; 21 } 22 }
 1 package cn.how2j.springcloud.pojo;
 2
 3 public class Product {
 4
 5     private int id;
 6     private String name;
 7     private int price;
 8     public int getId() {
 9         return id;
10     }
11     public void setId(int id) {
12         this.id = id;
13     }
14     public String getName() {
15         return name;
16     }
17     public void setName(String name) {
18         this.name = name;
19     }
20     public int getPrice() {
21         return price;
22     }
23     public void setPrice(int price) {
24         this.price = price;
25     }
26
27     public Product() {
28
29     }
30     public Product(int id, String name, int price) {
31         super();
32         this.id = id;
33         this.name = name;
34         this.price = price;
35     }
36
37 }
4.Euraka-client启动类:
1 @SpringBootApplication
2 @EnableEurekaClient // 开启EurekaClient功能
3 public class UserServiceDemoApplication {
4     public static void main(String[] args) {
5         SpringApplication.run(UserServiceDemoApplication.class, args);
6     }
7 }
手动多端口启动:
1 package cn.how2j.springcloud; 2 3 import java.util.Scanner; 4 import java.util.concurrent.ExecutionException; 5 import java.util.concurrent.Future; 6 import java.util.concurrent.TimeUnit; 7 import java.util.concurrent.TimeoutException; 8 import org.springframework.boot.autoconfigure.SpringBootApplication; 9 import org.springframework.boot.builder.SpringApplicationBuilder; 10 import org.springframework.cloud.netflix.eureka.EnableEurekaClient; 11 import cn.hutool.core.convert.Convert; 12 import cn.hutool.core.thread.ThreadUtil; 13 import cn.hutool.core.util.NetUtil; 14 import cn.hutool.core.util.NumberUtil; 15 16 @SpringBootApplication 17 @EnableEurekaClient 18 public class ProductDataServiceApplication { 19 public static void main(String[] args) { 20 int port = 0; 21 int defaultPort = 8001; 22 Futurefuture = ThreadUtil.execAsync(() ->{ 23 int p = 0; 24 System.out.println("请于5秒钟内输入端口号, 推荐 8001 、 8002 或者 8003,超过5秒将默认使用 " + defaultPort); 25 Scanner scanner = new Scanner(System.in); 26 while(true) { 27 String strPort = scanner.nextLine(); 28 if(!NumberUtil.isInteger(strPort)) { 29 System.err.println("只能是数字"); 30 continue; 31 } 32 else { 33 p = Convert.toInt(strPort); 34 scanner.close(); 35 break; 36 } 37 } 38 return p; 39 }); 40 try{ 41 port=future.get(5,TimeUnit.SECONDS); 42 } 43 catch (InterruptedException | ExecutionException | TimeoutException e){ 44 port = defaultPort; 45 } 46 47 if(!NetUtil.isUsableLocalPort(port)) { 48 System.err.printf("端口%d被占用了,无法启动%n", port ); 49 System.exit(1); 50 } 51 52 new SpringApplicationBuilder(ProductDataServiceApplication.class).properties("server.port=" + port).run(args); 53 } 54 }
5.yml配置文件:
 1 #   server:
 2 #   port: 因为会启动多个 product-data-service, 所以端口号由用户手动Scnner设置
 3
 4 spring:
 5   application:
 6     name: product-data-service #微服务在注册中心的应用名称
 7 eureka:
 8   client:
 9     serviceUrl:
10       defaultZone: http://localhost:8761/eureka/ #euraka注册中心对外公布的地址
11
12
13 ###################################
14 server:
15     port: 62002
16 #spring:
    #application:
      #name: user-service # 应用名称
17 eureka:
18     client:
19         service-url:
20             defaultZone: http://19.82.1.35:7001/eureka/,http://19.82.1.35:7002/eureka/,http://19.82.1.35:7003/eureka/
21     instance:
22         instance-id: ${spring.cloud.client.ip-address}:${server.port}
23         lease-expiration-duration-in-seconds: 60
24         lease-renewal-interval-in-seconds: 30
25         prefer-ip-address: true
26         #ip-address: 127.0.0.1 # 指定自己的ip信息,不指定的话会自己寻找
启动两次euraka客户端,输入端口号8001 8002 ,然后 http://127.0.0.1:8761/ 查看Euraka管理中心页面 看到注册了两个微服务。
![]()
此时我们可以 http://127.0.0.1:8001/products http://127.0.0.1:8002/products 访问可看到以下结果,这就是我们平时做的http 协议 访问微服务本身,而不是通过注册中心来调用!

接下来演示怎么通过注册中心调用微服务:
4.通过注册中心调用微服务
上面我们已经创建了注册中心(Euraka-server)、一个微服务A(Euraka-Client)并且该服务已经在注册中心注册管理。接下来我们在写一个微服务B通过注册中心来调用A。
SpringBoot提供了两种调用方式:Ribbon 和Feign
1.Ribbon 是使用 restTemplate 进行调用,并进行客户端负载均衡。 什么是客户端负载均衡呢? 在前面 注册数据微服务 里,注册了8001和8002两个微服务, Ribbon 会从注册中心获知这个信息,然后由 Ribbon 这个客户端自己决定是调用哪个,这个就叫做客户端负载均衡。
2.Feign 是什么呢? Feign 是对 Ribbon的封装,调用起来更简单
4.1创建子模块项目(jar)-- Ribbon调用:
1.pom文件添加依赖:
spring-cloud-starter-netflix-eureka-client: eureka 客户端
spring-boot-starter-web: springmvc
spring-boot-starter-thymeleaf: thymeleaf 做服务端渲染
12 4.0.0 34 8cn.how2j.springcloud 5springcloud 60.0.1-SNAPSHOT 7product-view-service-ribbon 9 1011 26 2712 15org.springframework.cloud 13spring-cloud-starter-netflix-eureka-client 1416 19 20org.springframework.boot 17spring-boot-starter-web 1821 24 25org.springframework.boot 22spring-boot-starter-thymeleaf 23
2.创建启动类
Ribbon调用需要使用RestTemplete
@EnableDiscoveryClient, 表示用于发现eureka 注册中心的微服务
1 package cn.how2j.springcloud; 2 3 import java.util.Scanner; 4 import java.util.concurrent.ExecutionException; 5 import java.util.concurrent.Future; 6 import java.util.concurrent.TimeUnit; 7 import java.util.concurrent.TimeoutException; 8 9 import org.springframework.boot.autoconfigure.SpringBootApplication; 10 import org.springframework.boot.builder.SpringApplicationBuilder; 11 import org.springframework.cloud.client.discovery.EnableDiscoveryClient; 12 import org.springframework.cloud.client.loadbalancer.LoadBalanced; 13 import org.springframework.cloud.netflix.eureka.EnableEurekaClient; 14 import org.springframework.context.annotation.Bean; 15 import org.springframework.web.client.RestTemplate; 16 17 import cn.hutool.core.convert.Convert; 18 import cn.hutool.core.thread.ThreadUtil; 19 import cn.hutool.core.util.NetUtil; 20 import cn.hutool.core.util.NumberUtil; 21 22 @SpringBootApplication 23 @EnableEurekaClient //注册客户端 24 @EnableDiscoveryClient//用于发现注册中心的微服务 25 public class ProductViewServiceRibbonApplication { 26 27 public static void main(String[] args) { 28 int port = 0; 29 int defaultPort = 8010; 30 Futurefuture = ThreadUtil.execAsync(() ->{ 31 int p = 0; 32 System.out.println("请于5秒钟内输入端口号, 推荐 8010 超过5秒将默认使用 " + defaultPort); 33 Scanner scanner = new Scanner(System.in); 34 while(true) { 35 String strPort = scanner.nextLine(); 36 if(!NumberUtil.isInteger(strPort)) { 37 System.err.println("只能是数字"); 38 continue; 39 } 40 else { 41 p = Convert.toInt(strPort); 42 scanner.close(); 43 break; 44 } 45 } 46 return p; 47 }); 48 try{ 49 port=future.get(5,TimeUnit.SECONDS); 50 } 51 catch (InterruptedException | ExecutionException | TimeoutException e){ 52 port = defaultPort; 53 } 54 if(!NetUtil.isUsableLocalPort(port)) { 55 System.err.printf("端口%d被占用了,无法启动%n", port ); 56 System.exit(1); 57 } 58 new SpringApplicationBuilder(ProductViewServiceRibbonApplication.class).properties("server.port=" + port).run(args); 59 60 } 61 62 //Ribbon是使用RestTemplate 调用的的 63 @Bean 64 @LoadBalanced //开启负载均衡 65 RestTemplate restTemplate() { 66 return new RestTemplate(); 67 } 68 69 }
3.yml配置文件
 1 eureka:
 2   client:
 3     serviceUrl:
 4       defaultZone: http://localhost:8761/eureka/
 5 spring:
 6   application:
 7     name: product-view-service-ribbon
 8
 9 ######thymeleaf配置######
10   thymeleaf:
11     cache: false
12     prefix: classpath:/templates/
13     suffix: .html
14     encoding: UTF-8
15     content-type: text/html
16     mode: HTML5
4.服务层:
1 package cn.how2j.springcloud.service; 2 3 import java.util.List; 4 5 import org.springframework.beans.factory.annotation.Autowired; 6 import org.springframework.stereotype.Service; 7 8 import cn.how2j.springcloud.client.ProductClientRibbon; 9 import cn.how2j.springcloud.pojo.Product; 10 11 @Service 12 public class ProductService { 13 @Autowired 14 RestTemplate restTemplate; 15 public ListlistProducts(){ 16 //使用restTemplate请求注册中心的微服务 17 return restTemplate.getForObject("http://PRODUCT-DATA-SERVICE/products",List.class); 18 19 } 20 }
 1 package cn.how2j.springcloud.pojo;
 2
 3 public class Product {
 4
 5     private int id;
 6     private String name;
 7     private int price;
 8     public int getId() {
 9         return id;
10     }
11     public void setId(int id) {
12         this.id = id;
13     }
14     public String getName() {
15         return name;
16     }
17     public void setName(String name) {
18         this.name = name;
19     }
20     public int getPrice() {
21         return price;
22     }
23     public void setPrice(int price) {
24         this.price = price;
25     }
26     public Product() {
27
28     }
29     public Product(int id, String name, int price) {
30         super();
31         this.id = id;
32         this.name = name;
33         this.price = price;
34     }
35
36 }
5.控制层:
1 package cn.how2j.springcloud.web; 2 import java.util.List; 3 4 import org.springframework.beans.factory.annotation.Autowired; 5 import org.springframework.stereotype.Controller; 6 import org.springframework.ui.Model; 7 import org.springframework.web.bind.annotation.RequestMapping; 8 9 import cn.how2j.springcloud.pojo.Product; 10 import cn.how2j.springcloud.service.ProductService; 11 12 @Controller 13 public class ProductController { 14 15 @Autowired ProductService productService; 16 17 @RequestMapping("/products") 18 public Object products(Model m) { 19 Listps = productService.listProducts(); 20 m.addAttribute("ps", ps); 21 return "products"; 22 } 23 }
6.页面:
1 2 3 4products 5 6 18 19 20 21class="workingArea"> 2239 40 41 4223 24
3825 29 30 31id 26产品名称 27价格 2832 36 3733 34 35
以上就完成了代码的开发,开始测试:
1. 先启动 注册中心:EurekaServerApplication
2. 然后启动两次 ProductDataServiceApplication 微服务, 分别输入 8001和8002.(模拟负载均衡调用)
3. 然后运行启动ProductViewServiceRibbonApplication微服务,然后多次刷新访问地址:http://127.0.0.1:8010/products 就可看到页面显示8001/8002,这样我们就完成了Ribbon调用!
4.2创建子模块项目(jar)-- Fegin调用:
Fegin封装了Ribbon 调用起来更简单:
1.pom文件:
多了个 spring-cloud-starter-openfeign
12 4.0.0 34 8cn.how2j.springcloud 5springcloud 60.0.1-SNAPSHOT 7product-view-service-feign 9 1011 31 3212 15org.springframework.cloud 13spring-cloud-starter-netflix-eureka-client 1416 19 20org.springframework.cloud 17spring-cloud-starter-openfeign 1821 24 25org.springframework.boot 22spring-boot-starter-web 2326 29 30org.springframework.boot 27spring-boot-starter-thymeleaf 28
2.启动类:
注解多了个 @EnableFeignClients ,不用再写RestTemplate
1 package cn.how2j.springcloud; 2 3 import java.util.Scanner; 4 import java.util.concurrent.ExecutionException; 5 import java.util.concurrent.Future; 6 import java.util.concurrent.TimeUnit; 7 import java.util.concurrent.TimeoutException; 8 9 import org.springframework.boot.autoconfigure.SpringBootApplication; 10 import org.springframework.boot.builder.SpringApplicationBuilder; 11 import org.springframework.cloud.client.discovery.EnableDiscoveryClient; 12 import org.springframework.cloud.netflix.eureka.EnableEurekaClient; 13 import org.springframework.cloud.openfeign.EnableFeignClients; 14 15 import cn.hutool.core.convert.Convert; 16 import cn.hutool.core.thread.ThreadUtil; 17 import cn.hutool.core.util.NetUtil; 18 import cn.hutool.core.util.NumberUtil; 19 20 @SpringBootApplication 21 @EnableEurekaClient 22 @EnableDiscoveryClient 23 @EnableFeignClients 24 public class ProductViewServiceFeignApplication { 25 26 public static void main(String[] args) { 27 int port = 0; 28 int defaultPort = 8012; 29 Futurefuture = ThreadUtil.execAsync(() ->{ 30 int p = 0; 31 System.out.println("请于5秒钟内输入端口号, 推荐 8012 、 8013 或者 8014,超过5秒将默认使用"+defaultPort); 32 Scanner scanner = new Scanner(System.in); 33 while(true) { 34 String strPort = scanner.nextLine(); 35 if(!NumberUtil.isInteger(strPort)) { 36 System.err.println("只能是数字"); 37 continue; 38 } 39 else { 40 p = Convert.toInt(strPort); 41 scanner.close(); 42 break; 43 } 44 } 45 return p; 46 }); 47 try{ 48 port=future.get(5,TimeUnit.SECONDS); 49 } 50 catch (InterruptedException | ExecutionException | TimeoutException e){ 51 port = defaultPort; 52 } 53 if(!NetUtil.isUsableLocalPort(port)) { 54 System.err.printf("端口%d被占用了,无法启动%n", port ); 55 System.exit(1); 56 } 57 new SpringApplicationBuilder(ProductViewServiceFeignApplication.class).properties("server.port=" + port).run(args); 58 59 } 60 }
3.yml配置文件:
 1 eureka:
 2   client:
 3     serviceUrl:
 4       defaultZone: http://localhost:8761/eureka/
 5 spring:
 6   application:
 7     name: product-view-service-feign
 8   thymeleaf:
 9     cache: false
10     prefix: classpath:/templates/
11     suffix: .html
12     encoding: UTF-8
13     content-type: text/html
14     mode: HTML5
4.服务层:
1 package cn.how2j.springcloud.client; 2 3 import java.util.List; 4 5 import org.springframework.cloud.openfeign.FeignClient; 6 import org.springframework.web.bind.annotation.GetMapping; 7 8 import cn.how2j.springcloud.pojo.Product; 9 //注解:注册中心中微服务的路径PRODUCT-DATA-SERVICE//products 10 11 @FeignClient(value = "PRODUCT-DATA-SERVICE") 12 public interface ProductClientFeign { 13 14 @GetMapping("/products") 15 public ListlistProdcuts(); 16 }
1 package cn.how2j.springcloud.service; 2 3 import java.util.List; 4 5 import org.springframework.beans.factory.annotation.Autowired; 6 import org.springframework.stereotype.Service; 7 8 import cn.how2j.springcloud.client.ProductClientFeign; 9 import cn.how2j.springcloud.pojo.Product; 10 11 @Service 12 public class ProductService { 13 @Autowired ProductClientFeign productClientFeign; 14 public ListlistProducts(){ 15 //调用Fegin 16 return productClientFeign.listProdcuts(); 17 18 } 19 }
其他代码和Ribbon相同,开始测试:
1. 先启动 注册中心:EurekaServerApplication
2. 然后启动两次 ProductDataServiceApplication 微服务, 分别输入 8001和8002.(模拟负载均衡调用)
3. 然后运行启动ProductViewServiceRibbonApplication微服务,然后多次刷新访问地址:http://127.0.0.1:8010/products 就可看到页面显示8001/8002,这样我们就完成了Ribbon调用!