Faster-RCNN全面解读(手把手带你分析代码实现)---前向传播部分
工欲善其事必先利其器,先要了解RCNN的大家庭方能彻底搞清楚Faster-RCNN的机制。
代码连接:https://github.com/xiguanlezz/Faster-RCNN
一、RCNN大家庭论文介绍
要想充分理解Faster-RCNN,推荐阅读paper的顺序为1->2->3。
1、Rich feature hierarchies for accurate object detection and semantic segmentation
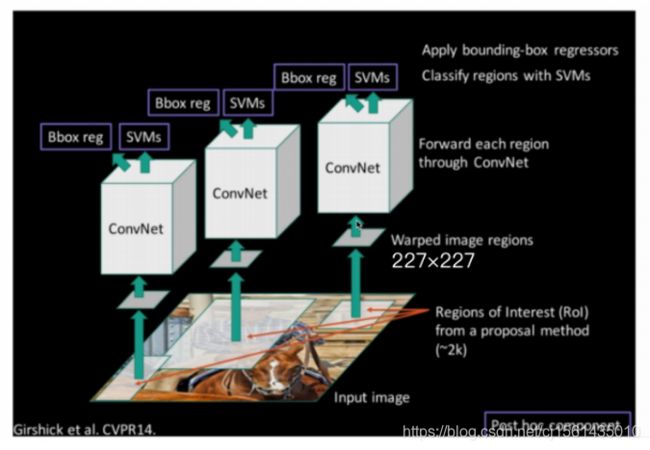
个人感觉本文写作思路就是作者先将CNN提取特征与传统的SIFT、HOG特征提取算法进行对比,引出后面要提出的RCNN这个网络就是用CNN完成特征的提取工作的。
paper中提到的网络结构就如下图,大致思路就是首先利用SS算法(selective search)将输入图片分成大致2000左右的proposals,对于每一个框都去利用CNN提取特征,之后训练一个SVM分类器以及计算位置的回归损失,最后每个proposals会对应一个scores,利用NMS算法(非极大值抑制)来得到最后的框框。其中SS算法感兴趣的可以自行百度,但算法确实有点老了,感觉没必要去细究;NMS算法在讲Faser-RCNN实现的时候会进行详细说明。
RCNN_Paper下载链接:https://pan.baidu.com/s/13WVWSzL6tYNWpFDnUHNRHw
提取码:rz9e
2、FastR-CNN
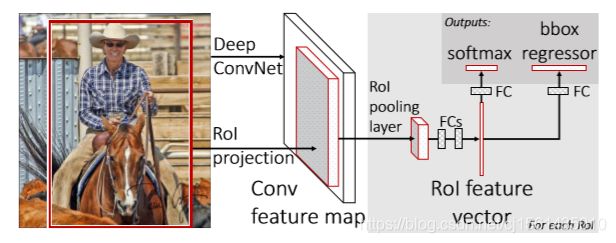
这论文取的名字真好,一个单词!够劲!个人感觉本文写作思路就是批评当前目标检测其他的网络模型时间太慢,例如SPPnet,直接摆出自己设计的网络模型即Fast-RCNN每张图片处理只要0.3s,而且在VOC数据集上面mAP达到了很高的值。
paper中提到的网络模型就是下图,候选框即proposals生成还是利用之前RCNN的SS算法来生成,但是后面紧接着是全卷积层即图中的Roi pooling layer,每个Roi都会被下采样到固定尺度的feature map,那相比之前RCNN的一大改进点就已经很明显了,通过共享卷积核参数大大减少了参数的个数进而提升了效率,最后再分别根据之前的输出通过两个全连接层,最后NMS。paper后面还提到了在全连接的时候可以先用SVD(矩阵的奇异值分解)可以加速。Roi pooling layer层具体的loss值后面在讲Faser-RCNN实现的时候会进行详细说明。
Fast-RCNN_Paper下载链接:https://pan.baidu.com/s/1v0wp3KYytwkh3uFUX_qkJA
提取码:w4q4
复制这段内容后打开百度网盘手机App,操作更方便哦
3、Faster R-CNN: Towards Real-Time Object Detection with Region Proposal Networks
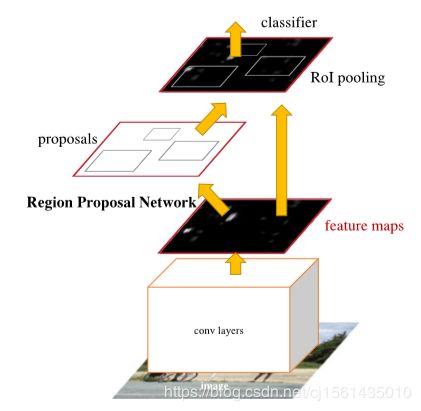
个人感觉本文写作思路就是上来就狂批RCNN先用SS算法生成k个候选框之后再用conv提取特征,很浪费时间,批完这个又对Fast-RCNN进行了一波操作,先赞扬Fast-RCNN实时性上已经很快了,but!when ignoring the time spent on region proposals,批了他生成候选框的方法。同时作者指出可以利用GPU来节约proposals生成的时间,于是设计了RPN网络来代替了Fast-RCNN中生成候选框的SS算法。
paper中提到的网络模型就如下图,先用预训练好的深度卷积神经网络(vgg系列、resnet系列)来提取原图的特征向量,采用rpn网络生成proposals,NMS之后通过Roi pooling层将proposals缩放到固定尺度,再经过全连接层。
Faster-RCNN_Paper下载链接:https://pan.baidu.com/s/1rRAdtWNWgbdnmtMaHXfrlA
提取码:md67
二、Faster-RCNN详解
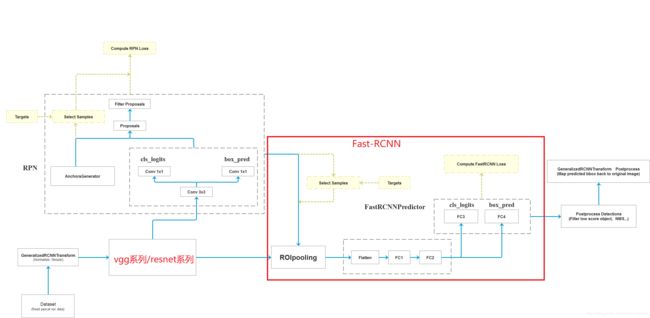
各位好好记住这张图!我代码实现可能和灰色的虚线框有点出入,但是不影响理解整体结构。
1、特征提取网络
代码使用预训练好的vgg16模型。预训练的权重直接使用这个代码可以从网上直接下载models.vgg16(pretrained=True)。
decom_VGG16函数就作为特征提取器,函数的入参就是本地预训练参数的路径。
	from torchvision import models
	from torch import nn
	import torch


	def decom_VGG16(path):
	    model = load_pretrained_vgg16(path)
	    print(model)
	    # 拿出vgg16模型的前30层来进行特征提取
	    features = list(model.features)[:30]

	    # 获取vgg16的分类的那些层
	    classifier = list(model.classifier)
	    # 除去Dropout的相关层
	    del classifier[6]
	    del classifier[5]
	    del classifier[2]
	    classifier = nn.Sequential(*classifier)

	    # 前10层的参数不进行更新
	    for layer in features[:10]:
	        for p in layer.parameters():
	            p.requires_grad = False

	    features = nn.Sequential(*features)
	    return features, classifier


	def load_pretrained_vgg16(path):
	    vgg16 = models.vgg16()
	    vgg16.load_state_dict(torch.load(path))
	    return vgg16
	    # return models.vgg16(pretrained=True)


	if __name__ == '__main__':
	    path = '../vgg16-397923af.pth'
	    # model = torch.load(path)
	    # vgg16_model = models.vgg16().load_state_dict(model)
	    vgg16_model = load_pretrained_vgg16(path)
	    print(vgg16_model)
2、RPN网络
总思路:这个网络就我代码里面,先将之前1中讲到的预训练好的特征提取网络输出的特征向量中每个像素点生成9个锚点(可能成为兴趣区域即rois的点)即先验框也可以叫anchors,对于vgg16输出的特征向量来计算则anchors的个数为38 x 38 x 9 = 12996。之后通过一个3x3的卷积,再将这个卷积的输出分别经过两次1x1的卷积(并不是连着两次,这两个是可以分开独立的,一个用于分类预测,一个用于回归预测,这部分是后面需要计算的loss值之一)。之后现根据RPN网络中用于回归预测的输出rpn_locs对先验框即anchors进行微调,让anchors变为rois,对rois计算iou根据NMS非极大值抑制算法减少兴趣区域的数量。
① 生成anchors部分
feature map中每个像素点生成9个anchors的代码。generate_base_anchors函数就是针对单个像素点计算出9个锚点坐标并返回,center_x和center_y是像素的偏移量,为了方便enumerate_shifted_anchor函数中生成anchors的常规做法,每次都调用generate_base_anchors函数。当然未被注释掉的是大神的实现,直接张量操作,最后利用pytorch的broadcast得到结果。
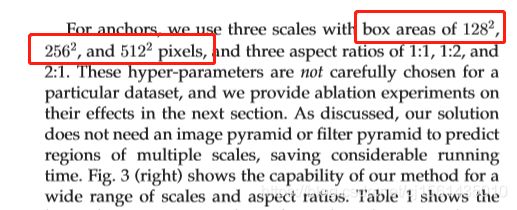
对于9个锚点生成很简单,就相当于是3个不同的ratios和3个不同的scales进行组合。不过我犯了个错,之前我还误以为scales的比例就是边长的直接缩放,所以看别人实现的代码百思不得其解,结果第二天早上瞬间就顿悟了,其实scales的平方就是面积之比,搞明白这个看下面代码松松的。后来我还去paper上看了,原来作者讲了这个问题,是我看得不够仔细。。。
注意!不管是anchors、proposals还是后面的rois,他们其实都是矩形框左上角点的坐标和右下角点的坐标(按照左上x,左上y,右下x,右下y的顺序)。另外计算机视觉中,x坐标都是左小右大,y坐标都是上小下大。
	import numpy as np


	def generate_base_anchors(base_size=16, ratios=[0.5, 1, 2], scales=[8, 16, 32], center_x=0, center_y=0):
	    """
	    function description: 生成k个以(0, 0)为中心的anchors模板

	    :param base_size: 特征图的每个像素的感受野大小(相当于featuremap上的一个像素的尺度所对应原图上的尺度)
	    :param ratios: 高宽的比率
	    :param scales: 面积的scales的开方
	    :return:
	    """
	    base_anchor = np.zeros((len(ratios) * len(scales), 4), dtype=np.float32)

	    # 生成anchor的算法本质: 使得总面积不变, 一个像素点衍生出9个anchors
	    for i in range(len(scales)):
	        for j in range(len(ratios)):
	            index = i * len(ratios) + j
	            area = (base_size * scales[i]) ** 2
	            width = np.sqrt(area * 1.0 / ratios[j])
	            height = width * ratios[j]

	            # 只需要保存左上角个右下角的点的坐标即可
	            base_anchor[index, 0] = -width / 2. + center_x
	            base_anchor[index, 1] = -height / 2. + center_y
	            base_anchor[index, 2] = width / 2. + center_x
	            base_anchor[index, 3] = height / 2. + center_y

	    return base_anchor


	def enumerate_shifted_anchor(base_anchor, base_size, width, height):
	    """
	    function description: 减少不必要的如generate_base_anchors的计算, 较大的特征图的锚框生成模板, 生成锚框的初选模板即滑动窗口

	    :param base_anchor: 需要reshape的anchors
	    :param base_size: 特征图的每个像素的感受野大小
	    :param height: featuremap的高度
	    :param width: featuremap的宽度
	    :return:
	        anchor: 维度为:[width*height*k, 4]的先验框(anchors)
	    """
	    # 计算featuremap中每个像素点在原图中感受野上的中心点坐标
	    shift_x = np.arange(0, width * base_size, base_size)
	    shift_y = np.arange(0, height * base_size, base_size)
	    shift_x, shift_y = np.meshgrid(shift_x, shift_y)
	    print('shift_x: ', shift_x.shape, 'shift_y: ', shift_y.shape)

	    # TODO 感觉最正统的方法还是遍历中心点
	    # index = 0
	    # for x in shift_x:
	    #     for y in shift_y:
	    #         anchors = generate_base_anchors(center_x=x, center_y=y)
	    #         if index == 0:
	    #             old_anchors = anchors
	    #         else:
	    #             anchors = np.concatenate((old_anchors, anchors), axis=0)
	    #             old_anchors = anchors
	    #         index += 1

	    # TODO 直接利用broadcast貌似也可以达到目的
	    # shift_x.ravel()表示原地将为一维数组, shift的维度为: [feature_stride, 4]
	    shift = np.stack((shift_x.ravel(), shift_y.ravel(), shift_x.ravel(), shift_y.ravel(),), axis=1)
	    A = base_anchor.shape[0]
	    K = shift.shape[0]
	    anchor = base_anchor.reshape((1, A, 4)) + shift.reshape((K, 1, 4))

	    # 最后再合成为所有的先验框, 相当于对featuremap的每个像素点都生成k(9)个先验框(anchors)
	    anchors = anchor.reshape((K * A, 4)).astype(np.float32)
	    print('result: ', anchors.shape)
	    return anchors
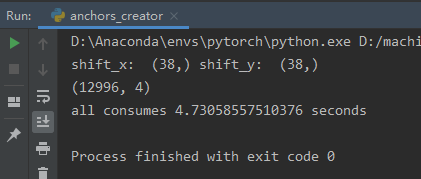
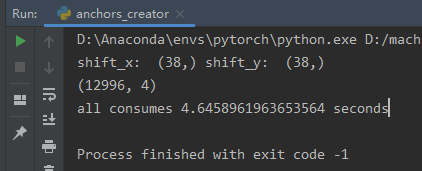
当然我还对比了一下张量直接运算得到anchors和利用多重for循环生成anchors的耗时情况。
测试代码:
	if __name__ == '__main__':
	    import matplotlib.pyplot as plt

	    start = time.time()
	    nine_anchors = generate_base_anchors()

	    height, width, base_size = 38, 38, 16
	    all_anchors = enumerate_shifted_anchor(nine_anchors, base_size, width, height)

	    fig = plt.figure()
	    ax = fig.add_subplot(111)
	    # x坐标和y坐标在接近[-10, 600]左右可以画出全部坊featuremap的像素点
	    plt.ylim(-10, 600)
	    plt.xlim(-10, 600)
	    shift_x = np.arange(0, width * base_size, base_size)
	    shift_y = np.arange(0, height * base_size, base_size)
	    shift_x, shift_y = np.meshgrid(shift_x, shift_y)
	    plt.scatter(shift_x, shift_y)

	    box_widths = all_anchors[:, 2] - all_anchors[:, 0]
	    box_heights = all_anchors[:, 3] - all_anchors[:, 1]
	    print(all_anchors.shape)

	    for i in range(12996):
	        rect = plt.Rectangle([all_anchors[i, 0], all_anchors[i, 1]], box_widths[i],
	                             box_heights[i], color="r", fill=False)
	        ax.add_patch(rect)
	    end = time.time()
	    print('all consumes {0} seconds'.format(end - start))
	    plt.show()
生成的结果都是下图。其实差距是比较小的,直接暴力for循环反而能更好理解。

② 根据rpn_locs对anchors进行微调部分
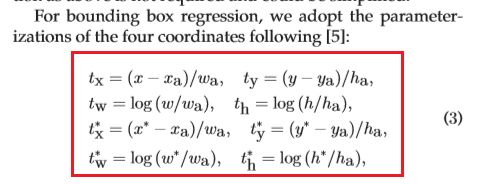
根据RPN网络中标注框的位置即bbox的回归值对anchors进行微调,纯实现paper中的公式。
	def loc2box(anchors, locs):
	    """
	    function description: 将所有的anchors根据通过rpn得到的locs值进行校正

	    :param anchors: 先验框
	    :param locs: rpn得到的locs
	    :return:
	        roi: 兴趣区域
	    """
	    anchors_width = anchors[:, 2] - anchors[:, 0]
	    anchors_height = anchors[:, 3] - anchors[:, 1]
	    anchors_center_x = anchors[:, 0] + 0.5 * anchors_width
	    anchors_center_y = anchors[:, 1] + 0.5 * anchors_height

	    tx = locs[:, 0]
	    ty = locs[:, 1]
	    tw = locs[:, 2]
	    th = locs[:, 3]

	    center_x = tx * anchors_width + anchors_center_x
	    center_y = ty * anchors_height + anchors_center_y
	    width = np.exp(tw) * anchors_width
	    height = np.exp(th) * anchors_height

	    # eps是一个很小的非负数, 使用eps将可能出现的零用eps来替换, 避免除数为0而报错
	    roi = np.zeros(locs.shape, dtype=locs.dtype)
	    roi[:, 0] = center_x - 0.5 * width  # xmin
	    roi[:, 2] = center_x + 0.5 * width  # xmax
	    roi[:, 1] = center_y - 0.5 * height  # ymin
	    roi[:, 3] = center_y + 0.5 * height  # ymax
	    return roi
③ NMS非极大值抑制算法
NMS非极大值抑制算法,将所有的rois放入一个数组中,每次选出scores最高的roi并加入结果索引中,分别和其他rois计算iou(交集/并集),从数组中剔除iou超过阈值的rois,一直重复这个步骤直到数组为空
关于重叠面积的计算方法,更简单了,无非就是对于两个矩形的左上角取最大值, 对于右下角取最小值, 再判断内部的矩形是否存在即可。这里也将常规思路注释掉了,放了大神的张量操作。
	def calculate_iou(valid_anchors, boxes):
	    """
	    function description: 计算两个框框之间的IOU(交集/并集)

	    :param inside_anchors: 在图片内的先验框(anchors), 维度为: [inside_anchors_num, 4]
	    :param boxes: 图片中的真实标注框, 维度为: [boxes_num, 4]
	    :return:
	        ious: 每个inside_anchors和boxes的iou的二维张量, 维度为: [inside_anchors_num, boxes_num]
	    """
	    # if valid_anchors.shape[1] != 4 or boxes.shape[1] != 4:
	    #     raise IndexError

	    # boxes = boxes.detach().cpu().numpy()
	    # TODO 常规思路---对于两个矩形的左上角取最大值, 对于右下角取最小值, 再判断内部的矩形是否存在即可
	    # ious = np.empty((len(valid_anchors), 2), dtype=np.float32)
	    # ious.fill(0)
	    # 命名规则: 左上角为1, 右下角为2
	    # for i, point_i in enumerate(valid_anchors):
	    #     print(point_i)
	    #     xa1, ya1, xa2, ya2 = point_i
	    #     anchor_area = (ya2 - ya1) * (xa2 - xa1)
	    #     for j, point_j in enumerate(boxes):
	    #         print(point_j)
	    #         xb1, yb1, xb2, yb2 = point_j
	    #         box_area = (yb2 - yb1) * (xb2 - xb1)
	    #
	    #         inter_x1 = max(xa1, xa2)
	    #         inter_y1 = max(ya1, ya2)
	    #         inter_x2 = min(xb1, xb2)
	    #         inter_y2 = min(yb1, yb2)
	    #         if inter_x1 < inter_x2 and inter_y1 < inter_y2:
	    #             overlap_area = (inter_x2 - inter_x1) * (inter_y2 - inter_y1)
	    #             iou = (overlap_area) * 1.0 / (anchor_area + box_area - overlap_area)
	    #         else:
	    #             iou = 0.
	    #         ious[i][j] = iou

	    # TODO 直接张量运算
	    # 获得重叠面积最大化的左上角点的坐标信息, 返回的维度是[inside_anchors_num, boxes_num, 2]
	    tl = np.maximum(valid_anchors[:, None, :2], boxes[:, :2])
	    # 获得重叠面积最大化的右下角点的坐标信息, 返回的维度是[inside_anchors_num, boxes_num, 2]
	    br = np.minimum(valid_anchors[:, None, 2:], boxes[:, 2:])

	    # 计算重叠部分的面积, 返回的维度是[inside_anchors_num, boxes_num]
	    area_overlap = np.prod(br - tl, axis=2) * (tl < br).all(axis=2)
	    # 计算inside_anchors的面积, 返回的维度是[inside_anchors_num]
	    area_1 = np.prod(valid_anchors[:, 2:] - valid_anchors[:, :2], axis=1)
	    # 计算boxes的面积, 返回的维度是[boxes_num]
	    area_2 = np.prod(boxes[:, 2:] - boxes[:, :2], axis=1)
	    # area_1[:, None]表示将数组扩张一个维度即维度变为[inside_anchors, 1]
	    ious = area_overlap / (area_1[:, None] + area_2 - area_overlap)
	    # 最后broadcast返回的维度是[inside_anchors_num, boxes_num]
	    return ious
再来看NMS算法。本来还想抽取计算公共代码,因为下面代码和上面计算iou代码有冗余,想想还是算了,咱只是码农,面向cv和百度编程。
	def non_maximum_suppression(roi, thresh):
	    """
	    function description: 非极大值抑制算法, 每次选出scores最高的roi分别和其他roi计算iou, 剔除iou查过阈值的roi,
	                           一直重复这个步骤

	    :param roi: 感兴趣的区域
	    :param thresh: iou的阈值
	    :return:
	    """
	    # 左上角点的坐标
	    xmin = roi[:, 0]
	    ymin = roi[:, 1]
	    # 右下角点的坐标
	    xmax = roi[:, 2]
	    ymax = roi[:, 3]

	    areas = (xmax - xmin) * (ymax - ymin)
	    keep = []
	    order = np.arange(roi.shape[0])
	    while order.size > 0:
	        i = order[0]
	        keep.append(i)
	        # TODO 和计算iou有些许冗余
	        xx1 = np.maximum(xmin[i], xmin[order[1:]])
	        yy1 = np.maximum(ymin[i], ymin[order[1:]])
	        xx2 = np.minimum(xmax[i], xmax[order[1:]])
	        yy2 = np.minimum(ymax[i], ymax[order[1:]])

	        width = np.maximum(0.0, xx2 - xx1)
	        height = np.maximum(0.0, yy2 - yy1)
	        inter = width * height
	        # 计算iou
	        iou = inter / (areas[i] + areas[order[1:]] - inter)

	        idx = np.where(iou <= thresh)[0]  # 去掉和scores的iou大于阈值的roi
	        order = order[1 + idx]  # 剔除score最大
	    roi_after_nms = roi[keep]
	    return roi_after_nms
④ 整个RPN层代码
会有两个输出的部分,一个是分类输出(维度为:[n, whk, 2]。其中最低维度中一个表示的是置信度,还一个表示的是label,0代表背景,其余代表类别),还一个是回归输出(维度为:[n, whk, 4],最低维度中的四个数分别代表左上角和右下角的坐标)。
	from torch import nn
import torch
import torch.nn.functional as F
from nets.anchors_creator import generate_base_anchors, enumerate_shifted_anchor
from nets.proposal_creator import ProposalCreator
from utils.util import normal_init
from configs.config import in_channels, mid_channels, feature_stride, anchors_scales, anchors_ratios


class RPN(nn.Module):
    def __init__(self):
        super(RPN, self).__init__()

        self.in_channels = in_channels  # 经过预训练好的特征提取网络输出的featuremap的通道数
        self.mid_channels = mid_channels  # rpn网络第一层3x3卷积层输出的维度
        self.feature_stride = feature_stride  # 可以理解为featuremap中感受野的大小(压缩的倍数)
        self.anchor_scales = anchors_scales  # 生成先验框的面积比例的开方
        self.anchor_ratios = anchors_ratios  # 生成先验框的宽高之比

        # 可以把rpn传入; 如果是train阶段, 返回的roi数量是2000; 如果是test则是300
        self.proposal_layer = ProposalCreator(parent_model=self)

        self.base_anchors = generate_base_anchors(scales=self.anchor_scales, ratios=self.anchor_ratios)
        self.feature_stride = feature_stride

        # RPN的卷积层用来接收特征图(预训练好的vgg16网络的输出)
        self.RPN_conv = nn.Conv2d(in_channels=in_channels, out_channels=self.mid_channels, kernel_size=3, stride=1,
                                  padding=1)

        anchors_num = self.base_anchors.shape[0]
        # 2 x k(9) scores, 分类预测
        self.RPN_cls_layer = nn.Conv2d(in_channels=self.mid_channels, out_channels=anchors_num * 2, kernel_size=1,
                                       stride=1,
                                       padding=0)

        # 4 x k(9) coordinates, 回归预测每一个网格点上每一个先验框的变化情况; 此处是1 x 1卷积, 只改变维度
        self.RPN_reg_layer = nn.Conv2d(in_channels=self.mid_channels, out_channels=anchors_num * 4, kernel_size=1,
                                       stride=1,
                                       padding=0)

        # paper中提到的用0均值高斯分布(标准差为0.01)初始化1x1卷积的权重
        normal_init(self.RPN_conv, mean=0, stddev=0.01)
        normal_init(self.RPN_cls_layer, mean=0, stddev=0.01)
        normal_init(self.RPN_reg_layer, mean=0, stddev=0.01)

    def forward(self, base_feature_map, img_size):
        """
        function description: rpn网络的前向计算

        :param base_feature_map: 经过预训练好的特征提取网络后的输出, 维度为: [batch_size, 38, 38, 512]
        :param img_size: 原图的尺寸, 需要用这个对anchors进行才间再转化成rois
        :return:
            rpn_locs:rpn层回归预测每一个先验框的变化情况, 维度为:[n, w*h*k, 4]
            rpn_scores: rpn分类每一个预测框内部是否包含了物体以及相应的置信度, 维度为:[n, w*h*k, 2]
            anchors: featuremap中每个像素点生成k个先验框的集合, 维度为:[w*h*k ,4]
            rois: 通过rpn网络输出的locs来校正先验框anchors的位置并完成NMS之后的rois
        """
        n, _, w, h = base_feature_map.shape

        # 前向传播的时候计算移动的anchors
        anchors = enumerate_shifted_anchor(self.base_anchors, base_size=self.feature_stride, width=w, height=h)

        anchor_num = len(self.anchor_ratios) * len(self.anchor_scales)

        x = F.relu(self.RPN_conv(base_feature_map), inplace=True)  # inplace=True表示原地操作, 节省内存

        # 回归预测, 其中第三个维度的四个数分别代表左上角和右下角的点的坐标
        rpn_locs = self.RPN_reg_layer(x)
        # [n, 4*k, w, h] -> [n, w, h, 4*k] -> [n, w*h*k, 4]
        rpn_locs = rpn_locs.permute(0, 2, 3, 1).contiguous().view(n, -1, 4)

        # 分类预测, 其中第三个维度的第一个数表示类别标签(0为背景), 第二个数表示置信度
        rpn_scores = self.RPN_cls_layer(x)
        # [n, 2*k, w, h] -> [n, w, h, 2*k] -> [n, w*h*k, 2]
        rpn_scores = rpn_scores.permute(0, 2, 3, 1).contiguous()
        # TODO
        # [n, w, h, 2*k] -> [n, w, h, k, 2]
        rpn_scores = rpn_scores.view(n, w, h, anchor_num, 2)
        # [n, w, h, k, 2] -> [n, w*h*k, 2]
        rpn_scores = rpn_scores.view(n, -1, 2)

        # print('rpn_locs: ', rpn_locs.shape)
        # print('rpn_scores: ', rpn_scores.shape)

        # 根据rpn回归的结果对anchors微调以及裁剪之后转为rois, 同时提供rois给Fast-RCNN部分
        rois = self.proposal_layer(rpn_locs[0].detach().cpu().numpy(),
                                   rpn_scores[0].detach().cpu().numpy(),
                                   anchors,
                                   img_size)

        return rpn_locs, rpn_scores, anchors, rois

    @staticmethod
    def reshape(x, width):
        # input_size = x.size()
        # x = x.view(input_size[0], int(d), int(float(input_size[1] * input_size[2]) / float(d)), input_size[3])
        height = float(x.size(1) * x.size(1)) / width
        x = x.view(x.size(0), int(width), int(height), x.size(3))
        return x


if __name__ == '__main__':
    net = RPN()
    x = net(torch.ones((1, 512, 38, 38)), (224, 224))
⑤ ProposalCreator类的代码
ProposalCreator封装了anchors->rois及NMS算法。其中对先验框还进行了范围的裁剪,去掉了图片外的anchors以及先验框尺寸小于min_size的框。
	import numpy as np
	from utils.util import loc2box, non_maximum_suppression


	class ProposalCreator:
	    def __init__(self,
	                 parent_model,
	                 nms_thresh=0.7,
	                 n_train_pre_nms=12000,
	                 n_train_post_nms=2000,
	                 n_test_pre_nms=6000,
	                 n_test_post_nms=300,
	                 min_size=16):
	        """
	        :param parent_model: 区分是training_model还是testing_model
	        :param nms_thresh: 非极大值抑制的阈值
	        :param n_train_pre_nms: 训练时NMS之前的boxes的数量
	        :param n_train_post_nms: 训练时NMS之后的boxes的数量
	        :param n_test_pre_nms: 测试时NMS之前的数量
	        :param n_test_post_nms: 测试时NMS之后的数量
	        :param min_size: 生成一个roi所需的目标的最小高度, 防止Roi pooling层切割后维度降为0
	        """
	        self.parent_model = parent_model
	        self.nms_thresh = nms_thresh
	        self.n_train_pre_nms = n_train_pre_nms
	        self.n_train_post_nms = n_train_post_nms
	        self.n_test_pre_nms = n_test_pre_nms
	        self.n_test_post_nms = n_test_post_nms
	        self.min_size = min_size

	    def __call__(self, locs, scores, anchors, img_size):
	        """
	        function description: 通过rpn网络输出的locs来校正先验框anchors的位置并完成NMS, 返回固定数量的rois

	        :param locs: rpn网络中的1x1卷积的一个输出, 维度为[w*h*k, 4]
	        :param scores: rpn网络中的1x1卷积的另一个输出, 维度为:[w*h*k, 2]
	        :param anchors: 先验框
	        :param img_size: 输入整个Faster-RCNN网络的图片尺寸
	        :return:
	            roi_after_nms: 通过rpn网络输出的locs来校正先验框anchors的位置并完成NMS之后的rois
	        """
	        if self.parent_model.training:
	            n_pre_nms = self.n_train_pre_nms
	            n_post_nms = self.n_train_post_nms
	        else:
	            n_pre_nms = self.n_test_pre_nms
	            n_post_nms = self.n_test_post_nms

	        # 根据rpn_locs微调先验框即将anchors转化为rois
	        roi = loc2box(anchors, locs)

	        # 防止建议框即rois超出图像边缘
	        roi[:, [0, 2]] = np.clip(roi[:, [0, 2]], 0, img_size[0])  # 对X轴剪切
	        roi[:, [1, 3]] = np.clip(roi[:, [1, 3]], 0, img_size[1])  # 对Y轴剪切

	        # 去除高或宽
	        min_size = self.min_size
	        roi_width = roi[:, 2] - roi[:, 0]
	        roi_height = roi[:, 3] - roi[:, 1]
	        keep = np.where((roi_width >= min_size) & (roi_height >= min_size))[0]  # 得到满足条件的行index
	        roi = roi[keep, :]

	        scores = scores[:, 1]
	        scores = scores[keep]
	        # argsort()函数得到的是从小到大的索引, x[start:end:span]中如果span<0则逆序遍历; 如果span>0则顺序遍历
	        order = scores.argsort()[::-1]  # 对roi通过rpn的scores进行排序, 得到scores的下降排列的坐标
	        # 保留分数排在前面的n_pre_nms个rois
	        order = order[: n_pre_nms]
	        roi = roi[order, :]

	        # 非极大值抑制
	        roi_after_nms, _ = non_maximum_suppression(roi, thresh=self.nms_thresh)
	        # NMS之后保留分数排在前面的n_post_nms个rois
	        roi_after_nms = roi_after_nms[:n_post_nms]

	        return roi_after_nms
3、Fast-RCNN网络
我自己实现的时候,在这个网络里就放了Roi pooling层和两个全连接层。
① Fast-RCNN部分的全部代码
	from torch import nn
	from nets.roi_pooling_2d import RoIPooling2D
	from nets.vgg16 import decom_VGG16
	from utils.util import normal_init


	class FastRCNN(nn.Module):
	    def __init__(self,
	                 n_class,
	                 roi_size,
	                 spatial_scale,
	                 classifier):
	        """
	        function description:
	            将rpn网络提供的roi"投射"到vgg16的featuremap上, 进行相应的切割并maxpooling(RoI maxpooling),
	            再将其展开从2d变为1d,投入两个fc层,然后再分别带入两个分支fc层,作为cls和reg的输出

	        :param n_class: 分类的总数
	        :param roi_size: RoIPooling2D之后的维度
	        :param spatial_scale: roi(rpn推荐的区域-原图上的区域)投射在feature map后需要缩小的比例, 这个个人感觉应该对应感受野大小
	        :param classifier: 从vgg16提取的两层fc(Relu激活)
	        """
	        super(FastRCNN, self).__init__()

	        self.classifier = classifier
	        self.cls_layer = nn.Linear(4096, n_class)
	        self.reg_layer = nn.Linear(4096, n_class * 4)
	        normal_init(self.cls_layer, 0, 0.001)
	        normal_init(self.reg_layer, 0, 0.01)
	        self.n_class = n_class
	        self.roi_size = roi_size
	        self.spatial_scale = spatial_scale
	        self.roi = RoIPooling2D((self.roi_size, self.roi_size), self.spatial_scale)

	    def forward(self, x, sample_rois):
	        """
	        function decsription:

	        :param x: 预训练好的特征提取网络的输出即featuremap
	        :param sample_rois: 经过NMS后的rois
	        :return:
	            roi_locs: roi的回归损失
	            roi_scores: roi的分类损失
	        """
	        pool = self.roi(x, sample_rois)
	        pool = pool.view(pool.size(0), -1)
	        fc7 = self.classifier(pool)

	        roi_scores = self.cls_layer(fc7)
	        roi_locs = self.reg_layer(fc7)
	        return roi_locs, roi_scores
RoIPooling2D这个类封装了最大池化,缩放到固定尺寸。
	class RoIPooling2D(nn.Module):
	    def __init__(self, output_size, spatial_scale, return_indices=False):
	        super(RoIPooling2D, self).__init__()

	        self.output_size = output_size
	        self.spatial_scale = spatial_scale
	        self.return_indices = return_indices
	        # 将输入张量的维度变为output_size, output_size是元组
	        self.adp_max_pool_2D = nn.AdaptiveMaxPool2d(output_size, return_indices)

	    def forward(self, x, rois):
	        """
	        function description: 将原图中采样后的roi变换到featuremap中的对应位置

	        :param x: 预训练好的特征提取网络的输出即featuremap
	        :param rois: 采样后的roi
	        :return:
	        """
	        rois_ = torch.from_numpy(rois).float()
	        rois = rois_.mul(self.spatial_scale)
	        rois = rois.long()

	        num_rois = rois.size(0)
	        output = []

	        for i in range(num_rois):
	            # roi维度为: [4]
	            roi = rois[i]
	            im = x[..., roi[0]:(roi[2] + 1), roi[1]:(roi[3] + 1)]
	            try:
	                output.append(self.adp_max_pool_2D(im))  # 元素维度 (1, channel, 7, 7)
	            except RuntimeError:
	                print("roi:", roi)
	                print("raw roi:", rois[i])
	                print("im:", im)
	                print("outcome:", self.adp_max_pool_2D(im))

	        output = torch.cat(output, 0)
	        return output
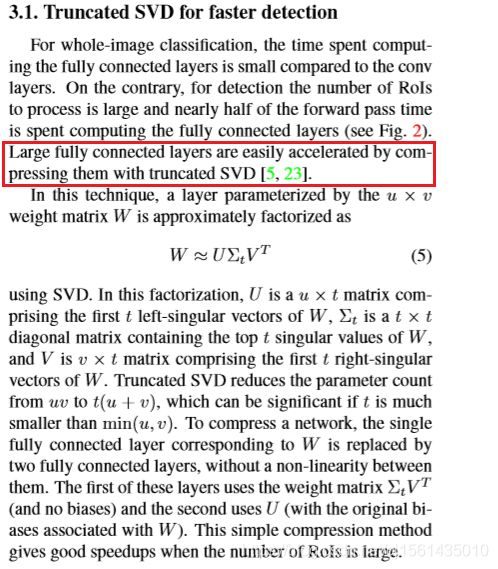
权重的初始化函数。这个函数的入参truncated代表着是否启用SVD(奇异值分解)。
	def normal_init(m, mean, stddev, truncated=False):
	    """
	    function description: 权重初始化函数

	    :param m: 输入
	    :param mean: 均值
	    :param stddev: 标准差
	    :param truncated: 是否截断, paper中使用矩阵奇异值分解加速的话就视为截断
	    :return:
	    """
	    if truncated:
	        m.weight.data.normal_().fmod_(2).mul_(stddev).add_(mean)
	    else:
	        m.weight.data.normal_(mean, stddev)
	        m.bias.data.zero_()
测试暂无。
