coocox学习笔记-串口
CoIDE版本:CoIDE-V2Beta
编译器版本:gcc-arm-none-eabi-5_2-2015q4
目标板:STM32F030C8T6
之前一直使用MDK开发STM32应用程序,近日想尝试下gcc编译STM32,享受下开源的果实,于是乎在网上了解到了coocox,它有一个CoIDE用来编辑代码,是简版的eclipse,目前最新版为V2Beta,之前用eclipse生成注释很方便,所以就想试试CoIDE是否也可以,但尝试了半天也没搞定,始终无法自动生成注释。。。
coocox使用的STM32库代码是cube库而不是std标准库,看来是紧跟ST的步伐那,还好之前也使用过cube库,更加方便了coocox的上手,在CoIDE上设置好编译器路径,这个在coocox的官网上有介绍,很简单。
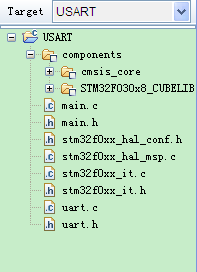
创建好一个STM32F030C8T6的工程,在Repository页面上添加cmsis_core、STM32F030x8_CUBELIB组件,使用coocox必须要了解的一个概念是Components(组件),它把库,驱动,OS,启动代码等抽象为组件,使用时直接添加即可,同时在组件中也配有示例代码,本例创建了一个USART的工程,添加完组件后会在工程目录下产生一个components的目录,里面存放我们添加的组件文件,目前该工程为空工程,添加两个文件uart.c、uart.h文件,工程组织如下:
uart.c和uart.h文件是从之前学习cube库时使用的直接拷贝过来稍作修改即可,uart.c代码如下:
#include "UART.h"
#include "stm32f0xx_hal_def.h"

UART_HandleTypeDef uartHandle;
uint8_t aRxBuffer[BUFFSIZE];
uint8_t aTxBuffer[BUFFSIZE];
struct uart uart_rev;

void HAL_UART_MspInit(UART_HandleTypeDef *huart)
{
	GPIO_InitTypeDef  GPIO_InitStruct;

	/*##-1- Enable peripherals and GPIO Clocks #################################*/
	/* Enable GPIO TX/RX clock */
	USARTx_TX_GPIO_CLK_ENABLE();
	USARTx_RX_GPIO_CLK_ENABLE();
	/* Enable USART2 clock */
	USARTx_CLK_ENABLE();

	/*##-2- Configure peripheral GPIO ##########################################*/
	/* UART TX GPIO pin configuration  */
	GPIO_InitStruct.Pin       = USARTx_TX_PIN;
	GPIO_InitStruct.Mode      = GPIO_MODE_AF_PP;
	GPIO_InitStruct.Pull      = GPIO_NOPULL;
	GPIO_InitStruct.Speed     = GPIO_SPEED_HIGH;
	GPIO_InitStruct.Alternate = USARTx_TX_AF;

	HAL_GPIO_Init(USARTx_TX_GPIO_PORT, &GPIO_InitStruct);

	/* UART RX GPIO pin configuration  */
	GPIO_InitStruct.Pin = USARTx_RX_PIN;
	GPIO_InitStruct.Alternate = USARTx_RX_AF;

	HAL_GPIO_Init(USARTx_RX_GPIO_PORT, &GPIO_InitStruct);

	/*##-3- Configure the NVIC for UART ########################################*/
	/* NVIC for USART2 */
	HAL_NVIC_SetPriority(USARTx_IRQn, 0, 1);
	HAL_NVIC_EnableIRQ(USARTx_IRQn);
}

/**
  * @brief UART MSP De-Initialization
  *        This function frees the hardware resources used in this example:
  *          - Disable the Peripheral's clock
  *          - Revert GPIO and NVIC configuration to their default state
  * @param huart: UART handle pointer
  * @retval None
  */
void HAL_UART_MspDeInit(UART_HandleTypeDef *huart)
{
	/*##-1- Reset peripherals ##################################################*/
	USARTx_FORCE_RESET();
	USARTx_RELEASE_RESET();

	/*##-2- Disable peripherals and GPIO Clocks #################################*/
	/* Configure UART Tx as alternate function  */
	HAL_GPIO_DeInit(USARTx_TX_GPIO_PORT, USARTx_TX_PIN);
	/* Configure UART Rx as alternate function  */
	HAL_GPIO_DeInit(USARTx_RX_GPIO_PORT, USARTx_RX_PIN);

	/*##-3- Disable the NVIC for UART ##########################################*/
	HAL_NVIC_DisableIRQ(USARTx_IRQn);
}

/**********************************************************************
函数:uart_init()
函数作用:串口初始化
参数:
	uint32_t BaudRate=========================串口波特率
返回值:无
上一版本:无
当前版本:1.0
作者:
最后修改时间:2015-04-02
说明:
**********************************************************************/
void uart_init(uint32_t BaudRate)
{

    uartHandle.Instance        = USARTx;
    uartHandle.Init.BaudRate   = BaudRate;
    uartHandle.Init.WordLength = UART_WORDLENGTH_8B;
    uartHandle.Init.StopBits   = UART_STOPBITS_1;
    uartHandle.Init.Parity     = UART_PARITY_NONE;
    uartHandle.Init.HwFlowCtl  = UART_HWCONTROL_NONE;
    uartHandle.Init.Mode       = UART_MODE_TX_RX;

    if(HAL_UART_Init(&uartHandle) != HAL_OK)
    {
        Error_Handler();
    }

	uart_rev.front = aRxBuffer;
	uart_rev.rear = aRxBuffer;	//两个指针指向相同的地址空间
	if(HAL_UART_Receive_IT(&uartHandle,(uint8_t*)aRxBuffer,1) != HAL_OK)
	{
		Error_Handler();
	}
}
void Error_Handler(void)
{
    while(1)
    {

    }
}

/**********************************************************************
函数:uart_read()
函数作用:从接收缓冲区中读取数据
参数:
	uint8_t *fmt--------------------------------接收到的数据
	uint16_t time_out---------------------------超时时间
返回值:0:读取到数据-1:没有读取到数据
上一版本:无
当前版本:1.0
作者:
最后修改时间:2015-04-08
说明:
**********************************************************************/
int8_t uart_read(uint8_t *fmt, uint16_t time_out)
{
	while(time_out)
	{
		if(uart_rev.front != uart_rev.rear)
		{
			//如果队首指针和队尾指针不同表明缓冲区中有数据还未收取
			*fmt=*uart_rev.front;

			uart_rev.front++;

			if (uart_rev.front >= (aRxBuffer+BUFFSIZE))
				uart_rev.front = aRxBuffer;

			return 0;
		}
		time_out--;
	}
	return (int8_t)-1;
}
/**********************************************************************
函数:uart_char()
函数作用:发送一个字节数据
参数:
	uint8_t *fmt--------------------------------接收到的数据
返回值:
上一版本:无
当前版本:1.0
作者:
最后修改时间:2015-04-08
说明:
**********************************************************************/

void uart_char(uint8_t fmt)
{
	uartHandle.Instance->TDR = fmt;
	while(!(uartHandle.Instance->ISR & USART_ISR_TXE));
}
void uart_send(uint8_t *fmt, uint16_t len)
{
	while(len)
	{
		uart_char(*fmt);
		fmt++;
		len--;
	}
	return ;
}
/***********************************************************************************
函数:fputc(int ch, FILE *f)
功能:重载标准函数里面的输入输出函数
参数:无
版本:V0.0.0
作者:
备注:
************************************************************************************/
#if defined(UART_DEBUG)
int fputc(int ch, FILE *f)
{
	USARTx->TDR = ch;
	while(!(USARTx->ISR & USART_ISR_TXE));
	return ch;
}
#endif

/**
  * @brief  UART error callbacks
  * @param  UartHandle: UART handle
  * @note   This example shows a simple way to report transfer error, and you can
  *         add your own implementation.
  * @retval None
  */
void HAL_UART_ErrorCallback(UART_HandleTypeDef *huart)
{
}

/**
  * @brief  Tx Transfer completed callback
  * @param  UartHandle: UART handle.
  * @note   This example shows a simple way to report end of IT Tx transfer, and
  *         you can add your own implementation.
  * @retval None
  */
void HAL_UART_TxCpltCallback(UART_HandleTypeDef * huart)
{
}
/**
  * @brief  Rx Transfer completed callback
  * @param  UartHandle: UART handle
  * @note   This example shows a simple way to report end of IT Rx transfer, and
  *         you can add your own implementation.
  * @retval None
  */
void HAL_UART_RxCpltCallback(UART_HandleTypeDef *huart)
{
	/* Set transmission flag: trasfer complete*/
	uart_rev.rear++;	//更新rear指针
	if(uart_rev.rear >= (aRxBuffer + BUFFSIZE))
		uart_rev.rear = aRxBuffer;
	HAL_UART_Receive_IT(huart,uart_rev.rear,1);
}
/******************************************************************************/
/*                 STM32L0xx Peripherals Interrupt Handlers                   */
/*  Add here the Interrupt Handler for the used peripheral(s) (PPP), for the  */
/*  available peripheral interrupt handler's name please refer to the startup */
/*  file (startup_stm32l0xx.s).                                               */
/******************************************************************************/
/**
  * @brief  This function handles UART interrupt request.
  * @param  None
  * @retval None
  * @Note   This function is redefined in "main.h" and related to DMA stream
  *         used for USART data transmission
  */
void USARTx_IRQHandler(void)
{
  	HAL_UART_IRQHandler(& uartHandle);
}
#ifndef __UART_H__
#define __UART_H__
#include "stm32f0xx_hal.h"
#include "stm32f0xx_hal_def.h"
#include "stm32f0xx_hal_uart.h"

#define UART_DEBUG
//#undef UART_DEBUG

#ifdef UART_DEBUG
#include
#include
#endif

struct uart
{
	uint8_t *rear;			//在中断函数中更改
	uint8_t *front;			//在主循环中更改
};

#define USARTx                           USART1
#define USARTx_CLK_ENABLE()              __USART1_CLK_ENABLE()
#define USARTx_RX_GPIO_CLK_ENABLE()      __GPIOA_CLK_ENABLE()
#define USARTx_TX_GPIO_CLK_ENABLE()      __GPIOA_CLK_ENABLE()

#define USARTx_FORCE_RESET()             __USART1_FORCE_RESET()
#define USARTx_RELEASE_RESET()           __USART1_RELEASE_RESET()

/* Definition for USARTx Pins */
#define USARTx_TX_PIN                    GPIO_PIN_9
#define USARTx_TX_GPIO_PORT              GPIOA
#define USARTx_TX_AF                     GPIO_AF1_USART1
#define USARTx_RX_PIN                    GPIO_PIN_10
#define USARTx_RX_GPIO_PORT              GPIOA
#define USARTx_RX_AF                     GPIO_AF1_USART1

/* Definition for USARTx's NVIC */
#define USARTx_IRQn                      USART1_IRQn
#define USARTx_IRQHandler                USART1_IRQHandler

#define BUFFSIZE 500

void HAL_UART_MspInit(UART_HandleTypeDef * huart);
void HAL_UART_MspDeInit(UART_HandleTypeDef * huart);
void uart_init(uint32_t BaudRate);
int8_t uart_read(uint8_t *fmt, uint16_t time_out);
void uart_char(uint8_t fmt);
void uart_send(uint8_t *fmt, uint16_t len);
void Error_Handler(void);
void USARTx_IRQHandler(void);
#endif
/* Add your application code here
	*/
uart_init(115200);

/* Infinite loop */
while (1)
{
	uart_send("1234567890\r\n",12);
	HAL_Delay(500);
}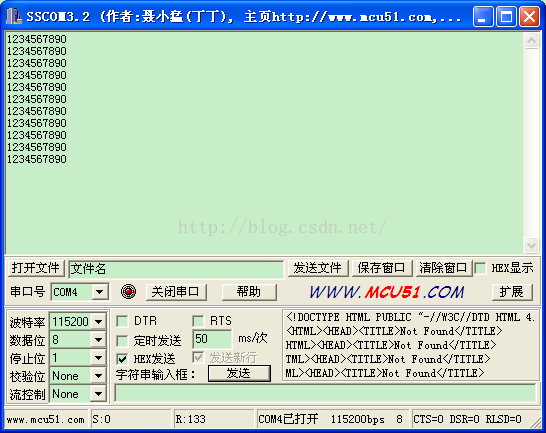
运行正常。
串口正常以后,就在想在coocox中如何使用printf函数呢,即把printf函数重定向到串口上,刚好在coocox的组件中有一个组件为Retarget_printf,添加该组件到工程中,该组件中有一个printf.c文件,用户需要去实现PrintChar(char c)函数,我们把在uart.c文件中的fputc函数替换成PrintChar(char c)函数,如下:
#if defined(UART_DEBUG)
void PrintChar(char c)
{
	USARTx->TDR = c;
	while(!(USARTx->ISR & USART_ISR_TXE));
	return;
}
#endif
再次编译提示位定义_init,在main.c文件中添加一个空的_init()函数,编译通过,下载运行,发现没有换行,如下:
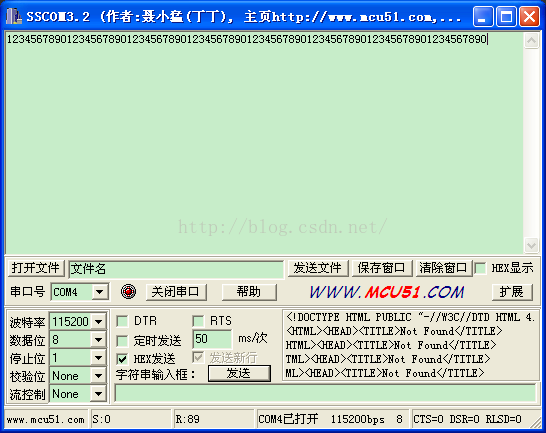
0x0A字符没有输出,不得不说printf.c文件实现还是有些小问题的,解决办法是把"\r\n"放在最前面即可
while (1)
{
	printf("\r\n1234567890");
	HAL_Delay(500);
}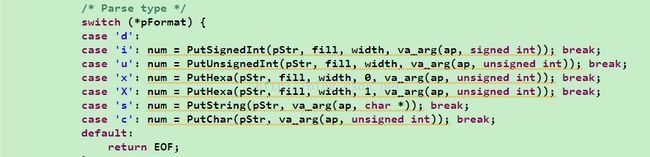
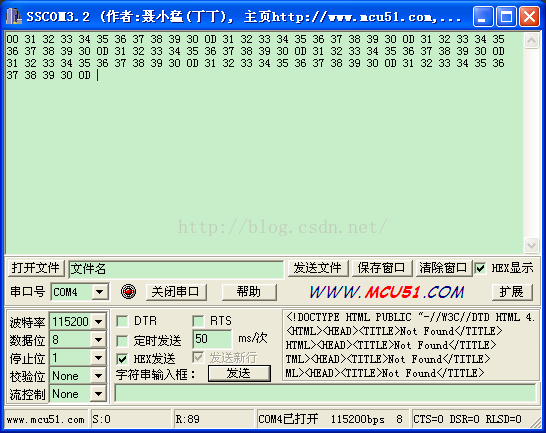
这个问题,coocox官网上有说不使用printf.c文件而是使用C库实现。我想修改下printf.c文件应该也是可以的。输出整型值如下:

浮点数支持的话,自己动手修改printf.c文件貌似比较费时间,还是用C库吧,毕竟之前MDK都是用的C库也,在工程中移除Retarget_printf组件,添加C_library组件,里面有一个syscalls.c文件,提供给用户一个_write接口,由于在CoIDE中所有组件文件都是上锁的,因此我们在外部用文本编辑器修改syscalls.c文件的_write函数,把宏打开,如下
/*Low layer write(output) function*/
__attribute__ ((used))
int _write(int file, char *ptr, int len)
{

#if 1
     //user code example

     int i;
     (void)file;

     for(i = 0; i < len; i++)
     {
        // UART_PutChar is user's basic output function
        UART_PutChar(*ptr++);
     }
#endif

    return len;
}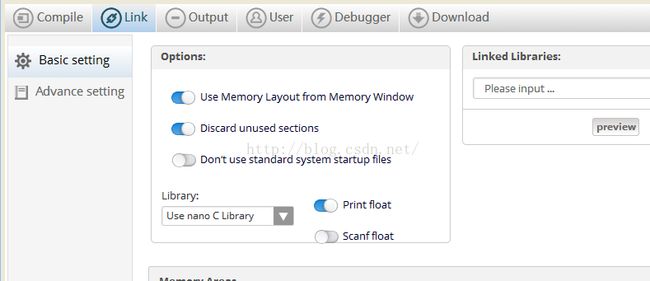
还要使能Print float选项,由于不再使用Retarget_printf组件,所以这里使用了标准的系统启动文件,同时把main.c文件中的_init()方法删掉了。
编辑主函数测试代码:
while (1)
{
	printf("\r\n1234567890");
	printf("\r\nvalue=%d,%X",100,100);
	printf("\r\nabc:%f",123.56);
	HAL_Delay(500);
}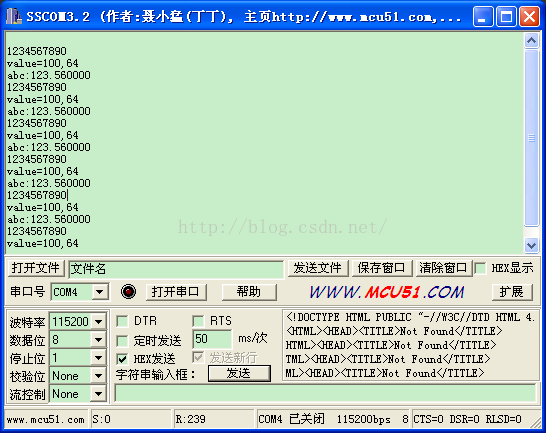
至此,可以很方便地调试代码啦!