angular:随笔笔记
以下记录基本是angular特有的,其他没有记录的和之前的用法一样,比如HTML,以前怎么写的,现在还是可以那样写,只是现在多了一些angular的用法
1.数据/属性绑定:
直接获取ts文件里面变量的值:{{变量名}}
在标签上使用,当鼠标悬浮上去后会显示变量的值:[title]="变量名"
在标签上使用,当变量值包含HTML代码的时候,自动解析:[innerHTML]="变量名"
angular支持简单的运算,页面会显示3:{{1+2}}
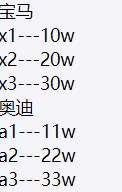
2.定义数组
最懒的一种:
public arr=['11','22','33'];推荐使用:也可以不用写public和属性,但建议还是写上
public arr:any[]=['11','22','33'];也可以是数组对象:
public arr: any[] = [
    { name: "张三", age: 20 }, { name: "李四", age: 24 }, { name: "王二", age: 22 }
  ];
或者多重数组:
public car: any[] = [
    {
      brand: "宝马", type: [
        { title: "x1", cost: "10w" }, { title: "x2", cost: "20w" }, { title: "x3", cost: "30w" }
      ]
    },
    {
      brand: "奥迪", type: [
        { title: "a1", cost: "11w" }, { title: "a2", cost: "22w" }, { title: "a3", cost: "33w" }
      ]
    }
  ];
在html循环数组数据:
    {{item.brand}}

        {{c.title}}---{{c.cost}}
效果
3.导入图片
本地导入:angular项目里面,assets是专门存放静态文件的,导入的时候不需要./作为开头,直接assets开头就行

服务导入:需要用[]把src包裹起来,值就是图片路径,或者一个变量
public picUrl: String = "https://www.baidu.com/img/bd_logo1.png";
![]()
4.获取索引,index赋值给i,i就是索引
索引:{{i}}
5.判断
单个判断,使用*ngIf,后面的值如果为true,就执行这个标签里面的代码,反之不执行
多个判断,在变量boo后面以;结束,接着else,else后面的名字自定义,然后用

第二种写法:上一个方法是判断成功后直接运行div里面的代码,这个是判断成功后运行then绑定


或者还有一种简单粗暴的方法,每一个判断单独写个标签,就不演示了...
ngSwitch判断
    这是1
    这是2
    这是3
    这是5
    当都不满足条件时,我才显示
6.样式
ngClass单个,当boo变量为true时显示ngClass1的样式
ngClass样式演示多个,boo变量为true时显示ngClass1的样式,反之显示ngClass2的样式
ngClass样式演示在循环里面通过索引使用
    {{item.brand}}

        {{c.title}}---{{c.cost}}
ngStyle,变量_style的属性是String,值是blue,这些都可以自定义
ngStyle样式演示7.管道-时间
在ts文件中定义变量
public _date: any = new Date();在constructor的花括号中写上以下代码,意思是每隔一秒赋值给_date变量
window.setInterval(() => this._date = new Date(), 1000);html编写以下代码,页面就会每隔一秒动态显示时间
--------------管道-时间--------------
{{_date|date:'yyyy-MM-dd HH:mm:ss'}}
8.事件
ts代码
//函数
public _str: string = "我是run函数数据";
  run() {
    this._str = "我是run函数改变后的数据";
  }
html代码
--------------事件--------------
{{_str}}
键盘事件:
键盘上的每个键都有自己的keyCode,通过keyCode编号实现键盘事件,编号可以直接网上查找,或者通过代码查找
ts代码
keyDown(e) {
    alert("这是按键的编码号" + e.keyCode);
  }
html代码,通过(keydown)事件属性,传入($event)到keyDown函数里面,$event参数是固定写法
通过回车键获取输入的值,这里我们用console.log()查看,在页面按F12,在Console里面
//键盘函数
keyDown(e) {
    if (e.keyCode == 13) {//13是回车键的编码号
      console.log(e.target.value);
    }
  }
同理,另一个键盘事件是(keyup),keydown是按下按键的那一刻执行事件,keyup是弹起按键的那一刻执行事件,其实相差不大,我还不信很多需求都是只按下不用弹起来的,这只让我拉弓,不让我射啊...
9.双向绑定
意思就是,当页面的值改变时,后端的值同时改变。反过来也一样,后端值改变,前台值同时改变
ts代码
//双向绑定
  public _text2: string = "我是默认值";
  changkeText() {
    this._text2 = "我是改变后的值";
  }
  getText(){//通过log查询验证
    console.log(this._text2);
  }
html代码
--------------双向绑定--------------
{{_text2}}
10.表单
表单-ts代码
import { Component, OnInit } from '@angular/core';

@Component({
  selector: 'app-form',
  templateUrl: './form.component.html',
  styleUrls: ['./form.component.css']
})
export class FormComponent implements OnInit {

  public peopleInfo: any = {
    username: "",
    age: "",
    sex: "1",
    cities: ["北京", "上海", "深圳", "成都"],
    city: "北京",
    hobby: [
      {
        title: "音乐",
        checked: false
      },
      {
        title: "宠物",
        checked: false
      },
      {
        title: "游戏",
        checked: false
      },
      {
        title: "冷兵器",
        checked: false
      },
      {
        title: "热武器",
        checked: false
      },
      {
        title: "敲代码",
        checked: false
      },
    ],
    mark: "",

  }

  constructor() { }

  ngOnInit() {
  }

  //提交form表单
  doSubmit() {
    console.log(this.peopleInfo);
  }

}
表单-html代码
人员登记表单
11.搜索记录
搜索记录-ts代码
import { Component, OnInit } from '@angular/core';

@Component({
  selector: 'app-search',
  templateUrl: './search.component.html',
  styleUrls: ['./search.component.css']
})
export class SearchComponent implements OnInit {

  public keyword: string;
  public keywordList: any[] = [];

  constructor() { }

  ngOnInit() {
  }

  doSearch() {
    if (this.keywordList.indexOf(this.keyword) == -1) {
      this.keywordList.push(this.keyword);
    }
    this.keyword = "";
  }
  //删除
  del(i) {
    this.keywordList.splice(i, 1);
  }


}
搜索记录-html代码
搜索记录:
-
{{item}}
12.todoList
todoList-ts代码
import { Component, OnInit } from '@angular/core';

@Component({
  selector: 'app-todo-list',
  templateUrl: './todo-list.component.html',
  styleUrls: ['./todo-list.component.css']
})
export class TodoListComponent implements OnInit {

  public todo: string;
  public todoList: any[] = [];

  constructor() { }

  ngOnInit() {
  }

  //添加
  doAdd(e) {

    if (e.keyCode == 13 && this.todoListHasTodo(this.todoList, this.todo) && this.todo != "" && this.todo != null) {
      this.todoList.push({
        title: this.todo,
        status: 0,
      })
      this.todo = "";
    }

  }

  //删除
  del2(i) {
    this.todoList.splice(i, 1);
  }

  //检查
  todoListHasTodo(todoList, todo) {
    //会存在问题
    // todoList.array.forEach(element => {
    //   if (element == todo) {
    //     return false;
    //   }
    // });
    // return true;

    for (var i = 0; i < todoList.length; i++) {
      if (todoList[i].title == todo) {
        return false;
      }
    }

    return true;
  }


}
todoList-html代码
todoList
正在进行
-
{{item.title}}
已经完成
-
{{item.title}}
13.通过服务实现组件与组件之间的通讯
*组件可以给子组件传递,但组件与组件不能进行通讯
*组件可以导入服务
*服务可以导入服务
*服务不能导入组件
组件与组件之间是不能进行通讯的,所以需要借助服务service实现,新建服务:
service是文件路径,app是服务名称
ng g s service/app创建好之后需要在app.module.ts里面导入
import { AppService } from './service/app.service';在@NgModule里面写入
providers: [AppService],这样在组件里面就可以导入服务进行通讯了,接着上面的例子试着做一个数据持久化
分别在搜索记录ts文件和todoList.ts文件导入appService
import { AppService } from '../../service/app.service';分别在搜索记录ts文件和todoList.ts文件里,在初始化函数里面写上以下代码
//搜索记录ts
var searchList = this.appservice.get("searchList");
    if (searchList) {
      this.keywordList = searchList;
    }


//todoList.ts
//在初始化函数里面,获取缓存数据
    var toList = this.appservice.get("toList");
    //判断缓存数据是否存在,如果存在,本地list等于缓存list
    if (toList) {
      this.todoList = toList;
    }
添加函数里面补充
//搜索记录ts
//添加
  doSearch() {
    if (this.keywordList.indexOf(this.keyword) == -1) {
      this.keywordList.push(this.keyword);
    }
    this.appservice.set("searchList", this.keywordList);//这一行是补充的代码

    this.keyword = "";
  }

//todoList.ts
//添加
  doAdd(e) {
    if (e.keyCode == 13 && this.todoListHasTodo(this.todoList, this.todo) && this.todo != "" && this.todo != null) {
      this.todoList.push({
        title: this.todo,
        status: 0,
      })
      //设置缓存数据
      this.appservice.set("toList", this.todoList);//这一行是补充的代码

      this.todo = "";
    }
  }
在删除函数里面补充
//搜索记录ts
//删除
  del(i) {
    this.keywordList.splice(i, 1);
    this.appservice.set("searchList", this.keywordList);//这一行是补充的代码
  }

//todoList.ts
//删除
  del2(i) {
    this.todoList.splice(i, 1);
    //删除本地list数据的同时,设置缓存数据
    this.appservice.set("toList", this.todoList);//这一行是补充的代码
  }
因为todoList的数据双向绑定改变状态的原因,所以还要单独在html补充
分别在正在进行和已近完成下面的这一句代码补充(change)="changeBox()"函数
并在todoList.ts里面添加函数
changeBox() {
    this.appservice.set("toList", this.todoList);
  }
执行试一试,现在刷新页面后数据不会被清除了
14.父组件调用子组件函数
新建一个header组件作为子组件,在父组件html里面引用
在子组件ts文件里面编写一个函数,在父组件ts文件导入
import { ViewChild } from '@angular/core';然后通过@ViewChild导入子组件
@ViewChild("header", { static: true }) header: any;然后就可以调用子组件的方法了
this.header.run();dom操作
//视图加载完成后触发的方法
  ngAfterViewInit(): void {
    this.myBox.nativeElement.style.width = "100px";
    this.myBox.nativeElement.style.background = "red";
  }
15.父组件给子组件传值-@Input
在子组组件导入
import { Input } from '@angular/core';在父组件ts文件定义
public title: string = "home标题";
public msg: string = "我是父组件的msg";
public mm: string = "这是一条测试数据";

run() {
    alert("这是父组件的run方法");
}
html引用子组件,下面的run是函数
子组件ts接收
@Input() title: any;
@Input() msg: any;
@Input() mm: any;
@Input() run: any;

run2() {
    this.run();
}
子组件html
{{title}}
{{msg}}-----{{mm}}
以上是一个一个的传,或者可以直接传整个父组件,this代表父组件自己
子组件ts
@Input() home: any;

run2() {
    alert(this.home.msg);
  }
16.子组件给父组件传值-@Output
子组件导入
import { Output, EventEmitter } from '@angular/core';定义变量和写一个函数
@Output() public outer = new EventEmitter();

testRun() {
    // alert("我是子组件函数");
    this.outer.emit("我是子组件数据");
  }
在父组件html引用
父组件ts
testRun(e) {
    alert(e);
  }
17.RxJS异步数据
service代码
import { observable, Observable } from 'rxjs';


//获取rxjs异步数据
  getRxjsData() {
    return new Observable((observer) => {
      setTimeout(() => {
        var username = "张三";
        observer.next(username);
        // observer.error("返回异常数据");
      }, 3000);
    });
  }


//获取rxjs异步数据--多次执行
  getRxjsData_Interval() {
    let count = 0;
    return new Observable((observer) => {
      setInterval(() => {
        count++;
        var username = "张三-Interval---" + count;
        observer.next(username);
        // observer.error("返回异常数据");
      }, 1000);
    });
  }
在ts文件外部引用
import { HttpService } from '../../service/http.service';


constructor(
    public httpService: HttpService,
  ) {

  }


ngOnInit() {

    //rxjs获取异步数据
    var rxjsData = this.httpService.getRxjsData();
    var d = rxjsData.subscribe((data) => {
      console.log(data);
    });

    //过一秒撤回刚才的操作
    setTimeout(() => {
      d.unsubscribe();
    });

  }


//3.多次执行
    var rxjsData_Interval = this.httpService.getRxjsData_Interval();
    rxjsData_Interval.subscribe((data) => {
      console.log(data);
    });
18.获取rxjs异步数据--用工具方法对返回的数据进行处理
service代码
//获取rxjs异步数据--用工具方法对返回的数据进行处理
  getRxjsData_Interval_Num() {
    let count = 0;
    return new Observable((observer) => {
      setInterval(() => {
        count++;
        observer.next(count);
        // observer.error("返回异常数据");
      }, 1000);
    });
  }
ts代码
//4.用工具方法对返回的数据进行处理
    var rxjsData_Interval_Num = this.httpService.getRxjsData_Interval_Num();
    rxjsData_Interval_Num.pipe(
      filter((value) => {
        if (value % 2 == 0) {
          return true;
        }
      }),
      map((value) => {
        return value * value;
      }),
    )
      .subscribe((data) => {
        console.log(data);
      });
19.http请求
app.module.ts导入
import { HttpClientModule, HttpClientJsonpModule } from '@angular/common/http';ts
import { HttpClient, HttpHeaders } from '@angular/common/http';//get请求
getData() {
let api = "http://a.itying.com/api/productlist";
this.http.get(api).subscribe((resp) => {
console.log(resp);
});
}
//post请求
postData() {
let api = "http://localhost:4200/postData";
let body = {}
const options = { headers: new HttpHeaders({ "content-type": "application/json" }) };
return this.http.post(api, body, options).subscribe((resp) => {
console.log(resp);
});
}
//jsonp请求
jsonpData() {
let api = "http://a.itying.com/api/productlist?callback=xxx";
this.http.jsonp(api, "callback").subscribe((resp) => {
console.log(resp);
});
}20.第三方模块axios实现http请求
安装axios
cnpm i axios --save引用axios
import axios from 'axios';封装函数
//axios请求
  axiosGet(api) {
    return axios.get(api).then(function (resp) {
      console.log(resp);
    });
  }
外部使用
//axios实现请求
  axiosData() {
    let api = "http://a.itying.com/api/productlist";

    this.httpService.axiosGet(api).then((resp) => {
      console.log(resp);
    });
  }