rsync+inotify实时同步(服务端:多目录,分别同步多个客户端)
需求
目标服务端:192.168.68.136 备份客户端数据至目录:/backup/html/、/backup/html2/
客户端(数据源):192.168.68.137 监控数据源目录:/data/html/ 并实时同步数据至目标服务端 /backup/html/
192.168.68.130 监控数据源目录:/data/html/ 并实时同步数据至目标服务端 /backup/html2/
目标服务端部署 – 192.168.68.136
安装部署rsync
yum install -y rsync
配置同步策略
实现免密(secrets file)同步必须使用rsync的daemon模式启动服务,客户端(数据源)和目标服务端默认使用873端口进行数据传输。目标服务端需要配置/etc/rsyncd.conf文件。
创建/etc/rsyncd.conf文件,添加如下代码:
注:hosts allow = 192.168.68.137,192.168.68.130
#日志文件位置,启动rsync后自动产生这个文件,无需提前创建

log file = /var/log/rsyncd.log

#pid文件的存放位置

pidfile = /var/run/rsyncd.pid

#支持max connections参数的锁文件

lock file = /var/run/rsync.lock

#用户认证配置文件,里面保存用户名称和密码,后面会创建这个文件

secrets file = /etc/rsync.pass

#rsync启动时欢迎信息页面文件位置(自己创建这个文件,内容随便自定义)

motd file = /etc/rsyncd.Motd


#设置rsync运行的uid权限。

uid = root

#设置rsync运行的gid权限。

gid = root

#默认的rsync端口

port=873

#默认为true,修改为no或false,增加对目录文件软连接的备份

use chroot = no

#设置rsync服务端文件为读写权限

read only = no

#不显示rsync服务端资源列表

list = no

#最大连接数

max connections = 200

#设置超时时间

timeout = 600

#执行数据同步的用户名,需要后面手动设置。可以设置多个,用英文状态下逗号隔开

auth users = root

#允许进行数据同步的客户端IP地址,可以设置多个,用英文状态下逗号隔开

hosts allow = 192.168.68.137,192.168.68.130

#禁止数据同步的客户端IP地址,可以设置多个,用英文状态下逗号隔开(如果没有禁止,就不用设置这一行)

#hosts deny = 192.168.1.194


#自定义名称   #我们可以指定多个模块 定义多个备份路径
[web]
#rsync目标服务端数据目录路径,即同步到目标目录后的存放路径
path = /backup/html
#模块名称描述
comment = web backup location

#自定义名称
[www]
#rsync目标服务端数据目录路径,即同步到目标目录后的存放路径
path = /backup/html2
#模块名称描述
comment = www backup location
创建用户认证文件 (多个模块用的是这同一个认证文件)
[root@localhost ~]# vim /etc/rsync.pass
# 认证文件内容格式为 用户名:密码
root:w*******
设置文件权限,即rsyncd.conf和rsync.pass认证文件都是600权限!
[root@localhost ~]# chmod 600 /etc/rsyncd.conf
[root@localhost ~]# chmod 600 /etc/rsync.pass
创建rsync同步过来的目标目录
[root@localhost ~]# mkdir -p /backup/html
启动rsync服务,确认进程和端口号
# 启动rsync服务
[root@localhost backup]# systemctl restart rsyncd
# 设置开机自启动
[root@localhost backup]# systemctl enable rsyncd
[root@localhost backup]# ps -ef|grep rsync
[root@localhost backup]# netstat -nltp
在客户端(数据源)部署– 192.168.68.137 (web)
安装rsync
yum install -y rsync
创建用于连接目标服务器验证用户root的密码文件,这个文件名可以跟服务端的认证文件不一样,但是里面的密码内容必须一致!
注意:此处的密码文件格式与目标服务端的密码文件格式不同,只需保存密码信息即可,不需要用户名!切记!
[root@localhost ~]# vim /etc/rsync_root.pass
[root@localhost ~]# cat /etc/rsync_root.pass
w*******
设置rsync_root.pass密码文件为600权限
[root@localhost ~]# chmod 600 /etc/rsync_root.pass
编写触发式脚本
vim /root/rsync_nginx_html_inotify.sh
# 给脚本添加x权限:
[root@localhost ~]# chmod +x /root/rsync_nginx_html_inotify.sh
-rwxr-xr-x 1 root root 268 5月 11 11:43 rsync_nginx_html_inotify.sh
测试脚本
客户端打开两个终端,终端2执行创建删除等操作,终端1运行脚本,查看脚本是否触发同步。
目标服务端查看目标文件夹是否同步。
#!/bin/bash
INOTIFY_CMD="inotifywait -mrq -e modify,create,move,delete /data/html"
RSYNC_CMD="rsync -av  --delete /data/html/ [email protected]::web --password-file=/etc/rsync_root.pass"

$INOTIFY_CMD | while read file
do
$RSYNC_CMD
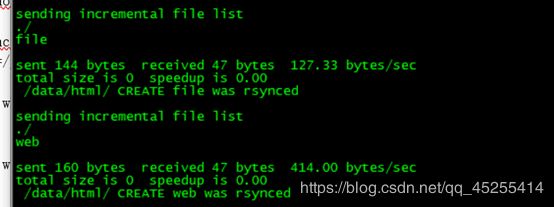
echo " ${file} was rsynced"
done
# 客户端终端1:运行脚本
[root@localhost ~]# ./rsync_nginx_html_inotify.sh
# 客户端终端2:进行/usr/local/nginx/html/目录下的操作
# 客户端终端1:脚本运行输出
# 目标服务端确认同步是否完成
把脚本加入开机自启动
# 打开/etc/rc.d/rc.local文件,在末尾增加如下内容
/root/rsync_nginx_html_inotify.sh
# 给rc.local增加x权限
chmod +x /etc/rc.d/rc.local
在客户端(数据源)部署– 192.168.68.130(www)
安装rsync
yum install -y rsync
创建用于连接目标服务器验证用户root的密码文件,这个文件名可以跟服务端的认证文件不一样,但是里面的密码内容必须一致!
注意:此处的密码文件格式与目标服务端的密码文件格式不同,只需保存密码信息即可,不需要用户名!切记!
[root@localhost ~]# vim /etc/rsync_root.pass
[root@localhost ~]# cat /etc/rsync_root.pass
w*******
设置rsync_root.pass密码文件为600权限
[root@localhost ~]# chmod 600 /etc/rsync_root.pass
编写触发式脚本
vim /root/rsync_nginx_html_inotify.sh
#!/bin/bash
INOTIFY_CMD="inotifywait -mrq -e modify,create,move,delete /data/html"
RSYNC_CMD="rsync -av  --delete /data/html/ [email protected]::www --password-file=/etc/rsync_root.pass"

$INOTIFY_CMD | while read file
do
$RSYNC_CMD
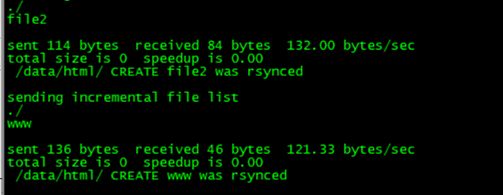
echo " ${file} was rsynced"
done
# 给脚本添加x权限:
[root@localhost ~]# chmod +x /root/rsync_nginx_html_inotify.sh
-rwxr-xr-x 1 root root 268 5月 11 11:43 rsync_nginx_html_inotify.sh
测试脚本
客户端打开两个终端,终端2执行创建删除等操作,终端1运行脚本,查看脚本是否触发同步。
目标服务端查看目标文件夹是否同步。
# 客户端终端1:运行脚本
[root@localhost ~]# ./rsync_nginx_html_inotify.sh
# 客户端终端2:进行/usr/local/nginx/html/目录下的操作
# 客户端终端1:脚本运行输出
# 目标服务端确认同步是否完成
把脚本加入开机自启动
# 打开/etc/rc.d/rc.local文件,在末尾增加如下内容
/root/rsync_nginx_html_inotify.sh
# 给rc.local增加x权限
chmod +x /etc/rc.d/rc.local
衍生文档
rsync+inotify实时同步(目标服务端、客户端):https://mp.csdn.net/console/editor/html/106057249
rsync+inotify实时同步(文件多备份,服务端:多目录,客户端:一目录):https://mp.csdn.net/console/editor/html/106066998


