简简单单实现一个大文件分片上传+断点续传(java springboot+vue vue-simple-uploader)
大文件分片思路
这里先大致说一下开发环境与背景和交代一下思路,由于笔者看教程是就不喜欢看那些没用的前言,所以我尽量长话短说。
开发环境
本次教程的例子是我用之前写的一个微服务中使用的文件系统做的,前端使用的是vue2.6,其中前端上传组件使用的是vue-simple-uploader。后端使用springboot2.2.7与springmvc
思路
前端依靠vue-simple-uploader组件只需要稍微配置一些参数即可轻松实现,后面会以代码形式体现,这里不多说了。后端的实现主要是需要一个entity实体类来对应记录每一次上传的文件分片,分片中应记录文件字节与分片的顺序,前端并发上传分片后,使用RandomAccessFile对象将分片数据按顺序传入到最终的文件中合成一个完整的文件。
代码
前端
前端我使用的是我之前做的一个架子点击这里进入,当然,你也可以直接使用vue-cli脚手架创建一个,只要按照下面代码去写,都可以实现。
- 引入vue-simple-uploader组件
npm install vue-simple-uploader
如果你习惯使用yarn可以使用下面的指令
yarn install vue-simple-uploader
- 在main.js中引入并绑定全局组件
//引入大文件分片上传
import uploader from 'vue-simple-uploader'
Vue.use(uploader)
- 在vue页面中引入
template
<div style="width: 100%;">

					<uploader :options="options" :autoStart="false" :fileStatusText="{
					               success: '上传成功',
					                error: '上传失败',
					                uploading: '正在上传',
					                paused: '暂停上传',
					                waiting: '等待上传'
					          }"
					 @file-success="onFileSuccess"  @file-added="fileAdded"  @file-error="onFileError"
					 class="uploader-example">
						<uploader-unsupport></uploader-unsupport>
						<uploader-drop>
							<uploader-btn :attrs="attrs" single>上传</uploader-btn>
						</uploader-drop>
						<uploader-list></uploader-list>
					</uploader>
				</div>
script
options: {
					target: 'http://localhost:8000/file-project/bigFile/fileUpload', //上传地址
					chunkSize: 5 * 1024 * 1024,
					testChunks: false,
					headers: { //设置header
						xtoken: localStorage.token
					},
					singleFile: true,
					query: { //传参,没有可以不传
						// module: 10

					}
				},
				attrs: {
					accept: '*' //接受文件类型
				},
methods
//大文件上传标签删除
			handleClose() {
				console.log("handleClose")
			},
			//大文件上传所需
			fileAdded(file) {
			//选择文件后暂停文件上传,上传时手动启动
				file.pause()

			},
			onFileError(file) {
				console.log('error', file)
			},
			onFileSuccess(rootFile, file, response, chunk) {
				console.log("上传成功")
			},
style
<style scoped>
	h1,
	h2 {
		font-weight: normal;
	}

	ul {
		list-style-type: none;
		padding: 0;
	}

	li {
		display: inline-block;
	}

	.uploader-list>ul>li {
		width: 100%;
		color: red;
		margin-bottom: 0;
	}

	a {
		color: #42b983;
	}

	.fileupload {
		width: 50%;
		margin-left: 25%;
	}
</style>
完成以上步骤后,打卡vue界面,可以看到一个上传文件的组件

点击上传按钮后选择文件会出现如下图这样的界面
因为我们之前代码中使用了file.pause(),所以选择文件后默认是暂停状态,需要上传时我们只需要点击后面的三角图形即可。
后端
1. 创建entity(请自己生成get/set方法)
Chunk.java
import org.springframework.web.multipart.MultipartFile;

import java.io.Serializable;

/**
 * 文件块
 * @author 李建
 */
public class Chunk implements Serializable {
    /**
     * 当前文件块,从1开始
     */
    private Integer chunkNumber;
    /**
     * 分块大小
     */
    private Long chunkSize;
    /**
     * 当前分块大小
     */
    private Long currentChunkSize;
    /**
     * 总大小
     */
    private Long totalSize;
    /**
     * 文件标识
     */
    private String identifier;
    /**
     * 文件名
     */
    private String filename;
    /**
     * 相对路径
     */
    private String relativePath;
    /**
     * 总块数
     */
    private Integer totalChunks;

    /**
     * 二进制文件
     */
    private MultipartFile file;


}
2. 创建Controller
BigFileController .java
import cn.jxysgzs.fileproject.entity.Chunk;
import cn.jxysgzs.fileproject.interfaces.BigFileServiceInterface;
import cn.jxysgzs.fileproject.interfaces.FileServiceInterface;
import org.springframework.beans.factory.annotation.Autowired;
import org.springframework.web.bind.annotation.*;

import javax.servlet.http.HttpServletRequest;
import javax.servlet.http.HttpServletResponse;

/**
 * 李建 2020年5月19日17:05:57
 * 文件Controller
 * 处理文件的上传与下载
 */
@RestController
@RequestMapping("/bigFile")
public class BigFileController {

    @Autowired
    BigFileServiceInterface bigFileServiceInterface;

    /**
     * 处理文件上传POST请求
     * 将上传的文件存放到服务器内
     * @param chunk 文件块
     * @param response 响应
     * @return 上传响应状态
     */
    @PostMapping("/fileUpload")
    public String uploadPost(@ModelAttribute Chunk chunk, HttpServletResponse response){
       return bigFileServiceInterface.fileUploadPost(chunk,response);
    }


}
3. 创建Service
BigFileService .java (接口BigFileServiceInterface 自己实现吧,我就替大家省点屏幕)
import cn.jxysgzs.fileproject.common.PathUtils;
import cn.jxysgzs.fileproject.common.PropertiesUtils;
import cn.jxysgzs.fileproject.entity.Chunk;
import cn.jxysgzs.fileproject.interfaces.BigFileServiceInterface;
import org.springframework.stereotype.Service;

import javax.servlet.http.HttpServletRequest;
import javax.servlet.http.HttpServletResponse;
import java.io.*;
/**
 * 大文件业务实现
 *
 * @author a2417
 * @version 1.0
 * @date 2020/6/29 10:32
 */
@Service
public class BigFileService implements BigFileServiceInterface {

    @Override
    public String fileUploadPost(Chunk chunk, HttpServletResponse response) {
        /**
         * 每一个上传块都会包含如下分块信息:
         * chunkNumber: 当前块的次序,第一个块是 1,注意不是从 0 开始的。
         * totalChunks: 文件被分成块的总数。
         * chunkSize: 分块大小,根据 totalSize 和这个值你就可以计算出总共的块数。注意最后一块的大小可能会比这个要大。
         * currentChunkSize: 当前块的大小,实际大小。
         * totalSize: 文件总大小。
         * identifier: 这个就是每个文件的唯一标示。
         * filename: 文件名。
         * relativePath: 文件夹上传的时候文件的相对路径属性。
         * 一个分块可以被上传多次,当然这肯定不是标准行为,但是在实际上传过程中是可能发生这种事情的,这种重传也是本库的特性之一。
         *
         * 根据响应码认为成功或失败的:
         * 200 文件上传完成
         * 201 文加快上传成功
         * 500 第一块上传失败,取消整个文件上传
         * 507 服务器出错自动重试该文件块上传
         */
        File file= new File(PathUtils.getFileDir(), chunk.getFilename());
        //第一个块,则新建文件
        if(chunk.getChunkNumber()==1 && !file.exists()){
            try {
                file.createNewFile();
            } catch (IOException e) {
                response.setStatus(500);
                return "exception:createFileException";
            }
        }

        //进行写文件操作
        try(
                //将块文件写入文件中
                InputStream fos=chunk.getFile().getInputStream();
                RandomAccessFile raf =new RandomAccessFile(file,"rw")
        ) {
            int len=-1;
            byte[] buffer=new byte[1024];
            raf.seek((chunk.getChunkNumber()-1)*1024*1024*5);
            while((len=fos.read(buffer))!=-1){
                raf.write(buffer,0,len);
            }
        } catch (IOException e) {
            e.printStackTrace();
            if(chunk.getChunkNumber()==1) {
                file.delete();
            }
            response.setStatus(507);
            return "exception:writeFileException";
        }
        if(chunk.getChunkNumber().equals(chunk.getTotalChunks())){
            response.setStatus(200);
            // TODO 向数据库中保存上传信息
            return "over";
        }else {
            response.setStatus(201);
            return "ok";
        }
    }
}
4. 创建Util
PathUtils .java
import org.springframework.util.ClassUtils;

import java.io.File;

/**
 * @author 李建 on 2019/12/4
 * 路径工具类
 * 功能:
 *      1、获取存放服务器文件列表的资源文件路径
 *      2、获取服务器存放文件的目录路径
 */
public class PathUtils {

    /**
     * 获取服务器存放文件的目录路径
     * @return 目录路径(String)
     */
    public static String getFileDir(){
        String path= ClassUtils.getDefaultClassLoader().getResource("").getPath().substring(1)+"static/file";
        File dir=new File(path);
        if(!dir.exists()){
            dir.mkdirs();
        }
        return path;
    }
}
至此,前后端编码均完毕,其实逻辑很简单,只要去搜一下RandomAccessFile 类的API基本上就能看懂。
上效果
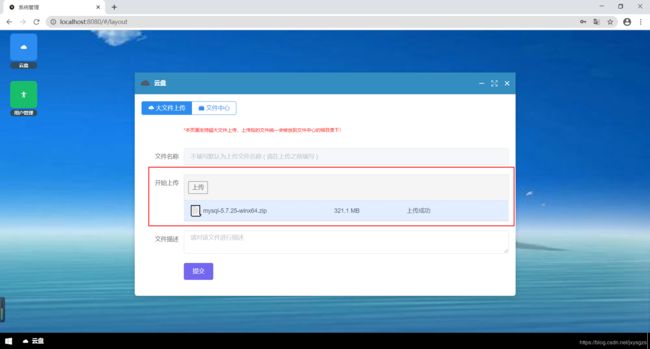
因为我用的自己的架子,所以页面展示上可能有些不同,这里我只给大家试一下大文件上传模块的功能。
选择一个大文件
仅实验中间红圈部分模块
点击右侧开始按钮
上传中状态
上传完成状态
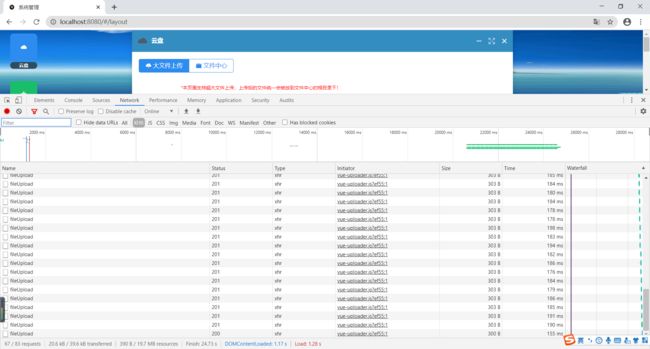
查看network
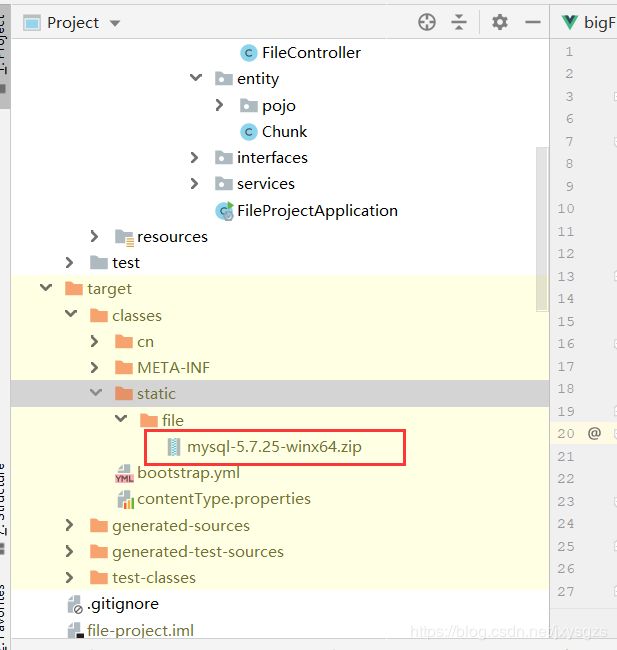
查看上传成功后的文件
好啦,有什么问题可以留言问我,看到必回。
如果觉得有帮助的话给个免费的点赞吧,Thanks♪(・ω・)ノ


