Ubuntu 18.04 下搭建MediaWiki 服务器
Ubuntu 18.04 下搭建mediawiki 服务器
文章目录
- Ubuntu 18.04 下搭建mediawiki 服务器
- 1. 安装前准备
- 2. 安装依赖工具包
- 3. 安装MediaWiki
- 3.1 拷贝mediawiki到/var/www/html/
- 3.2 配置mysql
- 3.2.1 创建一个新的mysql用户
- 3.2.2 创建一个新的数据库 my_wiki 用于mediawiki
- 3.2.3 授予新的mysql用户访问新创建的mysql数据库my_wiki
- 3.3 浏览器访问构建
- 3.3.1 set up the wiki
- 3.3.2 语言设置
- 3.3.3 环境检查
- 3.3.4 mysql配置
- 3.3.5 数据库设置
- 3.3.6 wiki 名称及管理员账户设置
- 3.3.7 LocalSettings.php 下载并配置
- 3.3.8 进入wiki首页
- 4. MediaWiki 使用相关配置
- 4.1 私有化
- 4.2 扩展: VisualEditor 搭建
- 4.2.1 VisualEditor 安装
- 4.2.1 Parsoid 安装
- 4.2.1.1 安装parsoid依赖npm
- 4.2.1.2 下载parsoid及安装
- 4.2.1.2 配置parsoid及运行
- 4.3 扩展:语法高亮、数学公式及图表
- 4.4 扩展:用户合并
- 4.5 其他
1. 安装前准备
- 系统: 阿里云 Ubuntu 18.04.1 LTS
- 主机IP地址: 39.106.45.177
- web服务器:Apache2 已安装
- 软件版本: MediaWiki-1.33.0
- 软件下载地址: https://releases.wikimedia.org/mediawiki/1.33/mediawiki-1.33.0.tar.gz
2. 安装依赖工具包
- php
- php-xml
- php-mbstring
- php-mysql
- mysql-server
root@Ubuntu1804-aliyun:~# apt-get install php php-xml php-mbstring php-mysql mysql-server
安装完成后重启apache服务器
root@Ubuntu1804-aliyun:~# /etc/init.d/apache2 restart
3. 安装MediaWiki
3.1 拷贝mediawiki到/var/www/html/
将下载的mediawiki-1.33.0.tar.gz 解压 拷贝到/var/www/html/
root@Ubuntu1804-aliyun:~# tar zxvf mediawiki-1.33.0.tar.gz
root@Ubuntu1804-aliyun:~# mv mediawiki-1.33.0 wiki
root@Ubuntu1804-aliyun:~# mv wiki /var/www/html
3.2 配置mysql
3.2.1 创建一个新的mysql用户
- 首先连接到本机上的mysql,mysql -u root -p 回车后提示你输密码,如果刚安装好MYSQL,root是没有密码的,这里我们可设置为123456
- 创建一个远程用户admin,密码admin.123
root@Ubuntu1804-aliyun:~# mysql -u root -p
Enter password:
Welcome to the MySQL monitor.  Commands end with ; or \g.
Your MySQL connection id is 2
Server version: 5.7.26-0ubuntu0.18.04.1 (Ubuntu)

Copyright (c) 2000, 2019, Oracle and/or its affiliates. All rights reserved.

Oracle is a registered trademark of Oracle Corporation and/or its
affiliates. Other names may be trademarks of their respective
owners.

Type 'help;' or '\h' for help. Type '\c' to clear the current input statement.

mysql> CREATE USER 'admin'@'localhost' IDENTIFIED BY 'admin.123';
Query OK, 0 rows affected (0.00 sec)

mysql> quit;
Bye
3.2.2 创建一个新的数据库 my_wiki 用于mediawiki
root@Ubuntu1804-aliyun:~# mysql -u root
Welcome to the MySQL monitor.  Commands end with ; or \g.
Your MySQL connection id is 3
Server version: 5.7.26-0ubuntu0.18.04.1 (Ubuntu)

Copyright (c) 2000, 2019, Oracle and/or its affiliates. All rights reserved.

Oracle is a registered trademark of Oracle Corporation and/or its
affiliates. Other names may be trademarks of their respective
owners.

Type 'help;' or '\h' for help. Type '\c' to clear the current input statement.

mysql> CREATE DATABASE my_wiki;
Query OK, 1 row affected (0.00 sec)
3.2.3 授予新的mysql用户访问新创建的mysql数据库my_wiki
mysql> use my_wiki;
Database changed
mysql> GRANT ALL ON my_wiki.* TO 'admin'@'localhost';
Query OK, 0 rows affected (0.00 sec)

mysql> quit;
Bye
3.3 浏览器访问构建
3.3.1 set up the wiki
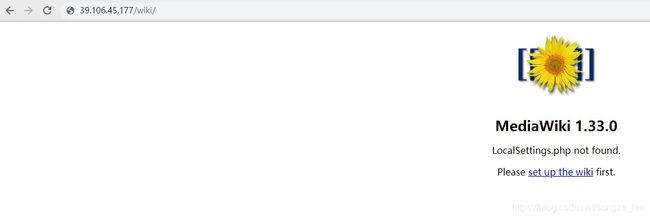
浏览器登录http://39.106.45.177/wiki 按照步骤提示操作,点击set up the wiki
3.3.2 语言设置
选择语言中文,点击继续

3.3.3 环境检查
然后会显示环境检查情况,点击继续

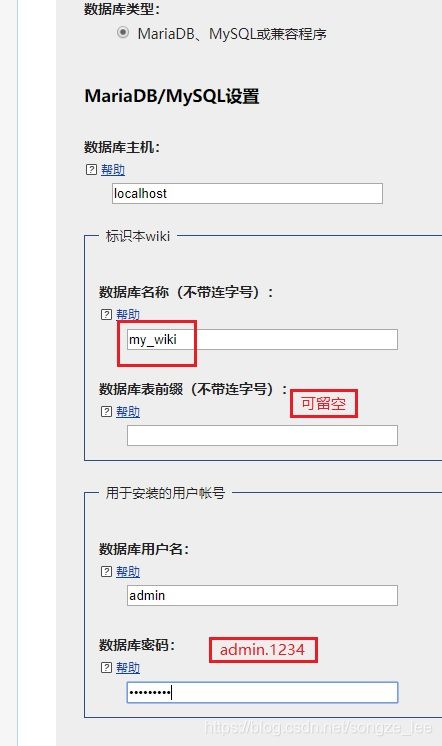
3.3.4 mysql配置
mysql配置这里比较关键,设置如下。
- 数据库主机: localhost
- 数据库名称: my_wiki
- 数据库前缀: 留空不填
- 数据库用户名: admin
- 数据库密码: admin.1234
3.3.5 数据库设置
数据库设置选择默认,点击继续

3.3.6 wiki 名称及管理员账户设置
wiki 名称及管理员账户设置,这里根据自己需求实际设置,然后可选择我不耐烦了,完成配置。

3.3.7 LocalSettings.php 下载并配置
接下来会弹出“恭喜! 您已经安装了MediaWiki。“
- 安装程序已经生成了LocalSettings.php文件,其中包含了您所有的配置。
- 需要下载该文件,并将其放在您wiki的根目录(index.php的同级目录)中。
- 拷贝完成被赋给权限,chmod 664 LocalSettings.php。

3.3.8 进入wiki首页
点击上图“进入您的wiki”,或者访问http://39.106.45.177/wiki ,如下图。
4. MediaWiki 使用相关配置
4.1 私有化
默认安装完任何用户都可注册,编辑,这里我们设置阻止新用户注册及未登录用户可浏览,但不能编辑。
在LocalSettings.php 末端加上下面语句。
# Prevent new user registrations 阻止新用户注册
$wgGroupPermissions['*' ]['createaccount'] = false;

# 设置匿名用户(未登录用户)可浏览,但不能编辑
$wgGroupPermissions['*' ]['read'] = true;
$wgGroupPermissions['*' ]['edit'] = false;
4.2 扩展: VisualEditor 搭建
4.2.1 VisualEditor 安装
可视化编辑器可方便用户编辑wiki,这个工具安装比较复杂,需要依赖于Parsoid。
在https://extdist.wmflabs.org/dist/extensions/网站找到最新的visualEditor,这里使用的版本是VisualEditor-REL1_33-8c9c37e.tar.gz。下载下来,解压,拷贝到/var/www/html/wiki/extensions下。
root@Ubuntu1804-aliyun:~# tar zxvf VisualEditor-REL1_33-8c9c37e.tar.gz
root@Ubuntu1804-aliyun:~# mv VisualEditor /var/www/html/wiki/extensions
在LocalSettings.php 末端加上下面语句。
wfLoadExtension( 'VisualEditor' );

// Enable by default for everybody
$wgDefaultUserOptions['visualeditor-enable'] = 1;

// Optional: Set VisualEditor as the default for anonymous users
// otherwise they will have to switch to VE
// $wgDefaultUserOptions['visualeditor-editor'] = "visualeditor";

// Don't allow users to disable it
$wgHiddenPrefs[] = 'visualeditor-enable';

// OPTIONAL: Enable VisualEditor's experimental code features
#$wgDefaultUserOptions['visualeditor-enable-experimental'] = 1;
4.2.1 Parsoid 安装
4.2.1.1 安装parsoid依赖npm
parsoid依赖npm,首先需要安装npm。
root@Ubuntu1804-aliyun:~# apt-get install nodejs npm
4.2.1.2 下载parsoid及安装
git clone https://github.com/wikimedia/parsoid.git
cd parsoid
npm install
4.2.1.2 配置parsoid及运行
配置parsoid,拷贝config.example.yaml到config.yaml,并修改config.yaml文件。
cp config.example.yaml config.yaml
config.yaml文件主要修改一下几条:
uri: 'https://39.106.45.177/wiki/api.php'
domain: 'localhost'  # optional
serverPort: 8000
serverInterface: '127.0.0.1'
运行parsoid,命令为nohup node bin/server.js &。
nohup node bin/server.js &
注意这里,主机重启或开机都需要运行parsoid,否则 VisualEditor 无法使用。
到这里,还需要使MediaWiki可以找到parsoid,编辑/var/www/html/wiki/LocalSettings.php,追加如下内容:
$wgVirtualRestConfig['modules']['parsoid'] = array(
        'url' => 'http://localhost:8000',
        'domain' => 'localhost',
        'prefix' => 'localhost'
);
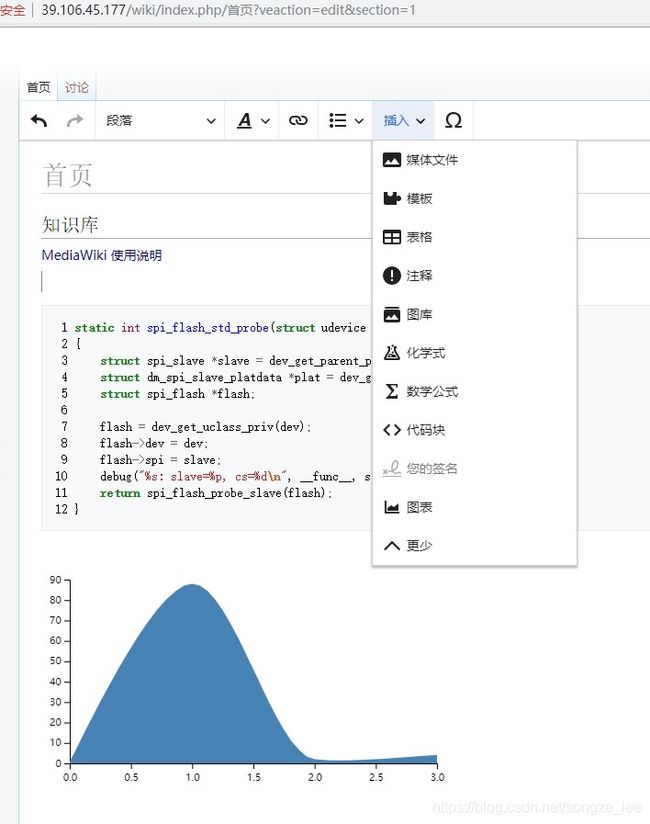
此时,我们可以通过wiki页面编辑使用VisualEditor,效果如图所示。
4.3 扩展:语法高亮、数学公式及图表
| 扩展 | 下载地址 | 使用版本 |
|---|---|---|
| SyntaxHighlight_GeSHi语法高亮(默认extensions有,可不用下载) | https://www.mediawiki.org/wiki/Special:ExtensionDistributor/SyntaxHighlight_GeSHi | SyntaxHighlight_GeSHi-REL1_32-715c3e0.tar.gz |
| Math 数学公式 | https://www.mediawiki.org/wiki/Special:ExtensionDistributor/Math | Math-REL1_32-b976708.tar.gz |
| Graph 图表 | https://www.mediawiki.org/wiki/Special:ExtensionDistributor/Graph | Math-REL1_32-b976708.tar.gz |
从上表地址中下载,分别放放到/var/www/html/wiki/extensions目录下。
并在LocalSettings.php 末端加上下面语句。
wfLoadExtension( 'SyntaxHighlight_GeSHi' );
wfLoadExtension( 'Math' );
wfLoadExtension( 'Graph' );
4.4 扩展:用户合并
Mediawiki 已经不推荐使用删除用户(Deleteuser),推荐使用用户合并(UserMerge)方式。
用户合并(UserMerge)扩展允许有“usermerge”权限的wiki用户(默认为行政员)合并一个Wiki用户账户至另一个Wiki用户账户。
- 下载文件(https://www.mediawiki.org/wiki/Special:ExtensionDistributor/UserMerge),并将其解压放置在您extensions/文件夹中的UserMerge目录内。
- 将下列代码放置在您的LocalSettings.php的底部:
wfLoadExtension( 'UserMerge' );
// By default nobody can use this function, enable for bureaucrat?
$wgGroupPermissions['bureaucrat']['usermerge'] = true;

// optional: default is array( 'sysop' )
$wgUserMergeProtectedGroups = array( 'groupname' );
- 完成 – 在您的wiki上导航至Special:Version,以验证扩展已成功安装。
管理员用户可在特殊页面找到“用户合并和删除”,点击进入页面进行操作。
4.5 其他
待续。
参考文档:
[1]: https://www.mediawiki.org/wiki/Manual:Running_MediaWiki_on_Debian_or_Ubuntu/zh
[2]:http://wangyapeng.me/2017/05/14/unbuntu-setup-mediawiki/
[3]:https://www.mediawiki.org/wiki/Extension:VisualEditor/pl
[4]:https://www.mediawiki.org/wiki/Extension:UserMerge/zh#Installation