CentOS7+Nginx+uWSGI+Flask部署
在linux上部署这套环境,折腾了十分的久,很多地方都不会,要反复的操作,还好,这些都不是问题,因为,我们最后,还是成功了,网上的部署方法很多,实际上我一步一步跟着做,也没奏效,最终都是零碎的去找原因,才OK的,下面介绍部署过程
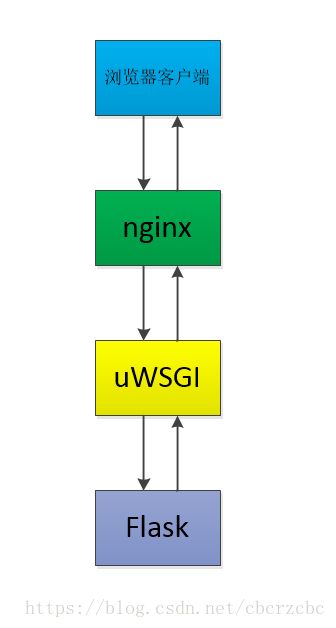
整个访问的流程是这样的,首先用户这边,用浏览器去访问我们flask的站点,由nginx受理,nginx接到请求后转发到uWSGI,由uWSGI来触发flask的应用,最终,将页面呈现到用户的浏览器上。
Linux环境:CentOS 7 1804
首先,我们安装了一个纯新的CentOS 7 1804版本的,我们先安装一些一些东西,一步一步调试
1、安装python-pip
[root@localhost ~]# yum -y install epel-release[root@localhost ~]# yum -y install python-pip2、升级pip的版本
[root@localhost ~]# python -m pip install --upgrade pip3、替换pip的国内源
替换国内源后,下载资源的速度会翻倍提升
创建一个隐藏目录,pip目录
[root@localhost ~]# mkdir -p .pip进入目录,并创建一个新的pip.conf文件,把配置写进去,保存
[root@localhost ~]# vi .pip/pip.confpip.conf的内容如下,替换的是清华大学的源:
[global]
index-url = https://pypi.tuna.tsinghua.edu.cn/simple
4、安装uwsgi
直接pip安装uwsgi,可能会报错,因为缺少c组件和python-devel
所以,我们要先解决这两个依赖,再pip安装uwsgi
[root@localhost ~]# yum -y install gcc gcc-c++[root@localhost ~]# yum -y install python-devel[root@localhost ~]# pip install uwsgi5、准备flask项目的代码
安装好uwsgi后,我们就要准备flask项目的代码了,就拿hello world为例
先是pip安装一下flask框架
[root@localhost ~]# pip install flask创建flask的项目文件夹
[root@localhost ~]# mkdir flask
[root@localhost ~]# cd flask
[root@localhost flask]# vi run.py
创建python文件 run.py ,内容如下:
from flask import Flask

application = Flask(__name__)


@application.route('/')
def hello_world():
    return 'Hello World!'


if __name__ == '__main__':
    application.run(host='0.0.0.0')
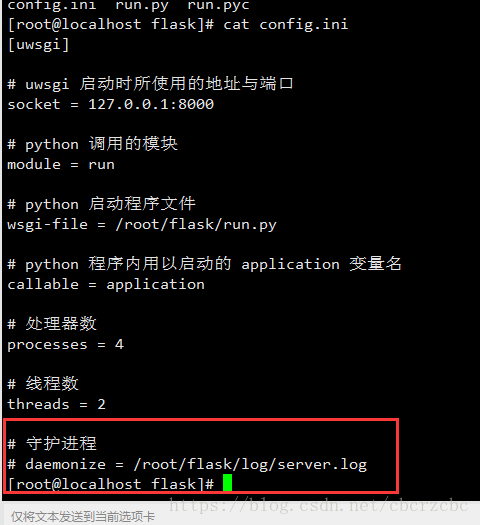
6、配置uwsgi的配置文件,这个文件很重要,配置错了,会访问不了的
在flask项目下,创建一个config.ini,内容如下:
[uwsgi]

# uwsgi 启动时所使用的地址与端口
socket = 127.0.0.1:8000

# python 调用的模块
module = run

# python 启动程序文件
wsgi-file = /root/flask/run.py

# python 程序内用以启动的 application 变量名
callable = application

# 处理器数
processes = 4

# 线程数
threads = 2

# 守护进程
# daemonize = /root/flask/log/server.log
7、安装Nginx
[root@localhost ~]# yum -y install nginx
配置nginx的配置文件
nginx的配置文件,在/etc/nginx/nginx.conf,可以直接配置它,也可以先把它备份一次,再进行配置
这里我就直接配置它了
# For more information on configuration, see:
#   * Official English Documentation: http://nginx.org/en/docs/
#   * Official Russian Documentation: http://nginx.org/ru/docs/


user nginx;
worker_processes auto;
error_log /var/log/nginx/error.log;
pid /run/nginx.pid;


# Load dynamic modules. See /usr/share/nginx/README.dynamic.
include /usr/share/nginx/modules/*.conf;


events {
    worker_connections 1024;
}


http {
    log_format  main  '$remote_addr - $remote_user [$time_local] "$request" '
                      '$status $body_bytes_sent "$http_referer" '
                      '"$http_user_agent" "$http_x_forwarded_for"';


    access_log  /var/log/nginx/access.log  main;


    sendfile            on;
    tcp_nopush          on;
    tcp_nodelay         on;
    keepalive_timeout   65;
    types_hash_max_size 2048;


    include             /etc/nginx/mime.types;
    default_type        application/octet-stream;


    # Load modular configuration files from the /etc/nginx/conf.d directory.
    # See http://nginx.org/en/docs/ngx_core_module.html#include
    # for more information.
    include /etc/nginx/conf.d/*.conf;


    server {
        listen       80 default_server;
        listen       [::]:80 default_server;
        server_name  192.168.10.139;    # 这里配置你服务器的IP地址
        root         /usr/share/nginx/html;


        # Load configuration files for the default server block.
        include /etc/nginx/default.d/*.conf;


        location / {
            include uwsgi_params;   # 引入uwsgi组件
            uwsgi_pass 127.0.0.1:8000;  # 定义uwsgi的转发端口
            uwsgi_param UWSGI_CHDIR /root/flask;  # 定义flask项目的路径
            uwsgi_param UWSGI_SCRIPT run:application;  # 定义flask项目的入口python文件和调用的函数
        }


        error_page 404 /404.html;
            location = /40x.html {
        }


        error_page 500 502 503 504 /50x.html;
            location = /50x.html {
        }
    }


# Settings for a TLS enabled server.
#
#    server {
#        listen       443 ssl http2 default_server;
#        listen       [::]:443 ssl http2 default_server;
#        server_name  _;
#        root         /usr/share/nginx/html;
#
#        ssl_certificate "/etc/pki/nginx/server.crt";
#        ssl_certificate_key "/etc/pki/nginx/private/server.key";
#        ssl_session_cache shared:SSL:1m;
#        ssl_session_timeout  10m;
#        ssl_ciphers HIGH:!aNULL:!MD5;
#        ssl_prefer_server_ciphers on;
#
#        # Load configuration files for the default server block.
#        include /etc/nginx/default.d/*.conf;
#
#        location / {
#        }
#
#        error_page 404 /404.html;
#            location = /40x.html {
#        }
#
#        error_page 500 502 503 504 /50x.html;
#            location = /50x.html {
#        }
#    }


}
重启nginx服务
[root@localhost ~]# service nginx restart8、临时关闭防火墙firewalld和SELinux
这是为了方便才这么做的,实际上,我们不会关闭防火墙,而是针对业务,做对应的放行策略,这里只是方便测试
[root@localhost ~]# service firewalld stop[root@localhost ~]# setenforce 09、启动uwsgi
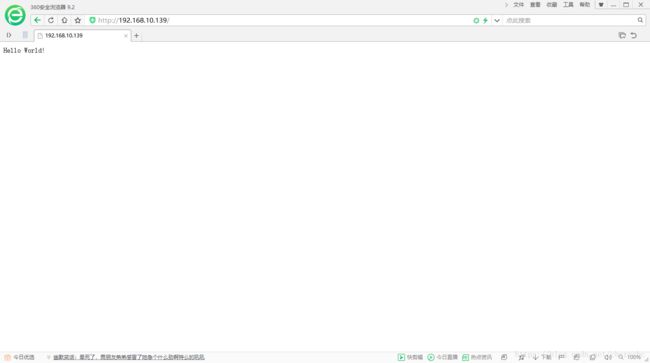
[root@localhost flask]# uwsgi config.ini10、测试一下,完全O98K
11、上线部署
直至上叙步骤,都只是半桶水的临时调试,综合多方面的考虑,我们并不能一昧的图方便,而关闭linux的防火墙,因此,我们要做放行策略
防火墙放行80端口,nginx访问web页面,默认是80,所以我们要放行80
[root@localhost ~]# firewall-cmd --zone=public --add-port=80/tcp --permanent
[root@localhost ~]# service firewalld restart
将Nginx加到SELinux的允许名单
[root@localhost ~]# yum -y install policycoreutils-python
[root@localhost ~]# cat /var/log/audit/audit.log | grep nginx | grep denied  | audit2allow -M mynginx
[root@localhost ~]# semodule -i mynginx.pp
自启项目里的config.ini文件,启动uWSGI
还记得这里有个这个吧
我们在项目目录下,创建对应的文件
[root@localhost flask]# mkdir log
[root@localhost flask]# touch /root/flask/log/server.log
然后,把config.ini的注释行,取消掉
这样,uwsgi的日志,就会写进server.log里面,方便我们随时调用日志查看
最后,配置开机自启动
开机自启动nginx服务和uwsgi
开机自启动nginx
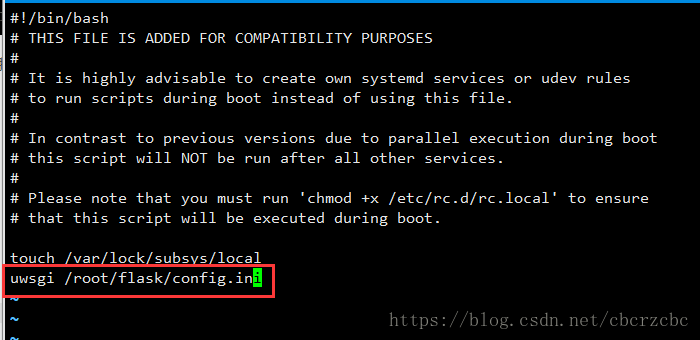
[root@localhost ~]# systemctl enable nginx.service在计划任务中,添加开机自启动,让uwsgi自动执行配置文件
[root@localhost ~]# vi /etc/rc.d/rc.local加一行,写上uwsgi启动config.ini的命令
给rc.local添加执行权限
[root@localhost ~]# chmod +x /etc/rc.d/rc.local12、重启Linux机器
直接reboot重启,然后,去其他电脑试一下,浏览器能不能直接访问,如果可以,那就是大功告成了


