关于latex的一些事(一)——新手入门
写在前面的一些东西
这是本人的第一次正式写作,如有写的不好还请大家多多指教。后面也想陆续的写一些关于LaTex相关的东西近来,当做自己的一些总结吧,大概也会安利一些比较实用的软件啥的。
下面是关于LaTex的一些东西
这些仅仅是LaTex很少很少的一部分,但是写点简单的文章大概够用了,比较适合刚入手LaTex的新手。作为很菜的过来人给新入手的朋友们一点小小的建议,新手一定不要先套模板,虽然现在模板很多,但是你可能看不懂,出了错你也不知道怎么改,所以基础的学习还是要有的,重要的一点,一定要多练多试,否则你在后续的改错中会头大。
LaTex的安装
关于LaTex的安装问题可能现在有很多的文章写得很清楚了,我这里就不赘述了,只是给大家推荐一个下载渠道,这是清华大学做的一个开源镜像网站,下载速度很快。
具体步骤参照:获取下载链接→应用软件→TeX 排版系统。
P S PS PS:安利一个网上编写LaTex的网站(点击此处进入),不用安装,可以在线编译,很方便,而且只是一个人编写是免费的,但我不太建议新手入手,还是从软件开始学起比较方便,最简单的一点,毕竟出了问题很多人都能解决。
关于LaTex使用
一个简单的文档
\documentclass{article}
\begin{document}
	hello,latex!
\end{document}
排版效果如下:
![]()
这里简单说明一下,\documentclass{…} 这里是头文件,在写LaTex文档时必须以这个来开头,这个命令指定了你所写的文档的类别,而article决定了你的文档类别。
文档类别通常分为三类,book,report 和 article,它们的各自特点如下:
- book 类(书籍)
可以有 part,chapter,section,subsection 等,但没有摘要。 - report 类(长篇论文)
可以有 part,chapter,section,subsection 等,也有摘要,且摘要位于单独一页上,有页码。 - article 类(科技论文、报告、说明文档)
可以有 part,section,subsection 等,但没有 chapter,可以有摘要,摘要紧接标题头位于第一页上。
此外还有一些其他的类,比如用来排版PPT的beamer,排版信件的letter等。
如果想对文档类型做些许调整,可以这样\documentclass[options]{…} 使用, options用来文档格式修正(默认字号10pt)调整为字号12pt,a4纸张,体现在语句中如下:
\documentclass[11pt,a4paper]{article}
当然,很明显\begin{document}和\end{document}则是用来开始和结束你的文档。
宏包调用
使用\usepackage命令在编译LaTex文件时要导入的扩展包,先看个例子:
\documentclass[11pt,a4paper]{article}
\usepackage{xeCJK}
\begin{document}
	hello,latex!\\
	你好,latex!


	你好!
\end{document}
排版后的效果如下:

这里调用了一个插入中文的宏包,对于插入中文这件事,也可以使用ctexart这种派生类的文档类别。
在这说一下关于换行之类的问题:
- 换行
\\:换行
\newline:与\\相同。
\linebreak:强制换行,与\newline的区别为\linebreak的当前行分散对齐。 - 分段
\par:分段(也可以用两个空行)。 - 分页
\newpage:分页命令。
\clearpage:和 \newpage 类似。我们在使用 CJK 环境时会加入 \clearpage 在环境末尾。
标题、图片、表格、公式的插入
插入标题
先看例子:
\documentclass[11pt,a4paper]{article}
\usepackage{xeCJK}
\title{My first LaTex}		%标题命名
\author{cp}					%作者命名
%\date{}					%如果不显示日期,取消本行注释
\begin{document}
\maketitle					%显示标题
\tableofcontents			%制作目录
\section{Hello LaTex}		%一级标题
	Here is the first level title.
	\subsection{Hello latex} 	%二级标题
		Here is the secondary title.
		\subsubsection{Hello} %三级标题
			\paragraph{latex} is useful.
				\subparagraph{latex} is flash.
\end{document}
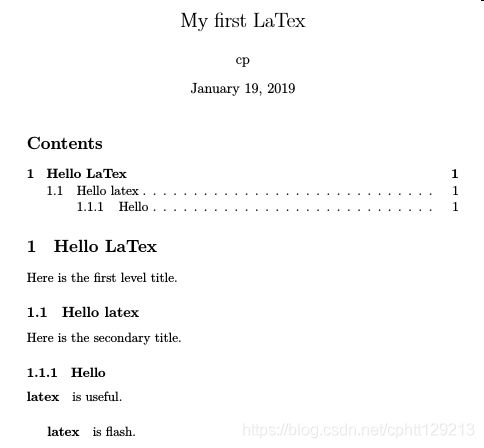
排版后的效果如下:
 LaTex会自动编译每一层的编号,即11.1之类的,标题层次大概分为以下5层:
section — subsection — subsubsection — paragraph — subparagraph
插入图片
先看例子:
\documentclass[11pt,a4paper]{article}
\usepackage{xeCJK}
\usepackage{graphicx}		%图片宏包
\title{My first LaTex}		%标题命名
\author{cp}					%作者命名
%\date{}					%如果不显示日期,取消本行注释
\begin{document}
\maketitle					%显示标题
\section{figure}		%一级标题

	\begin{figure}[h]
		\centering			%居中
		\includegraphics[width=5cm]{3.jpg}
		\caption{first figure} 		%图尾
	\end{figure}

\end{document}
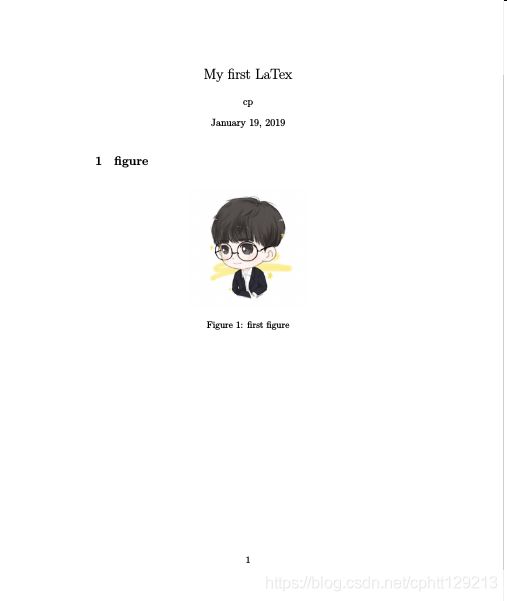
排版后的效果如下:

首先,插入图片需要先调用插入图片宏包graphicx,其次,需要把你想插入的图片放到与你写的.tex文档放在同一路径下。对于\includegraphics[width=5cm]{3.jpg}命令,width用来调试图片的宽度,3.jpg是你想插入图片的名称。
插入表格
先看例子:
\documentclass[11pt,a4paper]{article}
\usepackage{xeCJK}
\usepackage{graphicx}		%图片宏包
\title{My first LaTex}		%标题命名
\author{cp}					%作者命名
%\date{}					%如果不显示日期,取消本行注释
\begin{document}
\maketitle					%显示标题
\section{figure}		%一级标题

	\begin{figure}[h]
		\centering			%居中
		\includegraphics[width=5cm]{3.jpg}
		\caption{first figure} 		%图尾
	\end{figure}

\section{table}

	\begin{table}[h]
		\caption{table}		%表头
		\centering			%居中
		\begin{tabular}{|c|c|c|}
		\hline
		Score	&	Li Ming		&	Li Hua \\
		\hline
		Math	&	98			&	99		\\
		\hline
		\end{tabular}
	\end{table}

\end{document}
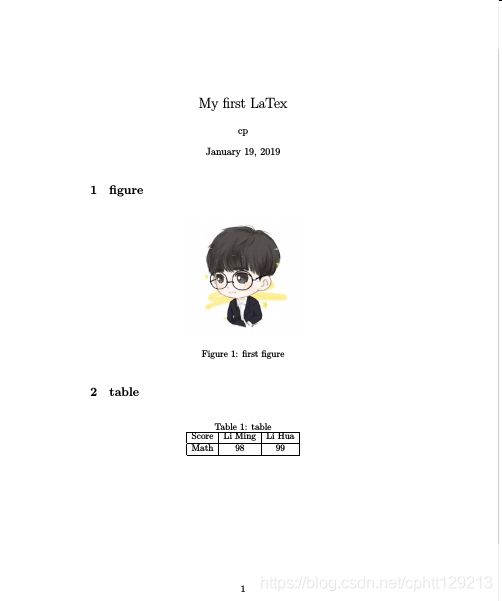
排版后的效果如下:
 可以明显的看到,\hline命令用来编译出表格的横线,|则用来编译表格的竖线,而&则用来连接横向的单元格。
插入数学公式
\documentclass[11pt,a4paper]{article}
\usepackage{xeCJK}
\usepackage{graphicx}		%图片宏包
\title{My first LaTex}		%标题命名
\author{cp}					%作者命名
%\date{}					%如果不显示日期,取消本行注释
\begin{document}
\maketitle					%显示标题
\section{figure}		%一级标题

	\begin{figure}[h]
		\centering			%居中
		\includegraphics[width=5cm]{3.jpg}
		\caption{first figure} 		%图尾
	\end{figure}

\section{table}

	\begin{table}[h]
		\caption{table}		%表头
		\centering			%居中
		\begin{tabular}{|c|c|c|}
		\hline
		Score	&	Li Ming		&	Li Hua \\
		\hline
		Math	&	98			&	99		\\
		\hline
		\end{tabular}
	\end{table}

\section{equation}

	\begin{equation}
		a+b=c
	\end{equation}

\end{document}
