GitLab 配置邮箱
设置 SMTP 发送邮件
这里以腾讯企业邮箱为例,其他邮箱可以参考 设置 SMTP 发送邮件。
SMTP 和 POP3/IMAP 协议
SMTP 负责发送邮件,POP3/IMAP 负责接收邮件。其中 IMAP 基本上替换掉了 POP3。
用户在使用客户端(例如 Foxmail)时,需要为这个客户端配置 SMTP 和 IMAP 服务器的地址和端口号。写完邮件后,发送到对应邮件服务器上的 SMTP 服务。邮件服务器收到客户编写完的邮件后,根据发件人和收件人的 domain 是否相同(例如都是 [email protected]),分为两种处理方式:
- domain 相同:SMTP 服务将邮件转给本地的 POP3/IMAP 服务。
- domain 不相同:SMTP 服务先通过 DNS 查找,找到收件人对应 domain 的 IP 地址,然后将邮件发送到这台服务器上的 SMTP 服务,后续步骤跟上一步相同。
设置
根据 GitLab 的不同安装方式(docker-compose、docker、二进制或源码安装),设置邮件的方式不同。
一直没找到邮件的日志位置,所以也不知道到底哪里报错。但是可以参考下面部分,通过 Ruby 控制台发邮件,会打印所有的错误信息。
以 root 用户身份登录后,在浏览器中访问 GitLab 时,在 URL 后添加 /api/v4/application/settings ,可以看到所有的设置,每个参数的含义可以 参考这里。
通过 docker-compose 设置(测试成功)
简单便捷,推荐。
修改 docker-compose.yml 文件后,通过 docker-compose up 命令重新加载配置(注意对于腾讯企业邮箱 SMTP_TLS 这个参数必须设置,且必须为 true,此时才会开启 TLS/SSL 加密):
    - SMTP_ENABLED=true
    - SMTP_DOMAIN=exmail.qq.com
    - SMTP_HOST=smtp.exmail.qq.com
    - SMTP_PORT=465
    - SMTP_USER=yeguan@szhuizhong.cn
    - SMTP_PASS=yg123lhf
    - SMTP_STARTTLS=true
    - SMTP_TLS=true
    - SMTP_AUTHENTICATION=login
注意,下面两个参数也要配置。GitLab 发出的确认邮件中的所有连接都会指向这两个参数设置的地址及端口:
    - GITLAB_HOST=https://gitlab.mydomain.com
    - GITLAB_PORT=10080
上面的设置,会影响容器中的 /home/git/gitlabconfig/initializers/smtp_settings.rb 文件。容器中所有 SMTP 相关设置都从这个文件获取,内容如下:
# To enable smtp email delivery for your GitLab instance do the following:
# 1. Rename this file to smtp_settings.rb
# 2. Edit settings inside this file
# 3. Restart GitLab instance
#
# For full list of options and their values see http://api.rubyonrails.org/classes/ActionMailer/Base.html
#
# If you change this file in a Merge Request, please also create a Merge Request on https://gitlab.com/gitlab-org/omnibus-gitlab/merge_requests

if Rails.env.production?
  Rails.application.config.action_mailer.delivery_method = :smtp

  ActionMailer::Base.delivery_method = :smtp
  ActionMailer::Base.smtp_settings = {
    address: "smtp.exmail.qq.com",
    port: 465,
    user_name: "[email protected]",
    password: "********",
    domain: "exmail.qq.com",
    authentication: "login",
    enable_starttls_auto: true,
    openssl_verify_mode: 'none',
    tls: true
  }
end
直接修改容器中的配置文件(没测试)
编辑 /home/gitlab/gitlab/config/environments/production.rb 或 /home/git/gitlab/config/environments/production.rb,把 config.action_mailer.delivery_method = :sendmail 这一行前面加 # 符号注释掉,下面添加:
config.action_mailer.delivery_method = :smtp
config.action_mailer.perform_deliveries = true
config.action_mailer.raise_delivery_errors = true

config.action_mailer.smtp_settings = {
  :address              => "smtp.exmail.qq.com",
  :port                 => 465,
  :domain               => 'exmail.qq.com',
  :user_name            => '[email protected]',
  :password             => 'xxx',
  :authentication       =>  :plain,
  :ssl                  =>  true,
  :enable_starttls_auto => true
}
编辑 /etc/gitlab/gitlab.rb 文件进行设置(没测试)
进入容器
docker exec -it gitlab bash修改配置文件
vi /etc/gitlab/gitlab.rb内容如下:
gitlab_rails['smtp_enable'] = true
gitlab_rails['smtp_address'] = ""
gitlab_rails['smtp_port'] = 587
gitlab_rails['smtp_user_name'] = "[email protected]"
gitlab_rails['smtp_password'] = "password"
gitlab_rails['smtp_authentication'] = "login"
gitlab_rails['smtp_enable_starttls_auto'] = true
gitlab_rails['smtp_tls'] = true
gitlab_rails['gitlab_email_from'] = '[email protected]'
gitlab_rails['smtp_domain'] = ""
重新加载配置并重启
gitlab-ctl reconfigure
gitlab-ctl restart
测试 SMTP 配置是否成功
查看容器的日志
通过容器安装时,如果 gitlab-ctl 和 gitlab-rails 不可用,可以直接进入容器查看日志:
docker exec -it gitlab_1 bash
cd  /var/log/gitlab
例如,GitLab 的时区不支持 Shanghai,只支持 Beijing,设置为 Shanghai 会报错无法启动:
TZ=Asia/Shanghai
GITLAB_TIMEZONE=Shanghai
时区报错时,通过 cat gitlab/unicorn.stderr.log 查看日志,会有这么一行:
/home/git/gitlab/vendor/bundle/ruby/2.3.0/gems/activesupport-4.2.10/lib/active_support/core_ext/time/zones.rb:72:in `rescue in find_zone!': Invalid Timezone: Shanghai (ArgumentError)点击忘记密码
最简单的方法,在登录页面, 点击忘记密码就会自动发送邮件。如果有异常,可以执行下面的命令查看日志:
gitlab-ctl tail用 Rails 控制台
配置完成后可以用 Rails 控制台验证邮件是否能发送成功。
1. 进入 rails 控制台
在 GitLab 服务器上,执行:
gitlab-rails console如果是通过 Docker 安装的,可能没有上面的命令,此时可以通过 docker exec -it xx bash 进入容器后使用 bundle 命令:
bundle exec rails console production2. 检查 ActionMailer 的 delivery_method 参数是否是你设置的值
如果是 SMTP 则会显示 :smtp。如果是 Sendmail 则会显示 :sendmail
irb(main):001:0> ActionMailer::Base.delivery_method
=> :smtp
3. 检查邮件的设置
irb(main):002:0> ActionMailer::Base.smtp_settings
=> {:address=>"smtp.exmail.qq.com", :port=>465, :user_name=>"[email protected]", :password=>"********", :domain=>"exmail.qq.com", :authentication=>"login", :enable_starttls_auto=>true, :openssl_verify_mode=>"none", :tls=>false}
如果有异常之处,可以检查邮件服务对应的日志(例如 /var/log/mail.log)。
4. 发送测试邮件
进入控制台后,在控制台提示符后输入下面的命令发送一封测试邮件:
irb(main):003:0> Notify.test_email('[email protected]', 'Hello World', 'This is a test message').deliver_now

Notify#test_email: processed outbound mail in 1.5ms

Sent mail to kikajack@163.com (60238.9ms)
Date: Fri, 18 May 2018 02:28:11 +0000
From: GitLab
Reply-To: GitLab
To: kikajack@163.com
Message-ID: <5[email protected]>
Subject: Hello World
Mime-Version: 1.0
Content-Type: text/html;
 charset=UTF-8
Content-Transfer-Encoding: 7bit
Auto-Submitted: auto-generated
X-Auto-Response-Suppress: All

PUBLIC "-//W3C//DTD HTML 4.0 Transitional//EN" "http://www.w3.org/TR/REC-html40/loose.dtd">
This is a test message

Net::ReadTimeout: Net::ReadTimeout
    from /usr/lib/ruby/2.3.0/net/protocol.rb:176:in `rbuf_fill'
    from /usr/lib/ruby/2.3.0/net/protocol.rb:154:in `readuntil'
    from /usr/lib/ruby/2.3.0/net/protocol.rb:164:in `readline'
    from /usr/lib/ruby/2.3.0/net/smtp.rb:955:in `recv_response'
    from /usr/lib/ruby/2.3.0/net/smtp.rb:556:in `block in do_start'
    from /usr/lib/ruby/2.3.0/net/smtp.rb:965:in `critical'
    from /usr/lib/ruby/2.3.0/net/smtp.rb:556:in `do_start'
    from /usr/lib/ruby/2.3.0/net/smtp.rb:521:in `start'
    from /home/git/gitlab/vendor/bundle/ruby/2.3.0/gems/mail-2.7.0/lib/mail/network/delivery_methods/smtp.rb:109:in `start_smtp_session'
    from /home/git/gitlab/vendor/bundle/ruby/2.3.0/gems/mail-2.7.0/lib/mail/network/delivery_methods/smtp.rb:100:in `deliver!'
    from /home/git/gitlab/vendor/bundle/ruby/2.3.0/gems/mail-2.7.0/lib/mail/message.rb:2160:in `do_delivery'
    from /home/git/gitlab/vendor/bundle/ruby/2.3.0/gems/mail-2.7.0/lib/mail/message.rb:260:in `block in deliver'
    from /home/git/gitlab/vendor/bundle/ruby/2.3.0/gems/actionmailer-4.2.10/lib/action_mailer/base.rb:543:in `block in deliver_mail'
    from /home/git/gitlab/vendor/bundle/ruby/2.3.0/gems/activesupport-4.2.10/lib/active_support/notifications.rb:164:in `block in instrument'
    from /home/git/gitlab/vendor/bundle/ruby/2.3.0/gems/activesupport-4.2.10/lib/active_support/notifications/instrumenter.rb:20:in `instrument'
    from /home/git/gitlab/vendor/bundle/ruby/2.3.0/gems/activesupport-4.2.10/lib/active_support/notifications.rb:164:in `instrument'
    from /home/git/gitlab/vendor/bundle/ruby/2.3.0/gems/actionmailer-4.2.10/lib/action_mailer/base.rb:541:in `deliver_mail'
    from /home/git/gitlab/vendor/bundle/ruby/2.3.0/gems/mail-2.7.0/lib/mail/message.rb:260:in `deliver'
    from /home/git/gitlab/vendor/bundle/ruby/2.3.0/gems/actionmailer-4.2.10/lib/action_mailer/message_delivery.rb:85:in `deliver_now'
    from (irb):4
    from /home/git/gitlab/vendor/bundle/ruby/2.3.0/gems/railties-4.2.10/lib/rails/commands/console.rb:110:in `start'
    from /home/git/gitlab/vendor/bundle/ruby/2.3.0/gems/railties-4.2.10/lib/rails/commands/console.rb:9:in `start'
    from /home/git/gitlab/vendor/bundle/ruby/2.3.0/gems/railties-4.2.10/lib/rails/commands/commands_tasks.rb:68:in `console'
    from /home/git/gitlab/vendor/bundle/ruby/2.3.0/gems/railties-4.2.10/lib/rails/commands/commands_tasks.rb:39:in `run_command!'
    from /home/git/gitlab/vendor/bundle/ruby/2.3.0/gems/railties-4.2.10/lib/rails/commands.rb:17:in `'
    from bin/rails:14:in `require'
    from bin/rails:14:in `'
上面发送失败,同时报了一堆错误。Ruby 我不懂,所以去查资料。mail SSL smtp 发送不成功 (QQ/163) 这里讲的很明白,TLS/SSL 必须设置为 true。
修改设置后,再次发送邮件,成功:
irb(main):003:0> Notify.test_email('[email protected]', 'Hello World', 'This is a test message').deliver_now

Notify#test_email: processed outbound mail in 313.8ms

Sent mail to [email protected] (1993.6ms)
Date: Fri, 18 May 2018 06:59:37 +0000
From: GitLab <[email protected]>
Reply-To: GitLab <[email protected]>
To: [email protected]
Message-ID: <[email protected]>
Subject: Hello World
Mime-Version: 1.0
Content-Type: text/html;
 charset=UTF-8
Content-Transfer-Encoding: 7bit
Auto-Submitted: auto-generated
X-Auto-Response-Suppress: All


<html><body><p>This is a test messagep>body>html>

=> #<Mail::Message:185028380, Multipart: false, Headers: <Date: Fri, 18 May 2018 06:59:37 +0000>, <From: GitLab <yeguan@szhuizhong.cn>>, <Reply-To: GitLab <yeguan@szhuizhong.cn>>, <To: kikajack@163.com>, <Message-ID: <5afe79d9e5b57_2e96b90b8507d6@f9147604e002.mail>>, <Subject: Hello World>, <Mime-Version: 1.0>, <Content-Type: text/html; charset=UTF-8>, <Content-Transfer-Encoding: 7bit>, <Auto-Submitted: auto-generated>, <X-Auto-Response-Suppress: All>>
各邮箱的区别
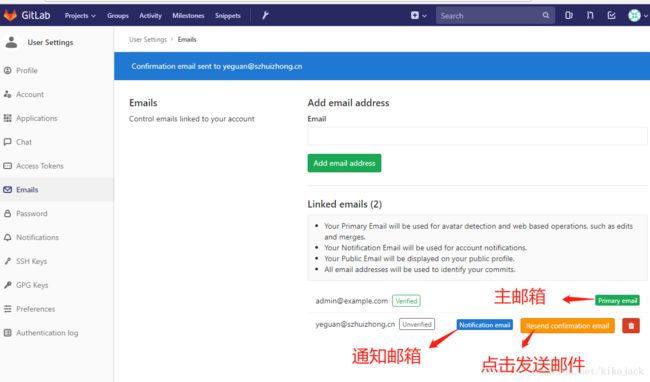
primary email
用户注册时的邮箱,默认状况下,通知邮箱也是同一个。可以在个人信息中修改。
notification email
用来接收系统邮件,如果 test、merge、review 通知等,和 primary email 一致就行。
public email
用户展示出来的个人信息,GitLab 并不使用。
ssh key 邮箱
设置公钥的时候是用的这个邮箱。用户将公钥添加到 GitLab 之后,可以在这个公钥的主机上 push 和 pull 代码。用户的commit后,系统鉴别的头像和用户名都和ssh key中的邮箱没有关系。
$ ssh-keygen -t rsa -b 4096 -C "[email protected]"
Generating public/private rsa key pair.
Enter file in which to save the key (/c/Users/Administrator/.ssh/id_rsa):
Enter passphrase (empty for no passphrase):
Enter same passphrase again:
Your identification has been saved in /c/Users/Administrator/.ssh/id_rsa.
Your public key has been saved in /c/Users/Administrator/.ssh/id_rsa.pub.
The key fingerprint is:
SHA256:ZZYs4/OKNCJLoMCJ5/4vf+Uvq0RvcD64YSw0VS6mBQE 565066158@qq.com
The key's randomart image is:
+---[RSA 4096]----+
|    E.o.  .      |
|       . + .     |
|        B B      |
|o .    * B       |
|+o.   + S .      |
|o+   . + O.      |
|. + . + *o*      |
| o o.o *.=o.     |
|  o..++.+..+.    |
+----[SHA256]-----+
git 配置邮箱
用户需要在 Git 软件中设置邮箱和用户名:
$ git config user.name 'jack'
$ git config user.email '[email protected]'
可以在 ~/.gitconfig 文件中实现全局配置。
用户提交代码之后,GitLab 会将 git config 中的邮箱与用户 email 进行匹配。如果匹配成功,则可以上传。
值得注意的是:当邮箱匹配时,commit 的用户名是用户的 GitLab 的用户名,而不是 git config 中的。如果邮箱不匹配,则使用 git config 中的用户名和邮箱。
