什么是CXF
什么是CXF
Apache CXF 是一个开放源代码框架,提供了用于方便地构建和开发 Web 服务的可靠基础架构。它允许创建高性能和可扩展的服务,您可以将这样的服务部署在 Tomcat 和基于 Spring 的轻量级容器中,以及部署在更高级的服务器上,例如 Jboss、IBM® WebSphere® 或 BEA WebLogic。
该框架提供了以下功能:
Web 服务标准支持:CXF 支持以下 Web 服务标准:
Java API for XML Web Services (JAX-WS)
SOAP
Web 服务描述语言(Web Services Description Language ,WSDL)
消息传输优化机制(Message Transmission Optimization Mechanism,MTOM)
WS-Basic Profile
WS-Addressing
WS-Policy
WS-ReliableMessaging
WS-Security
前端建模:CXF 提供了前端建模的概念,允许您使用不同的前端 API 来创建 Web 服务。API 允许您使用简单的工厂 Bean 并通过 JAX-WAS 实现来创建 Web 服务。它还允许您创建动态 Web 服务客户端。
工具支持:CXF 提供了用于在 Java Bean、Web 服务和 WSDL 之间进行转换的不同工具。它提供了对 Maven 和 Ant 集成的支持,并无缝地支持 Spring 集成。
RESTful 服务支持:CXF 支持代表性状态传输(Representational State Transfer,RESTful )服务的概念,并支持 Java 平台的 JAX-RS 实现。(本系列的第 2 部分将提供有关 RESTful 服务的更多信息。)
对不同传输和绑定的支持:CXF 支持不同种类的传输,从 XML 到逗号分隔值 (CSV)。除了支持 SOAP 和 HTTP 协议绑定之外,它还支持 Java Architecture for XML Binding (JAXB) 和 AEGIS 数据绑定。
对非 XML 绑定的支持:CXF 支持非 XML 绑定,例如 JavaScript Object Notation (JSON) 和 Common Object Request Broker Architecture (CORBA)。它还支持 Java 业务集成(Java Business Integration,JBI)体系架构和服务组件体系架构(Service Component Architecture,SCA)。
code first 或者 xml first : 支持使用code first 或者 xml first 的方式来创建web服务。
CXF中有一个EndPoint.publish方法,可以实现发布。
CXF中有一个EndPoint.publish方法,可以实现发布。
但我想知道如何把它发布到tomcat中,使用80端口。
Web service之 CXF详解与实例教程
CXF是什么?
CXF是建立在SOAP协议上的一个Web service框架。什么事SOAP协议,简单来说就是两个不同项目(开发语言不同等)通过xml文件来描述要传输的东西,然后通过HTTP协议传输,接收方把收到的xml解析成需要的对象使用,返回的时候又用xml封装又通过http协议传输,如此就是SOAP协议。而CXF就是两个项目之间为了提供服务,而开发的一个开源框架,使用CXF框架可以快速搭建web service。CXF就是将项目中暴露出来的接口(服务)包装起来,成为wsdl,使用方通过wsdl来调用这些服务。
跟CXF同样功能的是XFIRE,AXIAS。可是现在都用CXF了,他整合了XFIRE。AXIAS也越来越少人用。
CXF的demo:
第一步:下载CXF:http://www.apache.org/dyn/closer.cgi?path=/cxf/2.7.7/apache-cxf-2.7.7.zip 。解压后,新建一个Java项目,导入cxf中lib文件夹的所有jar包。
第二步:编写接口CalculatorService.java,这个接口就是提供web服务的那个接口啦,里面的方法都是提供给人家调用滴。
package com.likunjie;
import javax.jws.WebParam;
import javax.jws.WebService;

@WebService
public interface CalculatorService {int add(int a, int b);
    String concat(String a, String b);
}
第三步:编写接口的实现类CalculatorServiceImpl.java,类里面要实现接口的方法。
package com.likunjie;
import javax.jws.WebService;

@WebService(endpointInterface="com.demo.CalculatorService",serviceName="calculator")
public class CalculatorServiceImpl implements CalculatorService {
    @Override
    public int add(int a, int b) {
        return a + b;
    }
    @Override
    public String concat(String a, String b) {
        return a + b;
    }
}
第四步:开发服务端WebService.java,写完以后右击,运行Run As Java application(之后也不要关掉)。如果没有错误就继续下一步,有错误检查上一个类注解的地址是否跟你包名一致。检查是否有拼写错误。
package com.likunjie;

import javax.xml.ws.Endpoint;

public class WebService {
    public static void main(String[] args) {
        System.out.println("web service start");
        CalculatorServiceImpl implementor = new CalculatorServiceImpl();
        String address = "http://localhost:8080/calculator";  //这是上面在注解中已经声明过的URL
        Endpoint.publish(address, implementor);
        System.out.println("web service started");
    }
}
第五步:打开浏览器,输入:http://localhost:8080/calculator?wsdl ,如果显示以下信息,那么你已经完成了一大半。这个就是传说中的wsdl,要使用服务的客户端要先获取这个wsdl,知道里面描述了有什么服务使用以后。再根据这个wsdl,可以生成自己的客户端,并且访问所描述的服务。(这个一个schema文件,不懂的话再要去学一下)
<wsdl:definitions xmlns:xsd="http://www.w3.org/2001/XMLSchema"
    xmlns:wsdl="http://schemas.xmlsoap.org/wsdl/" xmlns:tns="http://likunjie.com/"
    xmlns:soap="http://schemas.xmlsoap.org/wsdl/soap/" xmlns:ns1="http://schemas.xmlsoap.org/soap/http"
    name="calculator" targetNamespace="http://likunjie.com/">
    <wsdl:types>
        <xs:schema xmlns:xs="http://www.w3.org/2001/XMLSchema"
            xmlns:tns="http://likunjie.com/" elementFormDefault="unqualified"
            targetNamespace="http://likunjie.com/" version="1.0">
            <xs:element name="add" type="tns:add" />
            <xs:element name="addResponse" type="tns:addResponse" />
            <xs:element name="concat" type="tns:concat" />
            <xs:element name="concatResponse" type="tns:concatResponse" />
            <xs:complexType name="concat">
                <xs:sequence>
                    <xs:element minOccurs="0" name="arg0" type="xs:string" />
                    <xs:element minOccurs="0" name="arg1" type="xs:string" />
                xs:sequence>
            xs:complexType>
            <xs:complexType name="concatResponse">
                <xs:sequence>
                    <xs:element minOccurs="0" name="return" type="xs:string" />
                xs:sequence>
            xs:complexType>
            <xs:complexType name="add">
                <xs:sequence>
                    <xs:element name="arg0" type="xs:int" />
                    <xs:element name="arg1" type="xs:int" />
                xs:sequence>
            xs:complexType>
            <xs:complexType name="addResponse">
                <xs:sequence>
                    <xs:element name="return" type="xs:int" />
                xs:sequence>
            xs:complexType>
        xs:schema>
    wsdl:types>
    <wsdl:message name="concatResponse">
        <wsdl:part element="tns:concatResponse" name="parameters">wsdl:part>
    wsdl:message>
    <wsdl:message name="addResponse">
        <wsdl:part element="tns:addResponse" name="parameters">wsdl:part>
    wsdl:message>
    <wsdl:message name="add">
        <wsdl:part element="tns:add" name="parameters">wsdl:part>
    wsdl:message>
    <wsdl:message name="concat">
        <wsdl:part element="tns:concat" name="parameters">wsdl:part>
    wsdl:message>
    <wsdl:portType name="CalculatorService">
        <wsdl:operation name="concat">
            <wsdl:input message="tns:concat" name="concat">wsdl:input>
            <wsdl:output message="tns:concatResponse" name="concatResponse">wsdl:output>
        wsdl:operation>
        <wsdl:operation name="add">
            <wsdl:input message="tns:add" name="add">wsdl:input>
            <wsdl:output message="tns:addResponse" name="addResponse">wsdl:output>
        wsdl:operation>
    wsdl:portType>
    <wsdl:binding name="calculatorSoapBinding" type="tns:CalculatorService">
        <soap:binding style="document"
            transport="http://schemas.xmlsoap.org/soap/http" />
        <wsdl:operation name="concat">
            <soap:operation soapAction="" style="document" />
            <wsdl:input name="concat">
                <soap:body use="literal" />
            wsdl:input>
            <wsdl:output name="concatResponse">
                <soap:body use="literal" />
            wsdl:output>
        wsdl:operation>
        <wsdl:operation name="add">
            <soap:operation soapAction="" style="document" />
            <wsdl:input name="add">
                <soap:body use="literal" />
            wsdl:input>
            <wsdl:output name="addResponse">
                <soap:body use="literal" />
            wsdl:output>
        wsdl:operation>
    wsdl:binding>
    <wsdl:service name="calculator">
        <wsdl:port binding="tns:calculatorSoapBinding" name="CalculatorServiceImplPort">
            <soap:address location="http://localhost:8080/calculator" />
        wsdl:port>
    wsdl:service>
wsdl:definitions>
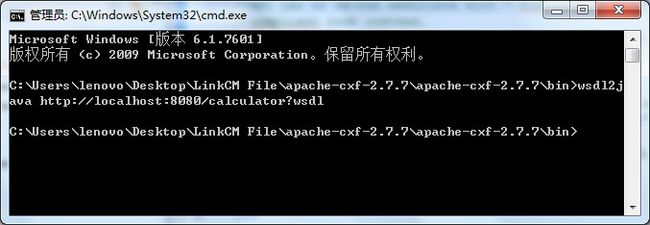
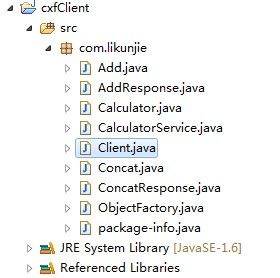
第六步:客户端是完全不知道服务端以上的代码的。只有cxf和被提供的这个wsdl,那么怎样才能调用服务呢?CXF包的bin目录下其实有一个指令,叫wsdl2java,我们可以使用这个命令,根据得到的wsdl来生成java代码。接下来,小心跟着下面的步骤:1、打开命令行,路径切换到cxf包下的bin目录(是为了使用该目录下的指令)。2、在命令行敲上:wsdl2java http://localhost:8080/calculator?wsdl 。完了以后再看这个bin目录,你会发现多了一个com文件夹,这个就是产生的项目代码文件,留着等下用。3、新建一个项目作为客户端,同样把所有CXF的jar包都导入,接着把上一步产生的com文件夹剪切到项目的src目录下。 把有出现红线的地方按提示修改就行了。4、在同一个包下面编写Client类,在main方法调用服务。最后运行Run as Java Application。


package com.likunjie;

public class Client {
    public static void main(String[] args) {
        Calculator calc = new Calculator();
        CalculatorService service = calc.getCalculatorServiceImplPort();
        int a = service.add(3, 7);
        String b = service.concat("what's ", "that about?");
        System.out.println(a);
        System.out.println(b);
    }
}
输出结果:
10