Latex学习笔记(一)
本人科研小白,最近要交论文终稿,师兄叫我用Latex排版,故做个学习笔记,随时更新。
转载的网站网址:(如有遗漏请见谅,侵删)
\documentclass模板和文档设置https://www.cnblogs.com/oucsheep/p/4169754.html
不等号 https://jingyan.baidu.com/article/49711c6179cd0dfa441b7c1d.html
\cite命令 https://blog.csdn.net/yf210yf/article/details/50589861?locationNum=7&fps=1
https://jingyan.baidu.com/article/3c48dd34ab4325e10ae3586a.html
LaTeX 各种命令,符号https://blog.csdn.net/garfielder007/article/details/51646604/
如何改变公式中字体的大小https://jingyan.baidu.com/article/948f59242c8a1fd80ef5f943.html
公式的序号https://www.cnblogs.com/suerchen/p/4817711.html
调整多行公式行距(间距)的方法https://blog.csdn.net/xuxinrk/article/details/103037200
调整公式、图片与正文间距离https://blog.csdn.net/u011089523/article/details/83578005?depth_1-utm_source=distribute.pc_relevant.none-task&utm_source=distribute.pc_relevant.none-task
插入图片相关参数https://blog.csdn.net/qqxx6661/article/details/52770214
双栏排版中的图表及公式通栏http://blog.sina.com.cn/s/blog_5fe50611010169g9.html
表格和图片排版(设置宽度和高度)https://blog.csdn.net/u010682375/article/details/78670325?depth_1-utm_source=distribute.pc_relevant.none-task&utm_source=distribute.pc_relevant.none-task
合并单元格https://blog.csdn.net/qq_35417268/article/details/83444143
bibtex使用和相关技巧https://blog.csdn.net/ErMiaoYY/article/details/84875863
还有非常感谢下图这本手册,很全面详细
链接:https://pan.baidu.com/s/1t-YeD0rcvA6M3A3wWtu3lw
提取码:gy15
版本是WinEdt 7.0
1.导言区:
\documentclass[journal]{IEEEtran}一些用的宏包
\usepackage[tight,footnotesize]{subfigure}% 调用子图工具包
\usepackage{tabularx}%调用表格工具包
\usepackage{multirow}%表格合并单元格
\usepackage{flushend} %调节最后一页的分布,双栏
\ifCLASSOPTIONcompsoc
% requires cite.sty v4.0 or later (November 2003)
\usepackage[nocompress]{cite}
\else
\usepackage{cite}
\fi

% *** GRAPHICS RELATED PACKAGES ***
%插入的图片格式
\ifCLASSINFOpdf
   \usepackage[pdftex]{graphicx}
  % declare the path(s) where your graphic files are
   \graphicspath{{../png/}{../jpeg/}{../tiff/}}
  % and their extensions so you won't have to specify these with
  % every instance of \includegraphics
   \DeclareGraphicsExtensions{.pdf,.jpeg,.png,.tiff}
\else
  % or other class option (dvipsone, dvipdf, if not using dvips). graphicx
  % will default to the driver specified in the system graphics.cfg if no
  % driver is specified.
\usepackage[dvips]{graphicx}
  % declare the path(s) where your graphic files are
  % \graphicspath{{../eps/}}
  % and their extensions so you won't have to specify these with
  % every instance of \includegraphics
  % \DeclareGraphicsExtensions{.eps}
\fi

% *** MATH PACKAGES ***
%
\usepackage[cmex10]{amsmath}
2.正文:
2.1标题,作者,关键词,摘要等
\begin{document} % 以\end{document}结束
\title{Go celtcis Go!}
\author{
    \vskip 1em  %设置竖直距离
    {
    Jason Tatum, \emph{Student Member, IEEE},
    Brad Stevens, \emph{Senior Member, IEEE},
    Gordon Hayward , \emph{Member, IEEE}
    }

\thanks{
This work is supported by the ........
    }
}

\markboth{IEEE TRANSACTIONS ON POWER ELECTRONICS,~Vol.~X, No.~X, XXX~20XX}%
{Shell \MakeLowercase{\textit{et al.}}: Bare Demo of IEEEtran.cls for Journals}


\maketitle

\begin{abstract}
It's not luck, it's us!

\end{abstract}

\begin{IEEEkeywords}
Paul Pierce(Truth), Kevin Garnett (KG), Ray Allen (Jesus), Rajon Rondo(Center), Doc Rivers.
\end{IEEEkeywords}
% For peer review papers, you can put extra information on the cover
% page as needed:
% \ifCLASSOPTIONpeerreview
% \begin{center} \bfseries EDICS Category: 3-BBND \end{center}
% \fi
%
% For peerreview papers, this IEEEtran command inserts a page break and
% creates the second title. It will be ignored for other modes.
\IEEEpeerreviewmaketitle
2.2章节标题
\section{FULLMETAL ALCHEMIST}
%第一章标题
\subsection{Van Hohenheim}
%子标题
\subsubsection{Edward Elric}
%%子子标题
2.3正文文本部分使用到的一些单位符号
%表示注释,在需要显示百分数时,加个反斜线:1\%
需要显示&时,加反斜线:\&
~为不允许换行的空格,需要显示波浪线时使用:\sim
输入下划线时2_2:2\_2
引用参考文献[1]:\cite{zvs1} %zvs1为bib文件中我命名的文献名字
需要在一处引用多篇文献[1-4]:\cite{1,2,3,4}
引用图片 1(a):\ref{1a} %1a是我插入图的label{1a},会自动显示小括号
引用公式2: \ref{eq2} %图和公式的label不要相同,引用时会出问题, 也可以不引用直接手打(2)
(此处先简单介绍,后面有详细描述)
需要显示‘1’时: `1' %左引号为英文输入ESC下面那个波浪线的键,右引号为ENTER左边的引号键
显示“1”时:``1''
需要输入 '时,如Xi'an:Xi'an
以下需要公式环境$...$
当输入变量时需要变换为斜体,或者输入公式时:${ k=0.1 }$
等号和数字也会变为斜体,如只将k变为斜体:$k$ =0.1
带下标的变量中,使用下划线即可将下划线后的部分为下标:${R_{L}}$
因为论文中需要变量都是斜体,故在公式环境中输入R,如不需要R为斜体,可以:R{_1}
保证下标为直体:${R_{\rm{L}}}$
输入上标时:${D^2}$
输入R1'时:${R_1'}$ %还有一些带星标以及具体上标的样式就不列出来了,自己多尝试
输入角度时 2°可以这样:2${^\circ}$ 或者${2^\circ}$ %这两种方法只是数字2样式不同
输入根号:${\sqrt{2}}$
输入大于:${1<2}$ 或者 \textgreater %\textgreater 不需要公式环境
输入小于: ${2>1}$ 或者 \textless %\textless 不需要公式环境
输入大于等于:${1\ge1}$
输入小于等于:${1\le 1}$
下面的两种不等号需要在导言区引用两个宏包:\usepackage{amsmath} \usepackage{amssymb}
另一种大于等于:${1 \geqslant 1}$
另一种小于等于:${1 \leqslant 1}$
表示角频率ω时:${\omega}$
需要Ω时:${\Omega}$
需要φ时:${\varphi}$
需要δ时:${\delta}$
需要△t时:${\Omega t}$
需要π时:${\pi}$
2.4插入公式
2.4.1一般公式
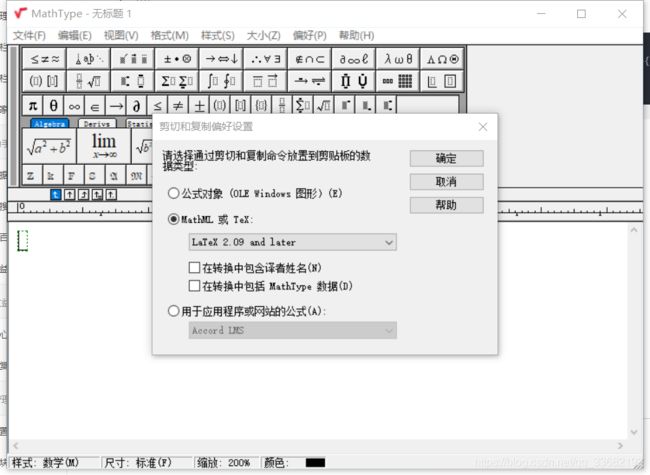
可以在Mathtype中导入
虽然很方便快捷,效果也不错,但有些地方还是根据个人需要再调整。
\begin{equation}
P_{\rm{u}}=\frac{P_2}{P_{\rm{2max}}}=\sin[\frac{D_{\rm{p}}\pi}{2}]\sin\left[\frac{D_{\rm{s}}\pi}{2}\right]\cos\left[\delta\right]
\label{eq1}
\end{equation}
若要调整分数中的字体大小,可使用\displaystyle\frac{}{}命令,见最顶部
这里展示了两种方括号的用法,小的是[],全部包括的大的方括号是\left[ \right]
小括号()也是同理,请自行试验
2.4.2当输入多行公式时
可使用align,gather,array等等,我没有学习那么多,此处仅介绍我所学习的align和array
肯定会有更全面更巧妙的讲解和使用方法,还请各位大神指正
- 先看align
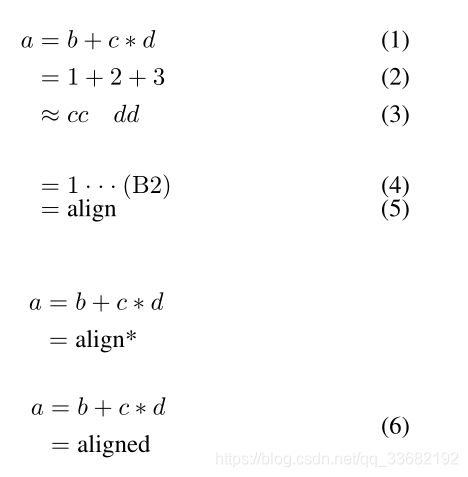
\begin{align}
a&=b+c*d  \\
&=1+2+3   \\
&\approx cc\quad dd\\[3ex]
&=1 \cdot  \cdot \cdot({\rm{B2}})\\[-2mm]
&=\text{align}
\end{align}

\begin{align*}
a&=b+c*d  \\
&=\text{align*}
\end{align*}

\begin{equation}
\begin{aligned}
a&=b+c*d  \\
&=\text{aligned}
\end{aligned}
\end{equation}
\\用来换行
&用来对齐每行公式
\approx 为约等号
\cdot 为行中央的点
\text{}为在公式环境中输入文本,(B2)也提供了一种输入文本的方法
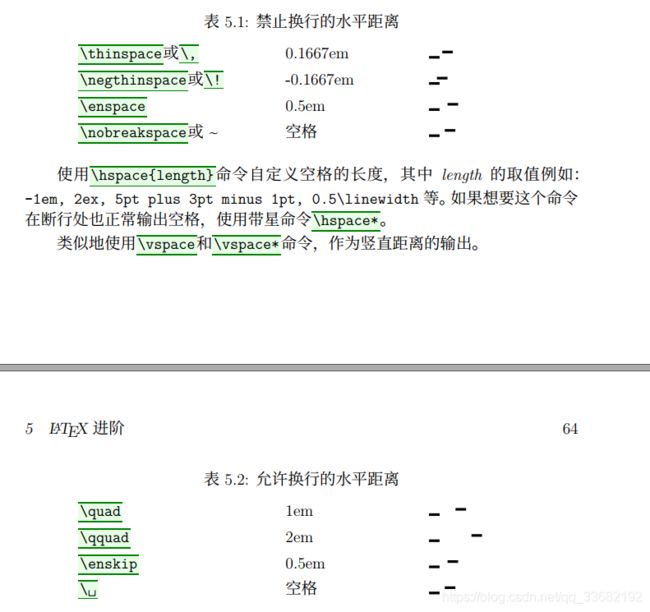
\quad表示横向上空一个距离
使用align时,不需要equation环境,每行公式后都会有标号
align*和align用法完全一样,只是每行都不带标号而已
我个人更喜欢用aligned,aligned中多行公式仅有一个标号
可以看到,图中公式的标号都是连续的
关于图片的序号在页顶的公式的序号有具体讲解
值得注意的是aligned需要嵌套在equation中
equation,figure都是自带计数器的,在后面做跨栏的图片、公式都用的到
- 再看array
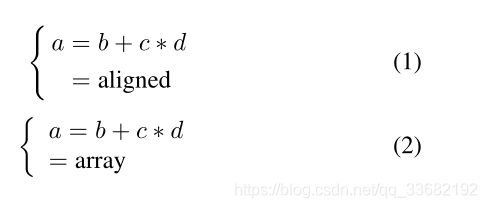
学习array是因为mathtype中的多行公式转换为Latex代码默认是用array的
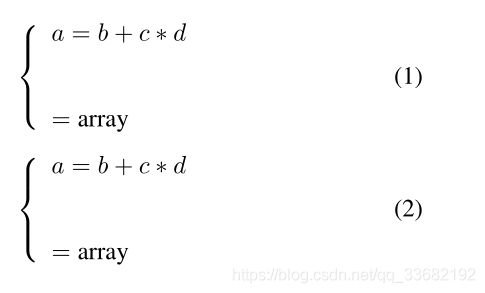
但是个人觉得array在写大括号时不如aligned美观
\begin{equation}
\left\{
\begin{aligned}
a&=b+c*d  \\
&=\text{aligned}
\end{aligned}
\right.
\end{equation}

\begin{equation}
\left\{
\begin{array}{l}
a=b+c*d  \\
=\text{array}
\end{array}
\right.
\end{equation}
在画单侧大括号时,左边是\left\{ 右边是\right. 注意这个.很可能忽略
去除掉大括号就是普通的用array做多行公式的方法
l代表left左对齐,c代表center居中对齐,r代表right居右对齐
array中不用&对齐,若忘记删会报错
- 关于调整公式内间距的方法
\begin{equation}
\left\{
\begin{array}{l}
a=b+c*d  \\[5ex]
=\text{array}
\end{array}
\right.
\end{equation}

\begin{equation}
\left\{
\begin{array}{l}
a=b+c*d  \vspace{5ex}\\
=\text{array}
\end{array}
\right.
\end{equation}
\\后面的[]表示这一行和下面一行的间距为默认行距与[]内距离的代数和
\vspace{}位置是在\\换行前
本人在align中使用\vspace总是无效,不知道为什么,暂时没做深入研究,希望大神可以给我指正
- 关于调整公式与正文距离的方法
\begin{equation}%公式

\setlength{\abovedisplayskip}{3pt}

\setlength{\belowdisplayskip}{3pt}

y(t)=a(t)-b(t).

\end{equation}
2.5插入图片、表格
首先在源文件的导言中加入下面代码,这样下面几种类型的图都可以插入
\ifCLASSINFOpdf
   \usepackage[pdftex]{graphicx}
   \graphicspath{{../pdf/}{../jpeg/}}     % declare the path(s) where your graphic files are
    \DeclareGraphicsExtensions{.pdf,.jpeg,.png}
    \else
    \usepackage[dvips]{graphicx}
    \graphicspath{{../eps/}}
    \DeclareGraphicsExtensions{.eps}
\fi
\begin{figure}[htbp]
\centering %设置对齐格式
\includegraphics[width=0.4\textwidth]{1.png}
%此处width=0.25和命令\textwidth配合可实现原图按比例缩放的功能
%此处代表原图的宽度为页面的大小的25%,高度按比例自动缩放。
%\includegraphics [width=0.75,height=2.5]{arch.pdf}
%指定图形大小和图形名称,一般将该图形放在latex文件同一路径下就不需要指明路径
\label{fig1}
%设置图形引用名称,fig1
\caption{Control block diagram.}
%设置图形标题
\end{figure}
%插入一张图片
\begin{figure}[tt]
\centering
\subfigure[]
{
\includegraphics[width=0.48\textwidth]{2a.png}
\label{fig2a}
}
\subfigure[]
{
\includegraphics[width=0.4\textwidth]{2b.png}
\label{fig2b}
}
\caption{(a) Celtics. (b) Lakers.}
\end{figure}
%插入两张子图片浮动体将图或表与其标题定义为整体,然后动态排版,以解决图、表卡在换⻚处造成的过⻓的垂直空⽩的问题。但有时它也会打乱你的排版意图,因此使⽤与否需要根据情况决定
在\begin{figure}后的[]中htbp分别为
! 表示忽略内部参数(否定LATEX内置的审美规则,强制要求位置)
h,here当前位置。 将图形放置在 正文文本中给出该图形环境的地方。如果本页所剩的页面不够, 这一参数将不起作用。
t,top顶部。 将图形放置在页面的顶部。
b,bottom底部。将图形放置在页面的底部。
p,page-of-its-own浮动页。 将图形放置在一只允许有浮动对象的页面上。
如果在图形环境中没有给出上述任一参数,则缺省为[tbp]。
给出参数的顺序不会影响到最后的结果。因为在考虑这些参数时LATEX总是尝试以h-t-b-p的顺序来确定图形的位置。所以[hb]和[bh]都使LATEX以h-b的顺序来排版。
只给出单个的参数项极易引发问题。 如果该图形不适合所指定的位置,它就会被搁置并阻碍对后面的图形的处理。一旦这些阻塞的图形数目超过了 18 幅这一LATEX 所能容许的最大值,就会产生 ``Too Many Unprocessed Floats'' 的错误。
接下来只是个人实践得到的一些心得,不敢保证完全适用于所有情况
当参数为[tt]时,只在上方显示图片, 不限于此处(指定的位置) %挺好用
当参数为[!ht]时,在此处的上方显示图片 %效果并不是很好
- 当插入跨栏的图片时
\begin{figure*}[htbp]
\centering
\includegraphics[width=0.8\linewidth]{1} % 1\linewidth
\caption{The overview of delivery system.}
\label{fig2}
\end{figure*}- 当插入跨栏的表格时用table*
值得注意的是跨栏的图片和表格会被挤到你代码处所在页的下一页去,ht就在下一页顶部,hb就在下一页底部
- 当需要跨栏公式置于底部时
将公式嵌套入图片类型的浮动体figure*来表示,将代码放入上页来使公式在其本应所处页码底部显示
但是这样会造成公式的序号混乱,此时就需要人为改变技术器的数值,让其显示正确的数值。
举个例子:我自己的文章中需要将(38)和(42)这两个长公式跨栏显示在当页底部
将这两个公式拿到上一页的公式(29)后,此时如果不改变计数器的值,直接编译后显示的会是(30)和(31)是长公式跨栏
故在\begin{figure*}之前,改变计数器的值
\newcounter{TempEqCnt1}%创建临时公式计数器1
\setcounter{TempEqCnt1}{\value{equation}}%把当前公式序号值赋给临时公式计数器1
\setcounter{equation}{37}%因为长公式序号为38,所以赋给equation 38-1=37
在(38)\end{figure*}之后再改变计数器的值
\setcounter{equation}{41}%因为接下来的长公式序号是42 所以此处给equation 42-1=41
在(42)\end{figure*}之后再恢复计数器的值
\setcounter{equation}{\value{TempEqCnt1}}%把储存的临时公式计数器1的值还给equation
在公式(39)之前,改变计数器的值
\setcounter{equation}{38}%公式38之前已经写过了
在公式(42)之前,改变计数器的值
\setcounter{equation}{42}%因为公式42已经在前面写过了
就大功告成了!
(其实前面不需要再创建临时变量的,可以全程使用\setcounter{equation}{number}这个命令来操作计数器的值就好了。
由于我比较懒,而且觉得万一之后用的到留着比较好,所以就没有改。大家可以自行尝试。)
代码如下:
%\begin{equation}
%\label{eq29}
%\end{equation}

\newcounter{TempEqCnt1}%创建临时公式计数器1
\setcounter{TempEqCnt1}{\value{equation}}%把当前公式序号值赋给临时公式计数器1
\setcounter{equation}{37}%因为长公式序号为38,所以赋给equation 38-1=37
\begin{figure*}[hb]
\hrulefill%长横线
\begin{equation}
%Best Wishes to you!
\label{eq38}
\end{equation}
\end{figure*}
\setcounter{equation}{41}%因为接下来的长公式序号是42 所以此处给equation 42-1=41
\begin{figure*}
\begin{equation}
%Best Wishes to you!
\label{eq42}
\end{equation}%......长公式页底显示........
\end{figure*}
\setcounter{equation}{\value{TempEqCnt1}}%把储存的临时公式计数器1的值还给equation

%\begin{equation}
%\label{eq30}
%\end{equation}

\setcounter{equation}{38}%公式38之前已经写过了
%\begin{equation}
%\label{eq39}
%\end{equation}

\setcounter{equation}{42}%因为公式42已经在前面写过了
%\begin{equation}
%\label{eq43}
%\end{equation}
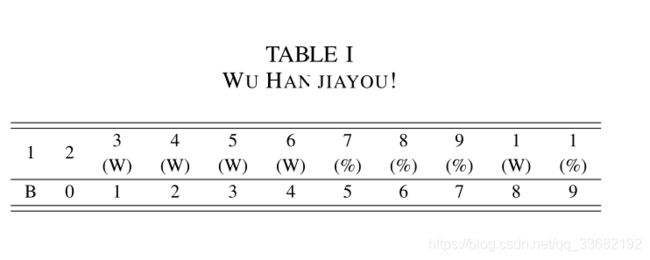
- 当插入表格时
\newcommand{\tabincell}[2]{\begin{tabular}{@{}#1@{}}#2\end{tabular}}%表格自动换行
\begin{table*}[ht]
\footnotesize %设置字体为小字体
\renewcommand\arraystretch{1.2} %设置表格中每行的宽度为标准的1.2倍
\caption{Wu Han jiayou!}
\centering
\label{TABLE V}
\scalebox{0.8}{%让表格缩小为原比例的0.8倍 输入2即放大为两倍
\begin{tabular}{ccccccccccc}%{}中同样可以输入l居左对齐,r居右对齐 如llllcccclll
\hline\hline
1 & 2 & \tabincell{c}{3\\(W)} & \tabincell{c}{4\\(W)} & \tabincell{c}{5\\(W)}
& \tabincell{c}{6\\(W)} & \tabincell{c}{7\\(\%)} & \tabincell{c}{8\\(\%)}
& \tabincell{c}{9\\(\%)} & \tabincell{c}{1\\(W)} & \tabincell{c}{1\\(\%)} \\ [1ex]
\hline
B & 0 & 1 & 2 & 3 & 4 & 5 & 6 & 7 & 8 & 9 \\
\hline\hline
\end{tabular}
}
\end{table*}
3.参考文献
使用bib文件
\bibliographystyle{IEEEtran}%
\bibliography{GO}%这里是自己命名的.bib文件的名字
%如果有前文中未曾引用过的文献,使用\nocite{}显示
\nocite{31}
下图为bib文件中,将鼠标移动至\bibliography词条中间,双击左键即可打开。
@ARTICLE{1,%前面引用这篇文章的方法是\cite{1}
author={C. {Liu} and C. {Jiang} and J. {Song} and K. T. {Chau}},
journal={IEEE Transactions on Industrial Electronics},
title={An Effective Sandwiched Wireless Power Transfer System for Charging Implantable Cardiac Pacemaker},
year={2019},
volume={66},
number={5},
pages={4108-4117},}

@ARTICLE{2,%前面引用这篇文章的方法是\cite{2}
author={M. R. {Basar} and M. Y. {Ahmad} and J. {Cho} and F. {Ibrahim}},
journal={IEEE Transactions on Industrial Electronics},
title={An Improved Wearable Resonant Wireless Power Transfer System for Biomedical Capsule Endoscope},
year={2018},
volume={65},
number={10},
pages={7772-7781},}

@ARTICLE{3,%前面引用这篇文章的方法是\cite{3}
author={M. R. {Basar} and M. Y. {Ahmad} and J. {Cho} and F. {Ibrahim}},
journal={IEEE Transactions on Industrial Electronics},
title={Stable and High-Efficiency Wireless Power Transfer System for Robotic Capsule Using a Modified Helmholtz Coil},
year={2017},
volume={64},
number={2},
pages={1113-1122},}
参考文献的引用名完全可以自定义为BOSTON什么的,不过注意和图片还有公式的引用名区别开,不要相同
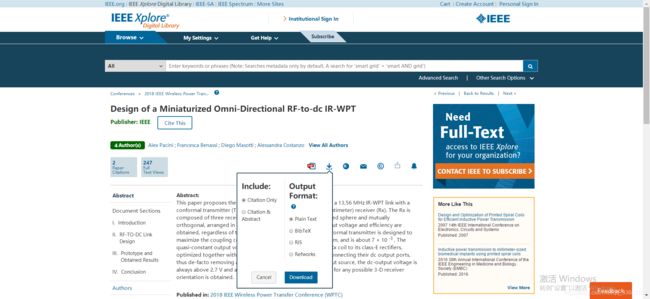
页顶的bibtex使用方法用的是百度学术或者谷歌学术,由于本人的参考文献都是IEEE中的,所以统一在IEEE数字图书馆上下载引文代码,这样格式相同。
代码中可以看到,参考文献2和3作者名字完全相同,编译出来默认会把3的作者名字变成—
除了转载的那个文章中所描述的方法。还可以更改IEEEtran中的代码
鼠标移动至bibliographystyle上,双击打开IEEEtran,然后找到里面的
% #0 turns off the "dashification" of repeated (i.e., identical to those
% of the previous entry) names. IEEE normally does this.
% #1 enables
FUNCTION {default.is.dash.repeated.names} { #0 }%这里默认为1,改成0关掉省略作者名
改成0让其显示作者名后,保存至.tex目录下再编译即可
暂时就学习了这么多,还希望各位大神批评指正!
