Opencv之多目标追踪(基于Dlib库)
Dlib介绍
Dlib是一个包含机器学习算法的C++开源工具包。Dlib可以帮助您创建很多复杂的机器学习方面的软件来帮助解决实际问题。目前Dlib已经被广泛的用在行业和学术领域,包括机器人,嵌入式设备,移动电话和大型高性能计算环境。
安装Dlib库
1、下载whl文件
使用于python3.7。
Dilb版本为Dlib-19.17。
点此获取Dlib-19.17的whl文件
提取码: rfh8
2、找到python3.7路径
将下载好的dlib-19.17.99-cp37-cp37m-win_amd64.whl文件放到指定环境的Scripts文件夹中。
![]()
3、安装下载的文件
pip install dlib-19.17.99-cp37-cp37m-win_amd64.whl
项目要求
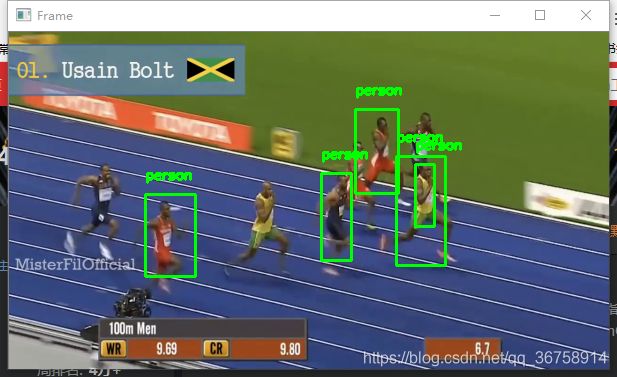
在一段视频中识别出“人”,并进行追踪。
代码实现
1、引入需要的库
#导入工具包
import numpy as np
import dlib
import cv2
2、给出深度学习分类的标签
# SSD标签
CLASSES = ["background", "aeroplane", "bicycle", "bird", "boat",
    "bottle", "bus", "car", "cat", "chair", "cow", "diningtable",
    "dog", "horse", "motorbike", "person", "pottedplant", "sheep",
    "sofa", "train", "tvmonitor"]
3、读取网络模型
print("[INFO] loading model...")
net = cv2.dnn.readNetFromCaffe('./mobilenet_ssd/MobileNetSSD_deploy.prototxt', './mobilenet_ssd/MobileNetSSD_deploy.caffemodel')
4、初始化
print("[INFO] starting video stream...")
vs = cv2.VideoCapture('race.mp4')
# 一会要追踪多个目标
trackers = []
labels = []
5、实现
- 先读取第一帧。
- 对此图像进行预处理。
- 用深度学习模型检测图像,得到检测结果(含有多个被检测到的物体信息)。
- 遍历被检测到的物体,如果检测结果表明此物体为人,则进行接下来的操作。
- 得到人在图中的位置。
- 使用dlib来进行目标追踪。
- 保存结果,将所有追踪器放到一个列表中(追踪器的数量表明图中人的数量)。
- 绘图,即将人用方框圈起来。
- 读取第二帧。
- 同样,进行预处理。
- 更新追踪器。
- 得到人的新的位置。
- 绘图。
- 重复操作,读取第三帧、第四帧……直到视频结束。
while True:
    # 读取一帧
    (grabbed, frame) = vs.read()

    # 是否是最后了
    if frame is None:
        break

    # 预处理操作
    (h, w) = frame.shape[:2]
    width=600
    r = width / float(w)
    dim = (width, int(h * r))
    frame = cv2.resize(frame, dim, interpolation=cv2.INTER_AREA)
    rgb = cv2.cvtColor(frame, cv2.COLOR_BGR2RGB)

    # 先检测 再追踪
    if len(trackers) == 0:
        # 获取blob数据
        (h, w) = frame.shape[:2]
        blob = cv2.dnn.blobFromImage(frame, 0.007843, (w, h), 127.5)

        # 得到检测结果
        net.setInput(blob)
        detections = net.forward()
        print(detections)


        # 遍历得到的检测结果
        for i in np.arange(0, detections.shape[2]):
            # 能检测到多个结果,只保留概率高的
            confidence = detections[0, 0, i, 2]
            print(confidence)

            # 过滤
            if confidence > 0.2:
                # extract the index of the class label from the
                # detections list
                idx = int(detections[0, 0, i, 1])
                label = CLASSES[idx]

                # 只保留人的
                if CLASSES[idx] != "person":
                    continue

                # 得到BBOX
                #print (detections[0, 0, i, 3:7])
                box = detections[0, 0, i, 3:7] * np.array([w, h, w, h])
                (startX, startY, endX, endY) = box.astype(np.int)

                # 使用dlib来进行目标追踪
                #http://dlib.net/python/index.html#dlib.correlation_tracker
                t = dlib.correlation_tracker()
                rect = dlib.rectangle(int(startX), int(startY), int(endX), int(endY))
                t.start_track(rgb, rect)

                # 保存结果
                labels.append(label)
                trackers.append(t)

                # 绘图
                cv2.rectangle(frame, (startX, startY), (endX, endY),
                    (0, 255, 0), 2)
                cv2.putText(frame, label, (startX, startY - 15),
                    cv2.FONT_HERSHEY_SIMPLEX, 0.45, (0, 255, 0), 2)

    # 如果已经有了框,就可以直接追踪了
    else:
        # 每一个追踪器都要进行更新
        for (t, l) in zip(trackers, labels):
            t.update(rgb)
            pos = t.get_position()

            # 得到位置
            startX = int(pos.left())
            startY = int(pos.top())
            endX = int(pos.right())
            endY = int(pos.bottom())

            # 画出来
            cv2.rectangle(frame, (startX, startY), (endX, endY),
                (0, 255, 0), 2)
            cv2.putText(frame, l, (startX, startY - 15),
                cv2.FONT_HERSHEY_SIMPLEX, 0.45, (0, 255, 0), 2)

    # 显示
    cv2.imshow("Frame", frame)
    key = cv2.waitKey(1) & 0xFF

    # 退出
    if key == 27:
        break
cv2.destroyAllWindows()
vs.release()
对其中的相关函数的介绍
1、blob = cv2.dnn.blobFromImage(image, scalefactor=1.0, size, mean, swapRB=True,crop=False,ddepth = CV_32F )
输入:
-
image:需要进行处理的图像。
-
scalefactor:执行完减均值后,需要缩放图像,默认是1。
-
size:输出图像的空间尺寸,如size=(200,300)表示高h=300,宽w=200。
-
mean:要减去的均值,可以是R,G,B均值三元组,或者是一个值,每个通道都减这值。如果执行减均值,通道顺序是R、G、B。 如果,输入图像通道顺序是B、G、R,那么请确保swapRB = True,交换通道。
-
swapRB:OpenCV认为图像通道顺序是B、G、R,而减均值时顺序是R、G、B,为了解决这个矛盾,设置swapRB=True即可。
-
crop:图像裁剪,默认为False.当值为True时,先按比例缩放,然后从中心裁剪成size尺寸。
-
ddepth:输出blob的深度,可选CV_32F or CV_8U。
返回值:
- 返回一个4通道的blob(blob可以简单理解为一个N维的数组,用于神经网络的输入)
在此案例中,均值均为127.5(255/2),所以减去均值后得到的所有像素值都位于-127.5到127.5之间,为了归一化,缩放比例应为1/127.5=0.007843。
2、detections = net.forward()
对图片中的所有物体进行检测,得到的结果中包含三个信息:
- 这是什么物体。
- 是这个物体的可能性。
- 这个物体相对于整张图片的位置。
其返回值是一个四维数组,形式为(1, 1, n, 7)。
- n表示在这张图片中共检测到了n个物体。
- 最后一维有7列:
- 其中第一列都是0,没有什么意义,
- 第二列表示检测到的物体类别,
- 第三列表示检测到是该物体的可能性,
- 第四到七列表示包含该物体的方框相对于整张图片的位置(不是在图中的实际位置),
- 包含该物体的方框在图中的实际位置:
- 左上角横坐标:第四列乘以整张图片的宽度,
- 左上角纵坐标:第五列乘以整张图片的高度,
- 右下角横坐标:第六列乘以整张图片的宽度,
- 右下角纵坐标:第七列乘以整张图片的高度。
使用多进程
另外,此项目可以使用多进程提高效率,其代码如下,有关多进程的相关知识,可以参考:Python | Python学习之多进程详解 。
from utils import FPS
import multiprocessing
import numpy as np
import dlib
import cv2
#perfmon

def start_tracker(box, label, rgb, inputQueue, outputQueue):
	t = dlib.correlation_tracker()
	rect = dlib.rectangle(int(box[0]), int(box[1]), int(box[2]), int(box[3]))
	t.start_track(rgb, rect)

	while True:
		# 获取下一帧
		rgb = inputQueue.get()

		# 非空就开始处理
		if rgb is not None:
			# 更新追踪器
			t.update(rgb)
			pos = t.get_position()

			startX = int(pos.left())
			startY = int(pos.top())
			endX = int(pos.right())
			endY = int(pos.bottom())

			# 把结果放到输出q
			outputQueue.put((label, (startX, startY, endX, endY)))

# 一会要放多个追踪器
inputQueues = []
outputQueues = []

CLASSES = ["background", "aeroplane", "bicycle", "bird", "boat",
	"bottle", "bus", "car", "cat", "chair", "cow", "diningtable",
	"dog", "horse", "motorbike", "person", "pottedplant", "sheep",
	"sofa", "train", "tvmonitor"]

print("[INFO] loading model...")
net = cv2.dnn.readNetFromCaffe('./mobilenet_ssd/MobileNetSSD_deploy.prototxt', './mobilenet_ssd/MobileNetSSD_deploy.caffemodel')

print("[INFO] starting video stream...")
vs = cv2.VideoCapture('race.mp4')


if __name__ == '__main__':  # 使用多进程时必须有此语句

	while True:
		(grabbed, frame) = vs.read()

		if frame is None:
			break

		(h, w) = frame.shape[:2]
		width=600
		r = width / float(w)
		dim = (width, int(h * r))
		frame = cv2.resize(frame, dim, interpolation=cv2.INTER_AREA)
		rgb = cv2.cvtColor(frame, cv2.COLOR_BGR2RGB)

		#首先检测位置
		if len(inputQueues) == 0:
			(h, w) = frame.shape[:2]
			blob = cv2.dnn.blobFromImage(frame, 0.007843, (w, h), 127.5)
			net.setInput(blob)
			detections = net.forward()
			for i in np.arange(0, detections.shape[2]):
				confidence = detections[0, 0, i, 2]
				if confidence > 0.2:
					idx = int(detections[0, 0, i, 1])
					label = CLASSES[idx]
					if CLASSES[idx] != "person":
						continue
					box = detections[0, 0, i, 3:7] * np.array([w, h, w, h])
					(startX, startY, endX, endY) = box.astype("int")
					bb = (startX, startY, endX, endY)

					# 创建输入q和输出q
					iq = multiprocessing.Queue()
					oq = multiprocessing.Queue()
					inputQueues.append(iq)
					outputQueues.append(oq)

					# 多核
					p = multiprocessing.Process(
						target=start_tracker,
						args=(bb, label, rgb, iq, oq))
					p.daemon = True
					p.start()

					cv2.rectangle(frame, (startX, startY), (endX, endY),
						(0, 255, 0), 2)
					cv2.putText(frame, label, (startX, startY - 15),
						cv2.FONT_HERSHEY_SIMPLEX, 0.45, (0, 255, 0), 2)

		else:
			# 多个追踪器处理的都是相同输入
			for iq in inputQueues:
				iq.put(rgb)

			for oq in outputQueues:
				# 得到更新结果
				(label, (startX, startY, endX, endY)) = oq.get()

				# 绘图
				cv2.rectangle(frame, (startX, startY), (endX, endY),
					(0, 255, 0), 2)
				cv2.putText(frame, label, (startX, startY - 15),
					cv2.FONT_HERSHEY_SIMPLEX, 0.45, (0, 255, 0), 2)

		cv2.imshow("Frame", frame)
		key = cv2.waitKey(1) & 0xFF

		if key == 27:
			break

	cv2.destroyAllWindows()
	vs.release()
