NSTimer
NSTimer
**
创建NSTimer
**
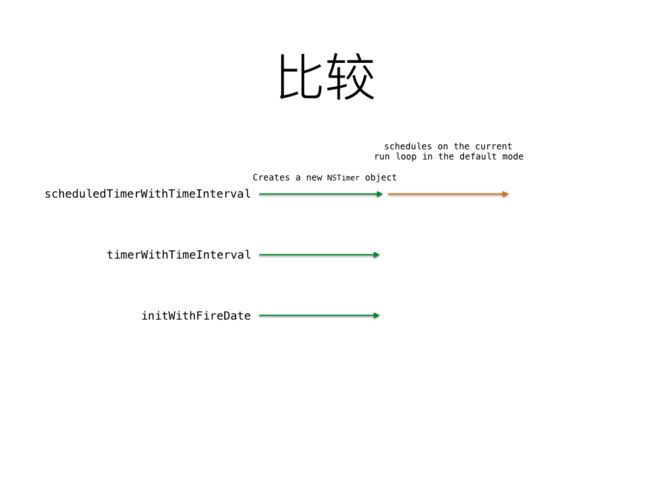
创建NSTimer的常用方法是:
+ (NSTimer *)scheduledTimerWithTimeInterval:(NSTimeInterval)ti target:(id)target selector:(SEL)aSelector userInfo:(id)userInfo repeats:(BOOL)repeats创建NSTimer的不常用方法是
+ (NSTimer *)timerWithTimeInterval:(NSTimeInterval)ti target:(id)target selector:(SEL)aSelector userInfo:(id)userInfo repeats:(BOOL)repeats
和
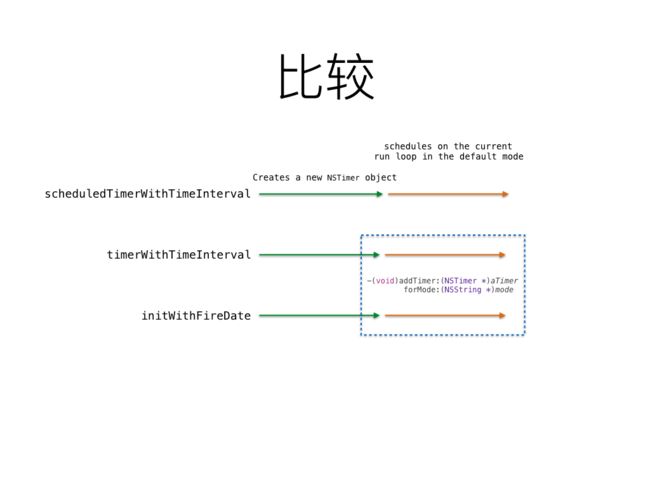
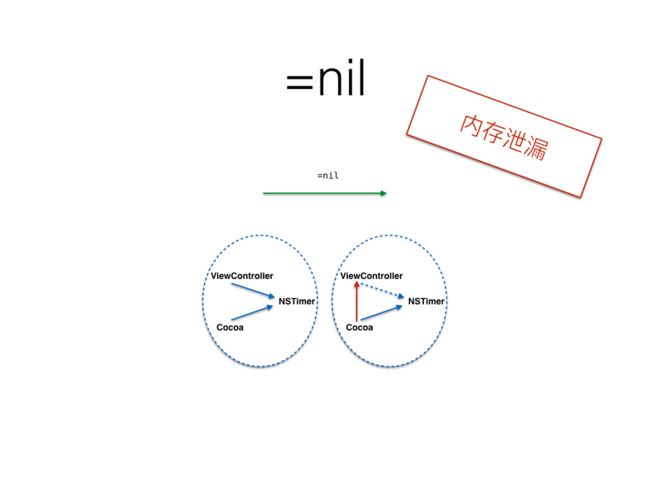
- (instancetype)initWithFireDate:(NSDate *)date interval:(NSTimeInterval)ti target:(id)target selector:(SEL)aSelector userInfo:(id)userInfo repeats:(BOOL)repeatsscheduledTimerWithTimeInterval相比它的小伙伴们不仅仅是创建了NSTimer对象, 还把该对象加入到了当前的runloop中,runloop的模式为默认模式(NSDefaultRunLoopMode)!
NSTimer只有被加入到runloop, 才会生效, 即NSTimer才会被真正执行
所以说, 如果你想使用timerWithTimeInterval或initWithFireDate的话, 需要使用NSRunloop的以下方法将NSTimer加入到runloop中
- (void)addTimer:(NSTimer *)aTimer forMode:(NSString *)modeNSTimer *timer=[NSTimer scheduledTimerWithTimeInterval:1.0 target:self selector:@selector(changeTimeAtTimedisplay) userInfo:nil repeats:YES];和
NSTimer  *timer=[NSTimer timerWithTimeInterval:10 target:self selector:@selector(changeTimeAtTimedisplay) userInfo:nil repeats:YES];

NSRunLoop *runloop=[NSRunLoop  currentRunLoop];

[runloop addTimer:timer  forMode:NSDefaultRunLoopMode];
是同效的。(initWithFireDate 方法创建的timer同第二种的使用方式一样)
关于 - (void)fire; 方法
其实他并不是真的启动一个定时器,从之前的初始化方法中我们也可以看到,建立的时候,在适当的时间,定时器就会自动启动,也即NSTimer是不准时的。那么,fire方法的作用是什么呢,官方解释是:
You can use this method to fire a repeating timer without interrupting its regular firing schedule. If the timer is non-repeating, it is automatically invalidated after firing, even if its scheduled fire date has not arrived.
大概意思就是fire并不是启动一个定时器,只是提前触发而已。我们来用一个按钮操作fire方法试验一下
在一个Controller中创建一个NSTimer属性=>

    //创建一个定时器,

self.timer= [NSTimer  scheduledTimerWithTimeInterval:10.0  target:self  selector:@selector(timerAction)  userInfo:nil  repeats:YES];

//当然这个定时器会自动启动,只不多过了十秒之后,才触发
timerAction事件里面:
- (void)timerAction {

static  int  a =0;

NSLog(@"定时开始了---- %d",a++);

}
然后单击一个按钮的时候:
- (IBAction)startTime:(id)sender {

//只是简单地调用一下这个方法,看到底功能是什么

[_timer  fire];

NSLog(@"定时fire了");

}
打印结果是:
2017-09-27 12:06:15.020 runloop–02[16073:598629]定时开始了—- 0
2017-09-27 12:06:15.020 runloop–02[16073:598629]定时fire了
2017-09-27 12:06:16.543 runloop–02[16073:598629]定时开始了—- 1
2017-09-27 12:06:26.542 runloop–02[16073:598629]定时开始了—- 2
2017-09-27 12:06:36.543 runloop–02[16073:598629]定时开始了—- 3
2017-09-27 12:06:46.542 runloop–02[16073:598629]定时开始了—- 4
结果解释:
定时器开始执行一次方法(即10秒之后)timerAction 之后,第一次执行a为0;下一次10秒后,a将为1,但是当我们点击按钮,执行了一次fire之后,定时器提前执行了一次timerAction方法,立即将a加1了;而后再一个10秒之后,定时器又按照设定将a加了1,变成2。。。。。
即 fire 方法只是提前出发定时器的执行,但不影响定时器的设定时间。
当我们,改为NO时,即不让它循环触发时,我们此时再单击开始按钮。会猛然发现,a+1了,但当我们再点击开始按钮时,会发现a不再加1。原因是:我们的定时器,被设置成只触发一次,再fire的时候,触发一次,该定时器,就被自动销毁了,以后再fire也不会触发了。
销毁NSTimer
invalidate 方法
Stops the receiver from ever firing again and requests its removal from its run loop
This method is the only way to remove a timer from an NSRunLoop object
将timer从它的runloop钟移除,所以:
如果想要销毁NSTimer, 那么确定, 一定以及肯定要调用invalidate方法。
repeat为YES的timer需要显示得进行invalidate销毁。
invalidate与=nil
不能简单得把_timer置为nil来销毁timer,原因:
- 首先, 是创建NSTimer, 加入到runloop后, 除了ViewController之外iOS系统也会强引用NSTimer对象
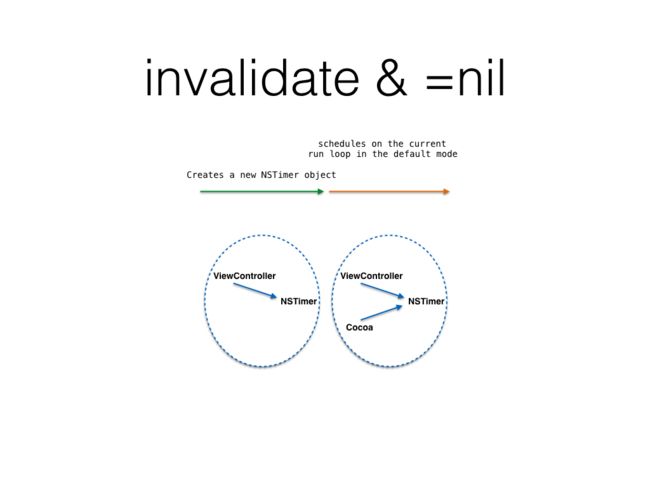
- 当调用invalidate方法时, 移除runloop后, iOS系统会解除对NSTimer对象的强引用, 当ViewController销毁时, ViewController和NSTimer就都可以释放了
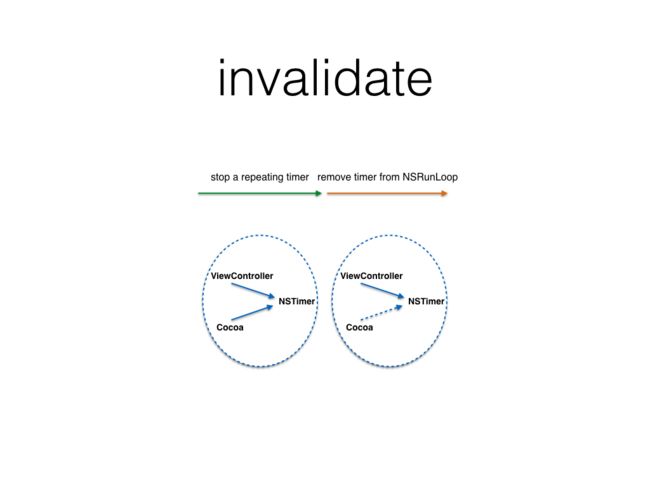
- 当将NSTimer对象置nil时, 虽然解除了ViewController对NSTimer的强引用, 但是iOS系统仍然对NSTimer和ViewController存在着强引用关系
这里所说的iOS系统对ViewController的强引用, 不是指为了实现View显示的强引用, 而是指iOS为了实现NSTimer而对ViewController进行的额外强引用
NSLog(@"Retain count is %ld", CFGetRetainCount((__bridge CFTypeRef)self));

_timer = [NSTimer scheduledTimerWithTimeInterval:TimerInterval

target:self  selector:@selector(timerSelector:)  userInfo:nil  repeats:TimerRepeats];

NSLog(@"Retain count is %ld", CFGetRetainCount((__bridge CFTypeRef)self));

[_timer invalidate];

NSLog(@"Retain count is %ld", CFGetRetainCount((__bridge CFTypeRef)self));
各位请注意, 创建NSTimer和销毁NSTimer后, ViewController(就是这里的self)引用计数的变化
Retain count is 7
Retain count is 8
Retain count is 7
综上所述, 销毁NSTimer的正确姿势应该是
[_timer invalidate]; // 真正销毁NSTimer对象的地方
如果将上述销毁NSTimer的代码放到ViewController的dealloc方法里, 你会发现dealloc还是永远不会走的 (此外还有另一种说法:
其实就是timer对viewController进行了强调应用,原因是因为,如果要让timer运行的时候执行viewController下面的timerSelector:,timer需要知道target,并且保存这个target,以便于在以后执行这个代码 [target performSelector:], 这里的target就是指viewController。所以,timer和viewController是相互强调引用的。 但是这样看起来,就形成了retain cycle。为了解除retain cycle,我觉得,在-(void)invalidate;这个方法下,timer之前保存的target被设置为nil,强制断开了引用环。这点和设置timer = nil是差不多的。 但是invalidate还做了另外一个动作,就是解除了runloop对timer的强调引用,使得timer成功停止。) 所以 timer只要没有销毁,就一直保持着对target也就是vc的强引用,dealloc方法就不会走。
所以我将上述代码放到ViewController的其他生命周期方法里, 例如ViewWillDisappear中
综上所述, 销毁NSTimer的正确姿势应该是
- (void)viewWillDisappear:(BOOL)animated {

[super viewWillDisappear:animated];

[_timer invalidate];

_timer = nil;

}
参考链接:
NSTimer使用
iOS开发 之 不要告诉我你会用NSTimer!
