增强现实入门实战,使用ArUco标记实现增强现实
点击上方“AI算法修炼营”,选择加星标或“置顶”
标题以下,全是干货
![]()
在本文中,我们将介绍ArUco标记以及如何使用OpenCV将其用于简单的增强现实任务,具体形式如下图的视频所示。
一、什么是ArUco标记?
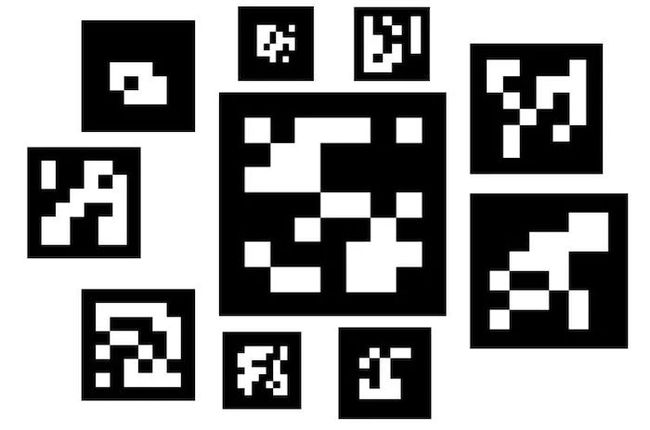
ArUco标记最初由S.Garrido-Jurado等人在2014年发表的论文Automatic generation and detection of highly reliable fiducial markers under occlusion中提出。ArUco的全称是Augmented Reality University of Cordoba,下面给出ArUco标记的一些示例。
ArUco标记作为基准标记放置在要成像的对象或场景上。它是一个背景为黑色的正方形,正方形内部的白色图案用来表示标记的唯一性,并且存储一些信息。黑色边界的目的是为了提高ArUco标记检测的准确性和性能。ArUco标记的尺寸可以任意的更改,为了成功检测可根据对象大小和场景选择合适的尺寸。在实际使用中,如果标记的尺寸太小,可能无法检测到它,这时可以选择更换较大尺寸的标记,或者将相机离标记更近一些。
在本文中,我们将ArUco标记放在图像相框的四个角上。当检测到这些标记时,便可以得到图像在相框中的位置,之后用其他图像替换原图像。并且当我们移动相机时,新替换的图片仍然具有正确的透视效果。
此外,在机器人应用中,可以将这些标记沿着仓库机器人的路径放置。当安装在机器人上的摄像头检测到这些标记时,由于每个标记都有唯一的ID,并且且标记在仓库中的放置位置已知,因此就可以知道机器人在仓库中的精确位置。
二、在OpenCV中生成ArUco标记
使用OpenCV可轻松生成这些标记。OpenCV中的Aruco模块总共有25个预定义的标记词典。每个词典中所有的Aruco标记均包含相同数量的块或位(例如4×4、5×5、6×6或7×7),且每个词典中Aruco标记的数量固定(例如50、100、250或1000)。接下来我们将展示如何在C++和Python中生成和检测各种aruco标记。
调用getPredefinedDictionary函数加载包含250个标记的字典,其中每个标记都是6×6位二进制模式。具体代码在下面给出。
C++代码
// Import the aruco module in OpenCV
#include


Mat markerImage;
// Load the predefined dictionary
Ptrdictionary=aruco::getPredefinedDictionary(cv::aruco::DICT_6X6_250);
// Generate the marker
aruco::drawMarker(dictionary, 33, 200, markerImage, 1);
Python代码
import cv2 as cv
import numpy as np


# Load the predefined dictionary
dictionary = cv.aruco.Dictionary_get(cv.aruco.DICT_6X6_250)


# Generate the marker
markerImage = np.zeros((200, 200), dtype=np.uint8)
markerImage = cv.aruco.drawMarker(dictionary, 33, 200, markerImage, 1);


cv.imwrite("marker33.png", markerImage);
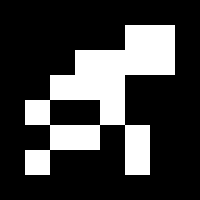
代码中drawMarker函数可以从由250个aruco标记组成的集合中选择给定id(第二个参数– 33)的标记,这250个标记的id由0~249表示。drawMarker函数的第三个参数决定生成的标记的大小,在上面的示例中,它将生成200×200像素的图像。第四个参数表示将要存储aruco标记的对象(上面的markerImage)。最后,第五个参数是边界宽度参数,它决定应将多少位(块)作为边界添加到生成的二进制图案中。
在上面的代码中,将在6×6生成的图形周围添加1位的边界,以在200×200像素的图像中生成7×7位的图像。上述代码生成的aruco标记如下图所示。
在实际应用时,我们可能需要生成多个标记。之后我们只需要将这些标记打印出来就可以直接使用了。
三、检测Aruco标记
将aruco标记放置在环境中后,我们需要检测它们并将其用于进一步处理。接下来我们介绍如何通过代码检测标记。
C++代码
// Load the dictionary that was used to generate the markers.
Ptr dictionary = getPredefinedDictionary(DICT_6X6_250);


// Initialize the detector parameters using default values
Ptr parameters = DetectorParameters::create();


// Declare the vectors that would contain the detected marker corners and the rejected marker candidates
vector> markerCorners, rejectedCandidates;


// The ids of the detected markers are stored in a vector
vector markerIds;


// Detect the markers in the image
detectMarkers(frame, dictionary, markerCorners, markerIds, parameters, rejectedCandidates);
Python代码
#Load the dictionary that was used to generate the markers.
dictionary = cv.aruco.Dictionary_get(cv.aruco.DICT_6X6_250)


# Initialize the detector parameters using default values
parameters =  cv.aruco.DetectorParameters_create()


# Detect the markers in the image
markerCorners, markerIds, rejectedCandidates = cv.aruco.detectMarkers(frame, dictionary, parameters=parameters)
对于每次成功检测到标记,将按从左上,右上,右下和左下的顺序检测标记的四个角点。在C ++中,将这4个检测到的角点存储为点矢量,并将图像中的多个标记一起存储在点矢量容器中。在Python中,它们存储为Numpy 数组。
detectMarkers函数用于检测和确定标记角点的位置。第一个参数是带有标记的场景图像。第二个参数是用于生成标记的字典。成功检测到的标记将存储在markerCorners中,其ID存储在markerIds中。先前初始化的DetectorParameters对象作为传递参数。
四、增强现实应用
ArUco标记主要是为解决包括增强现实在内的各种应用场景下的相机姿态估计问题。OpenCV在其文档中详细描述了姿势估计过程。
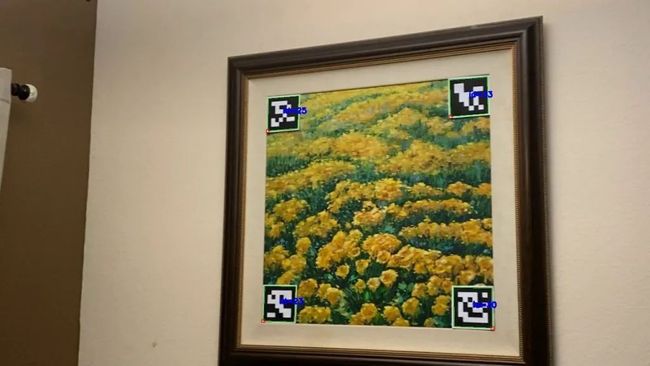
本文中,我们将把ArUco标记用于增强现实应用程序,该程序可以将任何新场景叠加到现有图像或视频上。我们在家中选择一个带有相框的场景,并希望用新的图片替换原有图片,并查看新图片在墙上的样子。然后,我们尝试在影片中插入视频。为此,我们将打印ArUco标记,并粘贴到图像区域的四个角落,如下图所示,然后采集视频,并按顺序分别处理视频的每一帧。
对于每帧图像,首先检测标记。上图中用绿色线条绘制了检测到的ArUco标记。该标记的第一个角点有一个红色小圆圈,可以通过顺时针移动标记来访问第二,第三和第四点。
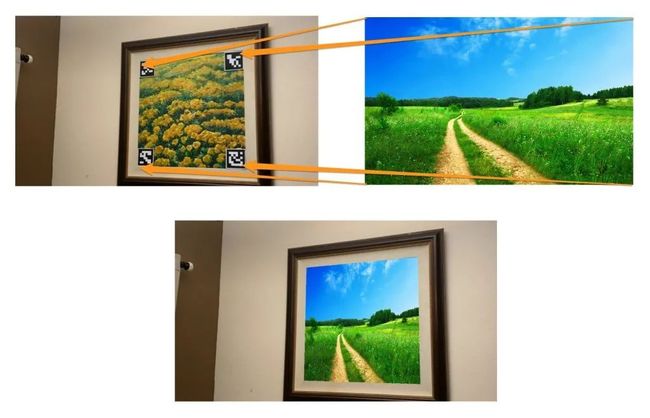
之后我们应用单应性变换将新的图像放置到视频中的相框位置。其过程与结果如下所示。
图像的替换过程我们可以通过如下代码实现:
C++代码
// Compute homography from source and destination points
Mat h = cv::findHomography(pts_src, pts_dst);


// Warped image
Mat warpedImage;


// Warp source image to destination based on homography
warpPerspective(im_src, warpedImage, h, frame.size(), INTER_CUBIC);


// Prepare a mask representing region to copy from the warped image into the original frame.
Mat mask = Mat::zeros(frame.rows, frame.cols, CV_8UC1);
fillConvexPoly(mask, pts_dst, Scalar(255, 255, 255));


// Erode the mask to not copy the boundary effects from the warping
Mat element = getStructuringElement( MORPH_RECT, Size(3,3) );
erode(mask, mask, element);


// Copy the masked warped image into the original frame in the mask region.
Mat imOut = frame.clone();
warpedImage.copyTo(imOut, mask);
Python代码
# Calculate Homography
h, status = cv.findHomography(pts_src, pts_dst)


# Warp source image to destination based on homography
warped_image = cv.warpPerspective(im_src, h, (frame.shape[1],frame.shape[0]))


# Prepare a mask representing region to copy from the warped image into the original frame.
mask = np.zeros([frame.shape[0], frame.shape[1]], dtype=np.uint8);
cv.fillConvexPoly(mask, np.int32([pts_dst_m]), (255, 255, 255), cv.LINE_AA);


# Erode the mask to not copy the boundary effects from the warping
element = cv.getStructuringElement(cv.MORPH_RECT, (3,3));
mask = cv.erode(mask, element, iterations=3);


# Copy the mask into 3 channels.
warped_image = warped_image.astype(float)
mask3 = np.zeros_like(warped_image)
for i in range(0, 3):
   mask3[:,:,i] = mask/255


# Copy the masked warped image into the original frame in the mask region.
warped_image_masked = cv.multiply(warped_image, mask3)
frame_masked = cv.multiply(frame.astype(float), 1-mask3)
im_out = cv.add(warped_image_masked, frame_masked)
在程序中,将新的场景图像角点作为源点(pts_src),并使用采集图像中图片框内的相应图片角点作为目标点(dst_src)。使用OpenCV中的findHomography函数计算源点和目标点之间的单应性函数h。然后将单应矩阵用于使新图像变形以适合目标框架。新图像被复制到目标帧中。对于视频素材,将此过程在每个帧上重复进行即可。
参考文献
OpenCV Documentation on ArUco markers
Automatic generation and detection of highly reliable fiducial markers under occlusion
Aruco project at Sourceforge
原文地址:https://www.learnopencv.com/augmented-reality-using-aruco-markers-in-opencv-c-python/
作者:Sunita Nayak
目标检测系列秘籍一:模型加速之轻量化网络秘籍二:非极大值抑制及回归损失优化秘籍三:多尺度检测秘籍四:数据增强秘籍五:解决样本不均衡问题秘籍六:Anchor-Free视觉注意力机制系列Non-local模块与Self-attention之间的关系与区别?视觉注意力机制用于分类网络:SENet、CBAM、SKNetNon-local模块与SENet、CBAM的融合:GCNet、DANetNon-local模块如何改进?来看CCNet、ANN
语义分割系列一篇看完就懂的语义分割综述最新实例分割综述:从Mask RCNN 到 BlendMask超强视频语义分割算法!基于语义流快速而准确的场景解析CVPR2020 | HANet:通过高度驱动的注意力网络改善城市场景语义分割

基础积累系列卷积神经网络中的感受野怎么算?
图片中的绝对位置信息,CNN能搞定吗?理解计算机视觉中的损失函数深度学习相关的面试考点总结


自动驾驶学习笔记系列 Apollo Udacity自动驾驶课程笔记——高精度地图、厘米级定位 Apollo Udacity自动驾驶课程笔记——感知、预测 Apollo Udacity自动驾驶课程笔记——规划、控制自动驾驶系统中Lidar和Camera怎么融合?

竞赛与工程项目分享系列如何让笨重的深度学习模型在移动设备上跑起来基于Pytorch的YOLO目标检测项目工程大合集目标检测应用竞赛:铝型材表面瑕疵检测基于Mask R-CNN的道路物体检测与分割
SLAM系列视觉SLAM前端:视觉里程计和回环检测视觉SLAM后端:后端优化和建图模块视觉SLAM中特征点法开源算法:PTAM、ORB-SLAM视觉SLAM中直接法开源算法:LSD-SLAM、DSO视觉SLAM中特征点法和直接法的结合:SVO
2020年最新的iPad Pro上的激光雷达是什么?来聊聊激光SLAM


