Linux内核安装按键驱动步骤及测试
硬件平台 : 搭载ARM9芯片的tiny4412开发板
宿主机系统 : Fedora 13
编译内核版本: Linux 3.5
gcc版本 : arm-linux-gcc 4.5.1
步骤:
1、在Linux-3.5/drivers/char/目录下复制tiny4412_buttons.c,命名为mybuttons.c。
2、修改mybuttons.c:
		(1)#define   DEVICE_NAME   "mybuttons"  //设备名称,应用程序中用:open("/dev/mybuttons", 0);
		(2)注释掉后3个按键,测试用。
			static struct button_desc buttons[] = {
			        { EXYNOS4_GPX3(2), 0, "KEY0" }
			//      { EXYNOS4_GPX3(3), 1, "KEY1" },
			//      { EXYNOS4_GPX3(4), 2, "KEY2" },
			//      { EXYNOS4_GPX3(5), 3, "KEY3" },
};可以看到该选项,见下图红色箭头所指。
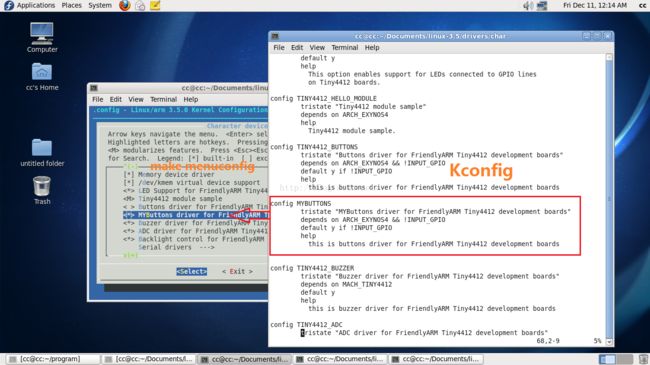
4、在menuconfig中选中“MYButtons driver ...”选项。
5、修改Makefile,告诉编译器要编译mybuttons.c。如下图

6、进入Linux-3.5目录,执行make命令,编译内核。
注意:make使用的arm-linux-gcc,如果没有配置环境变量或者没有该名称的编译器,在使用make命令的时候需要加
编译选项,指定gcc。
7、将Linux-3.5/arch/arm/boot目录下的zImage拷贝到sd卡上,然后插到tiny4412开发板上的sd卡槽上,将S2开关切换至
SD卡启动,上电开机,然后开始安装系统程序。
8、测试新加模块是否安装成功。
使用应用程序btn.c,该程序的功能是:当按下按键0时,灯0闪烁一下,其他3个按键和灯对应闪烁。
如果只有按键0按下时灯0闪烁,则说明mybuttons驱动加入成功。
btn.c
#include
#include
#include
#include
#include
#include
#include
#include
#include
#include

int main(int argc, char **argv)
{
	int buttons_fd;
	char buttons[6] = {'0', '0', '0', '0', '0', '0'};
	buttons_fd = open("/dev/mybuttons", 0);
	if (buttons_fd < 0)
	{
		perror("open device buttons");
		exit(1);
	}
	for (;;)
	{
		char current_buttons[6];
		int count_of_changed_key;
		int i;
		if (read(buttons_fd, current_buttons, sizeof current_buttons) != sizeof current_buttons)
		{
			perror("read buttons:");
			exit(1);
		}
		for (i = 0, count_of_changed_key = 0; i < sizeof buttons / sizeof buttons[0]; i++)
		{
			if (buttons[i] != current_buttons[i])
			{
			buttons[i] = current_buttons[i];
			printf("%skey %d is %s", count_of_changed_key? ", ": "", i+1, buttons[i]== '0' ? "up" : "down");
			count_of_changed_key++;

			led(i%4,buttons[i]-'0');
			}
		}
		if (count_of_changed_key)
		{
		printf("\n");
		}
	}
	close(buttons_fd);
	return 0;
}
/**
*点亮led
*/
int led( int led_no,int on)
{
	int fd;

	/* 检查 led 控制的两个参数,如果没有参数输入则退出。 */
	if (on < 0 || on > 1 || led_no < 0 || led_no > 3)
	{
		fprintf(stderr, "Usage: leds led_no 0|1\n");
		exit(1);
	}
	/*打开/dev/leds 设备文件*/
	fd = open("/dev/leds0", 0);
	printf("====fd=%d\n",fd);
	if (fd < 0)
	{
		fd = open("/dev/leds", 0);
		printf("fd=%d\n",fd);
	}
	if (fd < 0)
	{
		printf("error: open device leds!\n");
		perror("open device leds");
		exit(1);
	}
	printf("*******LIGHT********");
/*通过系统调用 ioctl 和输入的参数控制 led*/
	ioctl(fd, on, led_no);
	/*关闭设备句柄*/
	close(fd);
}