OpenCV 高斯模糊
高斯滤波器能够有效的抑制噪声,平滑图像。高斯滤波器相比于均值滤波器对图像个模糊程度较小。
高斯公式
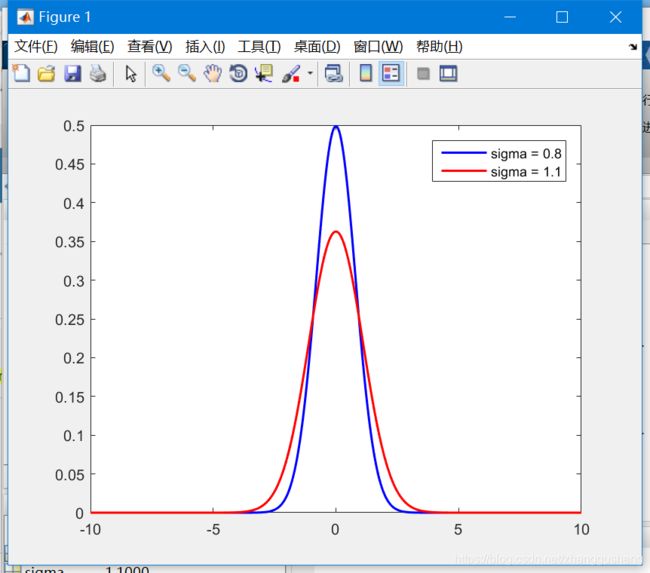
matlab代码
clear;
a=0;sigma=0.8;
x=-10:0.0001:10;
figure(1)
y=(1/((sqrt(2*pi))*sigma))*exp(-((x-a).^2)/(2*sigma.^2));
plot(x,y,'b','LineWidth',1.5);
hold on;
sigma=1.1
y=(1/((sqrt(2*pi))*sigma))*exp(-((x-a).^2)/(2*sigma.^2));
plot(x,y,'r','LineWidth',1.5);
legend('sigma = 0.8','sigma = 1.1')
从函数的结果来看,sigma值越大,曲线越“胖”;sigma值越小,曲线越“瘦”;对图像过滤来说,sigma值越大,滤波器中心点的权重也就越大,图像也就没有那么模糊。看一下代码原型和实例
OpenCV高斯函数原型即部分源码解析
函数原型为
//_src _IN_ 输入的源影像
//_dst _OUT_ 输出的目标影像
//kSize 核大小 如果大小为负数的话,那么根据输入的sigma进行计算
//ksize 大小可以为1,3,5,7,最大值为7
//计算的公式为 sigma = 0.3\*((ksize - 1)\*0.5 - 1) + 0.8
//sigmal1 X方向上的sigma值
//sigmal2 Y方向上的sigma值
//如果sigmal值为负数的话,那么使用默认的滤波过滤器
void cv::GaussianBlur( InputArray _src, OutputArray _dst, Size ksize,
                   double sigma1, double sigma2,
                   int borderType )
部分函数解析
void cv::GaussianBlur( InputArray _src, OutputArray _dst, Size ksize,
                   double sigma1, double sigma2,
                   int borderType )
{
    int type = _src.type();//获取通道类型 CV_8UC3 CV_8UC1...
    Size size = _src.size();//获取影像的大小 宽度和高度
    _dst.create( size, type );//创建目标影像,和源影像的大小和类型是相同的

	//borderType 边界类型参照的博客
	//https://blog.csdn.net/zhanggusheng/article/details/70197051
    if( borderType != BORDER_CONSTANT && (borderType & BORDER_ISOLATED) != 0 )
    {
        if( size.height == 1 )
            ksize.height = 1;
        if( size.width == 1 )
            ksize.width = 1;
    }

	//如果内核的宽度和高度都是1的话,那么源影像和目标影像是相同的
    if( ksize.width == 1 && ksize.height == 1 )
    {
        _src.copyTo(_dst);
        return;
    }

#ifdef HAVE_TEGRA_OPTIMIZATION
    Mat src = _src.getMat();
    Mat dst = _dst.getMat();
    if(sigma1 == 0 && sigma2 == 0 && tegra::useTegra() && tegra::gaussian(src, dst, ksize, borderType))
        return;
#endif

#if IPP_VERSION_X100 >= 801 && 0 // these functions are slower in IPP 8.1
    CV_IPP_CHECK()
    {
        int depth = CV_MAT_DEPTH(type), cn = CV_MAT_CN(type);

        if ((depth == CV_8U || depth == CV_16U || depth == CV_16S || depth == CV_32F) && (cn == 1 || cn == 3) &&
                sigma1 == sigma2 && ksize.width == ksize.height && sigma1 != 0.0 )
        {
            IppiBorderType ippBorder = ippiGetBorderType(borderType);
            if (ippBorderConst == ippBorder || ippBorderRepl == ippBorder)
            {
                Mat src = _src.getMat(), dst = _dst.getMat();
                IppiSize roiSize = { src.cols, src.rows };
                IppDataType dataType = ippiGetDataType(depth);
                Ipp32s specSize = 0, bufferSize = 0;

                if (ippiFilterGaussianGetBufferSize(roiSize, (Ipp32u)ksize.width, dataType, cn, &specSize, &bufferSize) >= 0)
                {
                    IppFilterGaussianSpec * pSpec = (IppFilterGaussianSpec *)ippMalloc(specSize);
                    Ipp8u * pBuffer = (Ipp8u*)ippMalloc(bufferSize);

                    if (ippiFilterGaussianInit(roiSize, (Ipp32u)ksize.width, (Ipp32f)sigma1, ippBorder, dataType, 1, pSpec, pBuffer) >= 0)
                    {
#define IPP_FILTER_GAUSS(ippfavor, ippcn) \
        do \
        { \
            typedef Ipp##ippfavor ippType; \
            ippType borderValues[] = { 0, 0, 0 }; \
            IppStatus status = ippcn == 1 ? \
                ippiFilterGaussianBorder_##ippfavor##_C1R(src.ptr(), (int)src.step, \
                    dst.ptr(), (int)dst.step, roiSize, borderValues[0], pSpec, pBuffer) : \
                ippiFilterGaussianBorder_##ippfavor##_C3R(src.ptr(), (int)src.step, \
                    dst.ptr(), (int)dst.step, roiSize, borderValues, pSpec, pBuffer); \
            ippFree(pBuffer); \
            ippFree(pSpec); \
            if (status >= 0) \
            { \
                CV_IMPL_ADD(CV_IMPL_IPP); \
                return; \
            } \
        } while ((void)0, 0)

                        if (type == CV_8UC1)
                            IPP_FILTER_GAUSS(8u, 1);
                        else if (type == CV_8UC3)
                            IPP_FILTER_GAUSS(8u, 3);
                        else if (type == CV_16UC1)
                            IPP_FILTER_GAUSS(16u, 1);
                        else if (type == CV_16UC3)
                            IPP_FILTER_GAUSS(16u, 3);
                        else if (type == CV_16SC1)
                            IPP_FILTER_GAUSS(16s, 1);
                        else if (type == CV_16SC3)
                            IPP_FILTER_GAUSS(16s, 3);
                        else if (type == CV_32FC1)
                            IPP_FILTER_GAUSS(32f, 1);
                        else if (type == CV_32FC3)
                            IPP_FILTER_GAUSS(32f, 3);
#undef IPP_FILTER_GAUSS
                    }
                }
                setIppErrorStatus();
            }
        }
    }
#endif
	//创建高斯内核函数
    Mat kx, ky;
	//创建高斯内核函数
    createGaussianKernels(kx, ky, type, ksize, sigma1, sigma2);
	//_src是源影像
	//_dst是目标影像
	//CV_MAT_DEPTH(type) 是CV_8U或者CV_16U
	//kx是滤波内核
	//ky是滤波内核
	//
    sepFilter2D(_src, _dst, CV_MAT_DEPTH(type), kx, ky, Point(-1,-1), 0, borderType );
}
static void createGaussianKernels( Mat & kx, Mat & ky, int type, Size ksize,
double sigma1, double sigma2 )
{
int depth = CV_MAT_DEPTH(type);//获取影像的深度 CV_8U、CV_16U...
if( sigma2 <= 0 )
sigma2 = sigma1;//如果sigma2小于0的话,那么sigma2和sigma相同
// automatic detection of kernel size from sigma
//自动决定sigma的大小
if( ksize.width <= 0 && sigma1 > 0 )//如果内核的宽度小于0并且sigma1大于的0的话
//如果数据类型为CV_8U的话 那么宽度大小为
//(sigmal*3*2+1)|1
//'|'的操作原因是内核的宽度必须是奇数
ksize.width = cvRound(sigma1*(depth == CV_8U ? 3 : 4)*2 + 1)|1;
if( ksize.height <= 0 && sigma2 > 0 )//和内核的宽度获取是相同的
ksize.height = cvRound(sigma2*(depth == CV_8U ? 3 : 4)*2 + 1)|1;
//内核的宽度必须大于0,并且是奇数的。
//内核的高度也是相同的
CV_Assert( ksize.width > 0 && ksize.width % 2 == 1 &&
ksize.height > 0 && ksize.height % 2 == 1 );
//sigma值是大于等于0的
sigma1 = std::max( sigma1, 0. );
sigma2 = std::max( sigma2, 0. );
//获取x方向的高斯内核
kx = getGaussianKernel( ksize.width, sigma1, std::max(depth, CV_32F) );
//如果内核的宽度和高度相同,并且sigma1和sigma2几乎相同的话,那么就是使用x方向的内核
if( ksize.height == ksize.width && std::abs(sigma1 - sigma2) < DBL_EPSILON )
ky = kx;
else
ky = getGaussianKernel( ksize.height, sigma2, std::max(depth, CV_32F) );
}cv::Mat cv::getGaussianKernel( int n, double sigma, int ktype )
{
const int SMALL_GAUSSIAN_SIZE = 7;
static const float small_gaussian_tab[][SMALL_GAUSSIAN_SIZE] =
{
{1.f},//内核大小为1
{0.25f, 0.5f, 0.25f},//内核大小为3
{0.0625f, 0.25f, 0.375f, 0.25f, 0.0625f},//内核大小为5
{0.03125f, 0.109375f, 0.21875f, 0.28125f, 0.21875f, 0.109375f, 0.03125f}//内核大小为7
};
//如果sigma小于0的话,那么内核数组规则为
//1、奇数
//2、小于等于7
//3、sigma 小于等于0
//n>>1 就是n/2
const float* fixed_kernel = n % 2 == 1 && n <= SMALL_GAUSSIAN_SIZE && sigma <= 0 ?
small_gaussian_tab[n>>1] : 0;
//断言,数据类型必须为CV_32F 或者CV_64F,也就是float或者double类型
CV_Assert( ktype == CV_32F || ktype == CV_64F );
//内核矩阵为n行1列
Mat kernel(n, 1, ktype);
//获取内核数据的指针,分别指向float或者double类型
float* cf = kernel.ptr();
double* cd = kernel.ptr();
//如果sigma是大于0的话,就是sigma的大小
//如果sigma小于等于0的话,就是默认的大小
double sigmaX = sigma > 0 ? sigma : ((n-1)*0.5 - 1)*0.3 + 0.8;
//-sigma *sigmma/2
double scale2X = -0.5/(sigmaX*sigmaX);
//求和,是为了进行归一化处理
double sum = 0;
int i;
for( i = 0; i < n; i++ )
{
double x = i - (n-1)*0.5;//例子如果n为3的话,那么x的值分别为-1、0、1。如果是5的话,那么x的值为-2,-1,0,1,2
double t = fixed_kernel ? (double)fixed_kernel[i] : std::exp(scale2X*x*x);
if( ktype == CV_32F )
{
cf[i] = (float)t;
sum += cf[i];
}
else
{
cd[i] = t;
sum += cd[i];
}
}
sum = 1./sum;
for( i = 0; i < n; i++ )
{
if( ktype == CV_32F )
cf[i] = (float)(cf[i]*sum);
else
cd[i] *= sum;
}
return kernel;
}
//包含OpenCV的头文件
//参照github https://github.com/yoyoyo-yo/Gasyori100knock
#include
#include
using namespace  std;
//使用OpenCV的命名空间
using namespace cv;
//
//频道改变
int main()
{
	//读取源影像
	Mat Src = imread("C:/Users/GuSheng/Desktop/标准测试图片/Fig0638(a)(lenna_RGB).tif", IMREAD_COLOR);
	if (Src.empty())
	{
		return 0;
	}
	//创建目标影像,影像格式、大小和源影像相同
	//sigma = 0.8
	Mat Dst1 = Mat(Src.size(), Src.type());
	//sigma = 1.5
	Mat Dst2 = Mat(Src.size(), Src.type());
	//创建目标影像失败
	if (Dst1.empty() || Dst2.empty())
	{
		return 0;
	}
	GaussianBlur(Src, Dst1, cv::Size(5, 5), 0.8,0.8);
	GaussianBlur(Src, Dst2, cv::Size(5, 5), 1.5, 1.5);
	namedWindow("Src", WINDOW_AUTOSIZE);
	namedWindow("Dst sigma = 0.8", WINDOW_AUTOSIZE);
	namedWindow("Dst sigma = 1.5", WINDOW_AUTOSIZE);
	imshow("Src", Src);
	imshow("Dst sigma = 0.8", Dst1);
	imshow("Dst sigma = 1.5", Dst2);
	waitKey(0);
	return 0;
}
 sigma = 0.8
 sigma = 1.5

