Android Framework 输入子系统(05)InputDispatcher解读
该系列文章总纲链接:专题分纲目录 Android Framework 输入子系统
本章关键点总结 & 说明:
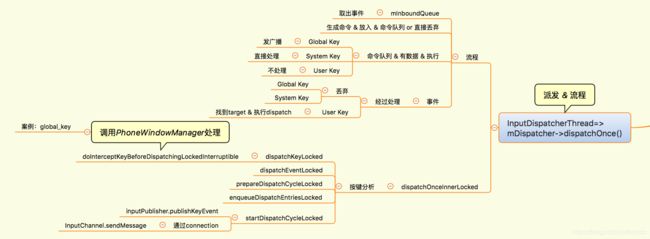
这里思维导图主要关注➕派发流程 以及启动流程的按键视角。因为图比较大,因此这里单独把新增的部分单独截图,IMS的框架部分新增:
这里新增加了 按键视角部分,以按键的流程来解读整个IMS的数据流走向的框架。新增的派发数据流程截图如下:
这里整个InputSispatcher的分析流程就如上思维导图所示。
1 Input子系统框架
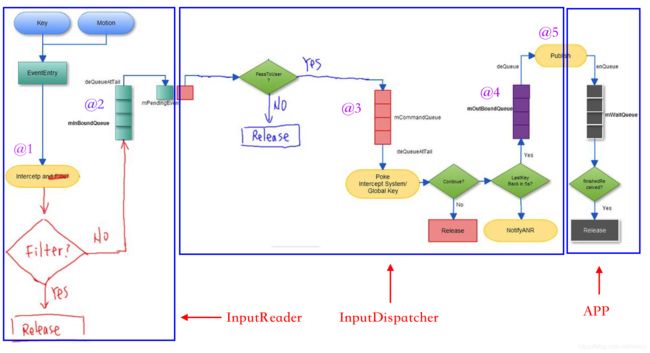
这里 步骤1和2的目的是获得事件,步骤3和4的目的是稍加处理,步骤5 目的是为了发送给APP。接下来用一张架构图来表示InputDispatcher的整体架构,如下所示:
以上架构图以图形的方式表达了Input输入子系统中关键的五步,如下所示:
- 在放入队列前先稍加处理,主要针对System Key、Global Key、User Key事件,以及处理紧急事件(比如来电静音等)。
- 把InputReader线程中事件放入mInboundQueue中即可。
- 对于Global Key、Sysytem Key按键处理,放入mCommandQueue,依次处理。
- 对于User Key,放入队列,查找目标APP,并放入它的outBoundQueue。
- 从OutboundQueue取出 事件,通过connection发送给APP。
对于InputDispatcher线程,更关注3 、4、5步。
2 Dispatcher对按键的处理流程关键点解析
2.1 通用模型的处理流程
回顾之前key的处理流程,关键点在于这段代码:
    //InputReader的分析:KeyboardInputMapper::processKey中数据最后同步到dispatcher中流程:
    NotifyKeyArgs args(when, getDeviceId(), mSource, policyFlags,
            down ? AKEY_EVENT_ACTION_DOWN : AKEY_EVENT_ACTION_UP,
            AKEY_EVENT_FLAG_FROM_SYSTEM, keyCode, scanCode, newMetaState, downTime);
	//说明:这里getListener是InputReader初始化时传入的对象,即InputDispatcher
    getListener()->notifyKey(&args);
这里继续分析notifyKey中的关键点,如下所示:
void InputDispatcher::notifyKey(const NotifyKeyArgs* args) {
    //...
    mPolicy->interceptKeyBeforeQueueing(&event, /*byref*/ policyFlags);
	//...
    needWake = enqueueInboundEventLocked(newEntry);
    //...
    if (needWake) {
        //唤醒等待的InputDispatcher,进行输入事件分发。
        mLooper->wake();
    }
}
这里关注➕三个主要步骤:
- interceptKeyBeforeQueueing函数,调用后对应PhoneWindowManager的同名函数处理,根据返回值设置PolicyFlags
- enqueueInboundEventLocked函数,将newEntry放入到mInBoundQueue队列
- mLooper->wake();根据需要唤醒Dispatcher线程
2.2 案例简要说明
@1 针对Global Key的处理模式
这里以按键AKEY_CODE_TV为例,对于Global Key,直接返回ACTION_PASS_TO_USER。
@2 针对System Key的处理模式
这里以按键AKEY_CODE_VOLUME_DOWN为例,对于System Key,如果可以直接处理则设置返回值~ACTION_PASS_TO_USER,否则设置ACTION_PASS_TO_USER。
@3 针对User Key的处理模式
这里以按键AKEY_CODE_A为例,对于普通按键则直接返回ACTION_PASS_TO_USER。
3 接下来是对DispatcherThread的分析,实际流程如下:
这里从InputManager的start函数,延续之前 章节的分析,代码如下:
status_t InputManager::start() {
    status_t result = mDispatcherThread->run("InputDispatcher", PRIORITY_URGENT_DISPLAY);
    //...
    result = mReaderThread->run("InputReader", PRIORITY_URGENT_DISPLAY);
    //...
    return OK;
}
InputManager启动了一个InputReaderThread和InputDispatcherThread来读取和分发输入消息,调用它们的run方法后,会进入threadLoop函数(只要threadLoop函数返回true,该函数就会循环执行)。因此接下来直接分析InputDispatcherThread的threadLoop函数,代码实现如下:
bool InputDispatcherThread::threadLoop() {
    mDispatcher->dispatchOnce();
    return true;
}
3.1 dispatchOnce分析
其中 dispatchOnce代码实现如下:
void InputDispatcher::dispatchOnce() {
    nsecs_t nextWakeupTime = LONG_LONG_MAX;
    { // acquire lock
        AutoMutex _l(mLock);
        mDispatcherIsAliveCondition.broadcast();

        /* 命令队列为空时
        @a 从mInboundQueue中取出事件
        @b 用它来生成命令放入命令队列 or 直接丢弃
        @d 对于经过处理的事件:
          Global Key:丢弃
          System Key:丢弃
          User Key:找到target,执行dispatch*/
        if (!haveCommandsLocked()) {//判断CommandQueue是否有命令
            dispatchOnceInnerLocked(&nextWakeupTime);//关键点
        }
        /*@c 当命令队列有数据时,执行命令:
          Global Key:发广播
          System Key:直接处理
          User Key:不处理*/
        if (runCommandsLockedInterruptible()) {
            nextWakeupTime = LONG_LONG_MIN;
        }
    } // release lock

    nsecs_t currentTime = now();
    int timeoutMillis = toMillisecondTimeoutDelay(currentTime, nextWakeupTime);
    mLooper->pollOnce(timeoutMillis);
}
@1 这里关注runCommandsLockedInterruptible函数,实现如下:
bool InputDispatcher::runCommandsLockedInterruptible() {
    if (mCommandQueue.isEmpty()) {
        return false;
    }
    do {
        CommandEntry* commandEntry = mCommandQueue.dequeueAtHead();
        Command command = commandEntry->command;
        (this->*command)(commandEntry); // commands are implicitly 'LockedInterruptible'
        commandEntry->connection.clear();
        delete commandEntry;
    } while (! mCommandQueue.isEmpty());
    return true;
}
以上是将 命令 放入命令队列里的过程,后面将会继续执行命令。
@2 一次输入事件分发,当没有事件输入消息时会走到mLooper->pollOnce(timeoutMillis);这个函数会进入睡眠状态。
当有按键消息发生时该函数会返回,然后走到dispatchOnceInnerLocked函数。代码实现如下:
void InputDispatcher::dispatchOnceInnerLocked(nsecs_t* nextWakeupTime) {
    nsecs_t currentTime = now();
    //...
    // If we don't already have a pending event, go grab one.
    if (! mPendingEvent) {
        //当InputReader队列中插入一个输入事件后,此处mInboundQueue不为空
        if (mInboundQueue.isEmpty()) {
            ...
        } else {
            // Inbound queue has at least one entry.
            mPendingEvent = mInboundQueue.dequeueAtHead();
            //...
        }
        //...
    }
    //...
    switch (mPendingEvent->type) {
    //...
    case EventEntry::TYPE_KEY: {
        KeyEntry* typedEntry = static_cast(mPendingEvent);
        //...
        done = dispatchKeyLocked(currentTime, typedEntry, &dropReason, nextWakeupTime);
        break;
    }
    //...
    }
    //...
}
上面是以按键为例,因此派发按键事件时仅关注 按键部分,继续分析dispatchKeyLocked,之前在InputReaderThread线程中调用enqueueInboundEventLocked函数,将EventEntry加入到mInboundQueue中,然后调用mLooper->wake函数会唤醒InputDispatcherThread线程,InputDispatcher中把队列的第一个事件取出来,因为这里是键盘事件,所以mPendingEvent->type是EventEntry::TYPE_KEY,然后调用dispatchKeyLocked函数。
3.2 按键案例
选择 dispatchKeyLocked继续分析,代码实现如下:
bool InputDispatcher::dispatchKeyLocked(nsecs_t currentTime, KeyEntry* entry,
        DropReason* dropReason, nsecs_t* nextWakeupTime) {
    //...
    //如果按键是第一次分发,则将命令封装为CommandEntry加入队列
    //执行doInterceptKeyBeforeDispatchingLockedInterruptible,以给java层拦截按键的机会
    if (entry->interceptKeyResult == KeyEntry::INTERCEPT_KEY_RESULT_UNKNOWN) {
        if (entry->policyFlags & POLICY_FLAG_PASS_TO_USER) {
            CommandEntry* commandEntry = postCommandLocked(
                    & InputDispatcher::doInterceptKeyBeforeDispatchingLockedInterruptible);
            if (mFocusedWindowHandle != NULL) {
                commandEntry->inputWindowHandle = mFocusedWindowHandle;
            }
            commandEntry->keyEntry = entry;
            entry->refCount += 1;
            return false; // wait for the command to run
        } else {
            entry->interceptKeyResult = KeyEntry::INTERCEPT_KEY_RESULT_CONTINUE;
        }
    } else if (entry->interceptKeyResult == KeyEntry::INTERCEPT_KEY_RESULT_SKIP) {
        if (*dropReason == DROP_REASON_NOT_DROPPED) {
            *dropReason = DROP_REASON_POLICY;
        }
    }
	//...
    // Identify targets.
    Vector inputTargets;
    //找到当前激活的Window窗口,并将其加入到Vendor中
    int32_t injectionResult = findFocusedWindowTargetsLocked(currentTime,
            entry, inputTargets, nextWakeupTime);
    if (injectionResult == INPUT_EVENT_INJECTION_PENDING) {
        return false;
    }

    setInjectionResultLocked(entry, injectionResult);
    if (injectionResult != INPUT_EVENT_INJECTION_SUCCEEDED) {
        return true;
    }
    //找到需要监听按键的InputChannel,封装成InputTarget,加入到Vendor中
    addMonitoringTargetsLocked(inputTargets);

    //将按键分发到上面Vendor的InputChannel中
    dispatchEventLocked(currentTime, entry, inputTargets);
    return true;
}
@1 这里关注doInterceptKeyBeforeDispatchingLockedInterruptible的实现,代码如下:
void InputDispatcher::doInterceptKeyBeforeDispatchingLockedInterruptible(
        CommandEntry* commandEntry) {
    KeyEntry* entry = commandEntry->keyEntry;

    KeyEvent event;
    initializeKeyEvent(&event, entry);

    mLock.unlock();

    nsecs_t delay = mPolicy->interceptKeyBeforeDispatching(commandEntry->inputWindowHandle,
            &event, entry->policyFlags);

    mLock.lock();

    if (delay < 0) {
        //不会上传给APP,如果是system Key则直接处理,返回-1
        entry->interceptKeyResult = KeyEntry::INTERCEPT_KEY_RESULT_SKIP;
    } else if (!delay) {
        //会上传给APP,让APP处理,返回0
        entry->interceptKeyResult = KeyEntry::INTERCEPT_KEY_RESULT_CONTINUE;
    } else {
        //杜宇User Key 会再次执行前面的dispatcherOnceInnerLocked
        entry->interceptKeyResult = KeyEntry::INTERCEPT_KEY_RESULT_TRY_AGAIN_LATER;
        entry->interceptKeyWakeupTime = now() + delay;
    }
    entry->release();
}
这里调用interceptKeyBeforeDispatching,会调用到PhoneWindowManager.java,如果这里是针对Global Key,则代码如下:
public long interceptKeyBeforeDispatching(WindowState win, KeyEvent event, int policyFlags) {
        final boolean keyguardOn = keyguardOn();
        final int keyCode = event.getKeyCode();
        final int repeatCount = event.getRepeatCount();
        final int metaState = event.getMetaState();
        //...
        //根据Global Key.xml发送广播给组件
        if (isValidGlobalKey(keyCode)
                && mGlobalKeyManager.handleGlobalKey(mContext, keyCode, event)) {
            return -1;
        }
        //...
}
@2 同时 这里继续分析dispatchEventLocked,代码实现如下:
void InputDispatcher::dispatchEventLocked(nsecs_t currentTime,
        EventEntry* eventEntry, const Vector& inputTargets) {
    pokeUserActivityLocked(eventEntry);

    for (size_t i = 0; i < inputTargets.size(); i++) {
        const InputTarget& inputTarget = inputTargets.itemAt(i);

        ssize_t connectionIndex = getConnectionIndexLocked(inputTarget.inputChannel);
        if (connectionIndex >= 0) {
            sp connection = mConnectionsByFd.valueAt(connectionIndex);
            prepareDispatchCycleLocked(currentTime, connection, eventEntry, &inputTarget);
        }
    }
}
这里会依次取出Vector中的InputTarget,根据InputTarget的InputChannel找到保存在mConnectionByFd中的Connection对象,
调用prepareDispatchCycleLocked函数进行分发。prepareDispatchCycleLocked代码实现如下:
void InputDispatcher::prepareDispatchCycleLocked(nsecs_t currentTime,
        const sp& connection, EventEntry* eventEntry, const InputTarget* inputTarget) {
    //...各种检查
	//这里将connection分装成DispatchEntry,加入到connection->outboundQueue的队列中
    enqueueDispatchEntriesLocked(currentTime, connection, eventEntry, inputTarget);
}
enqueueDispatchEntriesLocked的代码实现如下:
void InputDispatcher::enqueueDispatchEntriesLocked(nsecs_t currentTime,
        const sp& connection, EventEntry* eventEntry, const InputTarget* inputTarget) {
    bool wasEmpty = connection->outboundQueue.isEmpty();

    // Enqueue dispatch entries for the requested modes.
    enqueueDispatchEntryLocked(connection, eventEntry, inputTarget,
            InputTarget::FLAG_DISPATCH_AS_HOVER_EXIT);
    enqueueDispatchEntryLocked(connection, eventEntry, inputTarget,
            InputTarget::FLAG_DISPATCH_AS_OUTSIDE);
    enqueueDispatchEntryLocked(connection, eventEntry, inputTarget,
            InputTarget::FLAG_DISPATCH_AS_HOVER_ENTER);
    enqueueDispatchEntryLocked(connection, eventEntry, inputTarget,
            InputTarget::FLAG_DISPATCH_AS_IS);
    enqueueDispatchEntryLocked(connection, eventEntry, inputTarget,
            InputTarget::FLAG_DISPATCH_AS_SLIPPERY_EXIT);
    enqueueDispatchEntryLocked(connection, eventEntry, inputTarget,
            InputTarget::FLAG_DISPATCH_AS_SLIPPERY_ENTER);

    // If the outbound queue was previously empty, start the dispatch cycle going.
    if (wasEmpty && !connection->outboundQueue.isEmpty()) {
        startDispatchCycleLocked(currentTime, connection);
    }
}
这个函数首先获取以前的connection的outboundQueue是否为空,然后调用enqueueDispatchEntryLocked将事件加入到outboundQueue中。
- 如果以前为空,现在不为空,则调用startDispatchCycleLocked开始分发。
- 如果以前不为空,说明当前的Activity正在处理前面的按键,则不需要再调用startDispatchCycleLocked。
这里 startDispatchCycleLocked的代码实现如下:
void InputDispatcher::startDispatchCycleLocked(nsecs_t currentTime,
        const sp& connection) {
    while (connection->status == Connection::STATUS_NORMAL
            && !connection->outboundQueue.isEmpty()) {
        DispatchEntry* dispatchEntry = connection->outboundQueue.head;
        dispatchEntry->deliveryTime = currentTime;

        // Publish the event.
        status_t status;
        EventEntry* eventEntry = dispatchEntry->eventEntry;
        switch (eventEntry->type) {
        case EventEntry::TYPE_KEY: {
            KeyEntry* keyEntry = static_cast(eventEntry);

            // Publish the key event.
            status = connection->inputPublisher.publishKeyEvent(dispatchEntry->seq,
                    keyEntry->deviceId, keyEntry->source,
                    dispatchEntry->resolvedAction, dispatchEntry->resolvedFlags,
                    keyEntry->keyCode, keyEntry->scanCode,
                    keyEntry->metaState, keyEntry->repeatCount, keyEntry->downTime,
                    keyEntry->eventTime);
            break;
        }
		//...
		}

        //... Check the result.

        // Re-enqueue the event on the wait queue.
        connection->outboundQueue.dequeue(dispatchEntry);
        traceOutboundQueueLengthLocked(connection);
        connection->waitQueue.enqueueAtTail(dispatchEntry);
        traceWaitQueueLengthLocked(connection);
    }
}
从outboundQueue中取出需要处理的事件,交给connection的inputPublisher去分发,将事件加入到connection的waitQueue中。同时这里 分发事件是通过InputPublisher的publishKeyEvent来完成,代码如下:
status_t InputPublisher::publishKeyEvent(
        uint32_t seq,
        //...
        nsecs_t downTime,
        nsecs_t eventTime) {
	//...
    InputMessage msg;
    msg.header.type = InputMessage::TYPE_KEY;
	//...
    msg.body.key.eventTime = eventTime;
    return mChannel->sendMessage(&msg);
}
这里最终将调用InputChannel的sendMessage方法来分发,sendMessage代码实现如下:
status_t InputChannel::sendMessage(const InputMessage* msg) {
    size_t msgLength = msg->size();
    ssize_t nWrite;
    do {
        nWrite = ::send(mFd, msg, msgLength, MSG_DONTWAIT | MSG_NOSIGNAL);
    } while (nWrite == -1 && errno == EINTR);
	//...
    if (size_t(nWrite) != msgLength) {
        return DEAD_OBJECT;
    }
    return OK;
}
这里通过send函数往socket的server端写入InputMessage对象,应用程序正睡眠在client端的fd上,此时client端就会收到该InputMessage,client被唤醒后会进行按键事件的分发。最后dispatcher线程通过connection对象和APP之间建立连接。
最后简单总结下:事件派发流程:
- 查找目标:向WindowManagerService查询当前window,获得对应的connection
- 把事件放入到connection的outboundQueue队列当中
- 从队列中逐个把事件写入fd,取出并构造InputMessage最后发送。


