五、Sketchup用ruby进行二次开发--创建图形(面及pushpull、followMe方法的应用)
在上一节讲到了如何创建直线、曲线、圆及弧线,本节讲如何创建面和使用push/pull和Follow Me方法对面进行推拉创建三维体。
1、创建面
创建面使用的方法是add_face,也是继承于Entities父类。add_face的参数是由一系列用逗号分割开的点或边,下面看看代码如何实现。
# 先创建五个点
pt1 = [0, 1, 0]
pt2 = [-0.951, 0.309, 0]
pt3 = [-0.588, -0.809, 0]
pt4 = [ 0.588, -0.809, 0]
pt5 = [ 0.951, 0.309, 0]
# 用这五个点画一个面
pent = Sketchup.active_model.entities.add_face pt1, pt2, pt3,
pt4, pt5
# 打印出这五个点的坐标信息
puts "Point 0: " + pent.vertices[0].position.to_s
puts "Point 1: " + pent.vertices[1].position.to_s
puts "Point 2: " + pent.vertices[2].position.to_s
puts "Point 3: " + pent.vertices[3].position.to_s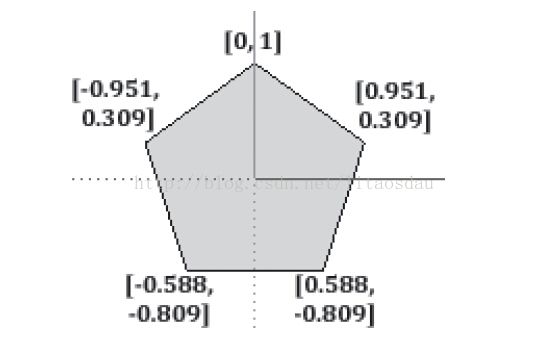
特别注意的是点的顺序非常重要,如果把pt2和pt3的顺改变一下,这个图形看起来就不像一个五边形了。但改变点的顺时针方向或逆时针方向是没有关系,依然是五边形。
有趣的是生成的面的正面符合右手定理,即如果点的顺序是顺时针方向,它的正面向量就是(0,0,-1),我可以用代码验证一下。面的方向在push和pull中会用到,稍后讲到。
pent.normal
#输出 (0, 0, -1)
pent.reverse!
pent.normal
#输出 (0, 0, 1)classify_point方法用于判断给定的点是否在这个面上,判断方法是通过返回的值,如表所示。
• 0 - 不确定的点
• 1 - 点在面上
• 2 - 点在面的某一条边上
• 4 - 点面的一个顶点
• 8 - 点在面所在的平面上,但不在这个面上
• 16 - 点不在这个面所在的平面上
例如:
face = Sketchup.active_model.entities.add_face [-1, -1, 0], [-1, 1, 0],
[1, 1, 0], [1, -1, 0]
face.classify_point [0, 0, 0]
#输出 1
face.classify_point [1, 1, 0]
#输出 4
face.classify_point [1, 2, 0]
#输出 8
face.classify_point [1, 1, 1]
#输出 16这一小节是本节的重点,相信使用过Sketchup的筒子们,肯定特别熟悉推拉工具。face类提供了两个方法把二维面扩展为三维体:pushpull和followme,这跟Sketchup的Push/Pull和Follow Me工具是一样的。
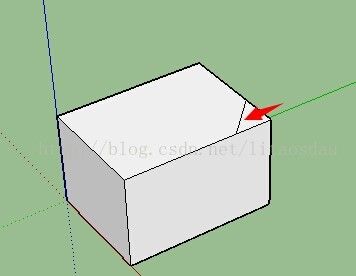
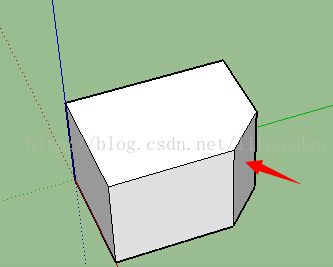
pushpull非常容易使用和理解,pushpull的参数是一个整数,如果整数是正数,那么就会沿着面的正向量进行拉伸,类似,如果是负数就会沿着反方向拉伸。说到这里不能不说在已有三维体上进行切割功能了,只要在一个三维体指定一个面进行反向拉伸就能将其切除了,要是说的不明白可以看下面这个例子。
# Create the box
ent = Sketchup.active_model.entities
main_face = ent.add_face [0,0,0], [6,0,0], [6,8,0], [0,8,0]
main_face.reverse!
main_face.pushpull 5
# Draw a line across the upper-right corner
cut = ent.add_line [6,6,5], [4,8,5]
# Remove the new face
cut.faces[1].pushpull -5
图1,生成一个四方体
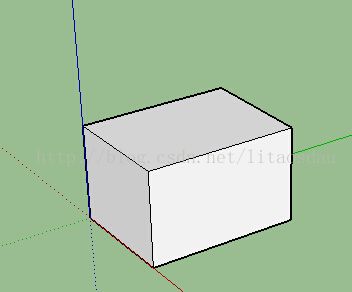
图2,在顶部生成一条
图3,切去一个角。很神奇吧。
如果最后一行代码
cut.faces[1].pushpull -5把faces[1]变为faces[0],那么图形就变为留下小的那一小部分。
4、followme方法
通过pushpull方法,我们可以沿着正向或反向进行拉伸,这还远远满足不了我们的需求。现在followme方法可以沿着你给定的向量进行扩展。
followme的扩展向量我们成为路径,可以使一条或多条直线,如果是多条直线则需要满足一下两个要求。
* 所有的路径必须是相连的。
*要进行拉伸的面不能与路径所在的面重合,这一条非常重要。
下面看例子
# Access the Entities container
model = Sketchup.active_model
ent = model.entities
# 创建一个圆面,直径为1英寸
circle = ent.add_circle [0,0,0], [0,0,1], 1
circle_face = ent.add_face circle
# 创建一个正方形的路径
path = ent.add_curve [10,0,0], [10,0,5], [10,5,5],
[10,5,0], [10,0,0]
# Extrude the circle along the path
circle_face.followme path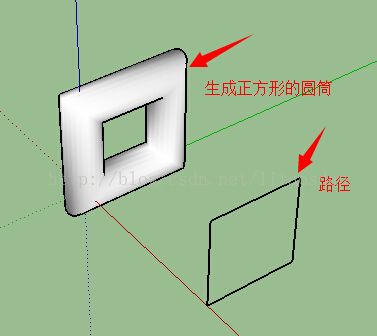
再来看一个例子
# Access the Entities object
model = Sketchup.active_model
ents = model.entities
# Create the 2-D shape
curve = ents.add_curve [0, 0, 1.244209], [0.116554, 0, 1.238382],
[0.160261, 0, 1.217985], [0.186486, 0, 1.188846],
[0.1894, 0, 1.165536], [0.17483, 0, 1.145139],
[0.142778, 0, 1.127656], [0.096157, 0, 1.118914],
[0.093243, 0, 1.063551], [0.175152, 0, 0.996269],
[0.175152, 0, 0.915269], [0.28237, 0, 0.871026],
[0.375392, 0, 0.801741], [0.448486, 0, 0.711683],
[0.497151, 0, 0.606398], [0.51839, 0, 0.492371],
[0.510894, 0, 0.376625], [0.475126, 0, 0.26629],
[0.413287, 0, 0.168161], [0.329188, 0, 0.088283],
[0.228007, 0, 0.031575], [0.115978, 0, 0.001531],
[0, 0, 0], [0, 0, 1.244209]
curve_face = ents.add_face curve
# Create the circular path
path = ents.add_circle [0, 0, 0], [0, 0, 1], 2
# Create the figure
curve_face.followme path
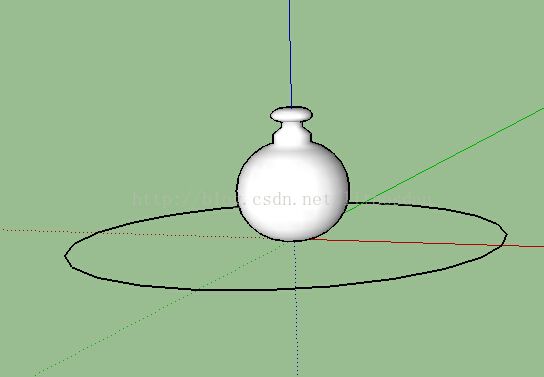
生成的图形为下图所示,这图形比较复杂,大家看看代码也很好理解。
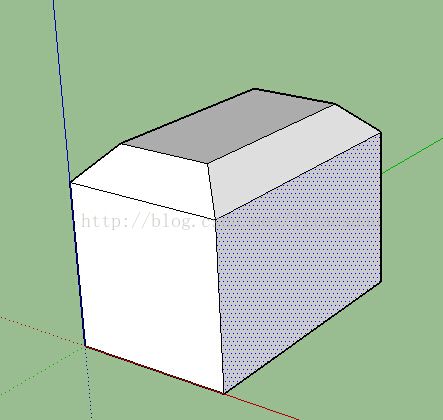
由于这个以后用的比较多,我再来第三个例子吧。
# Create the box
ents = Sketchup.active_model.entities
main_face = ents.add_face [0,0,0], [5,0,0], [5,8,0], [0,8,0]
main_face.reverse!
main_face.pushpull 6, true
# Draw a line across a corner
cut = ents.add_line [5, 7, 6], [5, 8, 5]
# Create the chamfer
cut.faces[0].followme main_face.edges好了,今天到这吧,马上凌晨1点了。
