带进度条的x5WebView
我们在使用webview加载网页的时候都希望顶部都有个进度条显示加载进度,由于在Android 4.4以下版本的Webview使用的是WebKit内核,,而在Android 4.4及其以上版本使用的是chromium内核,而且国内定制Rom众多,使用原生的WebView可能会遇到一些兼容性的问题。所以就打算接入X5内核的腾讯浏览服务.
并简单封装个带进度条的X5WebView.
首先来看腾讯X5浏览服务官网的介绍
腾讯X5浏览服务官网

看完官网的介绍,感觉很厉害的样子,话不多说,既然这么厉害,那么我们就使用它来替代官方的webview了.
官网上有接入指南,照做就行.
1.首先下载完整版的SDK
我下载的是这个,你们可以根据需求下载其他版本的.

解压后可以看到一个jar包,将jar包复制到项目中libs目录下,Add As Library即可.


需要注意的是,官方已经说明了x5暂时不提供64位so文件,为了保证64位手机能正常加载x5内核,需要按照官方提示的去做。
首先我们需要把官方的demo下载下来

将demo中的jinLibs拷贝到我们自己的项目中去,并在gradle文件中添加配置
ndk {
abiFilters “armeabi”, “armeabi-v7a”, “x86”, “mips”
}

自己的项目:

添加完成就ok啦.下面开始封装webView.
新建一个类取名为ProgressWevView继承自WebView,注意是tencent包下面的webview,不要搞错了.

然后添加构造方法,并定义初始化webView的方法,将我们平时常用的一些初始化操作放在该方法即可.
ProgressWebview整体代码:
package com.yzq.progresswebview;

import android.content.Context;
import android.util.AttributeSet;
import android.widget.LinearLayout;
import android.widget.ProgressBar;

import com.tencent.smtt.sdk.WebChromeClient;
import com.tencent.smtt.sdk.WebSettings;
import com.tencent.smtt.sdk.WebView;
import com.tencent.smtt.sdk.WebViewClient;

import java.util.Map;

/**
 * Created by yzq on 2017/7/1.
 */

public class ProgressWebView extends WebView {
    private ProgressBar mProgressBar;

    public ProgressWebView(Context context) {
        super(context);

        initWebView(context);


    }

    public ProgressWebView(Context context, AttributeSet attributeSet) {
        super(context, attributeSet);
        initWebView(context);

    }

    public ProgressWebView(Context context, AttributeSet attributeSet, int i) {
        super(context, attributeSet, i);
        initWebView(context);
    }

    public ProgressWebView(Context context, AttributeSet attributeSet, int i, boolean b) {
        super(context, attributeSet, i, b);
        initWebView(context);

    }

    public ProgressWebView(Context context, AttributeSet attributeSet, int i, Map map, boolean b) {
        super(context, attributeSet, i, map, b);

        initWebView(context);
    }


    /*初始化webView*/
    private void initWebView(Context context) {

        /*添加进度条*/
        mProgressBar = new ProgressBar(context, null,
                android.R.attr.progressBarStyleHorizontal);
        LinearLayout.LayoutParams layoutParams = new LinearLayout.LayoutParams(
                LinearLayout.LayoutParams.MATCH_PARENT, 10);
        mProgressBar.setLayoutParams(layoutParams);

        mProgressBar.setProgress(0);
        addView(mProgressBar);

        /*设置Settings*/
        final WebSettings webSetting = this.getSettings();
        webSetting.setJavaScriptEnabled(true);//开启js脚本
        webSetting.setAllowFileAccess(true);//是否允许访问文件
        webSetting.setSupportZoom(true);//是否支持缩放
        webSetting.setBuiltInZoomControls(true);//是否显示缩放控制栏

        /*初始化webClient*/

        setWebViewClient(new WebViewClient() {

            /*页面内跳转*/
            @Override
            public boolean shouldOverrideUrlLoading(WebView webView, String s) {
                webView.loadUrl(s);
                return super.shouldOverrideUrlLoading(webView, s);
            }
        });


        /*webChromeClient*/
        setWebChromeClient(new WebChromeClient() {
            @Override
            public void onReceivedTitle(WebView webView, String s) {
                super.onReceivedTitle(webView, s);
            }

            @Override
            public void onProgressChanged(WebView webView, int i) {
                super.onProgressChanged(webView, i);

                if (i == 100) {
                    mProgressBar.setVisibility(GONE);
                } else {
                    if (mProgressBar.getVisibility() == GONE)
                        mProgressBar.setVisibility(VISIBLE);
                    mProgressBar.setProgress(i);
                }
            }
        });

    }
}
这么一来一个简单的带进度条的x5WebView就封装好了.
要想使用x5WebView记得要先初始化.还有要添加权限.
初始化操作:
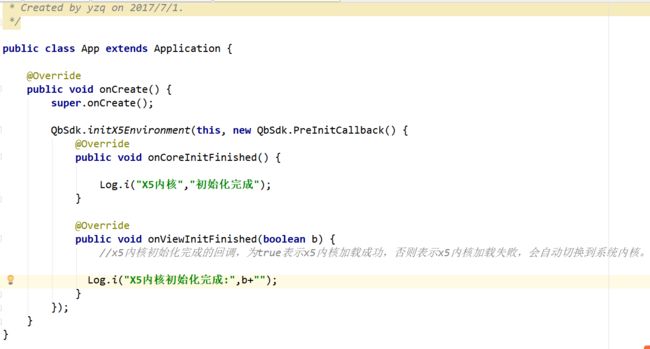
别忘了添加权限,并修改application的name

在MainActivity中使用
布局文件:
MainActivity代码:
package com.yzq.progresswebview;

import android.os.Bundle;
import android.support.v7.app.AppCompatActivity;
import android.view.KeyEvent;

public class MainActivity extends AppCompatActivity {

    private ProgressWebView webView;

    @Override
    protected void onCreate(Bundle savedInstanceState) {
        super.onCreate(savedInstanceState);
        setContentView(R.layout.activity_main);

        webView = (ProgressWebView) findViewById(R.id.webView);

        /*加载我的博客首页*/
        webView.loadUrl("http://blog.csdn.net/yuzhiqiang_1993");
    }

    /*处理WebView返回事件*/
    @Override
    public boolean onKeyDown(int keyCode, KeyEvent event) {
        if (keyCode == event.KEYCODE_BACK) {
            if (webView.canGoBack()) {
                webView.goBack();
                return true;
            }
        }
        return super.onKeyDown(keyCode, event);
    }

}
运行后大概就是这个效果
点击下载Demo