Android的控件CheckBox、ImageView以及ListView的自定义Adapter用法
概述
1、CheckBox一般用于多选框,在登录界面设置“是否保存账号“选项时也能用到。
2、ImageView的常用属性有:
a、background:可以设置背景颜色和图片,在设置图片时,图片会被自动拉伸。
b、scaleType=”XXX“:XXX可以是fitStart、fitXY、fitcenter、center、centerCrop、centerSide、fitEnd。
c、tint:设置覆盖颜色和透明度。
d、setAlpha 设置可见度。
3、ListView的常用适配器有:ArrayAdapter、SimpleAdapter、自定义Adapter。
代码与演示:
CheckBox
布局
"1.0" encoding="utf-8"?>
"http://schemas.android.com/apk/res/android"
android:orientation="vertical"
android:layout_width="match_parent"
android:layout_height="match_parent">
"@+id/radio_button"
android:layout_width="match_parent"
android:layout_height="wrap_content"
android:orientation="horizontal"
android:layout_margin="10dp"
android:checkedButton="@+id/man">
"wrap_content"
android:layout_height="wrap_content"
android:text="性别:"/>
"@+id/man"
android:layout_width="wrap_content"
android:layout_height="wrap_content"
android:text="男"/>
"@+id/human"
android:layout_width="wrap_content"
android:layout_height="wrap_content"
android:text="女"/>
"@+id/extras"
android:layout_width="wrap_content"
android:layout_height="wrap_content"
android:text="其他"/>
"wrap_content"
android:layout_height="wrap_content"
android:text="您的兴趣爱好是:"/>
"@+id/checkbox_eat"
android:layout_width="wrap_content"
android:layout_height="wrap_content"
android:checked="false"
android:text="品尝美食"/>
"@+id/checkbox_game"
android:layout_width="wrap_content"
android:layout_height="wrap_content"
android:checked="false"
android:text="玩游戏"/>
"@+id/checkbox_sing"
android:layout_width="wrap_content"
android:layout_height="wrap_content"
android:checked="false"
android:text="唱歌"/>
"@+id/checkbox_tour"
android:layout_width="wrap_content"
android:layout_height="wrap_content"
android:checked="false"
android:text="旅游"/>
java代码实现选择监听
public class MainActivity extends Activity {

    private Button mButtonSelect;
    private CheckBox mCheckBoxEat;
    private CheckBox mCheckBoxGame;
    private CheckBox mCheckBoxSing;
    private CheckBox mCheckBoxTour;
    @Override
    protected void onCreate(Bundle savedInstanceState) {
        super.onCreate(savedInstanceState);
        requestWindowFeature(Window.FEATURE_NO_TITLE);
        setContentView(R.layout.radio_button_layout);

        mCheckBoxEat = (CheckBox)findViewById(R.id.checkbox_eat);
        mCheckBoxGame = (CheckBox)findViewById(R.id.checkbox_game);
        mCheckBoxSing = (CheckBox)findViewById(R.id.checkbox_sing);
        mCheckBoxTour = (CheckBox)findViewById(R.id.checkbox_tour);
        mButtonSelect = (Button)findViewById(R.id.button_select);
        mButtonSelect.setOnClickListener(new View.OnClickListener() {
            @Override
            public void onClick(View v) {
                String hobby = "";
                //用idChecked()方法判断是否被选中。
                if(mCheckBoxEat.isChecked()){
                    hobby += mCheckBoxEat.getText();
                }if(mCheckBoxGame.isChecked()){
                    hobby += mCheckBoxGame.getText();
                }if(mCheckBoxSing.isChecked()){
                    hobby += mCheckBoxSing.getText();
                }if(mCheckBoxTour.isChecked()){
                    hobby += mCheckBoxTour.getText();
                }
                Log.d("d",hobby);
            }
        });
    }
}
效果:

ImageView
布局
布局用的是ScrollView,用于实现可滚动的效果
<ScrollView xmlns:android="http://schemas.android.com/apk/res/android"
            android:layout_width="match_parent"
            android:layout_height="match_parent"
            android:fillViewport="false">

    <LinearLayout
        android:layout_width="match_parent"
        android:layout_height="match_parent"
        android:orientation="vertical">

        <ImageView
            android:id="@+id/imageview"
            android:layout_width="match_parent"
            android:layout_height="wrap_content"
            android:background="@mipmap/image"
            android:src="@mipmap/pk"
            android:tint="#88ff0000"/>

        <Button
            android:id="@+id/add"
            android:layout_width="wrap_content"
            android:layout_height="wrap_content"
            android:text="增加透明度"/>
        <Button
            android:id="@+id/sub"
            android:layout_width="wrap_content"
            android:layout_height="wrap_content"
            android:text="减少透明度"/>
        <ImageView
            android:layout_width="match_parent"
            android:layout_height="wrap_content"
            android:scaleType="center"
            android:src="@mipmap/image"/>

        <ImageView
            android:layout_width="match_parent"
            android:layout_height="wrap_content"
            android:scaleType="centerCrop"
            android:src="@mipmap/image"/>

        <ImageView
            android:layout_width="match_parent"
            android:layout_height="wrap_content"
            android:scaleType="centerInside"
            android:src="@mipmap/image"/>

        <ImageView
            android:layout_width="match_parent"
            android:layout_height="wrap_content"
            android:scaleType="fitCenter"
            android:src="@mipmap/image"/>

        <ImageView
            android:layout_width="match_parent"
            android:layout_height="wrap_content"
            android:scaleType="fitStart"
            android:src="@mipmap/image"/>

        <ImageView
            android:layout_width="match_parent"
            android:layout_height="wrap_content"
            android:scaleType="fitEnd"
            android:src="@mipmap/image"/>

        <ImageView
            android:layout_width="match_parent"
            android:layout_height="wrap_content"
            android:scaleType="fitXY"
            android:src="@mipmap/image"/>

        <ImageView
            android:layout_width="match_parent"
            android:layout_height="wrap_content"
            android:scaleType="matrix"
            android:src="@mipmap/image"/>
    LinearLayout>
ScrollView>
java代码实现调整透明度
@TargetApi(Build.VERSION_CODES.JELLY_BEAN)
public class ImageActivity extends Activity implements View.OnClickListener{
    private ImageView mImageView;
    private Button mAddAlphaBtn;
    private Button mSubAlphaBtn;
    private int mAlphaCount;

    @Override
    protected void onCreate(Bundle savedInstanceState) {
        super.onCreate(savedInstanceState);
        requestWindowFeature(Window.FEATURE_NO_TITLE);
        setContentView(R.layout.imageview_layout);

        mImageView = (ImageView)findViewById(R.id.imageview);
        mAddAlphaBtn = (Button)findViewById(R.id.add);
        mSubAlphaBtn = (Button)findViewById(R.id.sub);
        mAlphaCount = mImageView.getImageAlpha();

        mAddAlphaBtn.setOnClickListener(this);
        mSubAlphaBtn.setOnClickListener(this);
    }
    @Override
    public void onClick(View v) {
        int code = Build.VERSION.SDK_INT;
        switch (v.getId()){
            case R.id.add:
                mAlphaCount-=5;
                if(code<16){
                    mImageView.setAlpha(mAlphaCount);
                }else {
                    mImageView.setImageAlpha(mAlphaCount);
                }
                break;
            case R.id.sub:
                mAlphaCount+=5;
                if(code<16){
                    mImageView.setAlpha(mAlphaCount);
                }else{
                    mImageView.setImageAlpha(mAlphaCount);
                }
                break;
            default:
                break;
        }
    }
}
结果:
ListView
1、ArrayAdapter
用于成列的显示数组中内容,每个view中只能显示单个文本。
**布局
<LinearLayout xmlns:android="http://schemas.android.com/apk/res/android"
              android:orientation="vertical"
              android:layout_width="match_parent"
              android:layout_height="match_parent">
    <ListView
        android:id="@+id/my_list_view"
        android:layout_width="match_parent"
        android:layout_height="match_parent">

    ListView>
LinearLayout>
public class ListActivity extends Activity {
private ListView mListView;
private String[] array = {"张三","李四","王五","赵六"};
@Override
protected void onCreate(Bundle savedInstanceState) {
super.onCreate(savedInstanceState);
requestWindowFeature(Window.FEATURE_NO_TITLE);
setContentView(R.layout.activity_listview);
mListView = (ListView)findViewById(R.id.my_list_view);
ArrayAdapter adapter = new ArrayAdapter(this,R.layout.my_list_item,array);
mListView.setAdapter(adapter);
}
} R.layout.my_list_item
<TextView xmlns:android="http://schemas.android.com/apk/res/android"
          android:layout_width="match_parent"
          android:layout_height="wrap_content"
          android:padding="5dp"
          android:textSize="20sp"
          android:textColor="#ff0000"/>
结果演示:
2、SimpleAdapter
能够让每个view里显示多条信息
布局:
<LinearLayout xmlns:android="http://schemas.android.com/apk/res/android"
              android:orientation="vertical"
              android:layout_width="match_parent"
              android:layout_height="match_parent">
    <ListView
        android:id="@+id/my_list_view"
        android:layout_width="match_parent"
        android:layout_height="match_parent">

    ListView>
LinearLayout>
用java代码实现列表
public class ListActivity extends Activity {
    private ListView mListView;
    private List> mData;
    @Override
    protected void onCreate(Bundle savedInstanceState) {
        super.onCreate(savedInstanceState);
        requestWindowFeature(Window.FEATURE_NO_TITLE);
        setContentView(R.layout.activity_listview);

        mListView = (ListView)findViewById(R.id.my_list_view);

        initData();
        SimpleAdapter simpleAdapter = new SimpleAdapter(this,mData,R.layout.list_simple_adapter_item,
                new String[]{"name","sex","age","hobby"},new int[]{R.id.item_name,R.id.item_sex,R.id.item_age,R.id.item_hobby});
        mListView.setAdapter(simpleAdapter);

        mListView.setOnItemClickListener(new AdapterView.OnItemClickListener() {
            @Override
            public void onItemClick(AdapterView parent, View view, int position, long id) {
                HashMap itemData = mData.get(position);
                Log.d("d",itemData.get("name")+itemData.get("sex")+itemData.get("age")+ itemData.get("hobby"));
            }
        });
    }

    private void initData() {
        mData = new ArrayList<>();
        HashMap zhangsan = createMap("張三","男","19","愛好吃");
        HashMap lisi = createMap("李四","女","21","愛好打麻將");
        HashMap wangwu = createMap("王五","男","22","愛好打遊戲");
        HashMap zhaoliu = createMap("趙六","男","17","愛好學習");
        mData.add(zhangsan);
        mData.add(lisi);
        mData.add(wangwu);
        mData.add(zhaoliu);
    }

    private HashMap createMap(String name,String sex,String age,String hobby) {
        HashMap people = new HashMap<>();
        people.put("name",name);
        people.put("sex",sex);
        people.put("age",age);
        people.put("hobby",hobby);
        return people;
    }
}
R.layout.list_simple_adapter_item
"1.0" encoding="utf-8"?>
"http://schemas.android.com/apk/res/android"
              android:orientation="horizontal"
              android:layout_margin="15dp"
              android:gravity="center_vertical"
              android:layout_width="match_parent"
              android:layout_height="match_parent">
    "@+id/item_name"
        android:layout_width="wrap_content"
        android:layout_height="wrap_content"
        android:text="姓名"/>
    "wrap_content"
        android:layout_height="wrap_content"
        android:layout_marginLeft="10dp"
        android:layout_marginRight="10dp"
        android:orientation="vertical">
        "@+id/item_sex"
            android:layout_width="wrap_content"
            android:layout_height="wrap_content"
            android:text="性別"/>
        "@+id/item_age"
            android:layout_width="wrap_content"
            android:layout_height="wrap_content"
            android:text="年齡"/>

    "@+id/item_hobby"
        android:layout_width="wrap_content"
        android:layout_height="wrap_content"
        android:text="愛好"/>
结果:

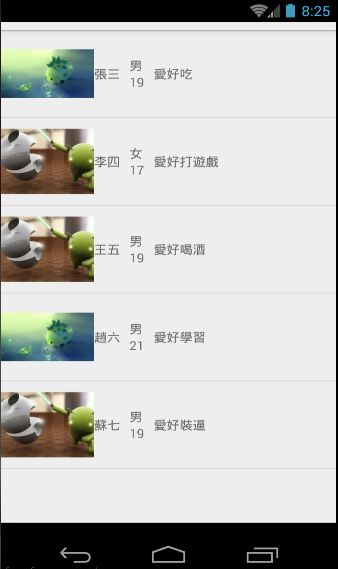
3、自定义Adapter
自定义Adapter一定要继承于BaseAdapter,且必须实现BaseAdapter的所有抽象方法。
布局:
<LinearLayout xmlns:android="http://schemas.android.com/apk/res/android"
              android:orientation="vertical"
              android:layout_width="match_parent"
              android:layout_height="match_parent">
    <ListView
        android:id="@+id/my_list_view"
        android:layout_width="match_parent"
        android:layout_height="match_parent">

    ListView>
LinearLayout>
利用java代码实现上述SimpleAdapter实现的功能并且加上个人照片信息。

1、在如图路径下新建两个包adapter、modle,包中分别新建两个类MyAdapter、Student
Student如下:
public class Student {

    private String name;
    private String sex;
    private String age;
    private String hobby;
    private int img;

    public Student(String name, String sex, String age, String hobby,int img) {
        this.name = name;
        this.sex = sex;
        this.age = age;
        this.hobby = hobby;
        this.img = img;
    }

    public int getImg() {
        return img;
    }

    public void setImg(int img) {
        this.img = img;
    }

    public String getName() {
        return name;
    }

    public void setName(String name) {
        this.name = name;
    }

    public String getSex() {
        return sex;
    }

    public void setSex(String sex) {
        this.sex = sex;
    }

    public String getAge() {
        return age;
    }

    public void setAge(String age) {
        this.age = age;
    }

    public String getHobby() {
        return hobby;
    }

    public void setHobby(String hobby) {
        this.hobby = hobby;
    }

}
MyAdapter如下:
public class MyAdapter extends BaseAdapter {
    private List mData;
    private LayoutInflater mInflater;
    public MyAdapter(LayoutInflater inflater,List mData) {
        this.mInflater = inflater;
        this.mData = mData;
    }

    @Override
    public int getCount() {
        return mData.size();
    }

    @Override
    public Object getItem(int position) {
        return position;
    }

    @Override
    public long getItemId(int position) {
        return position;
    }

    @Override
    public View getView(int position, View convertView, ViewGroup parent) {
        View view = mInflater.inflate(R.layout.list_simple_adapter_item,null);
        Student student = mData.get(position);
        TextView nameTextView = (TextView) view.findViewById(R.id.item_name);
        TextView sexTextView = (TextView) view.findViewById(R.id.item_sex);
        TextView ageTextView = (TextView) view.findViewById(R.id.item_age);
        TextView hobbyTextView = (TextView) view.findViewById(R.id.item_hobby);
        ImageView photoImageView = (ImageView) view.findViewById(R.id.item_image);
        nameTextView.setText(student.getName());
        sexTextView.setText(student.getSex());
        ageTextView.setText(student.getAge());
        hobbyTextView.setText(student.getHobby());
        photoImageView.setImageResource(student.getImg());
        return view;
    }
}
新建活动类
public class BaseAdapterTestActivity extends Activity{
    private ListView mListView;
    private MyAdapter mMyAdapter;
    private List mData;
    @Override
    protected void onCreate(Bundle savedInstanceState) {
        super.onCreate(savedInstanceState);
        requestWindowFeature(Window.FEATURE_NO_TITLE);
        setContentView(R.layout.activity_listview);
        mListView = (ListView)findViewById(R.id.my_list_view);

        dataInit();

        LayoutInflater inflater = this.getLayoutInflater();
        mMyAdapter = new MyAdapter(inflater,mData);
        mListView.setAdapter(mMyAdapter);

    }

    private void dataInit() {
        mData = new ArrayList<>();
        Student zhangsan = new Student("張三","男","19","愛好吃",R.mipmap.image);
        Student lisi = new Student("李四","女","17","愛好打遊戲",R.mipmap.pk);
        Student wangwu = new Student("王五","男","19","愛好喝酒",R.mipmap.pk);
        Student zhaoliu = new Student("趙六","男","21","愛好學習",R.mipmap.image);
        Student suqi = new Student("蘇七","男","19","愛好裝逼",R.mipmap.pk);
        mData.add(zhangsan);
        mData.add(lisi);
        mData.add(wangwu);
        mData.add(zhaoliu);
        mData.add(suqi);
    }
}
R.layout.list_simple_adapter_item
<LinearLayout xmlns:android="http://schemas.android.com/apk/res/android"
              android:orientation="horizontal"
              android:layout_margin="15dp"
              android:gravity="center_vertical"
              android:layout_width="match_parent"
              android:layout_height="match_parent">
    <ImageView
        android:id="@+id/item_image"
        android:layout_width="100dp"
        android:layout_height="100dp"/>
    <TextView
        android:id="@+id/item_name"
        android:layout_width="wrap_content"
        android:layout_height="wrap_content"
        android:text="姓名"/>
    <LinearLayout
        android:layout_width="wrap_content"
        android:layout_height="wrap_content"
        android:layout_marginLeft="10dp"
        android:layout_marginRight="10dp"
        android:orientation="vertical">
        <TextView
            android:id="@+id/item_sex"
            android:layout_width="wrap_content"
            android:layout_height="wrap_content"
            android:text="性別"/>
        <TextView
            android:id="@+id/item_age"
            android:layout_width="wrap_content"
            android:layout_height="wrap_content"
            android:text="年齡"/>
    LinearLayout>
    <TextView
        android:id="@+id/item_hobby"
        android:layout_width="wrap_content"
        android:layout_height="wrap_content"
        android:text="愛好"/>
LinearLayout>
结果演示: