Android软件自动更新升级(自动下载安装新版本)
因为Android系统版本的不同踩了不少坑,在此记录。
1.Android 8.0以后无法下载到SDK中
问题原因: 文件的存储权限原因导致的
- 动态申请sdk存储权限:Android 6.0以后都是需要动态申请权限的,注意即使动态申请了权限也要在AndroidManifest.xml申请一下,因为需要兼容低版本,低版本中没有动态申请权限一说。
- Android 7.0以后又对存储权限加了限制,应用私有目录被限制访问:
- 私有文件的文件权限不应再由所有者放宽,使用MODE_WORLD_READABLE/MODE_WORLD_WRITEABLE将抛出异常
- 向应用外传递file://URI会出发FileUriExposedException
解决方法:
问题一:判断版本,动态申请权限
 //----------------------------------------动态申请权限-------------------------------
 private void sdkPermission() {
        if(Build.VERSION.SDK_INT>Build.VERSION_CODES.M) {//高于6.0版本,动态申请权限
            if (ContextCompat.checkSelfPermission(context, "android.permission.WRITE_EXTERNAL_STORAGE") != PackageManager.PERMISSION_GRANTED) {
                ActivityCompat.requestPermissions(this, new String[]{"android.permission.WRITE_EXTERNAL_STORAGE"}, 111);
            } else {
                downloadApk();
            }
        }
        else {
            downloadApk();//低于6.0版本,直接下载apk
        }
    }

    @Override
    public void onRequestPermissionsResult(int requestCode, String[] permissions, int[] grantResults) {
        switch (requestCode) {
            case 111:
                if (grantResults.length > 0 && grantResults[0] == PackageManager.PERMISSION_GRANTED) {
                    //权限已经都通过了,可以下载apk到SDk中了
                    downloadApk();
                } else {
                   // 没有申请权限
                    showPermissionDialog();
                }
                break;
            default:
        }
}问题二:7.0以后使用FileProvider访问sdk私有文件
FileProvider:
当targetSdkVersion>=24时,会存在上述问题,可能涉及到的场景有:拍照,程序安装等。
同时,官方在v4包(api=22开始)中引入FileProvider类用于程序间私有文件的共享。该类继承自ContentProvider,使用时需 要在清单文件中注册。
-
第一步 注册:在清单文件中通过标签注册,参考代码对属性进行说明:
注意:当自定义类继承FileProvider时,需要更改name属性值为该类的相对路径。
    ...

        ...


        ...
说明:meta_data中的
name:为固定值android.support.FILE_PROVIDER_PATHS
resource:所对应的xml文件路径
-
第二步 resource对应的xml文件编写:作用设置可访问的共享文件
FileProvide只能对在paths中声明了的文件夹下的文件生成uri。
下例子就是声明私有文件目录下images/下的文件可以临时访问(文件在res/xml/目录下),下面时一个简单的样式:
1.创建xml:res/xml/file_paths
2.file_paths.xml中添加代码:
因为的子标签可以有多种,这里对所有进行说明:
子标签中属性说明:
-
第三步 FileProvider的使用:
1、通过路径生成要分享的File对象。
2、使用FileProvider生成临时访问uri (FileProvide.getUriForFile()).
3、客户端可以使用uri通过ContentResolver.openFileDescriptor获取到一个ParcelFileDescriptor
案例:
File imagePath = new File(Context.getFilesDir(), "images");
File newFile = new File(imagePath, "default_image.jpg");
Uri contentUri = getUriForFile(getContext(), "com.mydomain.fileprovider", newFile);

//改代码生成的uri为:content://com.mydomain.fileprovider/my_images/default_image.jpg
临时权限的授予方式
- 使用Context.grantUriPermission(package,Uri,mode_flags)方法,使用想要的模式。这个方法通过mode_flags方法授予客户 端package的临时权限,有两个取值,FLAG_GRANT_URI_PERMISSION和FLAG_GRANT_WRITE_URI_PERMISSOIN。该方式允许后,可通过revokeUriPermission终止,或者手机重启后
- 通过Intent
- 通过Intent的setData()方法将该uri放入Intent中
- 可以为Intent设置flag,设置一个或两个, FLAG_GRANT_URI_PERMISSION和FLAG_GRANT_WRITE_URI_PERMISSOIN
- 将Intent发送给其他app,大部分情况,通过setResult()来做 这种方法获取的权限,当接收的Activity在栈中一直活跃时都会保留,当activity栈finish时,权限会自动移除。被允许的activity所在的app的其他组件也会被允许该权限。
案例代码:
- 步骤一:在AndroidManifest.xml中的application注册FileProvider的清单文件
//临时访问文件的注册
- 步骤二:res中创建xml包,添加file_paths.xml,在file_paths.xml中添加如下文件
- 步骤三:代码中使用
private void installApk(File file) {
        Uri uri=null;
        try {
            Intent intent=new Intent(Intent.ACTION_VIEW);
            intent.setFlags(Intent.FLAG_ACTIVITY_NEW_TASK);//为intent 设置特殊的标志,会覆盖 intent 已经设置的所有标志。
            if(Build.VERSION.SDK_INT>=24){//7.0 以上版本利用FileProvider进行访问私有文件
                uri=FileProvider.getUriForFile(content,content.getPackageName() + ".android7.fileprovider",file);
                intent.addFlags(Intent.FLAG_GRANT_READ_URI_PERMISSION);//为intent 添加特殊的标志,不会覆盖,只会追加。
            }
            else {
                //直接访问文件
                uri=Uri.fromFile(file);
                intent.setAction(Intent.ACTION_VIEW);
            }
            intent.setDataAndType(uri, "application/vnd.android.package-archive");
            startActivity(intent);
        } catch (Exception e) {
            e.printStackTrace();
        }
    }
2.下载成功了没有跳出应用安装界面
原因:
Android 8.0的系统中,“未知来源应用权限”的开关被移除掉了,取而代之的是未知来源应用的管理列表,如果你想要安装某个被自己所信任的开发者的app,则需要在每一次都手动授权“安装未知应用”的许可。设置页面如下图:(在华为Android 8.0中,打开该设置页面:设置列表—>安全与隐私—>更多安全设置—>安装未知应用)
如图所示*,若某个应用选择的是“不允许”,那么假设app手动升级的时候,就无法成功跳转到安装页面进行正常的App升级流程了,此时需要手动去授权才行,但是很多用户并不知道需要这么设置。
解决方法:
安装软件前,先监测是否许可了此软件的“安装未知应用”,如果没有允许就跳转到设置页面,然后用户手动允许一下,如果允许了,就可以直接安装应用了。
步骤一:在AndroidManifest.xml文件中,添加REQUEST_INSTALL_PACKAGES权限
步骤二:判断版本号、是否允许安装此未知应用
           if(Build.VERSION.SDK_INT>Build.VERSION_CODES.O){
                    installAllowed=content.getPackageManager().canRequestPackageInstalls();//是否允许安装包
                    if(installAllowed){
                        installApk(file);//允许,安装
                    }else {
                        //跳转到设置页面,设置成允许安装
                        Intent intent = new Intent(android.provider.Settings.ACTION_MANAGE_UNKNOWN_APP_SOURCES, Uri.parse("package:" + content.getPackageName()));
                        intent.addFlags(Intent.FLAG_ACTIVITY_NEW_TASK);
                        content.startActivity(intent);
                        installApk(file);
                        return;
                    }

                }
                //版本低于8.0
                else {
                    installApk(file);
                }
//安装apk
    private void installApk(File file) {
        Uri uri=null;
        try {
            Intent intent=new Intent(Intent.ACTION_VIEW);
            intent.setFlags(Intent.FLAG_ACTIVITY_NEW_TASK);//为intent 设置特殊的标志,会覆盖 intent 已经设置的所有标志。
            if(Build.VERSION.SDK_INT>=24){//7.0 以上版本利用FileProvider进行访问私有文件
                uri=FileProvider.getUriForFile(content,content.getPackageName() + ".android7.fileprovider",file);
                intent.addFlags(Intent.FLAG_GRANT_READ_URI_PERMISSION);//为intent 添加特殊的标志,不会覆盖,只会追加。
            }
            else {
                //直接访问文件
                uri=Uri.fromFile(file);
                intent.setAction(Intent.ACTION_VIEW);
            }
            intent.setDataAndType(uri, "application/vnd.android.package-archive");
            startActivity(intent);
        } catch (Exception e) {
            e.printStackTrace();
        }
百度网盘源码:https://pan.baidu.com/s/1gKly1Syobmj1MkainAwOkw
密码:9lj5
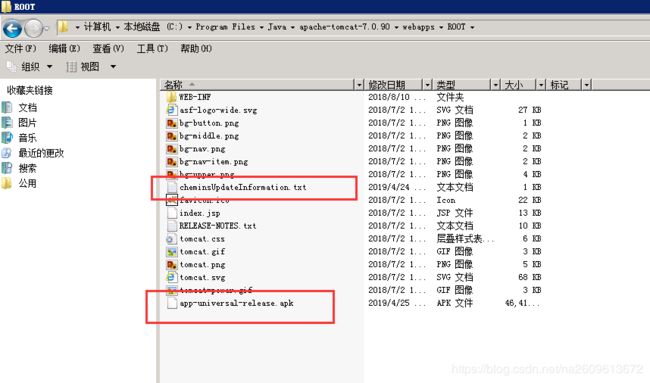
注解:版本信息和要升级的apk存放在自己tomcat服务器中的webapps—ROOT中,然后开启tomcat,代码中就可以直接访问下载了。
参考:https://blog.csdn.net/chen_white/article/details/72819814
https://www.jianshu.com/p/e05f35fbb569
注:如果你的gradle版本和我的不一样导致下载的代码不能运行,可看我另一篇代码可以解决这个问题https://blog.csdn.net/na2609613672/article/details/89086952


