SpringBoot+Spring Data JPA+JsonRpc+缓存等等实现的金融系统(二)——销售端的实现(JsonRpc和缓存)
项目已上传github:https://github.com/tihomcode/tihom-finance
SpringBoot+Spring Data JPA+JsonRpc+缓存等等实现的金融系统(一)——管理端的实现
SpringBoot+Spring Data JPA+JsonRpc+缓存等等实现的金融系统(三)——RSA签名、对账、定时任务实现
SpringBoot+Spring Data JPA+JsonRpc+缓存等等实现的金融系统(四)——JPA多数据源配置、JPA读写分离
SpringBoot+Spring Data JPA+JsonRpc+缓存等等实现的金融系统(五)——TYK、HTTPS
销售端
-
与第三方交互的门户网关
-
安全控制
-
流量统计
-
整合内部资源,对外提供接口
功能分析
- 产品查询
- 申购、赎回
- 对账
JsonRpc
与Http和WebService对比
-
http较为复杂,需要发送请求、响应请求、解析等等工作
-
webservice 报文使用xml形式浪费带宽
-
grpc、thrift等性能高,不过写法复杂,要按它们要求的形式开发
其实这些框架万变不离其宗,不同的只是用法,哪个合适我们就选哪个
JsonRpc的github地址:https://github.com/briandilley/jsonrpc4j
经验:在写接口时注意请求对象非固定参数的话一般整合成对象,这样在后期更改等等都不需要去动接口
主要步骤
- 在api模块中定义产品相关的rpc请求服务和请求对象
- 在manager中的rpc包下实现api模块中的服务类
- 在manager中的configuration包下实现RpcConfiguration将rpc相关配置交给spring管理
常见错误:
-
在配置类中对应的配置内容未添加@Bean
-
application.yml中url的配置末尾要加/,Json
-
@JsonRpcService("rpc/products") //这里不能以/开始 例如 /products这是错误的(这里可以通过自己封装来配置) -
序列化和反序列化问题
-
Cannot determine embedded database driver class for database type NONE
解决方案是配置一下在配置文件中配上dataSource相关就可以了
运行原理
先在application.yml中添加debug级别日志配置
logging:
  level:
    com.googlecode.jsonrpc4j: debug
在ProductRpcService中初始化一个加载即运行方法
@PostConstruct
public void init(){
	findOne("T001");
}
得出结果如下
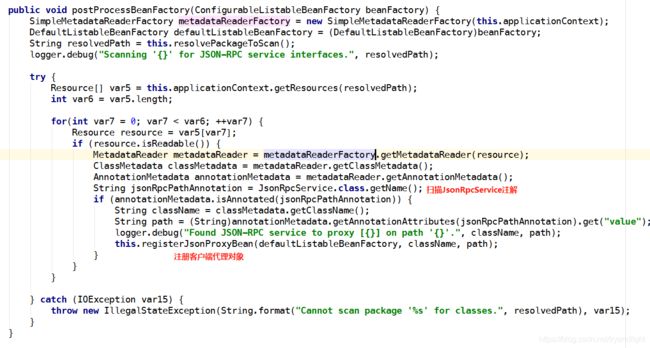
根据我们配置的信息去扫描RPC的服务接口,然后去创建代理,执行的时候就是把我们的操作信息转化成json字符串的格式传递到服务端,然后服务端使用json字符串的形式返回来
客户端唯一的入口就是RpcConfiguration里面创建的代理类的创建对象AutoJsonRpcClientProxyCreator
客户端的实现
-
扫描我们的包路径下面添加了JsonRpcService这个注解的接口
-
创建一个代理对象,对应的路径就是基础地址+注解里面配置的地址
-
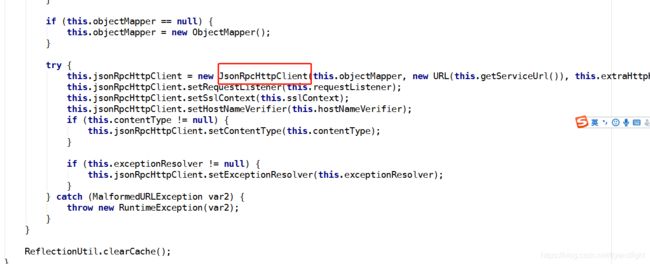
通过objectMapper将参数信息转换成Json字符串
-
通过http的形式传递到服务端
服务端的实现
-
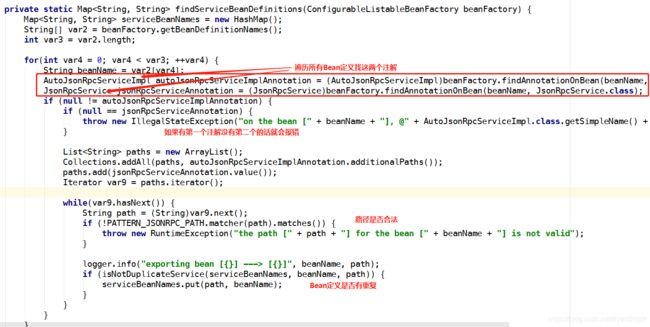
服务端的唯一 入口AutoJsonRpcServiceImplExporter,实现了BeanFactoryPostProcessor这个接口,会自动调用postProcessBeanFactory方法,这是spring的实现原理
总体流程概括
简化封装
-
在seller和manager模块中都有JsonRpcConfiguration,在我的代码中这两处都被注释了,因为后面进行简化封装,但是为了让读者能感受到变化我就没删掉
-
将两个模块中的JsonRpcConfiguration写在util(或者开一个jsonRpc的模块)的configuration/JsonRpcConfiguration中
private static Logger LOG = LoggerFactory.getLogger(JsonRpcConfiguration.class); @Bean public AutoJsonRpcServiceImplExporter rpcServiceImplExporter(){ return new AutoJsonRpcServiceImplExporter(); } @Bean @ConditionalOnProperty(value = {"rpc.client.url","rpc.client.basePackage"}) //当配置文件中有这两个属性时才需要导出客户端 public AutoJsonRpcClientProxyCreator rpcClientProxyCreator(@Value("${rpc.client.url}") String url, @Value("${rpc.client.basePackage}") String basePackage){ AutoJsonRpcClientProxyCreator clientProxyCreator = new AutoJsonRpcClientProxyCreator(); try { //配置基础url clientProxyCreator.setBaseUrl(new URL(url)); } catch (MalformedURLException e) { LOG.error("创建rpc服务地址错误"); } //让它扫描api下rpc服务的包 clientProxyCreator.setScanPackage(basePackage); return clientProxyCreator; } -
然后把两个模块中的JsonRpcConfiguration删除
-
在seller的application.yml中加上
rpc: client: url: http://localhost:8081/manager/ #结尾记得加上/,否则会报错 basePackage: com.tihom.api -
在resources/META-INF/spring.factories下
org.springframework.boot.autoconfigure.EnableAutoConfiguration =com.tihom.util.configuration.JsonRpcConfiguration -
**注意:**这里可能会报找不到productRpc的错误,解决方案就是在api模块中加上对util模块的依赖即可
缓存
- 产品查询
- 请求频繁、变更少
- 减少数据库压力
- 提高响应速度
- 将产品数据放在销售端,不要每次都去管理端查询产品,直接在内存中读取数据
- 流行框架
- memcache 最早 结构单一 k/v
- redis 数据结构多、持久化
- hazelcast 数据结构更多、功能更多、集群更方便、管理界面更好、spring整合方便
安装
添加依赖
    com.hazelcast
    hazelcast
    3.10.4
将下图xml中内容复制到seller模块的resources下的hazelcast.xml中
dev
dev-pass
http://localhost:8080/hazelcast-mancenter
5701
0
224.2.2.3
54327
127.0.0.1
127.0.0.1
my-access-key
my-secret-key
us-west-1
ec2.amazonaws.com
hazelcast-sg
type
hz-nodes
10.10.1.*
PBEWithMD5AndDES
thesalt
thepass
19
16
0
true
0
1
0
-1
com.hazelcast.spi.merge.PutIfAbsentMergePolicy
mapName
10000
0
cacheName
10000
0
1
SET
com.hazelcast.spi.merge.PutIfAbsentMergePolicy
OBJECT
true
true
com.hazelcast.spi.merge.PutIfAbsentMergePolicy
1
com.hazelcast.spi.merge.PutIfAbsentMergePolicy
1
com.hazelcast.spi.merge.PutIfAbsentMergePolicy
0
0
0
1000
true
CANCEL_RUNNING_OPERATION
0
1
0
10
BLOCK
true
10000
1
0
0
BINARY
com.hazelcast.spi.merge.PutIfAbsentMergePolicy
100
600000
0
0
true
com.hazelcast.spi.merge.PutIfAbsentMergePolicy
com.hazelcast.spi.merge.PutIfAbsentMergePolicy
0
1
0
HyperLogLogMergePolicy
100
1
16
com.hazelcast.spi.merge.PutIfAbsentMergePolicy
1000
1
2147483647
true
然后运行manager和seller,上官网下载管理页面工具包Management Center 3.10.2 下载后解压
进入文件夹,shift+右键在此处创建命令行工具,直接运行start.bat
有这样的显示表示成功了
测试功能
在seller包下直接定义一个HazelcastMapTest类
@Component
public class HazelcastMapTest {

    @Autowired
    private HazelcastInstance hazelcastInstance;

    @PostConstruct
    public void put(){
        Map map = hazelcastInstance.getMap("tihom");
        map.put("name","tihom");
    }

}
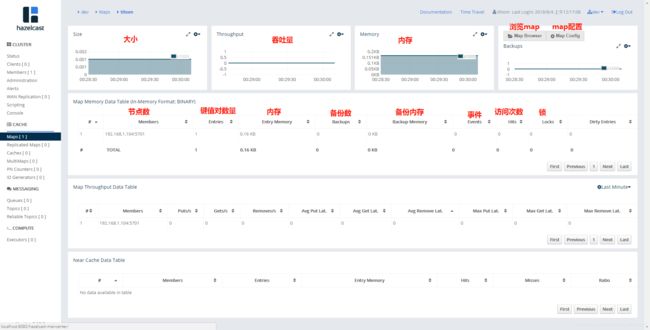
运行manager和seller,打开管理工具查看
Map Config的配置在hazelcast.xml中可以自定义配置,具体配置自行谷歌或百度
整合
添加依赖包
    com.hazelcast
    hazelcast-spring
    3.10.4
在seller的application.yml中
spring:
  cache:
	type: hazelcast
重构代码
创建一个新的类ProductCache,以后调用方法都先经过这个类,ProductRpcReq中直接调用ProductCache中方法即可
/**
 * 产品缓存
 * @author TiHom
 * create at 2018/8/4 0004.
 */

@Component
public class ProductCache {
    static final String CACHE_NAME = "tihom_product";

    private static Logger LOG  = LoggerFactory.getLogger(ProductCache.class);

    @Autowired
    private ProductRpc productRpc;

    @Autowired
    private HazelcastInstance hazelcastInstance;

    public List readAllCache(){
        //获取缓存中的map
        Map map = hazelcastInstance.getMap(CACHE_NAME);
        List products = null;
        //如果map中有数据,则从缓存中读取数据
        if(map.size()>0){
            products = new ArrayList<>();
            products.addAll(map.values());
        } else {
            products = findAll();
        }
        return products;
    }

    public List findAll(){
        ProductRpcReq req = new ProductRpcReq();
        List status = new ArrayList<>();
        status.add(ProductStatus.IN_SELL.name());

        req.setStatusList(status);
        LOG.info("rpc查询全部产品,请求:{}",req);
        List result = productRpc.query(req);
        LOG.info("rpc查询全部产品,结果:{}",result);
        return result;
    }
    /**
     * 读取缓存(如果缓存中有了就直接从缓存拿,没有才去调用下面的方法)
     * @param id
     * @return
     */
    @Cacheable(cacheNames = CACHE_NAME)
    public Product readCache(String id){
        LOG.info("rpc查询单个产品,请求:{}",id);
        Product result = productRpc.findOne(id);
        LOG.info("rpc查询单个产品,结果:{}",result);
        return result;
    }

    /**
     * 更新缓存
     * @param product
     * @return
     */
    @CachePut(cacheNames = CACHE_NAME,key = "#product.id")  //把product.id作为key,Product作为value
    public Product putCache(Product product){
        return product;
    }

    /**
     * 清除缓存
     * @param id
     */
    @CacheEvict(cacheNames = CACHE_NAME) //通过id去缓存数据中查询,如果有就清除掉
    public void removeCache(String id){

    }
}
ProductRpcService类改变,之前的执行方法转移到ProductCache类中
/**
 * 产品相关服务
 * @author TiHom
 * create at 2018/8/3 0003.
 */

@Service
//实现ApplicationListener监听器接口,监听ContextRefreshedEvent事件,容器初始化完成后会触发事件
public class ProductRpcService implements ApplicationListener {

    private static Logger LOG = LoggerFactory.getLogger(ProductRpcService.class);

    @Autowired
    private ProductRpc productRpc;
    @Autowired
    private ProductCache productCache;

    /**
     * 查询全部产品
     * @return
     */
    public List findAll(){
        return productCache.readAllCache();
    }

    public Product findOne(String id){
        Product product = productCache.readCache(id);
        if(product==null){
            productCache.removeCache(id);
        }
        return product;
    }

    @Override
    public void onApplicationEvent(ContextRefreshedEvent contextRefreshedEvent) {
        List products = findAll();
        products.forEach(product -> {
            productCache.putCache(product);
        });
    }


//    @PostConstruct
//    public void init(){
//        findOne("T001");
//    }

}
注解解析(常用)
-
@Cacheable:(开启缓存)
-
value=cacheNames
-
condition
-
key
默认策略 自定义策略 如果方法没有参数,则使用0作为key #参数名 #product.id 如果只有一个参数的话则使用该参数作为key #p参数index #p0.id 如果参数多于一个的话则使用所有参数的hashCode作为key
-
-
CachePut(更新缓存)
- 每次都会执行
-
CacheEvict(清空缓存)
- allEntries:true的话就清空所有缓存数据
- beforeInvocation:执行方法之前就清空缓存了
缓存维护
产品状态变化的时候,从审核中变成销售中的时候,销售端的缓存数据就应该添加产品,如果从销售中变成已完成就要从缓存中清除数据。做到随时更新到缓存中。
消息系统
- Topic:发布订阅模式。有生产者和消费者,每个消费者都会收到所有的消息。
- Queue:队列模式。一个消息只会给一个消费者使用。
- 消费者分组(虚拟主题),是上面两种的结合体,下面会详细解释
框架
- Kafka
- ActiveMQ 安装使用简单
- RocketMQ
使用方式不同但原理基本一致。
在manager模块中添加ProductStatusManager管理产品状态服务,一旦发生产品状态改变,则触发消息系统发送事件到目的地
@Component
public class ProductStatusManager {

  private static Logger LOG = LoggerFactory.getLogger(ProductStatusManager.class);

  //发送的目的地
  private static final String MQ_DESTINATION = "VirtualTopic.PRODUCT_STATUS";

  @Autowired
  private JmsTemplate jmsTemplate;

  public void changeStatus(String id, ProductStatus status){
      ProductStatusEvent event = new ProductStatusEvent(id,status);
      LOG.info("send message:{}",event);
      //目的地和事件对象
      jmsTemplate.convertAndSend(MQ_DESTINATION,event);
  }

//    @PostConstruct
//    public void init(){
//        changeStatus("T001",ProductStatus.IN_SELL);
//    }

}
在seller模块中的ProductRpcService中添加监听JMS消息的监听器
//监听的目的地址
private static final String MQ_DESTINATION = "Consumer.cache.VirtualTopic.PRODUCT_STATUS";

@JmsListener(destination = MQ_DESTINATION)     //接受状态改变的事件
void updateCache(ProductStatusEvent event){
	//首先要清除缓存,因为要重新读取数据,如果不清除空缓存会读取缓存中的数据
    LOG.info("receive event:{}",event);
    productCache.removeCache(event.getId());  //单个对象的缓存清除
    if(ProductStatus.IN_SELL.equals(event.getStatus())){
    	//如果是销售中的状态,读取缓存
        productCache.readCache(event.getId());
    }

}
那么对于这里的MQ_DESTINATION的赋值和原理实现是怎样的呢?
Topic最大的限制就是同一个ClientId的订阅者,任何时刻只能有一个活跃。所以我们在分布式部署时,就会很麻烦,比如一个应用部署成多个实例,且它们都有相同的Topic Consumer配置,那么意味着一个实例部署成功后,其它的实例都会因为无法订阅Topic而导致故障;同时也意味着,如果这个Topic Consumer失效后,我们不能自动让其他Consumer的接管它。但是Queue却没有这些限制,因为Queue可以同时有任意多个消费者,它们可以并发的消费消息,从而实现“负载均衡”。如果我们期望Topic也能如此,那么可以用VirtualTopic。
VirtualTopic 是一种取Topic和Queue两种方式的结合方案,因为Topic满足一对多的需求,但是不能持久化;而Queue满足持久化,但是只能一对一,多队列又无法保证发送的一致性,不能做到一个订阅多个应用同时接收且持久化。
这时VirtualTopic 给出了较好的解决方案,对于生产者来说,VirtualTopic 是一个Topic,它发送订阅VirtualTopic.PRODUCT_STATUS,这时发出的是Topic则一对多但不持久,而broker端则将订阅同时发放给不同队列,对于消费者而言,broker处理的订阅是一个队列,如Consumer.cache1.VirtualTopic.PRODUCT_STATUS和Consumer.cache2.VirtualTopic.PRODUCT_STATUS,然后Consumer.cache1.VirtualTopic.PRODUCT_STATUS对应的是消费端1(订单),Consumer.cache2.VirtualTopic.PRODUCT_STATUS对应的是消费端2(结算),这样就满足了即能一对多又能持久化。


