数据收集之Flume
Flume最初由Cloudera开发,于2011年6月贡献给Apache,于2012成为顶级项目。在孵化这一年,基于老版本的Flume(Flume OG:Flume Original Generation 即Flume 0.9.x版本)进行重构,摒弃了Zookeeper和Master,升级为现在的轻量级的Flume(Flume NG:Flume Next Generation,即Flume 1.x版本),
架构要点
核心概念
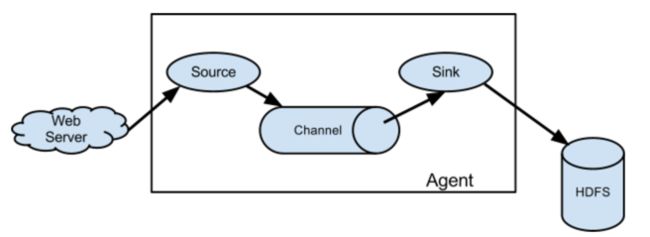
- Agent:Flume进程,包含组件Source、Channel、Sink。
- Source:源。收集数据,发送给Channel。
- Sink:输出。从Channel取数据,发送到目标地。
- Channel:缓冲。缓存Source传递过来的Event。
- Event:事件。Flume处理数据的最小单元。由键值对的Header和字节数组Body组成。
基本架构
单个Flume Agent基本架构。
运行机制
提到Flume的运行机制,就不得不提Flume的事务机制和可靠性。
Flume最核心的就是把数据从数据源收集过来,再送达到目的地。为了保证At-Least-Once投送,Agent会事先把Events缓存起来并采用两阶段事务提交的方式。每一批次对应两个事务,Source-Channel事务,保证这一Batch放入Channel的操作是原子的,要么全部放入Channel,要么一个不放;Channel-Sink事务,保证事务的投送是原子的,要么全部投送成功,要么全部回滚。
主要组件
Source
HTTP Source
某些环境可能不能部署Flume,此时可用HTTP Source接收数据倒Flume中。
在${FlUME_HOME}/conf目录下创建http_source.conf,内容如下:
agent.sources = s1
agent.channels = c1
agent.sinks = r1

#source
agent.sources.s1.type = http
agent.sources.s1.bind = 0.0.0.0
agent.sources.s1.port = 9600

#channel
agent.channels.c1.type = memory

#sink
agent.sinks.r1.type = logger

agent.sources.s1.channels = c1
agent.sinks.r1.channel = c1
在${FlUME_HOME}目录下启动agent
bin/flume-ng agent -c conf -f conf/http_source.conf -Dflume.root.logger=DEBUG,console -n agent发送POST请求,观察日志变化。
curl -X POST -d'[{"headers":{"Header1":"value1","Header2":"value2"},"body":"this is http source"}]' http://192.168.113.102:9600Avro Source
在${FlUME_HOME}/conf目录下创建avro_source.conf,内容如下:
agent.sources = s1
agent.channels = c1
agent.sinks = r1

#source
agent.sources.s1.type = avro
agent.sources.s1.bind = 0.0.0.0
agent.sources.s1.port = 4141

#channel
agent.channels.c1.type = memory

#sink
agent.sinks.r1.type = logger

agent.sources.s1.channels = c1
agent.sinks.r1.channel = c1
在${FlUME_HOME}目录下启动agent
bin/flume-ng agent -c conf -f conf/avro_source.conf -Dflume.root.logger=DEBUG,console -n agent在${FlUME_HOME}目录下启动一个avro-client 客户端生产数据
bin/flume-ng avro-client -H localhost -p 4141 -F README.md可以看到,README.md中的内容被接收并打印出来了。
Exec Source
Exec Source可执行Linux命令,并将输出同步给Sink。
在${FlUME_HOME}/conf目录下创建exec_source.conf,内容如下:
agent.sources = s1
agent.channels = c1
agent.sinks = r1

#source
agent.sources.s1.type = exec
agent.sources.s1.command = tail -f /data/software/apache-flume-1.7.0-bin/data/access.log

#channel
agent.channels.c1.type = memory

#sink
agent.sinks.r1.type = logger

agent.sources.s1.channels = c1
agent.sinks.r1.channel = c1
在${FlUME_HOME}目录下启动agent
bin/flume-ng agent -c conf -f conf/exec_source.conf -Dflume.root.logger=DEBUG,console -n agent向/data/software/apache-flume-1.7.0-bin/data/access.log中追加数据,观察日志变化。
注意:agent重启会重复消费。
Spooling Directory Source
Spooling Directory Source可监听一个目录,同步目录中的新文件到sink,被同步完的文件可被立即删除或被打上标记。适合用于同步新文件,但不适合对实时追加日志的文件进行监听并同步。
在${FlUME_HOME}/conf目录下创建spooling_directory_source.conf ,内容如下:
agent.sources = s1
agent.channels = c1
agent.sinks = r1

#source
agent.sources.s1.type = spooldir
#监控目录
agent.sources.s1.spoolDir = /data/software/apache-flume-1.7.0-bin/data
#Event Header中添加文件绝对路径
agent.sources.s1.fileHeader = true

#channel
agent.channels.c1.type = memory

#sink
agent.sinks.r1.type = logger

agent.sources.s1.channels = c1
agent.sinks.r1.channel = c1
在${FlUME_HOME}目录下启动agent
bin/flume-ng agent -c conf -f conf/spooling_directory_source.conf -Dflume.root.logger=DEBUG,console -n agentcp一个文件到/data/software/apache-flume-1.7.0-bin/data,观察agent日志变化,且能看到被同步的文件被打上.COMPLETED后缀。
Taildir Source
Taildir Source可实时监控一批文件,并记录每个文件最新消费位置。
具体可见:Flume Taildir Source监听实时追加内容的文件
Kafka Source
在${FlUME_HOME}/conf目录下创建kafka_source.conf ,内容如下:
agent.sources = s1
agent.channels = c1
agent.sinks = r1

#source
agent.sources.s1.type = org.apache.flume.source.kafka.KafkaSource
agent.sources.s1.kafka.bootstrap.servers = localhost:9092
agent.sources.s1.kafka.topics = testTopic3
agent.sources.s1.kafka.consumer.group.id = consumer_testTopic3

#channel
agent.channels.c1.type = memory

#sink
agent.sinks.r1.type = logger

agent.sources.s1.channels = c1
agent.sinks.r1.channel = c1
在${FlUME_HOME}目录下启动agent
bin/flume-ng agent -c conf -f conf/kafka_source.conf -Dflume.root.logger=DEBUG,console -n agent向testTopic3发送数据,可以看到消息被打印出来。如{ headers:{topic=testTopic3, partition=2, timestamp=1534177649622} body: 6E 6E 6E nnn }
Sink
Logger Sink
主要用于测试。将收到的Events以Logger INFO Level的方式打印出来。
在Source中多次使用,这里不再赘述。
File Roll Sink
Events存放本地文件系统。
在${FlUME_HOME}/conf目录下创建file_roll_sink.conf ,内容如下:
agent.sources = s1
agent.channels = c1
agent.sinks = r1

#source
agent.sources.s1.type = http
agent.sources.s1.bind = 0.0.0.0
agent.sources.s1.port = 9600

#channel
agent.channels.c1.type = memory

#sink
agent.sinks.r1.type = file_roll
#文件存放目录
agent.sinks.r1.sink.directory = /data/software/apache-flume-1.7.0-bin/data/logs
#多久生成一个新文件,单位秒。指定0将禁用滚动并导致所有事件都写入单个文件。
agent.sinks.r1.rollInterval = 30

agent.sources.s1.channels = c1
agent.sinks.r1.channel = c1
在${FlUME_HOME}目录下启动agent
bin/flume-ng agent -c conf -f conf/file_roll_sink.conf -Dflume.root.logger=DEBUG,console -n agent向9600端口发送数据,观察日志及 /data/software/apache-flume-1.7.0-bin/data目录变化。可看到每隔30秒生成一个新文件。
for i in `seq 1 100`;do curl -X POST -d'[{"headers":{"Header1":"value1","Header2":"value2"},"body":"Hello"}]' http://192.168.113.102:9600;doneHDFS Sink
Events写到HDFS 分布式文件系统中。
在${FlUME_HOME}/conf目录下创建hdfs_sink.conf ,内容如下:
agent.sources = s1
agent.channels = c1
agent.sinks = r1

#source
agent.sources.s1.type = exec
agent.sources.s1.command = tail -f /data/software/apache-flume-1.7.0-bin/data/access.log

#channel
agent.channels.c1.type = memory

#sink
agent.sinks.r1.type = hdfs
#使用服务器本地时间代替Event Header中的timestamp
#注意:HDFS Sink中所有与时间相关的转义序列,事件标题中必须存在带有“timestamp”键的标头(除非hdfs.useLocalTimeStamp设置为true)>。自动添加timestamp的一种方法是使用TimestampInterceptor
agent.sinks.r1.hdfs.useLocalTimeStamp = true
#hdfs 目录 这里%Y%m%d取自timestamp
agent.sinks.r1.hdfs.path = hdfs://node1:8020/test/%Y%m%d/accessLog
#hdfs 目录下文件前缀
agent.sinks.r1.hdfs.filePrefix = data
#hdfs 目录下文件后缀
agent.sinks.r1.hdfs.fileSuffix = .log
#多少秒生成一个新文件 0:不根据时间滚动
agent.sinks.r1.hdfs.rollInterval = 60
#文件达到多少字节后生成一个新文件 0:不根据文件大小滚动
agent.sinks.r1.hdfs.rollSize = 1024
#多个个Event生成一个新文件 0:不根据事件数量滚动
agent.sinks.r1.hdfs.rollCount = 10
#Event数量达到多少向hdfs刷新一次
agent.sinks.r1.hdfs.batchSize = 100
#指定压缩格式 支持gzip, bzip2, lzo, lzop, snappy
#agent.sinks.r1.hdfs.codeC =
#文件类型 支持SequenceFile, DataStream or CompressedStream
#DataStream 不启用压缩
agent.sinks.r1.hdfs.fileType = DataStream
#文件格式
agent.sinks.r1.hdfs.writeFormat = Text

agent.sources.s1.channels = c1
agent.sinks.r1.channel = c1
在${FlUME_HOME}目录下启动agent
bin/flume-ng agent -c conf -f conf/hdfs_sink.conf -Dflume.root.logger=DEBUG,console -n agent向/data/software/apache-flume-1.7.0-bin/data/access.log中追加文件,观察日志和HDFS目录变化。
for i in `seq 1 1000`;do echo "Hello Flume ${i}">> /data/software/apache-flume-1.7.0-bin/data/access.log;sleep 1;done可以看到,HDFS中生成了新文件。内容如下:
hdfs dfs -cat /test/20180814/accessLog/data.1534211236747.log
Hello Flume 21
Hello Flume 22
Hello Flume 23
Hello Flume 24
Hello Flume 25
Hello Flume 26
Hello Flume 27
Hello Flume 28
Hello Flume 29
Hello Flume 30
Kafka Sink
Events 写到Hive 分区或Hive表中。
在${FlUME_HOME}/conf目录下创建kafka_sink.conf ,内容如下:
agent.sources = s1
agent.channels = c1
agent.sinks = r1

#source
agent.sources.s1.type = netcat
agent.sources.s1.bind = localhost
agent.sources.s1.port = 6666

#channel
agent.channels.c1.type = memory

#sink
agent.sinks.r1.type = org.apache.flume.sink.kafka.KafkaSink
agent.sinks.r1.kafka.bootstrap.servers = node2:6667,node3:6667,node1:6667
agent.sinks.r1.kafka.topic = testTopic

agent.sources.s1.channels = c1
agent.sinks.r1.channel = c1
在${FlUME_HOME}目录下启动agent
bin/flume-ng agent -c conf -f conf/kafka_sink.conf -Dflume.root.logger=DEBUG,console -n agent向端口6666发送数据,观察到kafka-console-consumer消费出了数据。
telnet localhost 6666
Hello Flume!
其他Sink
- Hive Sink
通过Hive的事务,将Events近实时写到Hive分区中。注意:Hive必须开启事务,Hive的表必须是内部表,且是桶表,需存储为ORC格式。 - HBase Sink
将Events存储到HBase中。写入HBase不成功会尝试重写。 - Async HBase Sink
以异步的方式将Events存储到HBase中,比普通的HBase Sink要快。 - Elasticsearch Sink
Flume 支持的Elasticsearch版本较老。各种不兼容问题。 - Avro Sink
Avro Sink多用于多Agent节点间数据传输。 - File Roll Sink
把Events存储到本地文件系统。 - Null Sink
丢弃从Channel中取到的Events。
Channel
Channel临时缓存Events。Source向Channel添加事件,Sink从Channel删除事件。
Memory Channel
Events存储在内存中。吞吐量高,但Agent重启、JVM崩溃会丢数据。
关键参数:
agent.channels.c1.type = memory
channel的类型是memoryagent.channels.c1.capacity
默认100。channel中存储的最大事件数agent.channels.c1.transactionCapacity
默认100。指源Source单次事务可以写入的最大事件数,也指Sink单次事务所能读取的最大事件数。可以增大该值,但要注意还要同时增加JVM堆空间大小,因为事件是以Event对象的形式存在于堆中的。同时还要注意,增大该值可以提升速度,但事务失败就要回滚更多的数据。agent.channels.c1.keep-alive
单位是秒,默认3秒。指channel已满,Source线程将Events写入到channel中的等待时间,这个值设的太大容易导致Events堵在Source端。会抛出异常。agent.channels.c1.byteCapacityBufferPercentage与agent.channels.c1.byteCapacity
使用字节而非数量来控制内存中事件的总大小。避免OutOfMemoryError。
File Channel
Events持久化到文件中。多个Channel,应为每个Channel显示指定检查点目录和数据目录,且尽量在不同磁盘。
关键参数:
agent.channels.c1.type = file
agent.channels.c1.dataDirs
数据持久化目录。逗号分隔。在不同磁盘上使用多个目录可以提高文件通道的性能。agent.channels.c1.checkpointDir
检查点目录。agent.channels.c1.checkpointInterval
两个检查点之间的毫秒数。agent.channels.c1.useDualCheckpoints与agent.channels.c1.backupCheckpointDir
备份检查点目录。agent.channels.c1.capacity
默认1000000。同Memory Channel。agent.channels.c1.transactionCapacity
默认10000。同Memory Channel。agent.channels.c1.keep-alive
单位是秒,默认3秒。同Memory Channel。
在${FlUME_HOME}/conf目录下创建file_channel_sink.conf ,内容如下:
agent.sources = s1
agent.channels = c1
agent.sinks = r1

#source
agent.sources.s1.type = netcat
agent.sources.s1.bind = localhost
agent.sources.s1.port = 6666

#channel
agent.channels.c1.type = file
agent.channels.c1.dataDirs = /data/software/apache-flume-1.7.0-bin/data/fileChannel/dataDirs
agent.channels.c1.checkpointDir = /data/software/apache-flume-1.7.0-bin/data/fileChannel/checkpointDir
agent.channels.c1.capacity = 1000
agent.channels.c1.transactionCapacity = 100

#sink
agent.sinks.r1.type = logger

agent.sources.s1.channels = c1
agent.sinks.r1.channel = c1
在${FlUME_HOME}目录下启动agent
bin/flume-ng agent -c conf -f conf/file_channel_sink.conf -Dflume.root.logger=DEBUG,console -n agent向6666端口发送一段时间数据后,将agent关掉,然后重启。观察变化。
for i in `seq 1 100000`;do echo ${i} > /dev/tcp/localhost/6666;echo ${i};done重启后可以看到,flume会接着消费。
其他Channel
Kafka Channel
Events缓存在Kafka中,但需要Kafka 0.9以上的版本。JDBC Channel
Events缓存在数据库中。目前只支持Derby。Spillable Memory Channel
Events同时缓存在内存和文件中。内存做主存。实验性的,不建议生产下使用。Pseudo Transaction Channel
仅用于测试,不用于生产。
Channel Selector
一个源Source可以被选择性的写入多个Channel中,叫Channel选择器。
多路复制
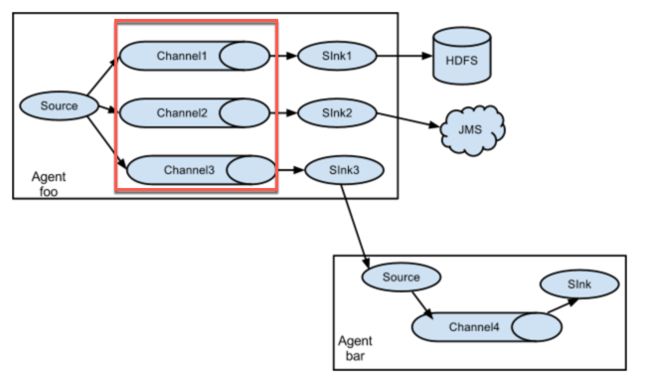
同一Source数据,复制多份,即复制到多个Channel,每个Channel最终分别发向不同Sink,如HDFS、Kafka、本地文件系统等。
关键参数:
agent.sources.s1.selector.type = replicating
channel selector为多路复制。agent.sources.s1.selector.optional = c1
如下c1是可选channel。无法写入c1的事务会被忽略。c2和c3未标记为可选,无法写入这些channel将导致事务失败。
在${FlUME_HOME}/conf目录下创建replicating_channel_selector.conf 内容如下:
agent.sources = s1
agent.channels = c1 c2 c3
agent.sinks = r1 r2 r3

#source 配置
#source
agent.sources.s1.type = netcat
agent.sources.s1.bind = localhost
agent.sources.s1.port = 6666

#配置channel selector
agent.sources.s1.selector.type = replicating
agent.sources.s1.channels = c1 c2 c3
agent.sources.s1.selector.optional = c1

#channel 配置
#channel c1
agent.channels.c1.type = file
agent.channels.c1.dataDirs = /data/software/apache-flume-1.7.0-bin/data/fileChannel/dataDirs
agent.channels.c1.checkpointDir = /data/software/apache-flume-1.7.0-bin/data/fileChannel/checkpointDir
agent.channels.c1.capacity = 1000
agent.channels.c1.transactionCapacity = 100

#channel c2
agent.channels.c2.type = memory

#channel c3
agent.channels.c3.type = memory

#sink 配置
#sink r1
agent.sinks.r1.type = logger

#sink r2
agent.sinks.r2.type = org.apache.flume.sink.kafka.KafkaSink
agent.sinks.r2.kafka.bootstrap.servers = node2:6667,node3:6667,node1:6667
agent.sinks.r2.kafka.topic = testTopic

#sink r3
agent.sinks.r3.type = file_roll
agent.sinks.r3.sink.directory = /data/software/apache-flume-1.7.0-bin/data/file_roll

#source/channel/sink绑定
agent.sinks.r1.channel = c1
agent.sinks.r2.channel = c2
agent.sinks.r3.channel = c3
在${FlUME_HOME}目录下启动agent
bin/flume-ng agent -c conf -f conf/replicating_channel_selector.conf -Dflume.root.logger=DEBUG,console -n agent向6666端口发送数据后,在控制台、file_roll目录、kafka中均收到一样的数据。
for i in `seq 1 100000`;do echo '{"name":"'"name${i}"'","age":10}' > /dev/tcp/localhost/6666;echo ${i};done多路复用
同一Source,根据某个Header值分别写入到不同Channel中。
关键参数:
agent.sources.s1.selector.type = multiplexing
channel selector为多路复用。agent.sources.s1.selector.header
用Header中哪个字段的值分流。agent.sources.s1.selector.mapping.*
值匹配到*则发送到相应channel。
在${FlUME_HOME}/conf目录下创建multiplexing_channel_selector.conf 内容如下:
agent.sources = s1
agent.channels = c1 c2 c3
agent.sinks = r1 r2 r3

#source 配置
#source
agent.sources.s1.type = netcat
agent.sources.s1.bind = localhost
agent.sources.s1.port = 6666

#这里使用拦截器向Event Header中添加字段
agent.sources.s1.interceptors = i1
#基于正则从Event body中抽取字段,添加到Event Header中
agent.sources.s1.interceptors.i1.type = regex_extractor
agent.sources.s1.interceptors.i1.regex = "log_type":"(\\w+)".*
agent.sources.s1.interceptors.i1.serializers = i1_ser1
agent.sources.s1.interceptors.i1.serializers.i1_ser1.name = log_type

#配置channel selector 为多路复用
agent.sources.s1.channels = c1 c2 c3
agent.sources.s1.selector.type = multiplexing
#使用Header中log_type字段的值分流
agent.sources.s1.selector.header = log_type
#Header中log_type=AppError 发送到channel c1
agent.sources.s1.selector.mapping.AppError = c1
#Header中log_type=UserInfo 发送到channel c2
agent.sources.s1.selector.mapping.UserInfo = c2
#Header中log_type=AccessLog 发送到channel c3
agent.sources.s1.selector.mapping.AccessLog = c3

#channel 配置
#channel c1
agent.channels.c1.type = file
agent.channels.c1.dataDirs = /data/software/apache-flume-1.7.0-bin/data/fileChannel/dataDirs
agent.channels.c1.checkpointDir = /data/software/apache-flume-1.7.0-bin/data/fileChannel/checkpointDir
agent.channels.c1.capacity = 1000
agent.channels.c1.transactionCapacity = 100

#channel c2
agent.channels.c2.type = memory

#channel c3
agent.channels.c3.type = memory

#sink 配置
#sink r1
agent.sinks.r1.type = logger

#sink r2
agent.sinks.r2.type = org.apache.flume.sink.kafka.KafkaSink
agent.sinks.r2.kafka.bootstrap.servers = node2:6667,node3:6667,node1:6667
agent.sinks.r2.kafka.topic = testTopic

#sink r3
agent.sinks.r3.type = file_roll
agent.sinks.r3.sink.directory = /data/software/apache-flume-1.7.0-bin/data/file_roll


#source/channel/sink绑定
agent.sinks.r1.channel = c1
agent.sinks.r2.channel = c2
agent.sinks.r3.channel = c3
在${FlUME_HOME}目录下启动agent
bin/flume-ng agent -c conf -f conf/multiplexing_channel_selector.conf -Dflume.root.logger=DEBUG,console -n agent向6666端口发送数据后,在控制台、file_roll目录、kafka中分别收到各自的数据。
log1='{"log_type":"AppError","msg":"this is AppError !"}'
log2='{"log_type":"UserInfo","msg":"this is UserInfo !"}'
log3='{"log_type":"AccessLog","msg":"this is AccessLog !"}'

#将会在kafka中收到此类数据
for i in `seq 1 100000`;do echo "${log2}" > /dev/tcp/localhost/6666;echo ${i};done
Sink Processors
通过接收器组,来解决Sink的单点故障与负载均衡问题。
故障转移 Failover Sink Processor
维护一个带优先级的sink列表,对失败根据优先级进行路由。若sinks都不可用,则事务会回滚。
关键参数:
agent.sinkgroups.g1.processor.type = failover
配置接收器组中接收器之间处理方式为故障转移。agent.sinkgroups.g1.processor.priority.r1
配置每个接收器sink的优先级。agent.sinkgroups.g1.processor.maxpenalty
不可用接收器的最大等待毫秒数。首次失败,间隔一秒后失败sink才可使用,之后指数级等待直到达到最大上限maxpenalty。
在${FlUME_HOME}/conf目录下创建failover_sink_processor.conf 内容如下:
agent.sources = s1
agent.channels = c1
agent.sinks = r1 r2

#source
agent.sources.s1.type = netcat
agent.sources.s1.bind = localhost
agent.sources.s1.port = 6666

#channel
agent.channels.c1.type = memory

#sink
agent.sinkgroups = g1
agent.sinkgroups.g1.sinks = r1 r2
#故障转移
agent.sinkgroups.g1.processor.type = failover
#sink r1 的优先级是10
agent.sinkgroups.g1.processor.priority.r1 = 10
#sink r2 的优先级是100 会优先写到文件
agent.sinkgroups.g1.processor.priority.r2 = 100
#不可用接收器的最大等待毫秒数
agent.sinkgroups.g1.processor.maxpenalty = 10000

#sink r1
agent.sinks.r1.type = org.apache.flume.sink.kafka.KafkaSink
agent.sinks.r1.kafka.bootstrap.servers = node2:6667,node3:6667,node1:6667
agent.sinks.r1.kafka.topic = testTopic

#sink r2
agent.sinks.r2.type = file_roll
agent.sinks.r2.sink.directory = /data/software/apache-flume-1.7.0-bin/data/file_roll

agent.sources.s1.channels = c1
agent.sinks.r1.channel = c1
agent.sinks.r2.channel = c1
在${FlUME_HOME}目录下启动agent
bin/flume-ng agent -c conf -f conf/failover_sink_processor.conf -Dflume.root.logger=DEBUG,console -n agent向端口发送数据,可以看到,数据都写进file_roll sink对应的本地目录,然后删掉file_roll sink本地目录(模拟某个sink挂掉),数据发送到kafka。
log2='{"log_type":"UserInfo","msg":"this is UserInfo !"}'
for i in `seq 1 100000`;do echo "${log2}" > /dev/tcp/localhost/6666;echo ${i};done
负载均衡 Load balancing Sink Processor
接收器组中的接收器之间根据负责均衡策略。
关键参数:
agent.sinkgroups.g1.processor.type = load_balance
配置接收器组中接收器之间处理方式为负载均衡。agent.sinkgroups.g1.processor.selector = round_robin
负载均衡的方式为轮询。也可配置成随机random。agent.sinkgroups.g1.processor.backoff = false
值为true,某个sink失败后会指数级等待并重试。
在${FlUME_HOME}/conf目录下创建load_balancing_sink_processor.conf 内容如下:
agent.sources = s1
agent.channels = c1
agent.sinks = r1 r2

#source
agent.sources.s1.type = netcat
agent.sources.s1.bind = localhost
agent.sources.s1.port = 6666

#channel
agent.channels.c1.type = memory

#sink
agent.sinkgroups = g1
agent.sinkgroups.g1.sinks = r1 r2
#负载均衡
agent.sinkgroups.g1.processor.type = load_balance
#负载均衡方式 random/round_robin
agent.sinkgroups.g1.processor.selector = round_robin
agent.sinkgroups.g1.processor.backoff = false


#sink r1
agent.sinks.r1.type = org.apache.flume.sink.kafka.KafkaSink
agent.sinks.r1.kafka.bootstrap.servers = node2:6667,node3:6667,node1:6667
agent.sinks.r1.kafka.topic = testTopic

#sink r2
agent.sinks.r2.type = file_roll
agent.sinks.r2.sink.directory = /data/software/apache-flume-1.7.0-bin/data/file_roll

agent.sources.s1.channels = c1
agent.sinks.r1.channel = c1
agent.sinks.r2.channel = c1
在${FlUME_HOME}目录下启动agent
bin/flume-ng agent -c conf -f conf/load_balancing_sink_processor.conf -Dflume.root.logger=DEBUG,console -n agent向端口发送数据,可以看到,数据以轮询的方式写入本地目录和kafka,然后删掉file_roll sink本地目录(模拟某个sink挂掉),数据发送到kafka。
Event Serializers
编解码器用于通过各种压缩算法压缩或解压缩数据。Flume支持gzip, bzip2, lzo, lzop, snappy方式压缩。而事件序列化器是将Flume事件转换为另一种方式输出。
常见事件序列化器有:
Body Text Serializer
只输出Event Body,会丢掉Event Header。Avro Event Serializer
序列化成Avro格式。类似Protobuf。
Interceptors
拦截器一般用于修改事件。拦截器的配置顺序即拦截器的调用顺序。
Timestamp Interceptor
在Event Header中增加timestamp字段,值为毫秒时间戳。
Host Interceptor
在Event Header中增加host字段,值为Agent主机名或IP。
Static Interceptor
在Event Header中增加指定的静态值,如datacenter=NEW_YORK。
Remove Header Interceptor
删除Event Header中指定字段。
UUID Interceptor
在Event Header中增加id字段,值为Flume生成的UUID。
Search and Replace Interceptor
基于正则查找并和替换。具体可参考:
Regex Filtering Interceptor
基于正则过滤或反向过滤Events。具体可参考:
Regex Extractor Interceptor
基于正则从Event body中抽取字段,添加到Event Header中。具体可参考:
多个拦截器同时使用
在${FlUME_HOME}/conf目录下创建load_balancing_sink_processor.conf 内容如下:
agent.sources = s1
agent.channels = c1
agent.sinks = r1

#source
agent.sources.s1.type = netcat
agent.sources.s1.bind = localhost
agent.sources.s1.port = 6666

agent.sources.s1.interceptors = i1 i2 i3 i4 i5
#基于正则从Event body中抽取字段,添加到Event Header中
agent.sources.s1.interceptors.i1.type = regex_extractor
agent.sources.s1.interceptors.i1.regex = "log_type":"(\\w+)".*
agent.sources.s1.interceptors.i1.serializers = i1_ser1
agent.sources.s1.interceptors.i1.serializers.i1_ser1.name = log_type

agent.sources.s1.interceptors.i2.type = timestamp

agent.sources.s1.interceptors.i3.type = host
agent.sources.s1.interceptors.i3.useIP = false

agent.sources.s1.interceptors.i4.type = static
agent.sources.s1.interceptors.i4.key = datacenter
agent.sources.s1.interceptors.i4.value = NEW_YORK

agent.sources.s1.interceptors.i5.type = org.apache.flume.sink.solr.morphline.UUIDInterceptor$Builder
agent.sources.s1.interceptors.i5.headerName = uuid


#channel
agent.channels.c1.type = memory

#sink
agent.sinks.r1.type = logger

agent.sources.s1.channels = c1
agent.sinks.r1.channel = c1
在${FlUME_HOME}目录下启动agent
bin/flume-ng agent -c conf -f conf/multiple_interceptors.conf -Dflume.root.logger=DEBUG,console -n agent向端口发送数据,可以看到,Event Header中添加了如下内容。
log2='{"log_type":"UserInfo","msg":"this is UserInfo !"}'
for i in `seq 1 100000`;do echo "${log2}" > /dev/tcp/localhost/6666;echo ${i};done
headers:{log_type=UserInfo, host=node2, datacenter=NEW_YORK, uuid=2b286f72-0453-48a4-a0fd-be00b4777966, timestamp=1534360528235}
Agent组合形式
多Agent顺序连接
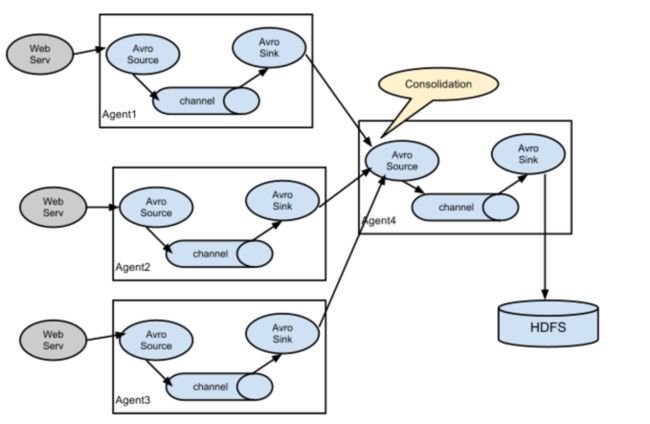
多Agent汇聚到一个Agent

服务端业务服务器一般都会采取负载均衡方式来进行分流,这样同一份日志就会分布在多台服务器上。在每台业务服务器上都部署一个Flume Agent收集日志,最后统一汇总到到数据收集服务器,再分发到目标存储。
多路Agent

红色方框部分可以用多路复制,也可以用多路复用,来分发到不同存储。
Flume监控
进程监控
- Crontab + Shell
- Supervisor
- Monit
monit是一个开源轻量级监控工具,可从系统、进程、文件、网络等多个层面进行监控。自带Web UI、可配置邮件告警或短信告警。
性能监控
- JMX
export JAVA_OPTS=”-Dcom.sun.management.jmxremote -Dcom.sun.management.jmxremote.port=5445 -Dcom.sun.management.jmxremote.authenticate=false -Dcom.sun.management.jmxremote.ssl=false”- Ganglia
#flume.monitoring.hosts 逗号分隔的Ganglia服务器列表
bin/flume-ng agent --conf-file example.conf --name a1 -Dflume.monitoring.type=ganglia -Dflume.monitoring.hosts=com.example:1234,com.example2:5455- HTTP
HTTP请求返回JSON格式数据。通过HTTP请求查看各个指标。
在${FlUME_HOME}/conf目录下创建http_monitor.conf 内容如下:
agent.sources = s1
agent.channels = c1
agent.sinks = r1

#source
agent.sources.s1.type = exec
agent.sources.s1.command = cat /data/software/apache-flume-1.7.0-bin/data/access.log

agent.sources.s1.interceptors = i1
#基于正则从Event body中抽取字段,添加到Event Header中
agent.sources.s1.interceptors.i1.type = regex_extractor
agent.sources.s1.interceptors.i1.regex = "log_type":"(\\w+)".*
agent.sources.s1.interceptors.i1.serializers = i1_ser1
agent.sources.s1.interceptors.i1.serializers.i1_ser1.name = log_type

#channel
agent.channels.c1.type = memory

#sink
agent.sinks.r1.type = org.apache.flume.sink.kafka.KafkaSink
agent.sinks.r1.kafka.bootstrap.servers = node2:6667,node3:6667,node1:6667
agent.sinks.r1.kafka.topic = testTopic

agent.sources.s1.channels = c1
agent.sinks.r1.channel = c1
在${FlUME_HOME}目录下启动agent
bin/flume-ng agent -c conf -f conf/http_monitor.conf -Dflume.root.logger=DEBUG,console -n agent -Dflume.monitoring.type=http -Dflume.monitoring.port=34545访问监控接口http://node2:34545/metrics并观察变化。
{
    "CHANNEL.c1":{
        "ChannelCapacity":"100",
        "ChannelFillPercentage":"75.0",
        "Type":"CHANNEL",
        "ChannelSize":"52",
        "EventTakeSuccessCount":"46700",
        "EventTakeAttemptCount":"46800",
        "StartTime":"1534365360844",
        "EventPutAttemptCount":"46820",
        "EventPutSuccessCount":"46800",
        "StopTime":"0"
    },
    "SOURCE.s1":{
        "EventReceivedCount":"46820",
        "AppendBatchAcceptedCount":"0",
        "Type":"SOURCE",
        "EventAcceptedCount":"46800",
        "AppendReceivedCount":"0",
        "StartTime":"1534365361074",
        "AppendAcceptedCount":"0",
        "OpenConnectionCount":"0",
        "AppendBatchReceivedCount":"0",
        "StopTime":"0"
    },
    "SINK.r1":{
        "ConnectionCreatedCount":"0",
        "BatchCompleteCount":"0",
        "EventDrainAttemptCount":"0",
        "BatchEmptyCount":"0",
        "StartTime":"1534365362817",
        "BatchUnderflowCount":"0",
        "ConnectionFailedCount":"0",
        "ConnectionClosedCount":"0",
        "Type":"SINK",
        "RollbackCount":"0",
        "EventDrainSuccessCount":"46800",
        "KafkaEventSendTimer":"49636",
        "StopTime":"0"
    }
}
可通过ChannelFillPercentage判断出去的速度是否大于进来的速度。以及结合其他参数判断当前Agent配置是否满足需求。

