使用LSTM分类MNIST数据集
参考文献【机器之心——使用MNIST数据集,在TensorFlow上实现基础LSTM网络】
1、LSTM简单介绍
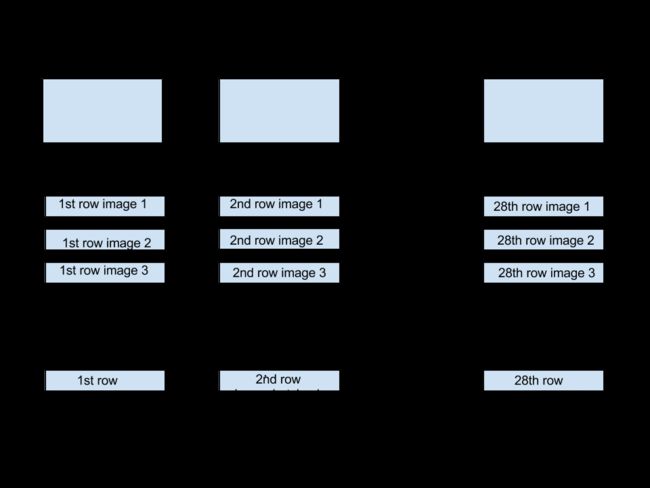
LSTM主要用于处理时间序列。在这里我们将一张图片的每一列或者每一行当成一个序列,这个序列是有一定的规律的,我们希望借助LSTM识别这种每一行的变化模式从而对数据集进行分类。
2、关于MNIST数据集
MNIST 数据集包括手写数字的图像和对应的标签。我们可以根据以下内置功能从 TensorFlow 上下载并读取数据。
from tensorflow.examples.tutorials.mnist import input_data
mnist = input_data.read_data_sets("/tmp/data/", one_hot=True)
print(mnist)
"""
输出:
Datasets(train=, validation=, test=)
"""
通过输出可以看到它有三类图片,分别是训练数据,验证数据,测试数据。
数据被分成 3 个部分:
- 训练数据(mnist.train):55000 张图像
- 测试数据(mnist.test):10000 张图像
- 验证数据(mnist.validation):5000 张图像
3、数据的形态
训练数据集包括 55000 张 28x28 像素的图像,这些 784(28x28)像素值被展开成一个维度为 784 的单一向量,所有 55000 个像素向量(每个图像一个)被储存为形态为 (55000,784) 的 numpy 数组,并命名为 mnist.train.images。
所有这 55000 张图像都关联了一个类别标签(表示其所属类别),一共有 10 个类别(0,1,2…9),类别标签使用独热编码的形式表示。因此标签将作为形态为 (55000,10) 的数组保存,并命名为 mnist.train.labels。
可以使用代码查看他们的相关属性。
print("mnist.train.images.shape:",mnist.train.images.shape)
print("mnist.train.labels.shape:",mnist.train.labels.shape)
print("mnist.validation.images.shape:",mnist.validation.images.shape)
print("mnist.validation.labels.shape:",mnist.validation.labels.shape)
print("mnist.test.images.shape:",mnist.test.images.shape)
print("mnist.test.labels.shape:",mnist.test.labels.shape)
print(type(mnist.train.images))
"""
对应输出:
mnist.train.images.shape: (55000, 784)
mnist.train.labels.shape: (55000, 10)
mnist.validation.images.shape: (5000, 784)
mnist.validation.labels.shape: (5000, 10)
mnist.test.images.shape: (10000, 784)
mnist.test.labels.shape: (10000, 10)

"""
4、处理问题的思想
 此图片来源于置顶的博客,在每一个时间步,维数是[batch_size,28]的数据进入LSTM。28表示每行数据的像素数目,一共有28行,也就是28个时间步,因此输入数据的维数是[batch_size,input_size,time_steps],输出数据的维数是[batch_size,num_units(LSTM隐藏层的个数),time_steps],但是我们只需要输出最后一个时间步的结果,维数是[batch_size,num_units],然后经过一个[num_units,num_class]的矩阵变换得到[batch_size,num_class]的输出结果,再和标准的结果比较计算Loss。
代码:
有了上面的思路,很容易就可以写出代码了:
1、构建完整计算图
import tensorflow as tf
from tensorflow.examples.tutorials.mnist import input_data
import numpy as np
from tensorflow.contrib import rnn
tf.reset_default_graph()
batch_size=128
time_steps=28
input_size=28
num_classes=10
num_units=128
learning_rate=0.01
inputs=tf.placeholder(name="inputs",shape=[None,time_steps,input_size],dtype=tf.float32)
targets=tf.placeholder(name="targets",shape=[None],dtype=tf.int32)
out_weights=tf.get_variable(name="out_weights",shape=[num_units,num_classes],dtype=tf.float32)
out_bias=tf.get_variable(name="out_bias",shape=[num_calsses],dtype=tf.float32)
inputs=tf.unstack(inputs ,time_steps,axis=1)
#形成了一个张量列表inputs,长度是time_steps,time_steps表示被分的那个维度的维数也就是time_steps
##构建lstm单元,其中包含了num_units个隐藏层
lstm_layer=rnn.BasicLSTMCell(num_units,forget_bias=1)
outputs,bb=rnn.static_rnn(lstm_layer,inputs,dtype="float32")
prediction=tf.add(tf.matmul(outputs[-1],out_weights),out_bias)
## outputs[-1]也就是bb.h呗
##计算误差
#loss_function
loss=tf.reduce_mean(tf.nn.softmax_cross_entropy_with_logits_v2(logits=prediction,labels=targets))
#optimization
opt=tf.train.AdamOptimizer(learning_rate=learning_rate).minimize(loss)
#model evaluation
correct_prediction=tf.equal(tf.argmax(prediction,1),tf.argmax(targets,1))
accuracy=tf.reduce_mean(tf.cast(correct_prediction,tf.float32))
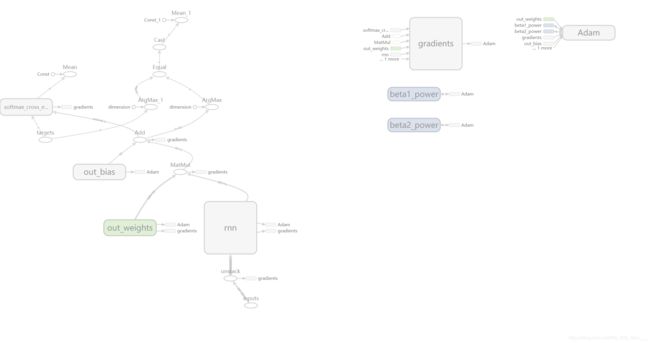
#目前为止,计算图已经构造完成,可以通过tensorboard查看一下
writer=tf.summary.FileWriter("logs",tf.get_default_graph())
writer.close()
from tensorflow.examples.tutorials.mnist import input_data
mnist=input_data.read_data_sets("/tmp/data/",one_hot=True)
“”“
输出:
Extracting /tmp/data/train-images-idx3-ubyte.gz
Extracting /tmp/data/train-labels-idx1-ubyte.gz
Extracting /tmp/data/t10k-images-idx3-ubyte.gz
Extracting /tmp/data/t10k-labels-idx1-ubyte.gz
”“”
4、开始会话,进行训练以及测试
init=tf.global_variables_initializer()
with tf.Session() as sess:
    sess.run(init)
    count=0
    epoches=2000
    while(count
训练输出:
count: 100 -loss: 0.21924514 -acc: 0.953125
count: 200 -loss: 0.23093262 -acc: 0.9375
count: 300 -loss: 0.100797944 -acc: 0.9765625
count: 400 -loss: 0.08406976 -acc: 0.984375
count: 500 -loss: 0.041525107 -acc: 0.9921875
count: 600 -loss: 0.063560225 -acc: 0.9921875
count: 700 -loss: 0.07479714 -acc: 0.984375
count: 800 -loss: 0.095448196 -acc: 0.9765625
count: 900 -loss: 0.0557895 -acc: 0.984375
count: 1000 -loss: 0.04715003 -acc: 0.984375
count: 1100 -loss: 0.040368546 -acc: 0.984375
count: 1200 -loss: 0.0148429945 -acc: 1.0
count: 1300 -loss: 0.028649883 -acc: 0.9921875
count: 1400 -loss: 0.10521688 -acc: 0.96875
count: 1500 -loss: 0.015948178 -acc: 1.0
count: 1600 -loss: 0.004116526 -acc: 1.0
count: 1700 -loss: 0.006338329 -acc: 1.0
count: 1800 -loss: 0.015455429 -acc: 1.0
count: 1900 -loss: 0.059001543 -acc: 0.9921875
count: 2000 -loss: 0.0056605088 -acc: 1.0
test_acc 0.9833
所以说效果还是比较优秀的。
