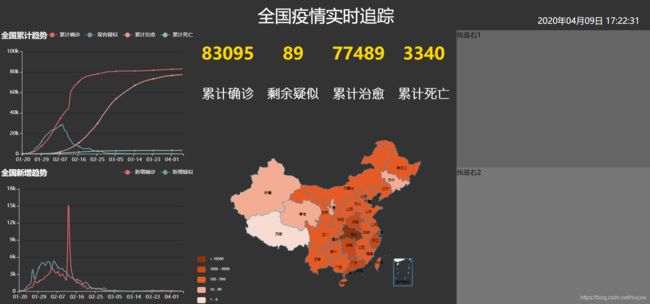
基于Python+Flask+Echarts的 COVID-19数据可视化项目
完整代码见 github
https://github.com/skyerhxx/COVID-19_Tracking
步骤
- Python网络爬虫
- 使用Python与MySQL数据库交互
- 使用Flask构建web项目
- 基于Echarts数据可视化展示
- 在Linux上部署web项目及爬虫
项目环境
Python 3.7
MySQL 8.0.17
Flask 1.1.1
Linux上:
阿里云 CentOS 8.0 64位
Python3.6
MySQL 8.0
IDE
pycharm/vscode/sublime
1、爬取yq数据
有了爬虫基础后,我们可以自行去全国各地的卫健委网站上爬取数据,不过部分网站反爬虫手段很高明,需要专业的反反爬手段
我们也可以去各大平台直接爬取最终数据,比如:
百度
请见 https://github.com/skyerhxx/COVID-19_Tracking/blob/master/%E7%96%AB%E6%83%85%E6%95%B0%E6%8D%AE%E7%BD%91%E7%AB%99.txt
腾讯
请见 https://github.com/skyerhxx/COVID-19_Tracking/blob/master/%E7%96%AB%E6%83%85%E6%95%B0%E6%8D%AE%E7%BD%91%E7%AB%99.txt
爬取腾讯yq数据
请见 https://github.com/skyerhxx/COVID-19_Tracking/blob/master/%E7%96%AB%E6%83%85%E6%95%B0%E6%8D%AE%E7%BD%91%E7%AB%99.txt
h5爬取的数据的key值有
other爬取的数据的key值有
但是h5爬取的数据后6个是空的
所以需要h5和other的数据结合起来处理
我们需要拿到历史数据和34个省的数据
即程序中的history和details
history从other爬取,details从h5爬取
#爬取并处理腾讯疫情数据
import requests
import json
import time

#返回历史数据和当日详细数据
def get_tencent_data():
    url1 = "https://view.inews.qq.com/g2/getOnsInfo?name=disease_h5"
    url2 = "https://view.inews.qq.com/g2/getOnsInfo?name=disease_other"
    headers = {
        'user-agent':'Mozilla/5.0 (Windows NT 10.0; Win64; x64) AppleWebKit/537.36 (KHTML, like Gecko) Chrome/78.0.3904.70 Safari/537.36'
    }
    r1 = requests.get(url1, headers)
    r2 = requests.get(url2, headers)

    #json字符串转字典
    res1 = json.loads(r1.text)
    res2 = json.loads(r2.text)

    data_all1 = json.loads(res1["data"])
    data_all2 = json.loads(res2["data"])

    #历史数据
    history = {}
    for i in data_all2["chinaDayList"]:
        ds = "2020." + i["date"]
        tup = time.strptime(ds, "%Y.%m.%d")  # 匹配时间
        ds = time.strftime("%Y-%m-%d", tup)  #改变时间输入格式,不然插入数据库会报错,数据库是datatime格式
        confirm = i["confirm"]
        suspect = i["suspect"]
        heal = i["heal"]
        dead = i["dead"]
        history[ds] = {"confirm": confirm, "suspect": suspect, "heal": heal, "dead": dead}
    for i in data_all2["chinaDayAddList"]:
        ds = "2020." + i["date"]
        tup = time.strptime(ds, "%Y.%m.%d")  # 匹配时间
        ds = time.strftime("%Y-%m-%d", tup)  #改变时间输入格式,不然插入数据库会报错,数据库是datatime格式
        confirm = i["confirm"]
        suspect = i["suspect"]
        heal = i["heal"]
        dead = i["dead"]
        history[ds].update({"confirm_add": confirm, "suspect_add": suspect, "heal_add": heal, "dead_add": dead})

    #当日详细数据
    details = []
    update_time = data_all1["lastUpdateTime"]
    data_country = data_all1["areaTree"]  #list 25个国家
    data_province = data_country[0]["children"] #中国各省
    for pro_infos in data_province:
        province = pro_infos["name"] #省名
        for city_infos in pro_infos["children"]:
            city = city_infos["name"]
            confirm = city_infos["total"]["confirm"]
            confirm_add = city_infos["today"]["confirm"]
            heal = city_infos["total"]["heal"]
            dead = city_infos["total"]["dead"]
            details.append([update_time, province, city, confirm, confirm_add, heal, dead])
    return history, details


his,de = get_tencent_data()
print(his)
print(de)
2、yq数据的存储
数据存储
建立数据库cov
进入cov数据库,建两张表,history表存储每日总数据,details表存储每日详细数据
CREATE TABLE `history` (
  `ds` datetime NOT NULL COMMENT '日期',
  `confirm` int(11) DEFAULT NULL COMMENT '累计确诊',
  `confirm_add` int(11) DEFAULT NULL COMMENT '当日新增确诊',
  `suspect` int(11) DEFAULT NULL COMMENT '剩余疑似',
  `suspect_add` int(11) DEFAULT NULL COMMENT '当日新增疑似',
  `heal` int(11) DEFAULT NULL COMMENT '累计治愈',
  `heal_add` int(11) DEFAULT NULL COMMENT '当日新增治愈',
  `dead` int(11) DEFAULT NULL COMMENT '累计死亡',
  `dead_add` int(11) DEFAULT NULL COMMENT '当日新增死亡',
  PRIMARY KEY (`ds`) USING BTREE
) ENGINE=InnoDB DEFAULT CHARSET=utf8mb4;
CREATE TABLE `details` (
  `id` int(11) NOT NULL AUTO_INCREMENT,
  `update_time` datetime DEFAULT NULL COMMENT '数据最后更新时间',
  `province` varchar(50) DEFAULT NULL COMMENT '省',
  `city` varchar(50) DEFAULT NULL COMMENT '市',
  `confirm` int(11) DEFAULT NULL COMMENT '累计确诊',
  `confirm_add` int(11) DEFAULT NULL COMMENT '新增治愈',
  `heal` int(11) DEFAULT NULL COMMENT '累计治愈',
  `dead` int(11) DEFAULT NULL COMMENT '累计死亡',
  PRIMARY KEY (`id`)
) ENGINE=InnoDB DEFAULT CHARSET=utf8mb4;
将数据存储到数据库中
pymysql库
import requests
import json
import time
import pymysql

#返回历史数据和当日详细数据
def get_tencent_data():
    url1 = "https://view.inews.qq.com/g2/getOnsInfo?name=disease_h5"
    url2 = "https://view.inews.qq.com/g2/getOnsInfo?name=disease_other"
    headers = {
        'user-agent':'Mozilla/5.0 (Windows NT 10.0; Win64; x64) AppleWebKit/537.36 (KHTML, like Gecko) Chrome/78.0.3904.70 Safari/537.36'
    }
    r1 = requests.get(url1, headers)
    r2 = requests.get(url2, headers)

    #json字符串转字典
    res1 = json.loads(r1.text)
    res2 = json.loads(r2.text)

    data_all1 = json.loads(res1["data"])
    data_all2 = json.loads(res2["data"])

    #历史数据
    history = {}
    for i in data_all2["chinaDayList"]:
        ds = "2020." + i["date"]
        tup = time.strptime(ds, "%Y.%m.%d")  # 匹配时间
        ds = time.strftime("%Y-%m-%d", tup)  #改变时间输入格式,不然插入数据库会报错,数据库是datatime格式
        confirm = i["confirm"]
        suspect = i["suspect"]
        heal = i["heal"]
        dead = i["dead"]
        history[ds] = {"confirm": confirm, "suspect": suspect, "heal": heal, "dead": dead}
    for i in data_all2["chinaDayAddList"]:
        ds = "2020." + i["date"]
        tup = time.strptime(ds, "%Y.%m.%d")  # 匹配时间
        ds = time.strftime("%Y-%m-%d", tup)  #改变时间输入格式,不然插入数据库会报错,数据库是datatime格式
        confirm = i["confirm"]
        suspect = i["suspect"]
        heal = i["heal"]
        dead = i["dead"]
        history[ds].update({"confirm_add": confirm, "suspect_add": suspect, "heal_add": heal, "dead_add": dead})

    #当日详细数据
    details = []
    update_time = data_all1["lastUpdateTime"]
    data_country = data_all1["areaTree"]  #list 25个国家
    data_province = data_country[0]["children"] #中国各省
    for pro_infos in data_province:
        province = pro_infos["name"] #省名
        for city_infos in pro_infos["children"]:
            city = city_infos["name"]
            confirm = city_infos["total"]["confirm"]
            confirm_add = city_infos["today"]["confirm"]
            heal = city_infos["total"]["heal"]
            dead = city_infos["total"]["dead"]
            details.append([update_time, province, city, confirm, confirm_add, heal, dead])
    return history, details


def get_conn():
	#建立连接
	conn = pymysql.connect(host="127.0.0.1", user="root", password="*", db="cov", charset="utf8")
	#创建游标
	cursor = conn.cursor()
	return conn,cursor

def close_conn(conn,cursor):
	if cursor:
		cursor.close()
	if conn:
		conn.close()

#插入details数据
def update_details():
	cursor = None
	conn = None
	try:
		li = get_tencent_data()[1] #0是历史数据,1是当日详细数据
		conn,cursor = get_conn()
		sql = "insert into details(update_time,province,city,confirm,confirm_add,heal,dead) values(%s,%s,%s,%s,%s,%s,%s)"
		sql_query = "select %s=(select update_time from details order by id desc limit 1)"  #对比当前最大时间戳
		#对比当前最大时间戳
		cursor.execute(sql_query,li[0][0])
		if not cursor.fetchone()[0]:
			print(f"{time.asctime()}开始更新数据")
			for item in li:
				cursor.execute(sql,item)
			conn.commit()
			print(f"{time.asctime()}更新到最新数据")
		else:
			print(f"{time.asctime()}已是最新数据!")
	except:
		traceback.print_exc()
	finally:
		close_conn(conn,cursor)


#插入history数据
def insert_history():
    cursor = None
    conn = None
    try:
        dic = get_tencent_data()[0]#0代表历史数据字典
        print(f"{time.asctime()}开始插入历史数据")
        conn,cursor = get_conn()
        sql = "insert into history values (%s,%s,%s,%s,%s,%s,%s,%s,%s)"
        for k,v in dic.items():
            cursor.execute(sql,[k, v.get("confirm"),v.get("confirm_add"),v.get("suspect"),
                           v.get("suspect_add"),v.get("heal"),v.get("heal_add"),
                           v.get("dead"),v.get("dead_add")])
        conn.commit()
        print(f"{time.asctime()}插入历史数据完毕")
    except:
        traceback.print_exc()
    finally:
        close_conn(conn,cursor)


#更新历史数据
def update_history():
    cursor = None
    conn = None
    try:
        dic = get_tencent_data()[0]#0代表历史数据字典
        print(f"{time.asctime()}开始更新历史数据")
        conn,cursor = get_conn()
        sql = "insert into history values (%s,%s,%s,%s,%s,%s,%s,%s,%s)"
        sql_query = "select confirm from history where ds=%s"
        for k,v in dic.items():
            if not cursor.execute(sql_query,k):
                cursor.execute(sql,[k, v.get("confirm"),v.get("confirm_add"),v.get("suspect"),
                               v.get("suspect_add"),v.get("heal"),v.get("heal_add"),
                               v.get("dead"),v.get("dead_add")])
        conn.commit()
        print(f"{time.asctime()}历史数据更新完毕")
    except:
        traceback.print_exc()
    finally:
        close_conn(conn,cursor)


# his,de = get_tencent_data()
# print(his)
# print(de)

insert_history()
update_details()
history数据库
details数据
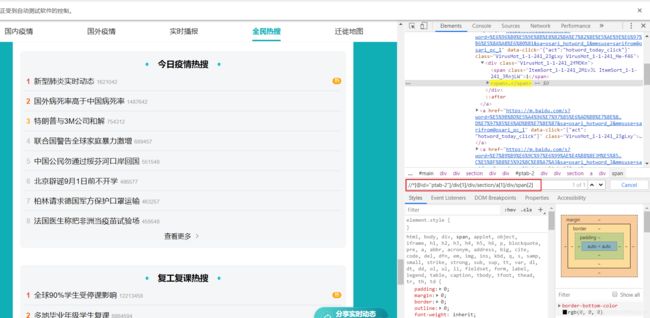
3、爬取百度热搜数据
即我们要爬取百度的疫情数据平台的今日疫情热搜
请见 https://github.com/skyerhxx/COVID-19_Tracking/blob/master/%E7%96%AB%E6%83%85%E6%95%B0%E6%8D%AE%E7%BD%91%E7%AB%99.txt
注意网址不一样,不是之前那个百度的疫情平台点全民热搜那样子出来的
对
错
百度的数据页面是采用了动态渲染数据,即它使用js来生成数据,数据不是html静态的,我们用普通爬虫是爬不到的
但我们可以用selenium爬取。selenium是模拟用户操作,就可以看到js返回的数据了
xpath是怎么确定的呢
在通过selenium打开的页面中F12
点击箭头选中热搜元素后定位到其源码
右键选择 复制xpath
ctrl+F打开搜索,可以验证我们复制的xpath对不对
然后就看这个xpath,试了一下将a[1]的1去掉,换成a,就正好能定位到8条,即热搜前8
这个8是因为上图的今日疫情热搜只显示到8,如果点开查看更多还多
from selenium.webdriver import Chrome,ChromeOptions

url = 'https://voice.baidu.com/act/virussearch/virussearch?from=osari_map&tab=0&infomore=1'
brower = Chrome()
brower.get(url)
c = brower.find_elements_by_xpath('//*[@id="ptab-0"]/div/div[2]/section/a/div/span[2]')
for i in c:
    print(i.text)
之后再设置不打开浏览器在后台自动加载数据
总的:
from selenium.webdriver import Chrome,ChromeOptions
import time

option = ChromeOptions()
option.add_argument("--headless")#隐藏浏览器
option.add_argument("--no-sandbox")  #禁用沙盘    部署在linux上访问chrome要求这样
url = 'https://voice.baidu.com/act/virussearch/virussearch?from=osari_map&tab=0&infomore=1'

brower = Chrome(options = option)
#brower = Chrome()
brower.get(url)
but = brower.find_element_by_css_selector('#ptab-0 > div > div.VirusHot_1-5-5_32AY4F.VirusHot_1-5-5_2RnRvg > section > div') #定位到点击展开按钮
but.click() #点击展开


time.sleep(1)#爬虫与反爬,模拟人等待1秒
c = brower.find_elements_by_xpath('//*[@id="ptab-0"]/div/div[2]/section/a/div/span[2]')
for i in c:
	print(i.text)
存储百度热搜数据到MySQL
这次在navicat上建表
注意id要设置成递增的,在页面下面有个选项要勾选
CREATE TABLE `hotsearch` (
  `id` int(11) NOT NULL AUTO_INCREMENT,
  `dt` datetime DEFAULT NULL ON UPDATE CURRENT_TIMESTAMP,
  `content` varchar(255) DEFAULT NULL,
  PRIMARY KEY (`id`)
) ENGINE=InnoDB DEFAULT CHARSET=utf8mb4;
import requests
import json
import time
import pymysql
from selenium.webdriver import Chrome,ChromeOptions


def get_conn():
	#建立连接
	conn = pymysql.connect(host="127.0.0.1", user="root", password="root", db="cov", charset="utf8")
	#创建游标
	cursor = conn.cursor()
	return conn,cursor

def close_conn(conn,cursor):
	if cursor:
		cursor.close()
	if conn:
		conn.close()


#返回百度疫情热搜
def get_baidu_hot():
	option = ChromeOptions() #创建谷歌浏览器实例
	option.add_argument("--headless")#隐藏浏览器
	option.add_argument("--no-sandbox")  #禁用沙盘    部署在linux上访问chrome要求这样

	url = 'https://voice.baidu.com/act/virussearch/virussearch?from=osari_map&tab=0&infomore=1'
	brower = Chrome(options = option)
	brower.get(url)
	#找到展开按钮
	but = brower.find_element_by_css_selector('#ptab-0 > div > div.VirusHot_1-5-5_32AY4F.VirusHot_1-5-5_2RnRvg > section > div') #定位到点击展开按钮
	but.click() #点击展开

	time.sleep(1)#爬虫与反爬,模拟人等待1秒

	c = brower.find_elements_by_xpath('//*[@id="ptab-0"]/div/div[2]/section/a/div/span[2]')
	context = [i.text for i in c]  #获取标签内容
	print(context)
	return context


#将疫情热搜插入数据库
def update_hotsearch():
	cursor = None
	conn = None
	try:
		context = get_baidu_hot()
		print(f"{time.asctime()}开始更新热搜数据")
		conn, cursor = get_conn()
		sql = "insert into hotsearch(dt,content) values(%s,%s)"
		ts = time.strftime("%Y-%m-%d %X")
		for i in context:
			cursor.execute(sql,(ts,i))  #插入数据
		conn.commit() #提交事务保存数据
		print(f"{time.asctime()}数据更新完毕")
	except:
		traceback.print_exc()
	finally:
		close_conn(conn,cursor)


update_hotsearch()
4、Flask & 使用ajax局部刷新页面
https://blog.csdn.net/hxxjxw/article/details/104781356
5、可视化大屏制作
https://blog.csdn.net/hxxjxw/article/details/104804186
可视化大屏是main.html
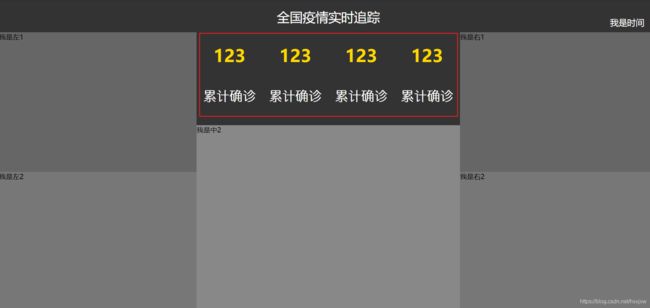
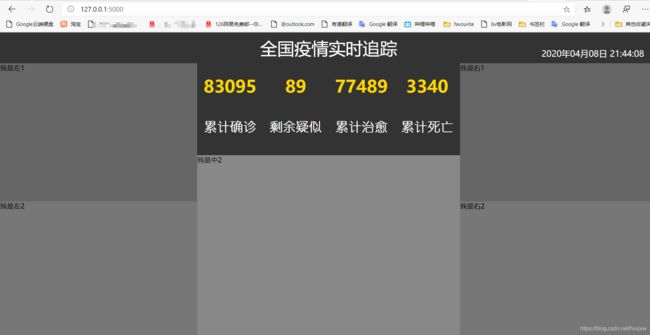
6、关键数字和时间的实时更新
通过后台发起ajax请求动态更改这里的值
.num是上面黄色数字的样式表
.txt是下面白色文字的样式表
utils.py里面的get_c1_data()
controller.py里面的get_c1_data()
@app.route('/c1')
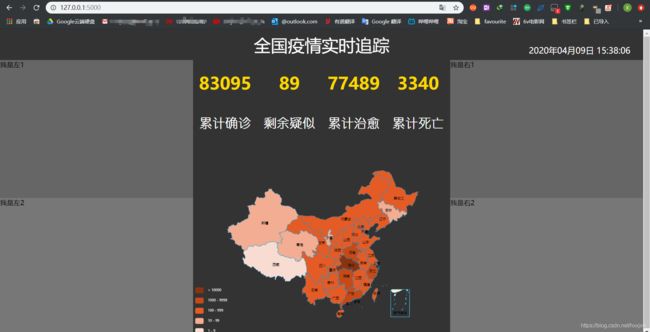
7、全国yq地图的实现
- 复制中国地图option,导入china.js
- 从数据库中获取数据
- 通过ajax请求,把数据设置到option对应的data里面去
ec_center.js
utils.py里面的get_c2_data()
controller.py里面的get_c2_data()
@app.route('/c2')
8、全国累计和新增趋势的实现
全国累计趋势
复制折线图option
从数据库里面获取数据
通过ajax请求,把数据设置到option对应的data里面去
ec_left1.js
utils.py里面的get_l1_data()
@app.route("/l1")
controller.py里面的get_l1_data()
新增趋势
和全国累计趋势的设计基本相似
ec_left2.js
utils.py里面的get_l2_data()
@app.route("/l2")
controller.py里面的get_l2_data()
9、非湖北城市TOP5和今日热搜词云图
- 复制柱状图option
- 从数据库里面获取数据
- 通过ajax请求,把数据设置到option对应的data里面去
词云图需要jieba分词库
ec_right1.js
utils.py的get_r1_data()
@app.route("/r1")
controller.py里面的get_r1_data()()
ec_right2.js
utils.py的get_r2_data()
@app.route("/r2")
controller.py里面的get_r2_data()
到此位置,整个项目可以运行
如果要运行的话,首先将数据库cov的3个表的数据都清掉,否则再次插入会报错
先运行spider.py,爬取实时数据存到数据库里
然后运行app.py从数据库中读取并可视化显示


10、项目部署
开发模式部署
开发模式就是专门用来做程序调试用的
将之前ec_certer.js, ec_left1.js, main.html 等文件中的预设的值都清掉
之前的123和时间也给清掉
检查是否清空的方法是打开main.html,看是否图表里还有数据
这样就好了
再给controller.js里面添加定时循环更新
开发模式修改app.py的运行端口为0.0.0.0
if __name__=="__main__":
    app.run(host="0.0.0.0")
0.0.0.0就是不限制任何ip地址
部署的阿里云主机上的python是3.6,我们开发时是3.7
运行的时候会有一点点小问题
app.py
@app.route('c1')
改动前
改动后
生产模式部署
正向代理&反向代理
正向代理
正向代理就是例如fq,通过代理服务器访问某个网站资源
我访问google,先发请求给代理,代理把我想要获取的数据的请求发给google;google根据请求返回数据给代理,代理再返回给我。但给我们的感觉像是我直接访问了google
对于google而言,所有使用同一个代理的人,它不知道是谁真正在访问它,它只知道是这个代理
即正向代理隐藏发起请求的人
反向代理
例如访问百度,域名www.baidu.com, 你也访问百度,他也访问百度,这个时候由于访问的人数很多,百度如果只用一台服务器来提供服务就可能扛不住这波压力。
它就可以采用反向代理的方式,我们都通过访问同一个网关,网关可以判断每一个人访问的权重值,根据权重值把你的请求发给第一台服务器,我的请求发给第二台,他的请求发给第三台。此时在我们看来我们都访问了同一个地址,但是在服务器内部其实已经分流到了不同的电脑之上。这也就是负载均衡
可以使用nginx作反向代理的网关实现负载均衡。
步骤:
在阿里云购买学生机,centos8.0 64位(自带了python3.6)
安装mysql, 参考https://blog.csdn.net/qq_26975307/article/details/89390208,本来想装5.7,结果装了8.0
修改了app.py
安装python相关库
pip3 install flask
pip3 install jieba
pip3 install pymysql
pip3 install selenium
pip3 install gunicorn
yum install nginx
编辑nginx配置文件
在这里添加
启动nginx
/usr/sbin/nginx来到Covid-19 Tracking的目录下,运行
gunicorn -b 127.0.0.1:8080 -D app:app-D是以守护进程的形式启动,以后台形式启动,不会挂在前端
此时从其他电脑访问访问可能还不成功,但是阿里云安全组也已经配置了8080端口了
原因是我们开启了防火墙,防火墙还没设置开放8080端口
两条命令
firewall-cmd --zone=public --add-port=80/tcp --permanent

systemctl restart firewalld.service
之后打开就可以从其他电脑正常访问了
因为之前并没有往数据库里写数据,所以都是空的
部署定时爬虫
首先要安装selenium用到的chromedriver
安装chrome就是 yum install https://dl.google.com/linux/direct/google-chrome-stable_current_x86_64.rpm
查看linux chrome的版本
google-chrome --version我是根据chrome的版本在本机下载后上传到云主机的
之后就可以了
来到COVID-19 Tracking目录下
python3 spider.py up_his
python3 spider.py up_det
python3 spider.py up_hot
数据库就会有数据了
crontab -e 会弹出一个文件,在里面输入你的命令
意思是:
每小时的第30分钟执行一次这个脚本
每两小时的第3分钟
每30分钟执行一次这个脚本
2>&1是将标准错误重定向到标准输出&是后台执行
之后输入crontab -l 查看任务列表
成功
之后服务器会定时执行脚本
至此,项目完结!
其实我觉得应该每次写入数据前先清空之前的数据表的,但既然视频上没有这样操作,也就先不改了。要想改也不难


参考视频:
https://www.bilibili.com/video/BV177411j7qJ?p=1