opencv3.1中利用SIFT特征及RANSAC筛选进行图像矫正
【我的】opencv3.1中利用SIFT特征及RANSAC筛选进行图像矫正
作者:zcr214 时间:2016年8月23日11:20:06
一、安装opencv_contrib
OpenCV3对OpenCV的模块进行了调整,将开发中与nofree模块放在了OpenCV_contrib中(包含SIFT),gitHub上的官方项目分成了两个,opencv 与 opencv_contrib。所以,要使用sift接口需在opencv3.1基础上,再安装opencv_contrib。
安装具体流程详情见:
http://note.youdao.com/yws/public/redirect/share?id=7140349b9ae4bc80fd7c5009b689d57a&type=false
二、sift特征提取
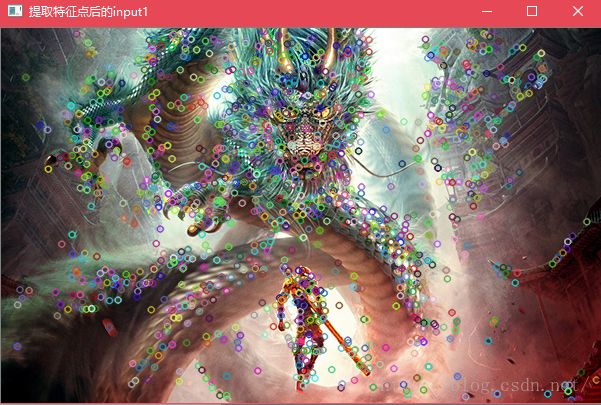
1.探测特征点
Matinput1=imread("01.jpg",1);
Matinput2=imread("02.jpg",1);
Ptr<xfeatures2d::SIFT>feature=xfeatures2d::SIFT::create();//创建SIFT特征类
vector<KeyPoint>keypoints1;
feature->detect(input1,keypoints1);//检测特征点,检测信息保存在keypoint中
Matoutput1;
drawKeypoints(input1,keypoints1,output1);
vector<KeyPoint>keypoints2;
feature->detect(input2,keypoints2);
Matoutput2;
drawKeypoints(input2,keypoints2,output2);
画出提取的特征点运行效果如下:

2.计算描述矩阵并匹配
Matdescription1;//初始化描述矩阵
feature->compute(input1,keypoints1,description1);//计算描述矩阵,保存在description中
Matdescription2;
feature->compute(input2,keypoints2,description2);
vector<DMatch>matches; //匹配矩阵
BFMatchermatcher;
matcher.match(description1,description2,matches);
OpenCV中features2d实现的SIFT匹配有多种 matcher:VectorDescriptorMatcher,BFMatcher(Brute-force descriptor matcher),FernDescriptorMatcher,OneWayDescriptorMatcher,FlannBasedMatcher 等等。本例中使用了BFMatcher,是暴力匹配的一种,选取特征点欧氏距离最近的点最为匹配点。
画出匹配点连线如图:
Matimage_match2;
drawMatches(input1,keypoints1,input2,keypoints2,matches,image_match2);
imshow("匹配后的图片2",image_match2);
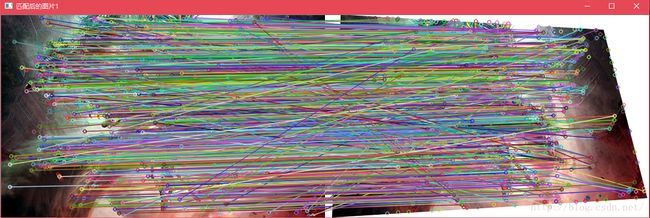
可以看出大部分连线还是比较对应的,但是存在部分匹配错误的点,接下俩就要消除掉这些错点。
3.采用findHomography函数进行RANSAC筛选。
函数原型为,参数顾名思义,包括源,目标,筛选方法,容错阈值,筛选结果的标识,迭代次数,置信度阈值,完成之后返回一个转移矩阵。
CV_EXPORTS_WMatfindHomography(
InputArraysrcPoints,
InputArraydstPoints,
intmethod =0,
doubleransacReprojThreshold =3,
OutputArray mask=noArray(),
constintmaxIters =2000,
constdoubleconfidence =0.995);
下面开始筛选,默认迭代为2000次,为了提高效率,这里只进行了100次迭代,内点为正值,外点为负值,保存在inliersMask中。
std::vector<Point2f>obj;
std::vector<Point2f>scene;
//保存之前BFMatcher匹配的点的坐标
for(size_ti=0;i<matches.size();i++)
{
//-- Get the keypoints from the good matches
obj.push_back(keypoints1[matches[i].queryIdx].pt);
scene.push_back(keypoints2[matches[i].trainIdx].pt);
}
vector<uchar>inliersMask(obj.size());
MatH=findHomography(scene,obj,CV_FM_RANSAC,3.0,inliersMask,100);
筛选之后可以将匹配中的外点排除掉,只留下内点:
cout<<"原匹配点数为:"<<matches.size()<<endl;
vector<DMatch>inliers;
for(size_ti=0;i<inliersMask.size();i++){
if(inliersMask[i])
inliers.push_back(matches[i]);
}
matches.swap(inliers);
cout<<"内点数为:"<<matches.size()<<endl;
运行结果可以看出,已经排除了部分的匹配
再次绘制匹配连线来看,已经消除了不好的匹配。
Matimage_match2;
drawMatches(input1,keypoints1,input2,keypoints2,matches,image_match2);
imshow("匹配后的图片2",image_match2);

4.利用得到的转移矩阵矫正
得到转移矩阵H后,利用warpPerspective函数,进行投影变换即可。注意这里的size要取模板图的大小。
矫正结果保存在dstimg中
Sizesize=input1.size();
dstimg=Mat::zeros(size,CV_8UC3);
warpPerspective(input2,dstimg,H,size);
矫正之后,视觉上相比模板图有一定的模糊。
