How to Add Your Own Tools to Unity's Editor(以创建一个2D的地图编辑器为例)
In this tutorial you'll learn how to extend the Unity3D's editor so you can make better use of it in your project. You'll learn how to draw your own gizmo, create and delete objects in code, create editor windows, use components, and allow the user to undo any action they take with your script.
This tutorial assumes you already know the basics of Unity workflow. If you know how to create objects, prefabs, scenes, move around in the editor, attach components then you are good to go!
Final Result Preview
Let's take a look at the final result we will be working towards:

As you can see, we'll be creating an editor window, and a color picker whose selection we'll use to draw a grid. We'll also be able to create and delete objects, snapped to this grid, and undo such actions.
Step 1: Gizmos
First we'll learn how to use gizmos. Here are a few examples of built-in gizmos.

This is the one you'll probably see the most in Unity, since it's drawn for every object that has a Transform component attached to it - so basically every selected object will have this gizmo drawn.
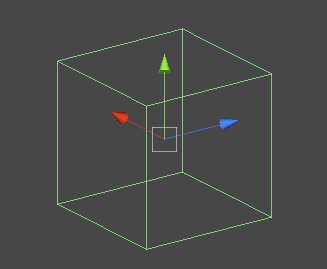
Here's another gizmo, which enables us to see the size of the BoxCollider attached to our game object.
Step 2: Create a Grid Script
Create a C# script that we can use to draw our own gizmo for an object; we'll draw a simple grid in the editor as an example.
|
01
02
03
04
05
06
07
08
09
10
11
12
13
14
|
using
UnityEngine;
using
System.Collections;
public
class
Grid : MonoBehaviour
{
void
Start ()
{
}
void
Update ()
{
}
}
|
For a grid we need to add two variables, the width and the height.
|
01
02
03
04
05
06
07
08
09
10
11
12
13
|
public
class
Grid : MonoBehaviour
{
public
float
width = 32.0f;
public
float
height = 32.0f;
void
Start ()
{
}
void
Update ()
{
}
}
|
To draw in the editor we need to use OnDrawGizmos callback, so let's create it.
|
01
02
03
04
05
06
07
08
09
10
11
12
13
14
15
16
17
|
public
class
Grid : MonoBehaviour
{
public
float
width = 32.0f;
public
float
height = 32.0f;
void
Start ()
{
}
void
Update ()
{
}
void
OnDrawGizmos()
{
}
}
|
Step 3: Draw the Grid
To draw a grid we need a set of horizontal and vertical lines and the position of the editor's camera so we know around which point we should draw our grid. First, let's save the camera's position to a separate variable.
|
1
2
3
4
|
void
OnDrawGizmos()
{
Vector3 pos = Camera.current.transform.position;
}
|
As you can see, we can get the editor's camera by using the Camera.current reference.
Now we'll need two for loops that will draw the horizontal and vertical lines.
|
01
02
03
04
05
06
07
08
09
10
11
12
13
14
15
16
|
void
OnDrawGizmos()
{
Vector3 pos = Camera.current.transform.position;
for
(
float
y = pos.y - 800.0f; y < pos.y + 800.0f; y+= height)
{
Gizmos.DrawLine(
new
Vector3(-1000000.0f, Mathf.Floor(y/height) * height, 0.0f),
new
Vector3(1000000.0f, Mathf.Floor(y/height) * height, 0.0f));
}
for
(
float
x = pos.x - 1200.0f; x < pos.x + 1200.0f; x+= width)
{
Gizmos.DrawLine(
new
Vector3(Mathf.Floor(x/width) * width, -1000000.0f, 0.0f),
new
Vector3(Mathf.Floor(x/width) * width, 1000000.0f, 0.0f));
}
}
|
To draw lines we use Gizmos.DrawLine(). Note that the Gizmos class has a lot of other drawing API methods, so it is possible to draw such primitives as cube or sphere or even their wireframes. You can also draw an image if you need to.
The grid lines should be infinitely long but float.positiveInfinity andfloat.negativeInfinity didn't seem to work well with drawing the lines, so we can simply put arbitrarily large numbers instead of those. Also, the number of lines strictly depend on the constants we put in the for loops' definitions; technically we shouldn't leave those constants like that but it's just a test code.
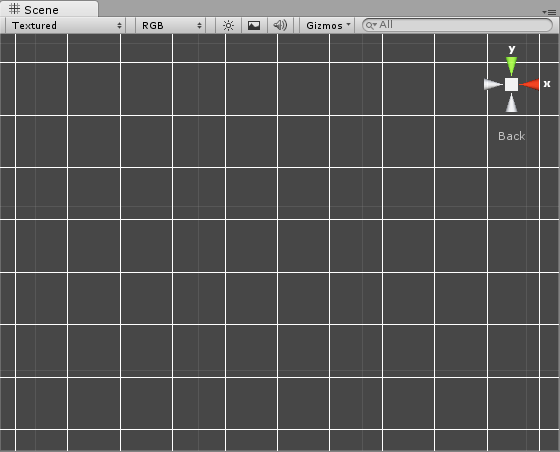
To see the grid, create an empty object and attach our script to it:
Step 4: Create a Custom Inspector
The next thing to cover is customizing the inspector. To do that we need to create an editor script. Create a new C# file and name it GridEditor. This script should be placed in the Editor folder; if you don't have one then create it now.
|
1
2
3
4
5
6
7
8
|
using
UnityEngine;
using
UnityEditor;
using
System.Collections;
[CustomEditor (
typeof
(Grid))]
public
class
GridEditor : Editor
{
}
|
This time we also need to use UnityEditor to be able to make use of the editor classes and functions. To override the default inspector of our Grid object we need to add an attribute before our class declaration, [CustomEditor (typeof(Grid))] lets Unity know that we'll be customising the Grid's inspector. To be able to use the editor callbacks, we need to derive from the Editor class instead of MonoBehaviour.
To change the current inspector we need to override the old one.
|
1
2
3
4
5
6
|
public
class
GridEditor : Editor
{
public
override
void
OnInspectorGUI()
{
}
}
|
If you check the grid object's inspector in the editor now, it'll be empty even though the object itself has some public members. That's because by overriding the OnInspectorGUI()we discarded the default inspector in order to make a custom one instead.
Step 5: Use GUILayout to Fill the Custom Inspector
Before we create any fields we need to get a reference to the object that inspector applies to. We actually have its reference already - it's named target - but for convenience we'll create a reference to the Grid component of that object. First, let's declare it.
|
1
2
3
|
public
class
GridEditor : Editor
{
Grid grid;
|
We should assign it in OnEnable() function which is called as soon as the inspector is enabled.
|
1
2
3
4
5
6
7
8
|
public
class
GridEditor : Editor
{
Grid grid;
public
void
OnEnable()
{
grid = (Grid)target;
}
|
Let's create some inspector fields now. We'll use GUILayout and EditorGUILayout classes for that.
|
1
2
3
4
5
6
7
|
public
override
void
OnInspectorGUI()
{
GUILayout.BeginHorizontal();
GUILayout.Label(
" Grid Width "
);
grid.width = EditorGUILayout.FloatField(grid.width, GUILayout.Width(50));
GUILayout.EndHorizontal();
}
|
The first line, GUILayout.BeginHorizontal(); indicates that we want to place the following inspector elements next to each other, left to right. As you may imagine, the last line,GUILayout.EndHorizontal(); indicates that we no longer want to do that. The actual items are in between those two lines. The first one is a simple label (in our case it will be displaying Grid Width text), and then next to it we create a EditorGUILayout.FloatFieldwhich is as you may imagine a float field. Note that we're assigning grid.width to the value of that FloatField, and the float field itself shows the value of grid.width. We also set its width to 50 pixels.
Let's see if the field is added to the inspector:
Step 6: Fill the Inspector and Repaint the Scene
Now let's add one more item to the inspector; this time it will be grid.height.
|
01
02
03
04
05
06
07
08
09
10
11
12
|
public
override
void
OnInspectorGUI()
{
GUILayout.BeginHorizontal();
GUILayout.Label(
" Grid Width "
);
grid.width = EditorGUILayout.FloatField(grid.width, GUILayout.Width(50));
GUILayout.EndHorizontal();
GUILayout.BeginHorizontal();
GUILayout.Label(
" Grid Height "
);
grid.height = EditorGUILayout.FloatField(grid.height, GUILayout.Width(50));
GUILayout.EndHorizontal();
}
|
That'd be all for our grid object fields, if you want to know about other fields and items that you can use in the inspector then you can visit the Unity reference pages onEditorGUILayout and GUILayout.
Note that the changes we make in our new inspector are visible only after we select the Scene View window. To make them visible once they are made we may callSceneView.RepaintAll().
|
01
02
03
04
05
06
07
08
09
10
11
12
13
14
|
public
override
void
OnInspectorGUI()
{
GUILayout.BeginHorizontal();
GUILayout.Label(
" Grid Width "
);
grid.width = EditorGUILayout.FloatField(grid.width, GUILayout.Width(50));
GUILayout.EndHorizontal();
GUILayout.BeginHorizontal();
GUILayout.Label(
" Grid Height "
);
grid.height = EditorGUILayout.FloatField(grid.height, GUILayout.Width(50));
GUILayout.EndHorizontal();
SceneView.RepaintAll();
}
|
Now we don't have to click outside the inspector to see the results of the changes.

Step 7: Handle the Editor Input
Now let's try to handle the editor's input, just like we would do it in the game. Any key or mouse states should be available to us. To have this functionality we have to add aonSceneGUIDelegate callback to our SceneView. Let's call our update function GridUpdate().
|
1
2
3
4
5
6
7
8
9
|
public
void
OnEnable()
{
grid = (Grid)target;
SceneView.onSceneGUIDelegate = GridUpdate;
}
void
GridUpdate(SceneView sceneview)
{
}
|
Now we only need to get the input Event.
|
1
2
3
4
|
void
GridUpdate(SceneView sceneview)
{
Event e = Event.current;
}
|
Step 8: Create a Prefab
For further playing with the editor scripts we'll need a game object that we'll be able to use. Let's create a simple cube and make a prefab out of it.

You can match the size of the grid to the cube or the other way around and align it with a grid.

As you can see, in the hierarchy view the cube text is colored in blue; this means it's connected to a prefab. You can see that prefab in the Project window.
Step 9: Create an Object from the Editor Script
Now we'll create an object from the editor script. Let's go back to our GridEditor.cs and extend the GridUpdate() function.
Let's create the object when the key a is pressed.
|
1
2
3
4
5
6
7
8
9
|
void
GridUpdate(SceneView sceneview)
{
Event e = Event.current;
if
(e.isKey && e.character ==
'a'
)
{
GameObject obj;
}
}
|
As you can see, we simply check whether the event is a key state change and whether the character that was pressed is 'a'. We also create a reference for our new object. Now let's instantiate it.
|
01
02
03
04
05
06
07
08
09
10
11
12
13
14
|
void
GridUpdate(SceneView sceneview)
{
Event e = Event.current;
if
(e.isKey && e.character ==
'a'
)
{
GameObject obj;
if
(Selection.activeObject)
{
obj = (GameObject)Instantiate(Selection.activeObject);
obj.transform.position =
new
Vector3(0.0f, 0.0f, 0.0f);
}
}
}
|
Selection.activeObject is a reference to the currently selected object in the editor. If any object is selected then we simply clone it and change the clone's position to (0.0, 0.0, 0.0).
Let's test whether it works. You must be mindful of one thing: our GridUpdate() stops working whenever the assets are reimported/refreshed, and to re-enable it you have to select the object (for example from the hierarchy view) that the editor script refers to - in our example it's the Grid object. You also need to remember that the input events will be caught only if the Scene view is selected.

Step 10: Instantiate a Prefab from the Editor Script
Altough we managed to clone the object, the cloned object's link to the prefab is non existant.

As you can see, the Cube (Clone) name is displayed with plain black font and that means it's not connected to the prefab as the original cube is. If we were to duplicate the original cube manually in the editor, the cloned cube would be linked to the Cubeprefab. To make it work this way for us we need to use InstantiatePrefab() function fromEditorUtility class.
Before we use this function we need to get the selected object's prefab. To do that we need to use GetPrefabParent() which also belongs to the EditorUtility class.
|
01
02
03
04
05
06
07
08
09
10
11
|
void
GridUpdate(SceneView sceneview)
{
Event e = Event.current;
if
(e.isKey&& e.character ==
'a'
)
{
GameObject obj;
Object prefab = EditorUtility.GetPrefabParent(Selection.activeObject);
if
(prefab)
{
|
We can also stop checking whether the Selection.activeObject exists, because if it doesn't then the prefab will be equal to null, and therefore we can get away with checking only the prefab reference.
Now let's instantiate our prefab and set its position.
|
01
02
03
04
05
06
07
08
09
10
11
12
13
14
15
16
|
void
GridUpdate(SceneView sceneview)
{
Event e = Event.current;
if
(e.isKey && e.character ==
'a'
)
{
GameObject obj;
Object prefab = EditorUtility.GetPrefabParent(Selection.activeObject);
if
(prefab)
{
obj = (GameObject)EditorUtility.InstantiatePrefab(prefab);
obj.transform.position =
new
Vector3(0.0f, 0.0f, 0.0f);
}
}
}
|
And that's it - let's check whether the cloned cube is linked to the prefab now.

Step 11: Translate Screen Mouse Coords to World Coords
The Event class doesn't let us know where the mouse is in the world space, it only provides the screen space mouse coordinates. Here's how we convert them so we can get an approximated world space mouse position.
|
1
2
3
4
5
6
|
void
GridUpdate(SceneView sceneview)
{
Event e = Event.current;
Ray r = Camera.current.ScreenPointToRay(
new
Vector3(e.mousePosition.x, -e.mousePosition.y + Camera.current.pixelHeight));
Vector3 mousePos = r.origin;
|
First we use the editor's camera ScreenPointToRay to get the ray from the screen coordinates, but unfortunately before that we need to translate the event's screen space to a space that is acceptable for ScreenPointToRay().
e.mousePosition holds the mouse position in a coordinate space where the top left corner is the (0, 0) point and bottom right corner is equal to (Camera.current.pixelWidth, -Camera.current.pixelHeight). We need to translate it into the space where the bottom left corner is the (0, 0) and the top right is (Camera.current.pixelWidth, Camera.current.pixelHeight), which is pretty simple.
The next thing we should do is save the ray's origin to our mousePos vector, so it's easily accessible.
Now we can assign the clone's position to where the mouse is.
|
1
2
3
4
5
|
if
(prefab)
{
obj = (GameObject)EditorUtility.InstantiatePrefab(prefab);
obj.transform.position =
new
Vector3(mousePos.x, mousePos.y, 0.0f);
}
|
Note that when the camera is set really flat then the approximation of mouse position on one of the axes is really really bad, that's why I set the z position of the clone manually. Now the cubes should be created wherever the mouse is.

Step 12: Align the Cubes to the Grid
Since we've got our grid set up, it would be a shame not to use it; let's use our mouse position to align the created cubes to the grid.
|
1
2
3
4
5
6
7
|
if
(prefab)
{
obj = (GameObject)EditorUtility.InstantiatePrefab(prefab);
Vector3 aligned =
new
Vector3(Mathf.Floor(mousePos.x/grid.width)*grid.width + grid.width/2.0f,
Mathf.Floor(mousePos.y/grid.height)*grid.height + grid.height/2.0f, 0.0f);
obj.transform.position = aligned;
}
|
Take a look at the result:

Step 13: Destroy an Object from the Editor Script
In this step we'll delete objects programmatically in the editor. We can do that by usingDestroyImmediate(). In this example let's make a greater use of the Selection class and delete all of the selected objects when the 'd' key is pressed.
|
01
02
03
04
05
06
07
08
09
10
11
12
13
14
15
16
17
18
|
if
(e.isKey && e.character ==
'a'
)
{
GameObject obj;
Object prefab = EditorUtility.GetPrefabParent(Selection.activeObject);
if
(prefab)
{
obj = (GameObject)EditorUtility.InstantiatePrefab(prefab);
Vector3 aligned =
new
Vector3(Mathf.Floor(mousePos.x/grid.width)*grid.width + grid.width/2.0f,
Mathf.Floor(mousePos.y/grid.height)*grid.height + grid.height/2.0f, 0.0f);
obj.transform.position = aligned;
}
}
else
if
(e.isKey && e.character ==
'd'
)
{
foreach
(GameObject obj
in
Selection.gameObjects)
DestroyImmediate(obj);
}
|
When the 'd' key is pressed we run through all the selected objects and delete each one of them. Of course we could also press Delete key in the editor to delete those objects, but then these wouldn't be deleted by our script. Test it in the editor.
Step 14: Undo Object Instantiation
In this step we'll make use of the Undo class, which basically lets us undo each action that our editor script does. Let's start by undoing the object creation.
To be able to destroy an object that we created in editor we need to callUndo.RegisterCreatedObjectUndo(). It takes two arguments: the first is the object that has been created and the second is the name of the undo. The name of the action that is going to be undone is always displayed under Edit->Undo name.
|
1
2
3
4
5
6
7
8
|
if
(prefab)
{
obj = (GameObject)EditorUtility.InstantiatePrefab(prefab);
Vector3 aligned =
new
Vector3(Mathf.Floor(mousePos.x/grid.width)*grid.width + grid.width/2.0f,
Mathf.Floor(mousePos.y/grid.height)*grid.height + grid.height/2.0f, 0.0f);
obj.transform.position = aligned;
Undo.RegisterCreatedObjectUndo(obj,
"Create "
+ obj.name);
}
|
If you create a few cubes using the a key and then try to undo now you'll notice that all the created cubes has been deleted. That's because all these created cubes went into a single undo event.
Step 15: Undo Single Object Instantiation
If we want to place every created object on another undo event and make it possible to undo creating them one by one we need to use Undo.IncrementCurrentEventIndex().
|
1
2
3
4
5
6
7
8
9
|
if
(prefab)
{
Undo.IncrementCurrentEventIndex();
obj = (GameObject)EditorUtility.InstantiatePrefab(prefab);
Vector3 aligned =
new
Vector3(Mathf.Floor(mousePos.x/grid.width)*grid.width + grid.width/2.0f,
Mathf.Floor(mousePos.y/grid.height)*grid.height + grid.height/2.0f, 0.0f);
obj.transform.position = aligned;
Undo.RegisterCreatedObjectUndo(obj,
"Create "
+ obj.name);
}
|
If you test the script now you'll see that the cubes are deleted one by one by undoing their creation.
Step 16: Undo Object Deletion
To undo the object deletion we have to use Undo.RegisterSceneUndo(). It's a very slow function that essentially saves the scene state so we can later revert to that state by performing an undo action. Unfortunately, it seems to be the only way for now to get the deleted objects back on the scene.
|
1
2
3
4
5
6
7
|
else
if
(e.isKey && e.character ==
'd'
)
{
Undo.IncrementCurrentEventIndex();
Undo.RegisterSceneUndo(
"Delete Selected Objects"
);
foreach
(GameObject obj
in
Selection.gameObjects)
DestroyImmediate(obj);
}
|
Undo.RegisterSceneUndo() takes only one argument, and that's the undo's name. After deleting a couple of cubes using the d key you can undo that deletion.
Step 17: Create an Editor Window Script
Create a new script, and let's make this one extend EditorWindow instead of Editor. Let's name it GridWindow.cs.
|
01
02
03
04
05
06
07
08
09
10
|
using
UnityEngine;
using
UnityEditor;
using
System.Collections;
public
class
GridWindow : EditorWindow
{
public
void
Init()
{
}
}
|
Let's create a reference to our Grid object so we can access it from the window.
|
1
2
3
4
5
6
7
8
9
|
public
class
GridWindow : EditorWindow
{
Grid grid;
public
void
Init()
{
grid = (Grid)FindObjectOfType(
typeof
(Grid));
}
}
|
Now we need to create the window, we can do that from our GridEditor script.
Step 18: Create the GridWindow
In our OnInspectorGUI() let's add a button that will create the GridWindow.
|
01
02
03
04
05
06
07
08
09
10
11
12
13
14
15
16
17
18
19
20
|
public
override
void
OnInspectorGUI()
{
GUILayout.BeginHorizontal();
GUILayout.Label(
" Grid Width "
);
grid.width = EditorGUILayout.FloatField(grid.width, GUILayout.Width(50));
GUILayout.EndHorizontal();
GUILayout.BeginHorizontal();
GUILayout.Label(
" Grid Height "
);
grid.height = EditorGUILayout.FloatField(grid.height, GUILayout.Width(50));
GUILayout.EndHorizontal();
if
(GUILayout.Button(
"Open Grid Window"
, GUILayout.Width(255)))
{
GridWindow window = (GridWindow) EditorWindow.GetWindow(
typeof
(GridWindow));
window.Init();
}
SceneView.RepaintAll();
}
|
We use GUILayout to create a button, we also set the button's name and width. TheGUILayout.Button returns true when the button is pressed, if that's the case then we open our GridWindow.
You can go back to the editor and press the button in our Grid object inspector.

Once you do that, the GridWindow should pop up.

Step 19: Create a Color Field in the GridWindow
Before we edit anything from our window, let's add a color field in our Grid class, so we can edit it later on.
|
1
2
3
4
5
6
|
public
class
Grid : MonoBehaviour
{
public
float
width = 32.0f;
public
float
height = 32.0f;
public
Color color = Color.white;
|
Now assign the Gizmos.color in the OnDrawGizmos() function.
|
1
2
3
4
|
void
OnDrawGizmos()
{
Vector3 pos = Camera.current.transform.position;
Gizmos.color = color;
|
And now let's go back to GridWindow script and create a color field there so we can pick the color in the window. We can do that in the OnGUI() callback.
|
01
02
03
04
05
06
07
08
09
10
11
12
13
14
|
public
class
GridWindow : EditorWindow
{
Grid grid;
public
void
Init()
{
grid = (Grid)FindObjectOfType(
typeof
(Grid));
}
void
OnGUI()
{
grid.color = EditorGUILayout.ColorField(grid.color, GUILayout.Width(200));
}
}
|
All right, now you can check whether everything works correctly in the editor: