树莓派连接阿里云物联网平台-服务(nodejs)
陈拓 [email protected] 2019/12/14-2019/12/20
1. 阿里云物联网平台设置
2. 在树莓派上安装Node.js LTS工具包
3. 阿里云物联网平台Node.js SDK
4. 发送温度数据到阿里云
5. node.js读DS18B20数据发送到阿里云
上面的内容见《树莓派连接阿里云物联网平台-属性(nodejs)》https://blog.csdn.net/chentuo2000/article/details/103705694
6. 阿里云控制LED
电路连接请看参考文档《树莓派GPIO控制》。
6.1 安装Node.js的gpio库
nodejs有不少树莓派Gpio库,在https://www.npmjs.com/上搜索raspberry gpio可以找到很多。
找一个简单的onoff,相关网址:https://www.npmjs.com/package/onoff
onoff用于Node.js的GPIO访问和中断检测。
- 安装onoff
npm install onoff
查看安装:
- 使用onoff
首先我们把LED和树莓派连接。LED的正极串联一个1KΩ电阻接树莓派的GPIO17 (pin11),负极接地。见参考文档《树莓派GPIO控制》。
看看例子程序:
■ 使用同步API闪烁LED
运行blink-led.js:
pi@raspberrypi:~/node_modules/onoff/examples $ node blink-led
blink-led.js使用同步readSync和writeSync方法使连接到GPIO17的LED闪烁5秒。
查看代码:
■ 使用异步API闪烁LED并完成回调
运行blink-led.js:
pi@raspberrypi:~/node_modules/onoff/examples $ node blink-led-async
blink-led-async.js使用异步读写方法使连接到GPIO17的LED闪烁5秒,并完成回调。
查看代码:
6.2 阿里云云端下发数据
详细操作请看参考文档“自己写微信小程序MQTT模拟器”。
- 修改index.js监听云端下发的服务调用消息
先看看我们的产品服务功能定义:
再查看API文档:https://github.com/aliyun/alibabacloud-iot-device-sdk#onService
监听物模型服务有异步方式回复和同步方式回复告诉服务端客户端的处理情况。按我们的产品功能定义调用方式是异步调用,标识符是switch。
将index.js中添加代码:
device.onService('switch', function (res,reply) {
// 处理服务参数
console.log('^onService',res);
reply({
"code": 200,
"data": {state:'led on'}
});
});
- 运行node index
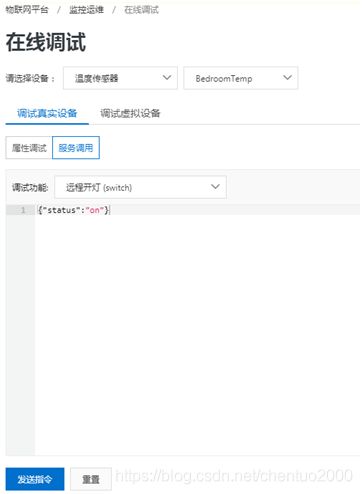
- 云端操作
输入参数{"status":"on"},开打。
点击“发送指令”。
查看实时日志:
从日志服务中查看:
上行消息分析:
Topic:/sys/a14U7TTbz9q/BedroomTemp/thing/service/switch_reply
下行消息分析:
- 查看树莓派上接收到的云端下发数据
接收服务switch下发数据的代码:
device.onService('switch', function (res,reply) {
console.log('^onService',res);
发送云端上报数据的代码:
reply({
"code": 200,
"data": {state:'led on'}
});
6.3 阿里云远程开关LED
- 开关指令格式
开打:{"status":"on"}
关灯:{"status":"off"}
- 修改index.js
■ 在程序的最前面添加代码
const Gpio = require('/home/pi/node_modules/onoff').Gpio;
const led = new Gpio(17, 'out');
■ 修改device.onService函数
device.onService('switch', function (res,reply) {
console.log('^onService',res);
paramsStr = JSON.stringify(res.params)
var stateInfo
if (paramsStr.indexOf('on') > 0) {
led.writeSync(1)
stateInfo = {state:'led on'}
} else {
led.writeSync(0)
stateInfo = {state:'led off'}
}
reply({
"code": 200,
"data": stateInfo
});
});
- 运行node index
- 云端操作
按照上一小节的操作方法,发送开打和关灯指令,可以看到LED点亮和熄灭。
Index.js完整代码
const Gpio = require('/home/pi/node_modules/onoff').Gpio;
const led = new Gpio(17, 'out');
const fs = require('fs');
const iot = require('alibabacloud-iot-device-sdk');
const deviceConfig = require('./device_id_password.json');
const device = iot.device(deviceConfig);
device.on('connect', () => {
console.log('Connect successfully!');
console.log('Post properties every 30 seconds...');
setInterval(() => {
var data = fs.readFileSync('/sys/bus/w1/devices/28-000004d627c6/w1_slave', $
var i = data.indexOf('t=');
var temp = data.substring(i+2, data.length)/1000;
const params = {
RoomTemp: temp
};
console.log(`Post properties: ${JSON.stringify(params)}`);
device.postProps(
params,
(res) => {
console.log(`postProps:`,res);
});
}, 30000);
device.onService('property/set', (data) => {
console.log('Received a message: ', JSON.stringify(data));
});
});
device.onService('switch', function (res,reply) {
console.log('^onService',res);
paramsStr = JSON.stringify(res.params)
var stateInfo
if (paramsStr.indexOf('on') > 0) {
led.writeSync(1)
stateInfo = {state:'led on'}
} else {
led.writeSync(0)
stateInfo = {state:'led off'}
}
reply({
"code": 200,
"data": stateInfo
});
});
device.on('error', err => {
console.error('err: ', err);
});
后面的内容见《树莓派连接阿里云物联网平台-订阅(nodejs)》
https://blog.csdn.net/chentuo2000/article/details/103769449
参考文档:
- 阿里云物联网平台基本设置https://blog.csdn.net/chentuo2000/article/details/103559553
- 微信小程序MQTT模拟器 阿里云物联网平台测试
https://blog.csdn.net/chentuo2000/article/details/102216865 - 自己写微信小程序MQTT模拟器
https://blog.csdn.net/chentuo2000/article/details/102507560 - 树莓派 Zero W+温度传感器DS18B20
https://blog.csdn.net/chentuo2000/article/details/81051701 - 树莓派GPIO控制
https://blog.csdn.net/chentuo2000/article/details/81051645 - 树莓派连接阿里云物联网平台-属性(nodejs)
https://blog.csdn.net/chentuo2000/article/details/103705694


