自定义View Layout过程 详解
自定义View Layout过程 详解
- 前言
- 1. 作用
- 2. 知识储备
- 3. layout过程详解
- 3.1 单一View的layout过程
- 3.1.1 应用场景
- 3.1.2 具体流程
- 3.1.3 总结
- 3.2 ViewGroup的layout过程
- 3.1.1 应用场景
- 3.1.2 原理(步骤)
- 3.1.3 具体流程
- 3.1.3 总结
- 4. ViewGroup的layout过程实例讲解
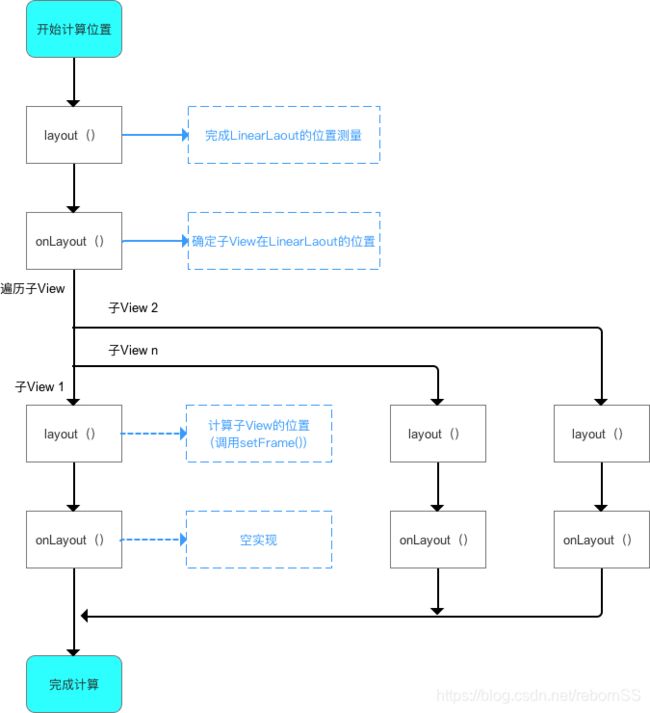
- 4.1 实例解析1(LinearLayout)
- 4.1.1 原理
- 4.1.2 具体流程
- 4.1.2 源码分析
- 4.2 实例解析2:自定义View
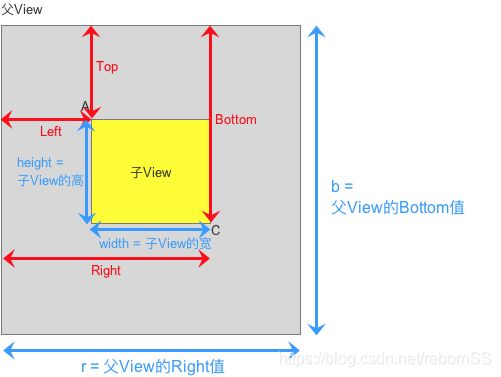
- 4.2.1示例图说明
- 4.2.2 原理
- 4.2.3 具体计算逻辑
- 4.2.3 代码分析
- 5. 细节问题:
- 5.1 详解
- 5.2 结论
- 6. 本文总结
前言
Acty
1. 作用
计算视图(View)的位置
即计算View的四个顶点位置:Left、Top、Right 和 Bottom
2. 知识储备
请参考文章:自定义View基础
3. layout过程详解
类似measure过程,layout过程根据View的类型分为2种情况:
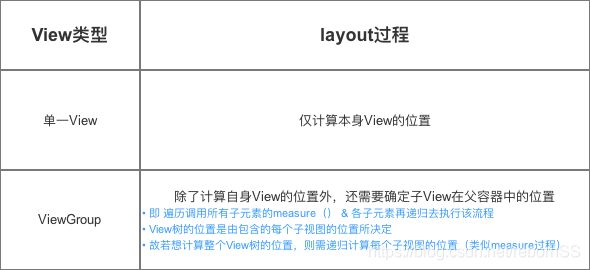
接下来,我将详细分析这2种情况下的layout过程
3.1 单一View的layout过程
3.1.1 应用场景
在无现成的控件View满足需求、需自己实现时,则使用自定义单一View
特征:继承自View、SurfaceView 或 其他View;不包含子View
- 如:制作一个支持加载网络图片的ImageView控件
- 注:自定义View在多数情况下都有替代方案:图片 / 组合动画,但二者可能会导致内存耗费过大,从而引起内存溢出等问题。
3.1.2 具体流程
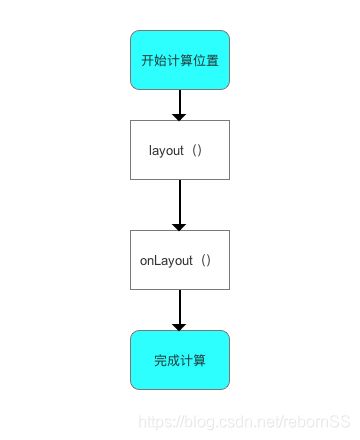
下面我将一个个方法进行详细的源码分析
layout过程的入口 = layout(),具体如下:
/**
  * 源码分析:layout()
  * 作用:确定View本身的位置,即设置View本身的四个顶点位置
  */
  public void layout(int l, int t, int r, int b) {

    // 当前视图的四个顶点
    int oldL = mLeft;
    int oldT = mTop;
    int oldB = mBottom;
    int oldR = mRight;

    // 1. 确定View的位置:setFrame() / setOpticalFrame()
    // 即初始化四个顶点的值、判断当前View大小和位置是否发生了变化 & 返回
    // ->>分析1、分析2
    boolean changed = isLayoutModeOptical(mParent) ?
            setOpticalFrame(l, t, r, b) : setFrame(l, t, r, b);

    // 2. 若视图的大小 & 位置发生变化
    // 会重新确定该View所有的子View在父容器的位置:onLayout()
    if (changed || (mPrivateFlags & PFLAG_LAYOUT_REQUIRED) == PFLAG_LAYOUT_REQUIRED) {

        onLayout(changed, l, t, r, b);
        // 对于单一View的laytou过程:由于单一View是没有子View的,故onLayout()是一个空实现->>分析3
        // 对于ViewGroup的laytou过程:由于确定位置与具体布局有关,所以onLayout()在ViewGroup为1个抽象方法,需重写实现(后面会详细说)
  ...

}

/**
  * 分析1:setFrame()
  * 作用:根据传入的4个位置值,设置View本身的四个顶点位置
  * 即:最终确定View本身的位置
  */
  protected boolean setFrame(int left, int top, int right, int bottom) {
        ...
    // 通过以下赋值语句记录下了视图的位置信息,即确定View的四个顶点
    // 从而确定了视图的位置
    mLeft = left;
    mTop = top;
    mRight = right;
    mBottom = bottom;

    mRenderNode.setLeftTopRightBottom(mLeft, mTop, mRight, mBottom);

    }

/**
  * 分析2:setOpticalFrame()
  * 作用:根据传入的4个位置值,设置View本身的四个顶点位置
  * 即:最终确定View本身的位置
  */
  private boolean setOpticalFrame(int left, int top, int right, int bottom) {

        Insets parentInsets = mParent instanceof View ?
                ((View) mParent).getOpticalInsets() : Insets.NONE;

        Insets childInsets = getOpticalInsets();

        // 内部实际上是调用setFrame()
        return setFrame(
                left   + parentInsets.left - childInsets.left,
                top    + parentInsets.top  - childInsets.top,
                right  + parentInsets.left + childInsets.right,
                bottom + parentInsets.top  + childInsets.bottom);
    }
    // 回到调用原处

/**
  * 分析3:onLayout()
  * 注:对于单一View的laytou过程
  *    a. 由于单一View是没有子View的,故onLayout()是一个空实现
  *    b. 由于在layout()中已经对自身View进行了位置计算,所以单一View的layout过程在layout()后就已完成了
  */
 protected void onLayout(boolean changed, int left, int top, int right, int bottom) {

   // 参数说明
   // changed 当前View的大小和位置改变了
   // left 左部位置
   // top 顶部位置
   // right 右部位置
   // bottom 底部位置
}
至此,单一View的layout过程已分析完毕。
3.1.3 总结
3.2 ViewGroup的layout过程
3.1.1 应用场景
利用现有的组件根据特定的布局方式来组成新的组件
特征:继承自ViewGroup 或 各种Layout;含有子 View
如:底部导航条中的条目,一般都是上图标(ImageView)、下文字(TextView),那么这两个就可以用自定义ViewGroup组合成为一个Veiw,提供两个属性分别用来设置文字和图片,使用起来会更加方便。
3.1.2 原理(步骤)
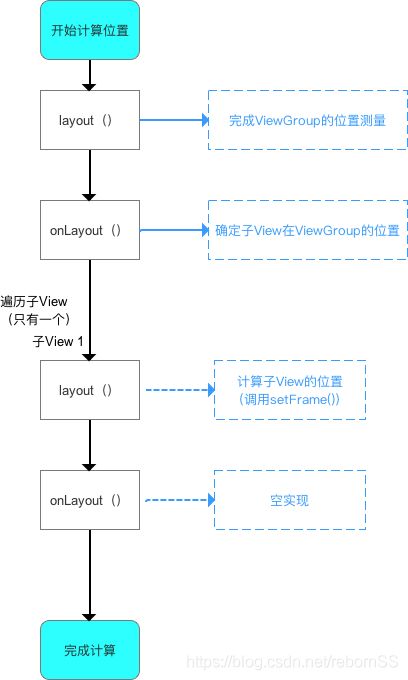
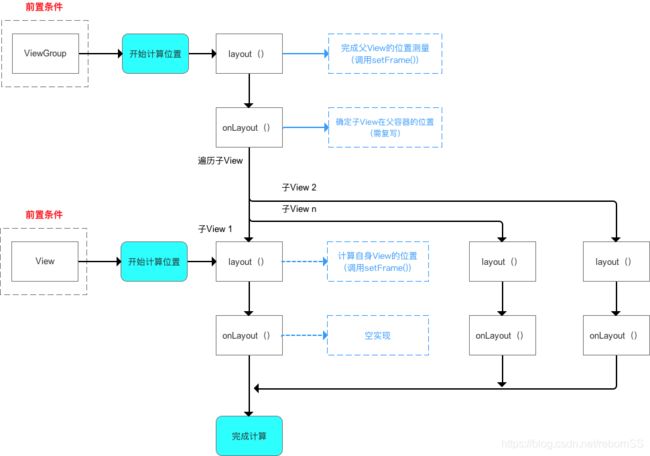
layout():计算自身ViewGroup的位置onLayout():遍历子View & 确定自身子View在ViewGroup的位置(调用子View 的layout())
步骤2 类似于 单一View的layout过程
3.1.3 具体流程

此处需注意:
ViewGroup 和 View 同样拥有layout()和onLayout(),但二者不同的:
- 一开始计算ViewGroup位置时,调用的是
ViewGroup的layout()和onLayout(); - 当开始遍历子View & 计算子View位置时,调用的是
子View的layout()和onLayout()
注:遍历子View 类似于单一View的layout过程
下面我将逐个方法进行详细分析:layout过程入口为layout()
/**
  * 源码分析:layout()
  * 作用:确定View本身的位置,即设置View本身的四个顶点位置
  * 注:与单一View的layout()源码一致
  */
  public void layout(int l, int t, int r, int b) {

    // 当前视图的四个顶点
    int oldL = mLeft;
    int oldT = mTop;
    int oldB = mBottom;
    int oldR = mRight;

    // 1. 确定View的位置:setFrame() / setOpticalFrame()
    // 即初始化四个顶点的值、判断当前View大小和位置是否发生了变化 & 返回
    // ->>分析1、分析2
    boolean changed = isLayoutModeOptical(mParent) ?
            setOpticalFrame(l, t, r, b) : setFrame(l, t, r, b);

    // 2. 若视图的大小 & 位置发生变化
    // 会重新确定该View所有的子View在父容器的位置:onLayout()
    if (changed || (mPrivateFlags & PFLAG_LAYOUT_REQUIRED) == PFLAG_LAYOUT_REQUIRED) {

        onLayout(changed, l, t, r, b);
        // 对于单一View的laytou过程:由于单一View是没有子View的,故onLayout()是一个空实现(上面已分析完毕)
        // 对于ViewGroup的laytou过程:由于确定位置与具体布局有关,所以onLayout()在ViewGroup为1个抽象方法,需重写实现 ->>分析3
  ...

}

/**
  * 分析1:setFrame()
  * 作用:确定View本身的位置,即设置View本身的四个顶点位置
  */
  protected boolean setFrame(int left, int top, int right, int bottom) {
        ...
    // 通过以下赋值语句记录下了视图的位置信息,即确定View的四个顶点
    // 从而确定了视图的位置
    mLeft = left;
    mTop = top;
    mRight = right;
    mBottom = bottom;

    mRenderNode.setLeftTopRightBottom(mLeft, mTop, mRight, mBottom);

    }

/**
  * 分析2:setOpticalFrame()
  * 作用:确定View本身的位置,即设置View本身的四个顶点位置
  */
  private boolean setOpticalFrame(int left, int top, int right, int bottom) {

        Insets parentInsets = mParent instanceof View ?
                ((View) mParent).getOpticalInsets() : Insets.NONE;

        Insets childInsets = getOpticalInsets();

        // 内部实际上是调用setFrame()
        return setFrame(
                left   + parentInsets.left - childInsets.left,
                top    + parentInsets.top  - childInsets.top,
                right  + parentInsets.left + childInsets.right,
                bottom + parentInsets.top  + childInsets.bottom);
    }
    // 回到调用原处

/**
  * 分析3:onLayout()
  * 作用:计算该ViewGroup包含所有的子View在父容器的位置()
  * 注:
  *      a. 定义为抽象方法,需重写,因:子View的确定位置与具体布局有关,所以onLayout()在ViewGroup没有实现
  *      b. 在自定义ViewGroup时必须复写onLayout()!!!!!
  *      c. 复写原理:遍历子View 、计算当前子View的四个位置值 & 确定自身子View的位置(调用子View layout())
  */
  protected void onLayout(boolean changed, int left, int top, int right, int bottom) {

     // 参数说明
     // changed 当前View的大小和位置改变了
     // left 左部位置
     // top 顶部位置
     // right 右部位置
     // bottom 底部位置

     // 1. 遍历子View:循环所有子View
          for (int i=0; i<getChildCount(); i++) {
              View child = getChildAt(i);

              // 2. 计算当前子View的四个位置值
                // 2.1 位置的计算逻辑
                ...// 需自己实现,也是自定义View的关键

                // 2.2 对计算后的位置值进行赋值
                int mLeft  = Left
                int mTop  = Top
                int mRight = Right
                int mBottom = Bottom

              // 3. 根据上述4个位置的计算值,设置子View的4个顶点:调用子view的layout() & 传递计算过的参数
              // 即确定了子View在父容器的位置
              child.layout(mLeft, mTop, mRight, mBottom);
              // 该过程类似于单一View的layout过程中的layout()和onLayout(),此处不作过多描述
          }
      }
  }
3.1.3 总结
4. ViewGroup的layout过程实例讲解
为了更好理解ViewGroup的layout过程(特别是复写onLayout())
下面,我将用2个实例来加深对ViewGroup layout过程的理解
- 系统提供的ViewGroup的子类:LinearLayout
- 自定义View(继承了ViewGroup类)
4.1 实例解析1(LinearLayout)
4.1.1 原理
- 计算出LinearLayout本身 在父布局的位置
- 计算出LinearLayout中 所有子View在容器中的位置
4.1.2 具体流程
4.1.2 源码分析
- 在上述流程中,对于LinearLayout的layout()的实现与上面所说是一样的,此处不作过多阐述
- 故直接进入LinearLayout复写的
onLayout()分析
/**
  * 源码分析:LinearLayout复写的onLayout()
  * 注:复写的逻辑 和 LinearLayout measure过程的 onMeasure()类似
  */
  @Override
  protected void onLayout(boolean changed, int l, int t, int r, int b) {

      // 根据自身方向属性,而选择不同的处理方式
      if (mOrientation == VERTICAL) {
          layoutVertical(l, t, r, b);
      } else {
          layoutHorizontal(l, t, r, b);
      }
  }
      // 由于垂直 / 水平方向类似,所以此处仅分析垂直方向(Vertical)的处理过程 ->>分析1

/**
  * 分析1:layoutVertical(l, t, r, b)
  */
    void layoutVertical(int left, int top, int right, int bottom) {

        // 子View的数量
        final int count = getVirtualChildCount();

        // 1. 遍历子View
        for (int i = 0; i < count; i++) {
            final View child = getVirtualChildAt(i);
            if (child == null) {
                childTop += measureNullChild(i);
            } else if (child.getVisibility() != GONE) {

                // 2. 计算子View的测量宽 / 高值
                final int childWidth = child.getMeasuredWidth();
                final int childHeight = child.getMeasuredHeight();

                // 3. 确定自身子View的位置
                // 即:递归调用子View的setChildFrame(),实际上是调用了子View的layout() ->>分析2
                setChildFrame(child, childLeft, childTop + getLocationOffset(child),
                        childWidth, childHeight);

                // childTop逐渐增大,即后面的子元素会被放置在靠下的位置
                // 这符合垂直方向的LinearLayout的特性
                childTop += childHeight + lp.bottomMargin + getNextLocationOffset(child);

                i += getChildrenSkipCount(child, i);
            }
        }
    }

/**
  * 分析2:setChildFrame()
  */
    private void setChildFrame( View child, int left, int top, int width, int height){

        // setChildFrame()仅仅只是调用了子View的layout()而已
        child.layout(left, top, left ++ width, top + height);

        }
    // 在子View的layout()又通过调用setFrame()确定View的四个顶点
    // 即确定了子View的位置
    // 如此不断循环确定所有子View的位置,最终确定ViewGroup的位置
4.2 实例解析2:自定义View
- 上面讲的例子是系统提供的、已经封装好的ViewGroup子类:LinearLayout
- 但是,一般来说我们使用的都是自定义View;
- 接下来,我用一个简单的例子讲下自定义View的
layout()过程
4.2.1示例图说明
实例视图 = 1个ViewGroup(灰色视图),包含1个黄色的子View,如下图:
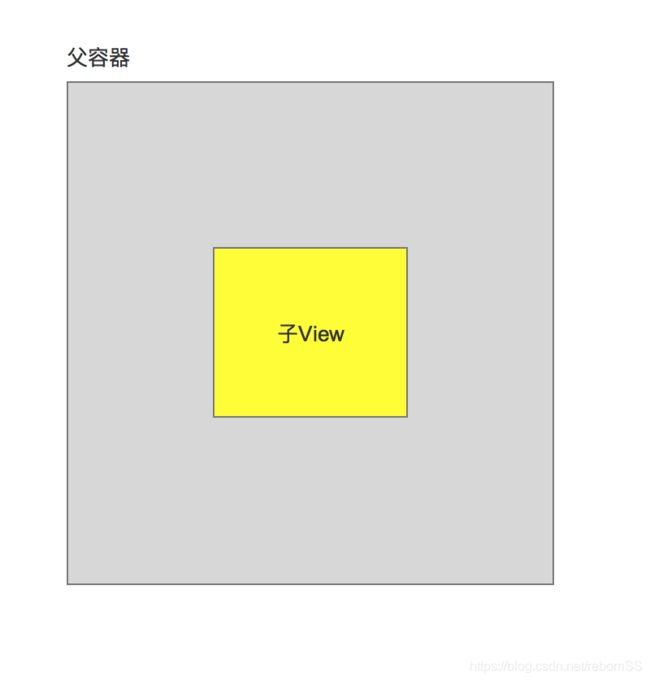
4.2.2 原理
- 计算出ViewGroup在父布局的位置
- 计算出ViewGroup中子View在容器中的位置
4.2.3 具体计算逻辑
- 具体计算逻辑是指计算子View的位置,即计算四顶点位置 = 计算Left、Top、Right和Bottom;
- 主要是写在复写的onLayout()
- 计算公式如下:
r = Left + width + Left;// 因左右间距一样
b = Top + height + Top;// 因上下间距一样

Left = (r - width) / 2;
Top = (b - height) / 2;

Right = width + Left;
Bottom = height + Top;
4.2.3 代码分析
因为其余方法同上,这里不作过多描述,所以这里只分析复写的onLayout()
/**
  * 源码分析:LinearLayout复写的onLayout()
  * 注:复写的逻辑 和 LinearLayout measure过程的 onMeasure()类似
  */
  @Override
protected void onLayout(boolean changed, int l, int t, int r, int b) {

     // 参数说明
     // changed 当前View的大小和位置改变了
     // left 左部位置
     // top 顶部位置
     // right 右部位置
     // bottom 底部位置

        // 1. 遍历子View:循环所有子View
        // 注:本例中其实只有一个
        for (int i=0; i<getChildCount(); i++) {
            View child = getChildAt(i);

            // 取出当前子View宽 / 高
            int width = child.getMeasuredWidth();
            int height = child.getMeasuredHeight();

            // 2. 计算当前子View的四个位置值
                // 2.1 位置的计算逻辑
                int mLeft = (r - width) / 2;
                int mTop = (b - height) / 2;
                int mRight =  mLeft + width;
                int mBottom = mTop + height;

            // 3. 根据上述4个位置的计算值,设置子View的4个顶点
            // 即确定了子View在父容器的位置
            child.layout(mLeft, mTop, mRight,mBottom);
        }
    }
}
布局文件如下:
<scut.carson_ho.layout_demo.Demo_ViewGroup xmlns:android="http://schemas.android.com/apk/res/android"
    xmlns:tools="http://schemas.android.com/tools"
    android:layout_width="wrap_content"
    android:layout_height="wrap_content"
    android:background="#eee998"
    tools:context="scut.carson_ho.layout_demo.MainActivity">

    <Button
        android:text="ChildView"
        android:layout_width="200dip"
        android:layout_height="200dip"
        android:background="#333444"
        android:id="@+id/ChildView" />
scut.carson_ho.layout_demo.Demo_ViewGroup >
效果图

好了,你是不是发现,粘了我的代码但是画不出来?!(如下图)
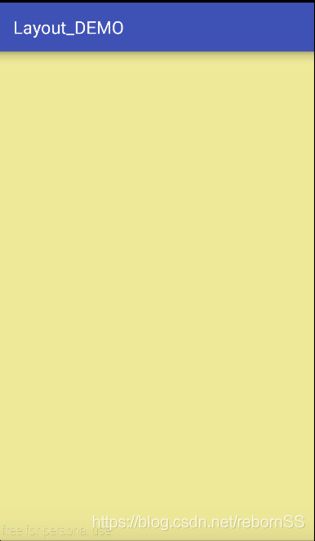
因为我还没说draw流程啊哈哈哈!
draw流程:将View最终绘制出来
layout()过程讲到这里讲完了,接下来继续讲自定义View的最后一个流程draw流程
5. 细节问题:
问题:getWidth() ( getHeight())与 getMeasuredWidth() (getMeasuredHeight())获取的宽 (高)有什么区别?
5.1 详解
答:首先明确定义:
- getWidth() / getHeight():获得View最终的宽 / 高
- getMeasuredWidth() / getMeasuredHeight():获得 View测量的宽 / 高
先看下各自的源码:
// 获得View测量的宽 / 高
  public final int getMeasuredWidth() {
      return mMeasuredWidth & MEASURED_SIZE_MASK;
      // measure过程中返回的mMeasuredWidth
  }

  public final int getMeasuredHeight() {
      return mMeasuredHeight & MEASURED_SIZE_MASK;
      // measure过程中返回的mMeasuredHeight
  }


// 获得View最终的宽 / 高
  public final int getWidth() {
      return mRight - mLeft;
      // View最终的宽 = 子View的右边界 - 子view的左边界。
  }

  public final int getHeight() {
      return mBottom - mTop;
     // View最终的高 = 子View的下边界 - 子view的上边界。
  }
二者的区别:

上面标红:一般情况下,二者获取的宽 / 高是相等的。那么,“非一般”情况是什么?
答:人为设置:通过重写View的 layout()强行设置
@Override
public void layout( int l , int t, int r , int b){

   // 改变传入的顶点位置参数
   super.layout(l,t,r+100,b+100);

   // 如此一来,在任何情况下,getWidth() / getHeight()获得的宽/高 总比 getMeasuredWidth() / getMeasuredHeight()获取的宽/高大100px
   // 即:View的最终宽/高 总比 测量宽/高 大100px

}
虽然这样的人为设置无实际意义,但证明了View的最终宽 / 高 与 测量宽 / 高是可以不一样
特别注意
网上流传这么一个原因描述:
实际上在当屏幕可包裹内容时,他们的值是相等的;
只有当view超出屏幕后,才能看出他们的区别:getMeasuredWidth()是实际View的大小,与屏幕无关,而getHeight的大小此时则是屏幕的大小。当超出屏幕后getMeasuredWidth()等于getWidth()加上屏幕之外没有显示的大小
这个结论是错的!详细请点击文章
5.2 结论
在非人为设置的情况下,View的最终宽/高(getWidth() / getHeight())与 View的测量宽/高(getMeasuredWidth() / getMeasuredHeight())永远是相等
6. 本文总结
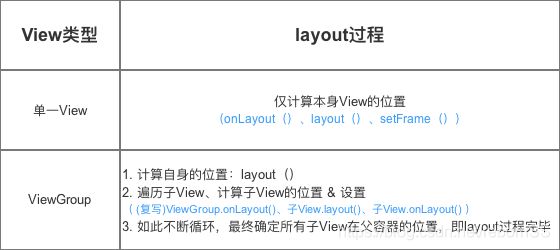
本文主要讲解了自定义View中的Layout过程,总结如下:
参考内容
自定义View Layout过程 - 最易懂的自定义View原理系列
链接名称(一)


