定时任务在python中的多种实现方式
定时任务在python中的多种实现方式
- 一、在Python中实现定时任务
- 1 . 使用 Timer 实现定时任务
- A . 介绍 Timer
- B . 示例代码
- C . 总结及问题
- 2.使用 Thread 实现定时任务
- A . 介绍 Thread
- B . 代码示例
- C . 总结及问题
- 3.使用 Twisted 实现定时任务
- A . 介绍 twisted
- B . 代码示例
- C . 总结及问题
- 二 . 在 python 中实现重复定时任务
- 1 . 使用 Thread 实现定时任务
- A . 介绍 Thread
- B . 代码示例
- (1) 创建Thread 类的实例,传递一个函数
- (2) 创建 Thread 类的实例,传递一个可调用的类实例
- (3) 派生 Thread 类的子类,并创建子类的实例
- C . 总结及问题
- 2 . 使用 Twisted 实现定时任务
- A . 介绍 Thread
- B . 代码示例
- C . 总结及问题
- Appendix
定时任务是一个非常常用的功能,在许多系统中都会被用到。例如,定时清理临时文件,定时预处理用户活动数据,定时推送新闻等。然而,定时任务也有很多种实现方式。从最古老的Unix/Linux cron[1]工具,到现在非常火热的Airfow[2]平台(虽然Airflow的底层仍然重度依赖cron工具)。对于一些系统业务依赖程度高的定时服务,我们也可以直接使用代码实现。今天我为大家介绍在Python中使用定时器实现定时任务的几种方法。希望本文能够”搬砖”引玉。
一、在Python中实现定时任务
要在Python中实现定时任务,最最简单的方法就是直接使用time sleep(t)[3],t为等待时间,以秒为单位,可以为浮点数。这种方法的确实现了时间控制(t秒后执行),但是这种方法最大的缺点就是直接把主线程给阻塞了。因此,这种方法在实际项目中用来实现定时任务的情况非常罕见。下面我就介绍几种常用的实现方式。
1 . 使用 Timer 实现定时任务
A . 介绍 Timer
Timer(定时器)是 Thread 的派生类,用于在指定时间后调用一个方法。
构造方法 :
Timer(interval, function, args=[], kwargs={})
		interval : 指定的时间
		function : 要执行的方法
		args/kwargs : 方法的参数
B . 示例代码
代码 :
import time
from threading import Timer

def hello():
    print("Execting hello : %s " % time.ctime())
    print("Hello world!")

t = Timer(10.0, hello)
print("Strat : %s " % time.ctime())
t.start()
print("End: %s " % time.ctime())
运行结果:

我们可以看到代码中先定义了一个函数,函数的作用为输出执行此函数时的系统时间,并且输出 “Hello world”。然后定义一个 Timer 类型的对象 t,代表10秒之后执行 hello() 函数。接着,输出当前系统时间。调用 t 的 start() 函数之后,我们再次输出当前系统时间。从输出结果中,我们看到执行函数的时间确实在 start() 的 10 秒之后。然而。start() 之后的输出系统时间却没有等到 hello() 函数调用完。这说明使用 Timer 实现定时任务并没有阻塞线程。
C . 总结及问题
需要说明的是, Timer 只能控制函数在制定时间内执行一次,如果要使用 Timer 控制函数多次重复执行,则需要再执行下一次调度,否则会报错。详见代码示例 :
代码:
import time
from threading import Timer

def print_time():
    print("当前时间 : %s " % time.ctime())

t = Timer(1, print_time)
t.start()
t.start()
2.使用 Thread 实现定时任务
A . 介绍 Thread
Thread 是 threading 模块中的一个类, 表示一个执行进程的对象, 是 threading 模块的主要执行对象。 属性和方法如下 :
| Thread 类属性 | |
|---|---|
| name | 线程名 |
| ident | 线程的标识符 |
| daemon | 布尔值,表示这个线程是否是守护线程 |
| Thread 类方法 | |
| _init_(group=None,target=None,name=None,args=(),kwargs={},verbose=Node,daemon=None | 实例化一个线程对象,需要和一个可调用的 target 对象,以及参数 args 或者 kwargs。还可以传递 name 和group 参数。daemon 的值将会设定 thread.daemon 的属性 |
| start() | 开始执行该进程 |
| run() | 定义线程的方法。(通常开发者应该在子类中重写) |
| join(timeout=None) | 直至启动的线程终止之前一直挂起;除非给出了 timeout(单位秒),否则一直被阻塞 |
| getName() | 返回线程名(该方法已被弃用) |
| setName() | 设定线程名(该方法已被弃用) |
| isAlive | 布尔值,表示这个线程是否还存活(驼峰式命名,python2.6版本开始已被取代) |
| isDaemon() | 布尔值,表示是否是守护线程(已经弃用) |
| setDaemon(布尔值) | 在线程 start() 之前调用,把线程的守护标识设定为指定的布尔值(已弃用) |
B . 代码示例
代码:
import threading
import time

def hello(n, nsec):
    print("Executing : %d hello %s" % (n, time.ctime()))
    time.sleep(nsec)
    print("Hello World! %s" %time.ctime())

t = threading.Thread(target=hello, args=(1,2))
print("Start : %s" %time.ctime())
t.start()
print("end : %s" %time.ctime())
运行结果:

我们看到代码中先定义了一个函数 hello(),函数的作用是输出当前系统时间之后等待几秒,然后输出当前系统时间。我们用 Thread 创建一个线程,指定 target 并传参。输出当前系统时间,开始线程,然后输出当前系统时间。从输出结果中,我们可以看到线程执行完之前已经输出了主线程中的结束时间,说明使用 Thread 不阻塞主线程。
C . 总结及问题
使用 Thread 时,为 target 传递参数的 args 必须是列表类型,不能是 int 类型。
3.使用 Twisted 实现定时任务
A . 介绍 twisted
Twisted 是使用python实现的基于事件驱动的网络引擎框架,诞生于 2000 年初。Twisted支持许多常见的传输及应用层协议,包括TCP、UDP、SSL/TLS、HTTP、IMAP、SSH、IRC 以及 FTP。Twisted对于其支持的所有协议都带有客户端和服务器实现,同时附带有机遇命令行的工具,使得配置和部署产品级的 Twisted 应用变得非常方便。
Twisted 的核心是 reactor 事件循环。Reactor 可以感知网络、文件系统以及定时器事件。它等待然后处理这些事件,从特定于平台的行为中抽象出来,并提供统一的接口,使得在网络协议栈的任何位置对事件作出响应都变得简单。
B . 代码示例
代码 :
from twisted.internet import reactor
import time

def func():
    print("Hello World! %s" %time.ctime())

print("Start : %s" %time.ctime())
reactor.callLater(2, func)
reactor.run()
print("end : %s" %time.ctime())
运行结果 :

我们可以看到代码中先定义了一个函数 func() 输出 “Hello World” 以及当前系统时间。输出开始运行时的当前系统时间,利用 reactor 在 2 秒后运行 func(),当程序结束时输出当前系统时间。在输出结果中我们看到在主线程开始 2 秒后运行了函数 func()。值得注意的是,在 VScode 下我们并不会看到程序结束时输出的当前系统时间。这是因为 reactor循环是在其开始的进程中运行,一旦启动,就会一直运行下去,也就是说只要不中断程序,reactor.run() 永远运行下去。在 cmd 中运行程序后,终止程序可以看到程序结束时输出的当前系统时间,运行结果如下:

C . 总结及问题
如果 pip install twisted 出错的话可以在 http://www.lfd.uci.edu/~gohlke/pythonlibs/#twisted 下载 twisted 对应版本的 whl 文件(如我的 Twisted-19.2.0-cp37-cp37m-win_amd64.whl),cp 后面是 python 的版本,amd64 代表64为,运行命令:pip install D:\User\SONGKEXIN324\Downloads\Twisted-19.2.0-cp37-cp37m-win_amd64.whl(路径名请自行替换)
用 VScode 调试代码时,遇到划在 reactor 下的红线,提示类似“Module ‘twisted.internet.reactor’ has no ‘run’ member”不必担心,只是因为 IDE不能自动补全第三方库而已。
二 . 在 python 中实现重复定时任务
有时单次定时任务并不能满足我们的需求,我们常常需要设置某个任务每隔一定时间重复一次,这时就需要实现重复定时了。
1 . 使用 Thread 实现定时任务
A . 介绍 Thread
同一.2.A
B . 代码示例
使用 Thread 类,可以创建多个线程,我们为每个线程设置好时间和任务就可以实现重复定时了。利用 Thread 可以有多种方法创建线程实现定时任务,下面我分别为大家介绍。
(1) 创建Thread 类的实例,传递一个函数
代码:
 import threading
from time import sleep, ctime

loops = [4, 2]

def loop(nloop, nsec):
    print("开始循环 %d 时间:%s" %(nloop, ctime()))
    sleep(nsec)
    print("循环 %d 结束于:%s" %(nloop, ctime()))

print("程序开始于:", ctime())
threads = []
nloops = range(len(loops))

for i in nloops:
    t = threading.Thread(target=loop, args=(i, loops[i]))
    threads.append(t)

for i in nloops:
    threads[i].start()

for i in nloops:
    threads[i].join()

print("程序结束于:", ctime())
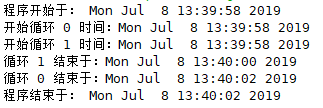
运行结果 :

我们可以看到代码中,先定义了一个列表 loops 来存储每个线程等待的时间。接着定义了一个函数 loop(),参数为循环的 id nloop 和 nsec 为循环的等待时间,函数的作用为在等待之前和之后分别输出当前系统时间。程序开始时输出当前系统时间,接着定义列表 threads 来存储每个线程,定义 range nloops 存储每个线程的 id,接下来的3个 for 循环的作用分别为实例化 Thread 类传递函数及其参数并将线程对象放入列表 threads 中,开始线程,让主线程等待所有的线程都执行完毕。当所有线程结束后,输出当前系统时间。从输出结果中,我们可以看到循环 0 和循环 1 同时进行互不阻塞。如果我们将最后一个循环删掉,那么主程序也会在线程结束前结束,证明使用 Thread 不会阻塞主线程,读者可以自行尝试。
(2) 创建 Thread 类的实例,传递一个可调用的类实例
代码 :
import threading
from time import sleep, ctime

loops = [4, 2]

class ThreadFunc(object):
    def __init__(self, func, args, name=''):
        self.name = name
        self.func = func
        self.args = args

    def __call__(self):
        self.func(*self.args)

def loop(nloop, nsec):
    print("开始循环 %d 时间:%s" %(nloop, ctime()))
    sleep(nsec)
    print("循环 %d 结束于:%s" %(nloop, ctime()))

print("程序开始于:", ctime())
threads = []
nloops = range(len(loops))

for i in nloops:
    t = threading.Thread(target=ThreadFunc(loop,(i,loops[i]), loop.__name__))
    threads.append(t)

for i in nloops:
    threads[i].start()

for i in nloops:
    threads[i].join()

print("程序结束于:", ctime())
运行结果 :

上述代码中,主要添加了 ThreadFunc 类,并在实例化 Thread 对象中,通过传参的形式同时实例化了可调用类 ThreadFunction 。创建 ThreadFunc 类的思想 :我们希望这个类更加通用,而不局限于 loop() 函数,为此,添加了以下新的东西,比如这个类保存了函数自身,函数的参数,以及函数名。构造函数 init() 用于设定上述值。当创建新线程的时候,thread 类的代码将调用 ThreadFunc 对象,此时会调用 call() 这个特殊方法。
(3) 派生 Thread 类的子类,并创建子类的实例
代码 :
import threading
from time import sleep, ctime

loops = [4, 2]

class MyThread(threading.Thread):
    def __init__(self, func, args, name=''):
        threading.Thread.__init__(self)
        self.name = name
        self.func = func
        self.args = args

    def run(self):
        self.func(*self.args)

def loop(nloop, nsec):
    print("开始循环 %d 时间:%s" %(nloop, ctime()))
    sleep(nsec)
    print("循环 %d 结束于:%s" %(nloop, ctime()))

print("程序开始于:", ctime())
threads = []
nloops = range(len(loops))

for i in nloops:
    t = MyThread(loop, (i,loops[i]), loop.__name__)
    threads.append(t)

for i in nloops:
    threads[i].start()

for i in nloops:
    threads[i].join()

print("程序结束于:", ctime())
C . 总结及问题
当使用多线程的时候,程序中的输出语句最好使用占位符方式而不要用拼接方式,否则输出语句会被其他线程扰乱。
第二种方法稍微难以阅读,一般的,我们会采用第一种或者第三种方法,如果需要一个更加符合面向对象的接口时,倾向于选择第三种方法。
2 . 使用 Twisted 实现定时任务
A . 介绍 Thread
同一.3.A
B . 代码示例
代码 :
from twisted.internet import reactor
import time

def func():
    print("Hello world! %s" %time.ctime())

print("start: %s" %time.ctime())
for i in range(5):
    reactor.callLater(i+1, func)
reactor.run()
print("end: %s" %time.ctime())
C . 总结及问题
Twisted 于 thread 的不同之处在于, thread 开启了多个线程, 而 twisted 的多个任务交错执行,但仍然在一个单独的线程控制中。这种方式让程序尽可能的得以执行而不需要用到额外的线程。事件驱动型程序比多线程程序更容易推断出行为,因为程序员不需要关心线程安全问题。当程序中有许多任务,而且任务之间高度独立(因此它们不需要互相通信,或者等待彼此)时,采用事件驱动模型是个很好的选择。
Appendix
[1] 在 Linux 系统中,计划任务一般是由 cron 承担,我们可以把 cron 设置为开机时自动启动。 Cron 启动后,它会读取它的所有配置文件(全局性配置文件 /etc/crontab,以及每个用户的计划任务配置文件),然后 cron 会根据命令和执行时间来按时来调度工作任务。cron 是一个linux 下的定时执行工具,可以在无需人工干预的情况下运行作业。由于 Cron 是 Linux 的内置服务,但它不自动起来,可以用以下的方法启动、关闭这个服务 :
		/sbin/service crond start //启动服务;
 		/sbin/service crond stop//关闭服务;
 		/sbin/service crond restart //重启服务;
 		/sbin/service crond reload//重新载入配置;
也可以将这个服务在系统启动的时候自动启动 :
在 /etc/rc.d/rc.local 这个脚本的末尾加上 : /sbin/service crond start
Cron 服务提供以下几种接口供大家使用 :
1 . 直接用 crontab 命令编辑
2 . 编辑 /etc/crontab 文件配置 cron
[2] Airflow 是一个可编程、调度和监控的工作流平台,基于有向无环图(DAG),airflow 可以定义一组有依赖的任务,按照依赖依次执行,airflow 提供了丰富的命令行工具用于系统管控,而其 web 管理界面同样也可以方便的管控调度任务,并且对任务运行状态进行实时监控,方便了系统的运维和管理。
[3] time.sleep(t)示例代码
代码 :
import time

print("start: %s" %time.ctime())
time.sleep(5)
print("End: %s" %time.ctime())


