Lnmp架构一之Mysql、PHP,Nginx源码安装
一.MYSQL的源码编译
1.实验环境
rhel6.5 selinux and iptables disabled
因为MYSQL占用的空间大所以需要20G的硬盘,并且内存设置为2048KB,在编译安装的时候可以加快速度
2.源码编译
(1)在官网下载Mysql的源码包
Mysql5.7源码包下载地址
https://dev.mysql.com/downloads/mysql/5.7.html#downloads
本次实验直接从物理机上scp已经下载好的安装包到server1,然后进行解压
[root@hetoto1 ~]# tar zxf mysql-boost-5.7.17.tar.gz
[root@hetoto1 ~]# cd mysql-5.7.17/


(2)编译安装
创建目录用于存放LNMP框架需要的MYSQL,Nginx,PHP
mkdir /usr/local/lnmp
-
安装编译源码工具cmake
cmake跨平台工具是用来编译mysql源码的,用于设置mysql的编译参数。如安装目录,存放路径,字符编码及排序规则等等
[root@hetoto1 ~]# yum install -y cmake-2.8.12.2-4.el6.x86_64.rpm
- 安装编译时需要的依赖包
[root@hetoto1 mysql-5.7.17]# yum install -y ncurses-devel #安装依赖性软件
[root@hetoto1 mysql-5.7.17]# yum install -y gcc gcc-c++
[root@hetoto1 mysql-5.7.17]# yum install -y bison
- 进行编译,在编译时可以加上在编译时的条件
[root@hetoto1 ~]#  cd mysql-5.7.17/
[root@hetoto1 mysql-5.7.17]# cmake -DCMAKE_INSTALL_PREFIX=/usr/local/lnmp/mysql \  #指定mysql的安装位置
> -DMYSQL_DATADIR=/usr/local/lnmp/mysql/data \  #指定数据库中数据存放的路径
> -DMYSQL_UNIX_ADDR=/usr/local/lnmp/mysql/data/mysql.sock \  #链接数据库的socket文件
> -DWITH_MYISAM_STORAGE_ENGINE=1 \ #安装MYISAM的存储引擎
> -DWITH_INNOBASE_STORAGE_ENGINE=1 \
> -DDEFAULT_CHARSET=utf8 \ #使用utf-8字符编码
> -DDEFAULT_COLLATION=utf8_general_ci \ #校验字符
> -DEXTRA_CHARSETS=all \ #安装所有的扩展字符集
> -DWITH_BOOST=boost/boost_1_59_0


注:如果编译过一次出现问题解决后再次编译回保留缓存文件,再次编译时会报错,因此需要先删除缓存文件,然后再进行编译:rm -rf CMakeCache.txt
3.MYSQL的配置
(1)将编译完成的mysql的启动脚本复制到系统启动服务脚本的默认目录中去
[root@hetoto1 mysql-5.7.17]# cd support-files/
[root@hetoto1 support-files]# cp mysql.server /etc/init.d/mysqld
[root@hetoto1 support-files]# chmod +x /etc/init.d/mysqld #给服务脚本添加执行权限

(2)进入源码编译目录,再进入mysql安装的位置,在相关的配置目录下把mysql的配置文件放到/etc/my.cnf

(3)编辑配置文件my.cnf,添加mysql的存放路径
[root@hetoto1 support-files]# vim /etc/my.cnf

文件编辑内容如下:
 18 basedir = /usr/local/lnmp/mysql
 19 datadir = /usr/local/lnmp/mysql/data
 20 # port = .....
 21 # server_id = .....
 22 socket = /usr/local/lnmp/mysql/data/mysql.sock


(4)添加mysql用户对mysql服务进行限制,将mysql服务的工作空间局限在mysql用户的家目录中
[root@hetoto1 support-files]# groupadd -g 27 mysql
[root@hetoto1 support-files]# useradd -u 27 -g 27 -M -d /usr/local/lnmp/mysql/data -s /sbin/nologin mysql
![]()
(5)创建数据目录data
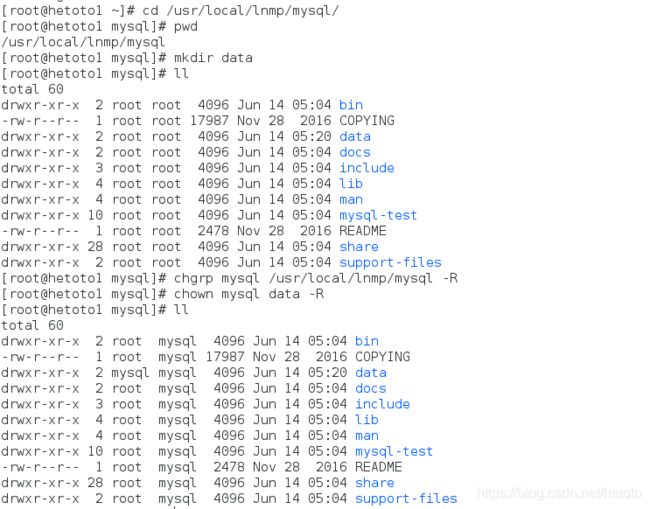
将mysql目录下的所有文件的所有组都改为mysql用户,实现mysql用户的管理,并且将数据data的目录的所有人改为mysql,实现对其的操作
[root@hetoto1 mysql]# chgrp mysql /usr/local/lnmp/mysql -R
[root@hetoto1 mysql]# chown mysql data -R

(6)将编译生成的mysql二进制命令放进系统的环境变量中,方便调用
[root@hetoto1 mysql]# vim ~/.bash_profile
[root@hetoto1 mysql]# source ~/.bash_profile
[root@hetoto1 mysql]# mysqld --user=mysql --initialize

注:如果初始化出现问题,则进入data数据的目录下将已经生成的东西删掉,再次执行即可
(8)开启数据库
[root@hetoto1 mysql]# /etc/init.d/mysqld start
Starting MySQL.Logging to '/usr/local/lnmp/mysql/data/hetoto1.err'.
 SUCCESS!

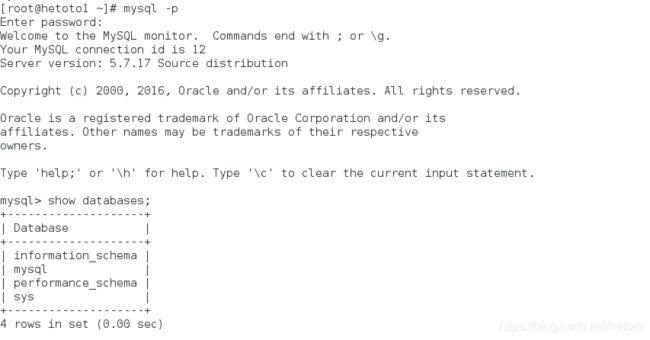
(9)登录查看
这里命令行不识别特殊字符,在安全初始化的时候,可以使用
![]()
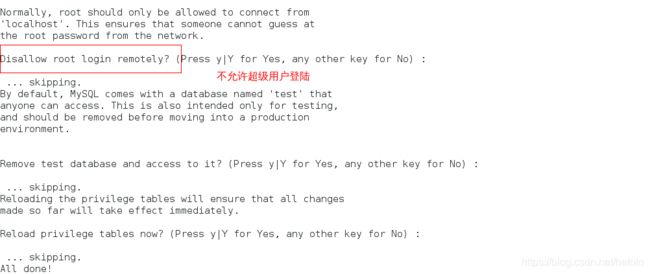
(10)mysql的安全初始化


(11)使用新密码重新登录再次测试

二.PHP的源码编译
1.php的编译及其安装
(1)官网下载php的原码包并进行解压
PHP官网:
https://www.php.net/
可以在PHP官网下载源码包
[root@hetoto1 ~]# tar jxf php-5.6.35.tar.bz2
yum install -y libmcrypt-2.5.8-9.el6.x86_64.rpm
yum install libmcrypt-devel-2.5.8-9.el6.x86_64.rpm #上面俩个安装包需要再官网上下载
 yum install libxml2-devel -y
 yum install openssl-devel -y
 yum install libcurl-devel -y
 yum install libjpeg-turbo-devel-1.2.1-1.el6.x86_64 -y
 yum install 2:libpng-devel-1.2.49-1.el6_2.x86_64 -y
 yum install freetype-devel -y
 yum install gmp-devel-4.3.1-7.el6_2.2.x86_64 -y
 yum install net-snmp-devel -y
[root@hetoto1 ~]#  cd php-5.6.35
[root@hetoto1 php-5.6.35]#./configure --prefix=/usr/local/lnmp/php #指定php的安装路径
--with-config-file-path=/usr/local/lnmp/php/etc #php配置文件所在的路径
--with-openssl #支持openssl加密
--with-snmp
--with-gd
--with-zlib
--with-curl
--with-libxml-dir
--with-png-dir
--with-jpeg-dir
--with-freetype-dir  #以上三个为php处理图片的格式
--with-gmp
--with-gettext
--with-pear
--enable-mysqlnd
--with-mysql=mysqlnd
--with-mysqli=mysqlnd #支持与mysql数据库之间建立联系
--with-pdo-mysql=mysqlnd
--enable-inline-optimization
--enable-soap --enable-ftp
--enable-sockets
--enable-mbstring
--enable-fpm #开启php-fpm服务
--with-fpm-user=nginx  #使用nginx用户来限制对php服务
--with-fpm-group=nginx
--with-mcrypt #提供了多种块算法的支持
--with-mhash #加密算法
(4)安装
[root@hetoto1 php-5.6.35]# make && make install

2.php的相关配置
(1)创建nginx用户实现对php的控制
[root@hetoto1 php-5.6.35]# useradd -M -d /usr/local/lnmp/nginx -s /sbin/nologin nginx
![]()
(2)复制配置文件模版到配置文件中
[root@hetoto1 php-5.6.35]# cd /usr/local/lnmp/php/etc/
[root@hetoto1 etc]# ls
pear.conf  php-fpm.conf.default
[root@hetoto1 etc]# cp php-fpm.conf.default php-fpm.conf
(3)编辑php的配置文件,配置pid,及其查看所属用户和组是否为nginx
[root@hetoto1 etc]# vim php-fpm.conf
[root@hetoto1 etc]# cp ~/php-5.6.35/php.ini-production /usr/local/lnmp/php/etc/php.ini
[root@hetoto1 etc]# cd /usr/local/lnmp/php/etc/
[root@hetoto1 etc]# ls
pear.conf  php-fpm.conf  php-fpm.conf.default  php.ini
[root@hetoto1 etc]# vim php.ini


(5)将php的启动脚本复制到系统的启动目录下并添加执行权限
[root@hetoto1 etc]# cd ~
[root@hetoto1 ~]# cd php-5.6.35
[root@hetoto1 php-5.6.35]# cd sapi/fpm/
[root@hetoto1 fpm]# cp init.d.php-fpm /etc/init.d/php-fpm
[root@hetoto1 fpm]# chmod +x /etc/init.d/php-fpm
(6)开启服务并且查看php段口,默认为9000
[root@hetoto1 fpm]# /etc/init.d/php-fpm start
Starting php-fpm  done
[root@hetoto1 fpm]# netstat -tnlp
三.Nginx的源码编译
1.Nginx的源码编译
(1)官网下载源码编译包并解压
可以在Ngnix官网下载: http://nginx.org/
[root@hetoto1 ~]# tar zxf nginx-1.14.0.tar.gz
(3)关闭debug日志,因为debug日志是最基础的日志,里面的记录比较多会占用内存
(4)安装编译时遇到的依赖性的安装包
[root@hetoto1 cc]# yum install pcre-devel zlib-devel -y
(5)编译
[root@hetoto1 ~]# cd nginx-1.14.0
[root@hetoto1 nginx-1.14.0]# ./configure --prefix=/usr/local/lnmp/nginx --with-threads --with-file-aio --with-http_ssl_module --with-http_stub_status_module --user=nginx --group=nginx
[root@hetoto1 nginx-1.14.0]# make && make install
[root@hetoto1 conf]# ln -s /usr/local/lnmp/nginx/sbin/nginx /usr/local/sbin/
![]()
(3)检测nginx服务的语法错误,打开服务,查看端口(80)

(4)在浏览器中查看nginx是否可用

四.测试
在nginx的默认发布目录下添加所要识别的php页面

在浏览器再次查看

显示上图则LNMP架构搭建成功!!!


